
Original: https://forum.cocos.org/t/topic/156878
Author: BitByBit
Outer Stroke Effect for 2D Sprites
Continuing from the previous article Inner Stroke Effect for 2D Sprites
Introduction
In the last article, we introduced the method of inner stroke and also discussed its pros and cons.
If you are particularly concerned about those drawbacks, the outer stroke effect discussed in this article might be a savior for you.
However, you will also have to bear its shortcomings, which is that it is a little complex.
Without further ado, let’s explore the vast differences between outer and inner stroke.
Principle
Since it’s an outer stroke, it doesn’t occupy the pixels of the original image to draw the edges. Instead, it draws a circle around the perimeter of the original image.
As it doesn’t use the original image’s pixels, it doesn’t involve manipulating its material but rather post-processing (custom post-processing is not introduced in this article; there are many official and related articles, and I will provide reference links later).
-
We need an additional camera to capture the object we want to stroke separately
-
Then find the edges on the image captured by this camera
-
Expand the edges by one circle, apply our stroke color
-
Extract these strokes separately to obtain an image with only the strokes.
Cameras
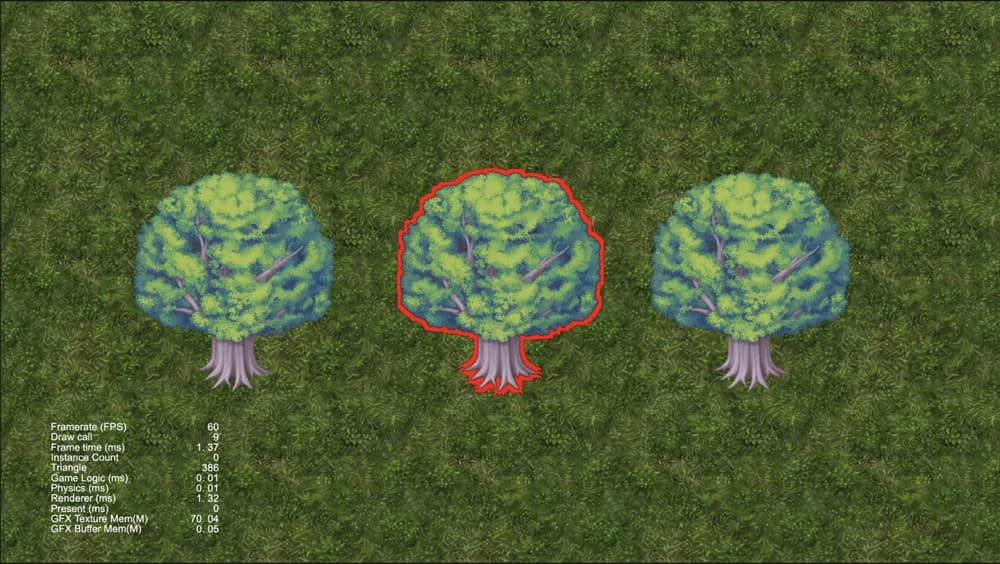
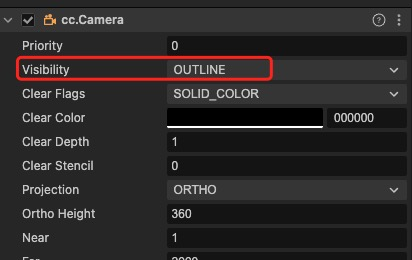
So, the first step is to create a stroke camera. This step is relatively simple. I only want to outline the edges of the tree in the middle, so I create a Layer named OUTLINE, assign it to the Layer of the tree, and then set the Visibility of the stroke Camera to only include OUTLINE.
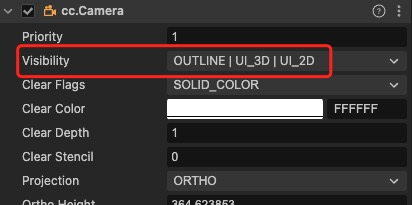
This way, it only captures the tree in the middle. Also, don’t forget to add OUTLINE to the Visibility of our main camera as well. Otherwise, it won’t capture the tree in the middle.
Stroke Camera
Main Camera
Custom Post-Processing
After the Stroke Camera captures the objects to be stroked, we obtain a RenderTexture, referred to as the “stroke rt”.
How do we use this rt to create a stroke?
Remember the previous article, where we used the image’s Alpha to find edges, determining whether there were pixels with Alpha of 0 around the image. Here, we take the opposite approach. Consider the characteristics of this rt; apart from the tree where Alpha is greater than 0, the rest of the Alpha is 0. So, can’t we make the Alpha of the pixels outside the tree’s edge also greater than 0, effectively expanding the tree by one circle? Then, by making the Alpha of the tree’s central part 0, we are left with only the expanded circle, which is what we want.
So, the core principle is to first expand by one circle. As I mentioned, this is the reverse of the previous article. The previous one looked for the minimum Alpha around the pixels, while here, we look for the maximum Alpha around the pixels. Think about it, in the part outside the tree where Alpha is 0, if there is a pixel with Alpha not equal to 0 next to it, it means that pixel is adjacent to the tree, and that’s the contour we want.
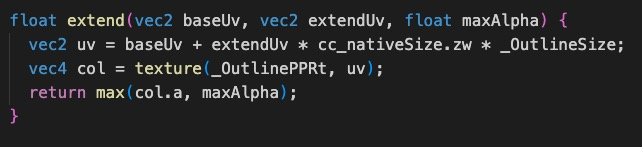
As shown in the above, the core algorithm is as simple as that.
baseUv is the current pixel’s uv, extendUv is the offset uv, and maxAlpha is the maximum Alpha passed in.
First, we get the uv of the surrounding pixel through the offset uv. Here’s something new, cc_nativeSize, which is a built-in vec4 variable. The xy represents the width and height of the screen, and zw is the reciprocal of the width and height, that is, the pixels of the screen rt.
So, we have finally gotten rid of the issue of passing the texture pixels from the previous article. _OutlineSize is the stroke width. _OutlinePPRt is the original image before post-processing, which is the rt image of our stroke Camera.
After obtaining the Alpha of the surrounding pixel, we compare it with the passed maxAlpha and return the maximum Alpha, allowing us to find the pixels with Alpha greater than 0 around.
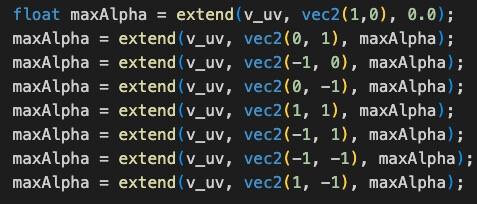
This is the code that iterates through the Alpha of the current pixel’s surrounding 8 offset uvs, finally obtaining the maximum Alpha. Now, the task of expanding by one circle has been completed.
Then, we need to remove the central part of the tree. This is quite simple; we directly subtract the expanded Alpha from the original image’s Alpha, leaving only the Alpha of the outer contour.
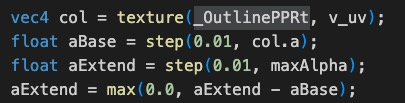
aExtend is the expanded Alpha. If it is greater than 0, it is a stroke, so we apply the stroke color to that pixel, and set the Alpha to 1.0; otherwise, it is not, and we apply black, with the Alpha being 0. It is roughly as shown below.

The above is the part of the custom post-processing shader. The corresponding TS code is quite straightforward, just passing the stroke width and stroke color to the shader.
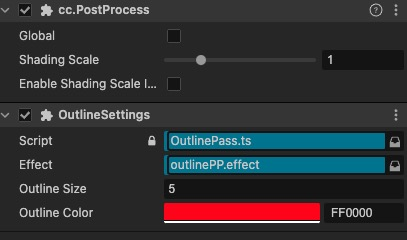
Finally, we output the result of the stroke Camera to a custom stroke rt of our own.
Integration
After obtaining the above stroke rt, we need to integrate it with the Main Camera. Cocos Creator has already provided us with the BlitScreen post-processing, which can be used for integration by simply providing our custom shader and material.
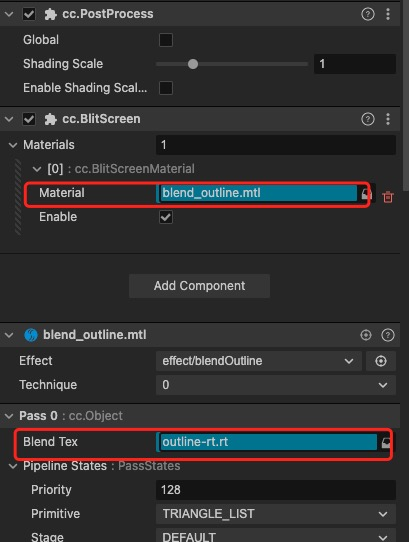
The outline-rt above is our stroke rt. The shader is quite simple.
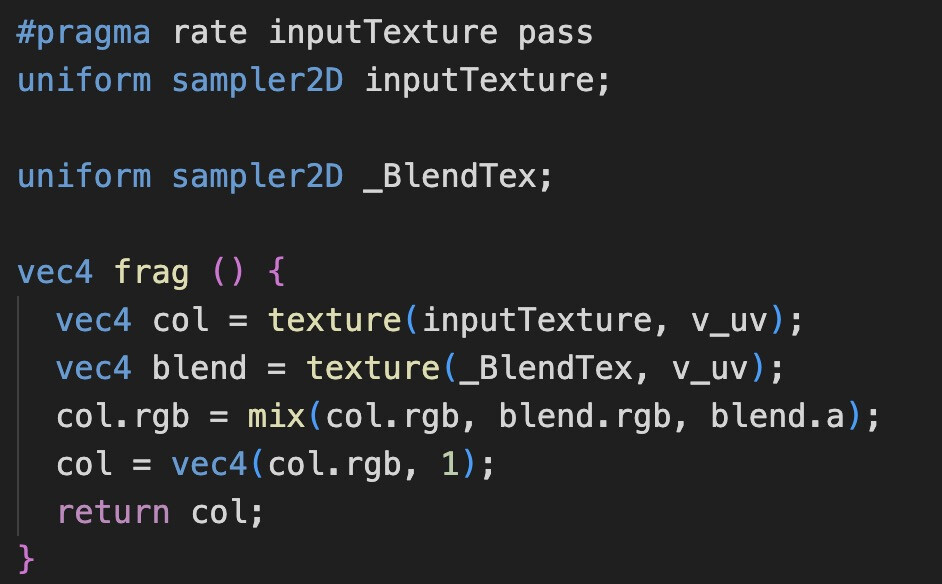
inputTexture is the image currently passed to the shader by the system, which is everything captured by our Main Camera. _BlendTex is the above outline-rt, that is, the stroke rt, captured by the Stroke Camera.
We blend the two images based on the Alpha of the stroke rt, using the original image color where there is no stroke, and the stroke color where there is, and that’s it. Finally, we obtain the image shown at the beginning.
Advantages and Disadvantages
After all this, the downside is that it’s a bit more complex. It requires custom post-processing. It’s also not possible to have different stroke colors on different objects unless you define several post-processing shaders, which is obviously not very performance-friendly.
However, the advantages are obvious. No matter how many strokes you want, they are all rendered in one go, and you don’t have to consider the atlas issues from the previous article, and the phenomenon of small dots will also be much less. So, it’s up to you to decide.