
Creating a Wave effect, Mask + Graphics Bezier drawing with Cocos Creator
Introduction and getting help
You are welcome to post to the Cocos Creator category on the Cocos forums to talk about any issues you encounter during the development process. This tutorial does not teach how to code.
Please prepare your development environment before starting this tutorial. If you are having trouble with our tutorial, please take a look at the following documentation:
Preparing the development environment:
Summary
Simulating the movement and behaviors of water is extremely complex. When thinking about water in two-dimensional games, you just want to simulate its wave characteristics and make some effects that mimic the water flowing. Example:

Let’s get started
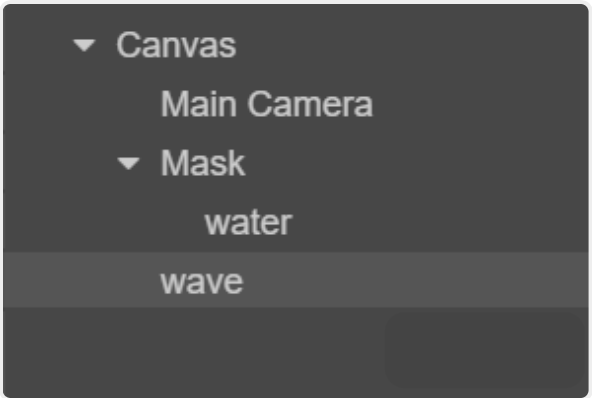
First, we need just a background image. The Background Color of the Main Camera camera component is set to white (not the node color). The Mask node holds the cc.Mask component and requires no additional setup. The water node holds the sprite component, which is the background image. Under normal circumstances, it should be completely covered. The wave node can hold the wave.js script.
Point structure
In reality, water surfaces are made up of water molecules. This means our code can be abstracted out into individual modules:
water:{
    x:0,
    y:0
}
We now have the water surface width (design resolution of width 720), and point objects. How many points do we fit? The diameter of water molecules is about 0.3 nanometers, it is up to you to decide how many water molecules you want to appear on the screen. The greater the number, the more realistic the effect, but performance may decrease. Set it like this:
this.n=20; // # of molecules
Now, we have 20 points on this 720 wide surface. We heed to store these points for future access.
this.nodeArray = []; // storing points
Next, there is energy transfer between points, for example, the right-most point, this.nodeArray [19] moves upward, then the point next to it, this.nodeArray [18] must be affected. An array should be used to represent the energy:
this.nodeEnergy = []; // storing the energy
Third, we need to represent the energy transfer cyclically, the more cycles there is, the farther it is transferred.
// The left and right points affect each other twice,
// which determines the speed of wave propagation
for (let k = 0; k < 2; k++)
{
    for (let i = 0; i < this.n; i++)
    {
        if (i > 0)
        {
            // 0.02 pagenation loss
            // pass to the left
            this.nodeEnergy[i-1] += 0.98 *
            (this.nodeArray[i].y -
            this.nodeArray[i-1].y);
        }

        if(i < this.n - 1)
        {
            // pass to right
            this.nodeEnergy[i + 1] += 0.98 *
            (this.nodeArray[i].y -
            this.nodeArray[i + 1].y);
        }
    }
}
Fourth, velocity decay when the energy transfer occurs, energy must also be lost, mainly to surface tension and gravity.
// right-most
for (let i = 0; i < this.n - 1; i++)
{
    // 0.02 speed loss
    this.nodeEnergy[i] *= 0.98;

    // change position
    this.nodeArray[i].y += this.nodeEnergy[i] * dt;
}
Fifth, change the position of the mask display.
let draw = this.mask._graphics;
Sixth, the mask component contains a cc.Graphics object named _graphics, and the drawing we use to erase the effect of the mask. We can then simulate the shape of the water surface by erasing it based on the points on the water surface and the bottom closed figure. Because it is 720 x 1280, find the bottom two points (-360, -640) and (360, -640), and connect them to the surface point for graphic closure. Be careful not to use lineTo to curve with Bezier, because of sharp corners.
// Using a mask
showWater()
{
    let draw = this.mask._graphics;
    draw.clear();
    draw.lineWidth = 1;

    // do not match line color with fill color
    draw.strokeColor = cc.color(255,0,0);
    draw.fillColor = cc.color(0,255,0);

    // Move to the far left of the screen, this.h = 200 is my
    // custom water surface height.
    draw.moveTo(-360, this.h);

    // The Bezier curve is separated by a point as a control point.
    for (let i = 0; i < this.n; i+=2)
    {
        // bessel
        draw.quadraticCurveTo(this.nodeArray[i].x, this.nodeArray[i].y,
            this.nodeArray[i+1].x, this.nodeArray[i+1].y);
    }

    // closed area
    draw.lineTo(360,- 640);
    draw.lineTo(-360,-640);
    draw.lineTo(-360, this.h);
    draw.fill();
    draw.stroke();
}
Finally, let the right-most point be sin eased under the start method. Please refer to the cc.Tween documentation if necessary.
// right-most point easing
let obj = this.nodeArray[this.n-1];
let time = 0.5;

cc.tween(obj).repeatForever(cc.tween()
    .to(time, {y:40 + this.h}, {easing:'sineOut'})
    .to(time, {y:0 + this.h}, {easing:'sineIn'})
    .to(time, {y:-40 + this.h}, {easing:'sineOut'})
    .to(time, {y:0 + this.h}, {easing:'sineIn'})
)
Finished code
Here is the complete code of wave.js:
cc.Class ({
    extends : cc.Component,

    properties: {
        mask: cc.Mask
    },

    onLoad()
    {
        // water surface height
        this.h = 200;
        this.n = 20; // number of points
        this.nodeArray = []; // loaded points
        this.nodeEnergy = []; // energy for each point
        // assign the values
        for(let i = 0; i < this.n;i++)
        {
            this.nodeEnergy[i] = 0;
        }
    },

    start()
    {
        // create points on the water
        for(let i = 0; i < this.n; i++)
        {
            let node = {x:0, y:0};

            node.y = this.h;
            node.x = -360 + (i+1) * 720 / this.n;

            this.nodeArray[i] = node;
        }

        // right-most point easing
        let obj = this.nodeArray[this.n-1];
        let time = 0.5;

        cc.tween(obj).repeatForever(cc.tween()
            .to(time, {y:40 + this.h}, {easing:'sineOut'})
            .to(time, {y:0 + this.h}, {easing:'sineIn'})
            .to(time, {y:-40 + this.h}, {easing:'sineOut'})
            .to(time, {y:0 + this.h}, {easing:'sineIn'}))
            .start();
    },

    // Using a mask
    showWater()
    {
        let draw = this.mask._graphics;
        draw.clear();
        draw.lineWidth = 1;

        // do not match line color with fill color
        draw.strokeColor = cc.color(255,0,0);
        draw.fillColor = cc.color(0,255,0);

        // Move to the far left of the screen, this.h = 200 is my
        // custom water surface height.
        draw.moveTo(-360, this.h);

        // The Bezier curve is separated by a point as a control point.
        for (let i = 0; i < this.n; i+=2)
        {
            // bessel
            draw.quadraticCurveTo(this.nodeArray[i].x, this.nodeArray[i].y,
                this.nodeArray[i+1].x, this.nodeArray[i+1].y);
        }

        // closed area
        draw.lineTo(360,- 640);
        draw.lineTo(-360,-640);
        draw.lineTo(-360, this.h);
        draw.fill();
        draw.stroke();
    }

    update(dt)
    {
        // The left and right points affect each other twice,
        // which determines the speed of wave propagation
        for (let k = 0; k < 2; k++)
        {
            for (let i = 0; i < this.n; i++)
            {
                if (i > 0)
                {
                    // 0.02 pagenation loss
                    // pass to the left
                    this.nodeEnergy[i-1] += 0.98 *
                    (this.nodeArray[i].y -
                    this.nodeArray[i-1].y);
                }

                if(i < this.n - 1)
                {
                    // pass to right
                    this.nodeEnergy[i + 1] += 0.98 *
                    (this.nodeArray[i].y -
                    this.nodeArray[i + 1].y);
                }
            }
        }

        this.showWater();
    },
});
Conclusion
This tutorial has been fun!
One last tip: When you want to change the energy or position of a point on the water use the following code:
// Change the corresponding point data in these two arrays
this.nodeArray
this.nodeEnergy