
The magic of light and shadows! Cocos Creator Brings Screen Space Ambient Occlusion (SSAO)
Introduction
The author of this article, alpha, has been engaged in front-end game development for 5 years. After graduation, he first joined the Tencent Wireless Dalian R&D Center and then started a career in Beidiao. During his three years in Beijing, he has been using Cocos Creator. There he gained practical experience in memory optimization. Recently, alpha has been studying computer graphics-related technologies. Today, he will share with you some of Cocos Creator 3.3 's technical experience in creating screen space ambient light occlusion (SSAO).
What is AO?
Ambient lighting is a fixed lighting constant in the overall lighting of the scene, used to simulate light scattering. In reality, the light will scatter in any direction, and its intensity will change.
One type of indirect lighting simulation is called Ambient Occlusion. Its principle is to approximate indirect lighting by darkening folds, holes, and very close walls. The surrounding geometry largely obscures these areas so that these areas will look darker.
In 2007, Crytek released a technology called Screen Space Ambient Occlusion (SSAO) and used it in their game, Crysis. This technique uses the depth of the screen space scene instead of real geometric data to determine the amount of occlusion. Compared with real ambient light occlusion (based on ray tracing), this approach is faster and achieves better results, making it a standard for approximate real-time ambient light occlusion.
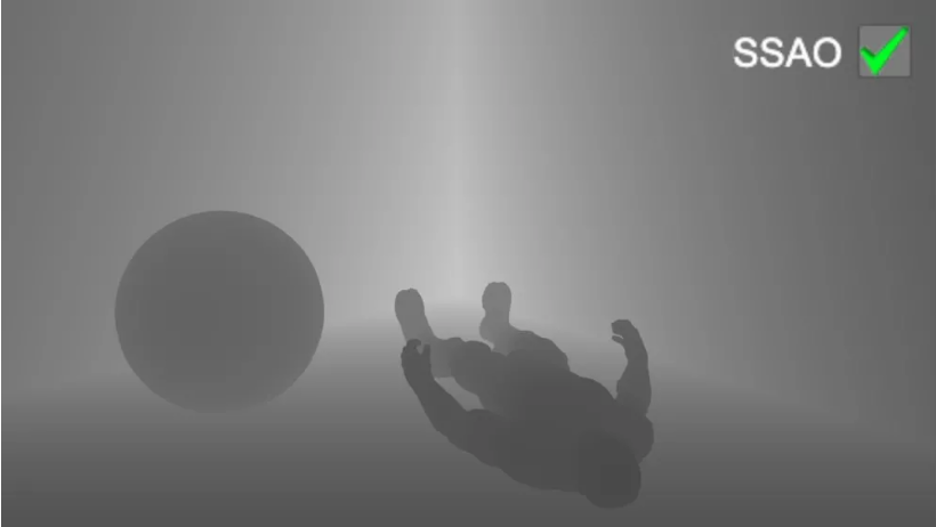
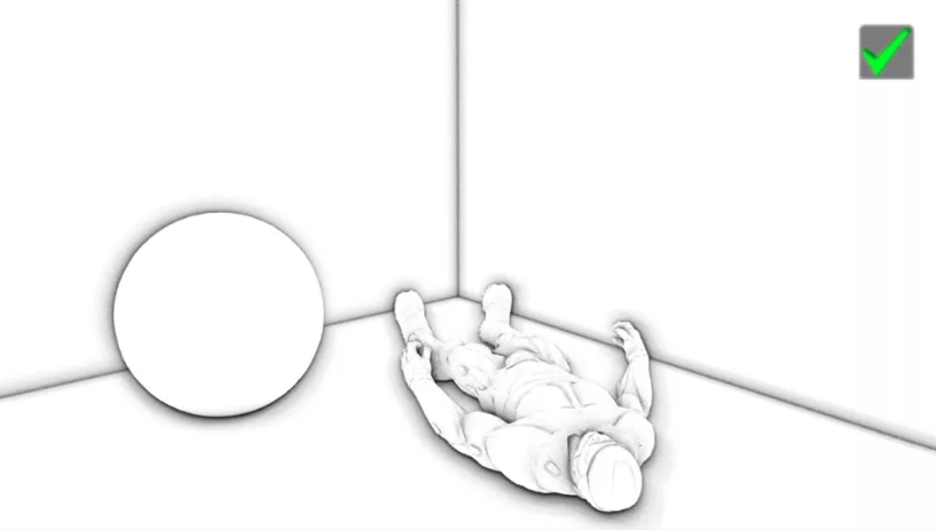
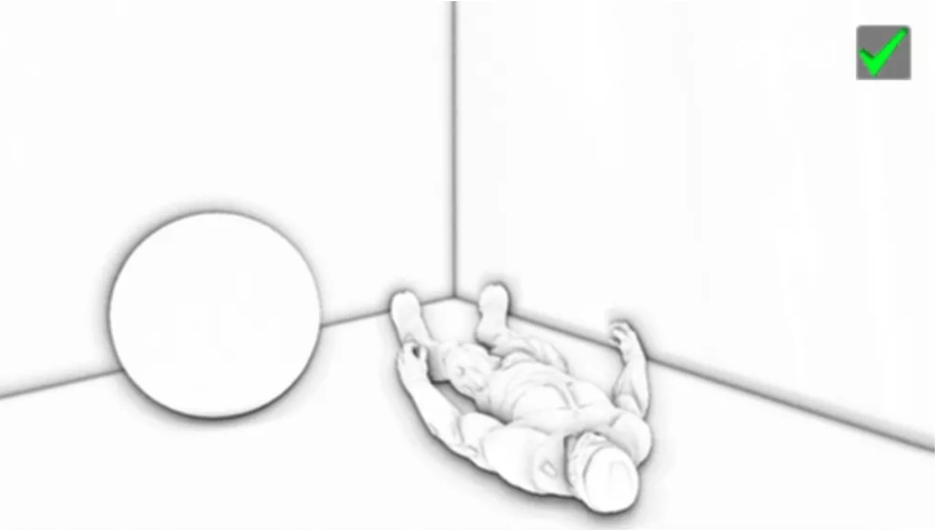
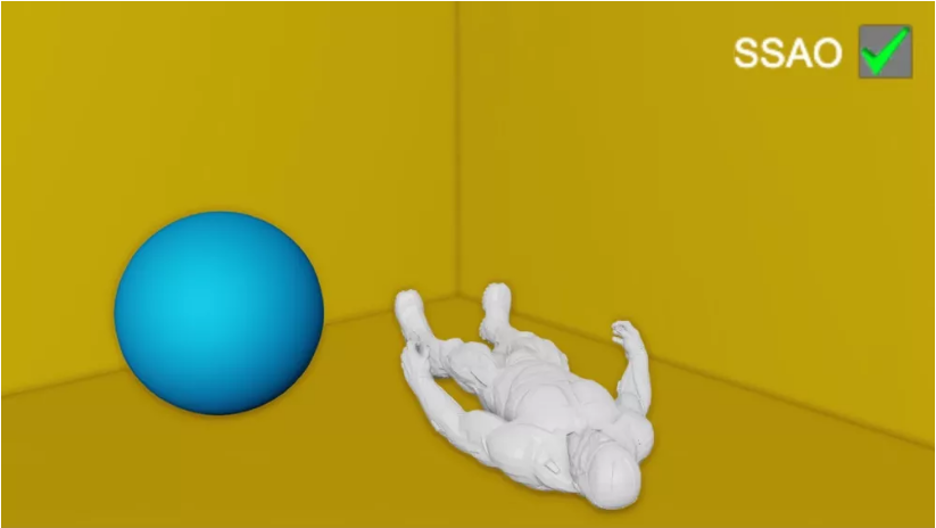
The following picture shows the difference between the scenes when SSAO is used and when SSAO is not used. Pay special attention to the comparison between the back of the phone booth and the corner of the wall, and you will find that the (ambient) light is blocked a lot:

Although this effect is not very obvious, enabling AO does give us a more realistic feeling. These small obscured details can make the whole scene look more three-dimensional.
SSAO principle
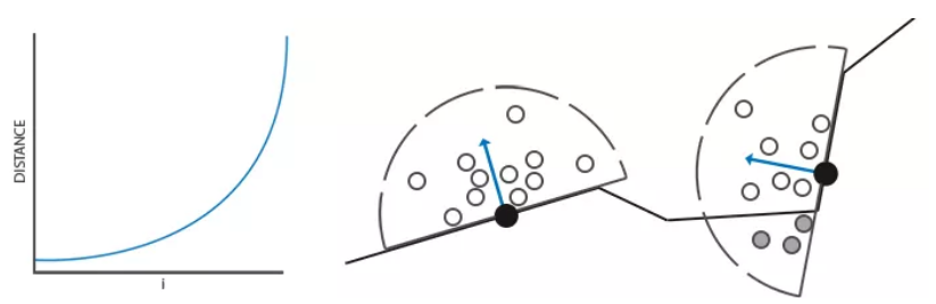
The principle behind SSAO is straightforward: an occlusion factor is calculated based on the surrounding depth value for each segment on the screen. This occlusion factor will then be used to determine the ambient light component of the fragment. The masking factor is obtained by collecting multiple depth samples of the spherical core (kernel) around the fragment and comparing it with the current fragment depth value. The number of samples higher than the fragment depth value is the occlusion factor we want.
In the above figure, the gray depth samples in the geometry are higher than the fragment depth value, and they will increase the occlusion factor; the more samples in the geometry, the less ambient light the fragment will get.
Obviously, the quality and accuracy of the rendering effect are directly related to the number of samples sampled. If the number of samples is too low, the rendering accuracy will be drastically reduced, and an effect called Banding will be obtained; if it is too high, performance will be affected. By introducing randomness to the sample kernel (Sample Kernel) to reduce the number of samples. By randomly rotating the sampling core, high-quality results can be obtained in a limited number of samples. However, randomness introduces a very obvious noise pattern, which needs to be fixed by blurring and noise reduction. The following picture shows the ripple effect and the effect caused by randomness:
It can be seen that despite the apparent ripple effect obtained in the case of a low number of samples, the ripple effect completely disappeared after the introduction of randomness. The initial implementation of Crytek was to use a depth buffer as input, but this method has some problems (such as self-masking halo). For this reason, nowadays, the sampling core of the sphere is usually not used, but a sampling core along the surface is used—the hemisphere sampling core of the normal vector.
By sampling around the normal hemisphere (Normal Oriented Hemisphere), the geometry on the back of the fragment will not be taken into account, eliminating the grayishness of ambient light occlusion, resulting in more realistic results.
SSAO features:
- Independent of the complexity of the scene, it is only related to the final pixels after projection. It has nothing to do with the number of vertices and triangles in the scene.
- Compared with the traditional AO processing method, there is no need for preprocessing, no loading time, and no memory allocation in the system memory, so it is more suitable for dynamic scenes.
- Work in the same consistent way for every pixel on the screen.
- No CPU usage-it can be fully executed on the GPU.
- It can be easily integrated into any modern graphics pipeline.
After understanding AO & SSAO, let’s take a look at how to implement SSAO based on Cocos Creator 3.3.1.
Sample buffer
SSAO needs geometric information to determine the occlusion factor of a segment. For each segment (pixel), the following data is required:
- Fragment-by-segment position vector
- Fragment-by-fragment normal vector
- Segment reflection color
- Sampling core
- Random rotation vector used to rotate the sampling core
By using a segment-by-segment observation space position, a sampling hemisphere core can be aligned with the segment’s observation space surface normal. For each core sample, a linear depth texture is sampled to compare the results. The sampling core will be slightly deflected according to the rotation vector; the obtained occlusion factor will be used later to limit the final ambient light component.

From the above, it is found that the data required by SSAO is not the G-buffer of the delay pipeline. You can get a simple understanding of what G-buffer is through the article "Delayed Shading Method. “ You can find a link at the bottom of this post. Read the engine code editor/assets/chunks/standard-surface-entry-entry.chunk and cocos/core/pipeline/define.ts:
// editor/assets/chunks/standard-surface-entry-entry.chunk near line 33
#elif CC_PIPELINE_TYPE == CC_PIPELINE_TYPE_DEFERRED

    layout(location = 0) out vec4 fragColor0;
    layout(location = 1) out vec4 fragColor1;
    layout(location = 2) out vec4 fragColor2;
    layout(location = 3) out vec4 fragColor3;

    void  main  () {
        StandardSurface s; surf(s);
        fragColor0 = s.albedo; // diffuse color -> albedo texture
        fragColor1 = vec4(s .position, s.roughness); // position -> world space position
        fragColor2 = vec4(s.normal, s.metallic); // normal -> world space normal
        fragColor3 = vec4(s.emissive, s.occlusion ); // Nothing to do with this article, no introduction
    }
#endif
Near // cocos / core / pipeline / define.ts 117 rows
Export  enum {PipelineGlobalBindings
    UBO_GLOBAL,
    UBO_CAMERA,
    UBO_SHADOW,

    SAMPLER_SHADOWMAP,
    SAMPLER_ENVIRONMENT,
    SAMPLER_SPOT_LIGHTING_MAP,
    SAMPLER_GBUFFER_ALBEDOMAP, //. 6
    SAMPLER_GBUFFER_POSITIONMAP, //. 7
    SAMPLER_GBUFFER_NORMALMAP, //. 8
    SAMPLER_GBUFFER_EMISSIVEMAP,
    SAMPLER_LIGHTING_RESULTMAP,

    COUNT,
}

// near line 283 of cocos/core/pipeline/define.ts
const UNIFORM_GBUFFER_ALBEDOMAP_NAME =  'cc_gbuffer_albedoMap' ;
export PipelineGlobalBindings.SAMPLER_GBUFFER_ALBEDOMAP UNIFORM_GBUFFER_ALBEDOMAP_BINDING = const; //. 6
// ...

const = UNIFORM_GBUFFER_POSITIONMAP_NAME  'cc_gbuffer_positionMap' ;
Export  const = UNIFORM_GBUFFER_POSITIONMAP_BINDING PipelineGlobalBindings.SAMPLER_GBUFFER_POSITIONMAP;. 7 //
// ...

const = UNIFORM_GBUFFER_NORMALMAP_NAME  'cc_gbuffer_normalMap' ;
Export  const = PipelineGlobalBindings UNIFORM_GBUFFER_NORMALMAP_BINDING .SAMPLER_GBUFFER_NORMALMAP; // 8
// ...
The data layout of the engine G-buffer and the specific G-buffer data content can be analyzed through the above code. The depth value will be calculated using G-buffer later.
Custom rendering pipeline
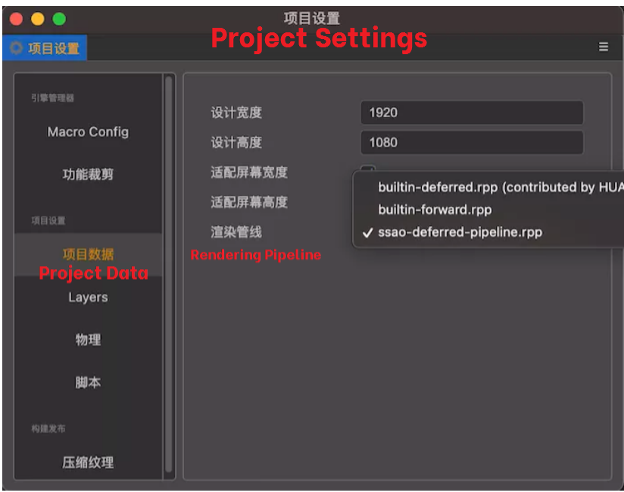
By extending the deferred rendering pipeline, an SSAO processing stage is added to the built-in rendering pipeline LightFlow to generate AO textures. First, create a rendering pipeline resource, right-click in the resource manager → create → Render Pipeline → Render Pipeline Asset, name it ssao-deferred-pipeline, create ssao-material | ssao-effect shader to calculate AO texture. The complete file is as follows:
.
├── ssao-constant.chunk // UBO description├──
ssao-deferred-pipeline.rpp // pipeline resource file
├── ssao-effect.effect // ssao shader
├── ssao-lighting.effect // Lighting shader, directly copy the built-in internal/effects/pipeline/defferrd-lighting
├── ssao-lighting.mtl
├── ssao-material.mtl
├── ssao-render-pipeline.ts // Custom pipeline script
├── ssao -stage.ts // stage
script└── uboDefine.ts // Uniform Buffer Object definition script
The corresponding pipeline configuration is as follows. Add ssaoStage at the top of stages under LightingFlow and specify the corresponding material. You can see that the engine actually supports PostProcess now. Just specify the material. Maybe the current version is not perfect. Therefore, the engine group has not been made public. In fact, SSAO can be regarded as a post-processing effect. The properties of pipeline resources are set as follows:
The custom pipeline script is as follows:
// uboDefine.ts
import {gfx, pipeline} from  "cc" ;
const {DescriptorSetLayoutBinding, UniformSamplerTexture, DescriptorType, ShaderStageFlagBit, Type} = gfx;
const {SetIndex, PipelineGlobalBindings, globalDescriptorSetLayout} = pipeline;

let  GlobalBindingStart = PipelineGlobals.COUNT; / / 11
let  GlobalBindingIndex = 0;

/**
* Define SSAO Frame Buffer, layout description
*/

const UNIFORM_SSAOMAP_NAME =  'cc_ssaoMap' ;
export  const UNIFORM_SSAOMAP_BINDING = GlobalBindingStart + GlobalBindingIndex++; // 11
UNIFORM_SSAOMAP_DESCRIPTOR new new DescriptorSetLayoutBinding = const (UNIFORM_SSAOMAP_BINDING, DescriptorType.SAMPLER_TEXTURE,. 1, ShaderStageFlagBit.FRAGMENT);
const = UNIFORM_SSAOMAP_LAYOUT new new UniformSamplerTexture (SetIndex.GLOBAL, UNIFORM_SSAOMAP_BINDING, UNIFORM_SSAOMAP_NAME, Type.SAMPLER2D,. 1);
globalDescriptorSetLayout.layouts [UNIFORM_SSAOMAP_NAME] = UNIFORM_SSAOMAP_LAYOUT;
globalDescriptorSetLayout .bindings[UNIFORM_SSAOMAP_BINDING] = UNIFORM_SSAOMAP_DESCRIPTOR;

/**
 * UniformBlock layout description for sampling core, a camera near & far clipping planes near & far, etc.
 */

export  class UBOSsao {
    public static  readonly  SAMPLES_SIZE = 64; // Maximum sampling core

    public static  readonly  CAMERA_NEAR_FAR_LINEAR_INFO_INFO_LINEAR_INFO_ ;
    static public  Readonly  SSAO_SAMPLES_OFFSET + = UBOSsao.CAMERA_NEAR_FAR_LINEAR_INFO_OFFSET. 4;

    public static  Readonly  COUNT = (+ UBOSsao.SAMPLES_SIZE. 1). 4 *;
    public static  Readonly  SIZE = UBOSsao.COUNT. 4 *;

    public static  Readonly  NAME =  'CCSsao' ;
    public static  Readonly  BINDING = GlobalBindingStart + GlobalBindingIndex++; // 12
    public static  readonly  DESCRIPTOR = new gfx.DescriptorSetLayoutBinding(UBOSsao.BINDING, gfx.DescriptorType.UNIFORM_BUFFER, 1, gfx.ShaderStageFlagBit.ALL);
    public static  readonly LAYOUT = new gfx.UniformBlock(SetIndex.GLOBAL, UBOSsao.BINDING, UBOSsao.NAME, [
        new gfx.Uniform( 'cc_cameraNFLSInfo' , gfx.Type.FLOAT4, 1), // vec4
        new gfx.Uniform( 'ssao_samples' , gfx.Type.FLOAT4, UBOSsao.SAMPLES_SIZE), // vec4[64]
    ], 1);
}

globalDescriptorSetLayout.layouts[UBOSsao.NAME] = UBOSsao.LAYOUT;
globalDescriptorSetLayout.bindings[UBOSsao.BINDING] = UBOSsao.DESCRIPTOR;
/**
 * ssao-render-pipeline.ts
 * Extended Deferred Rendering Pipeline
 */
import {_decorator, DeferredPipeline, gfx, renderer} from  "cc" ;
import {UNIFORM_SSAOMAP_BINDING} from  "./uboDefine" ;
const {ccclass} = _decorator ;

const _samplerInfo = [
    gfx.Filter.POINT,
    gfx.Filter.POINT,
    gfx.Filter.NONE,
    gfx.Address.CLAMP,
    gfx.Address.CLAMP,
    gfx.Address.CLAMP,
];

const samplerHash = renderer.genSamplerHash( _samplerInfo);

export class SsaoRenderData {
    frameBuffer?: gfx.Framebuffer | null;
    renderTargets?: gfx.Texture[] | null;
    depthTex?: gfx.Texture | null;
}

@ccclass( "SsaoRenderPipeline" )
export class SsaoRenderPipeline extends DeferredPipeline {
    private _width = 0;
    private _height = 0;

    private _ssaoRenderData: SsaoRenderData | null = null!;
    private _ssaoRenderPass | null = null;

    public activate(): boolean {
        const result = super.activate();
        this._width = this.device.width;
        this._height = this.device.height;
        this._generateSsaoRenderData();
        return  result;
    }

    public resize(width: number, height: number) {
        if (this._width === width && this._height === height) {
            return ;
        }
        super.resize(width, height);
        this._width = width;
        this._height = height;
        this._destroyRenderData();
        this. _generateSsaoRenderData();
    }

    public getSsaoRenderData(camera: renderer.scene.Camera): SsaoRenderData {
        if  (!this._ssaoRenderData) {
            this._generateSsaoRenderData();
        }
        return  this._ssaoRenderData!;
    }

    /**
     * Core code, create one FrameBuffer stores SSAO texture
     */

    private  _generateSsaoRenderData () {
        if (!this._ssaoRenderPass) {
            const colorAttachment = new gfx.ColorAttachment();
            colorAttachment.format = gfx.Format.RGBA8;
            colorAttachment.loadOp = gfx.LoadOp.CLEAR;
            colorAttachment.storeOp = gfx.StoreOp.STORE;
            colorAttachment.endAccesses = [gfx.AccessType.COLOR_ATTACHMENT_WRITE];

            const depthStencilAttachment = new gfx.DepthStencilAttachment();
            depthStencilAttachment.format = this.device.depthStencilFormat;
            depthStencilAttachment.depthLoadOp = gfx.LoadOp.CLEAR;
            depthStenAttachOcil=
            STOREStore .stencilLoadOp = gfx.LoadOp.CLEAR;
            = gfx.StoreOp.STORE depthStencilAttachment.stencilStoreOp;

            const renderPassInfo new new gfx.RenderPassInfo = ([colorAttachment], depthStencilAttachment);
            this._ssaoRenderPass = this.device.createRenderPass (renderPassInfo);
        }

        this._ssaoRenderData new new SsaoRenderData = ();
        the this. _ssaoRenderData.renderTargets = [];

        // Because the SSAO texture is ultimately a grayscale image, the Format.R8 single-channel texture is used to reduce memory usage. Only the R channel needs to be read when using

        this._ssaoRenderData.renderTargets.push (this.device.createTexture(new gfx.TextureInfo(
            gfx.TextureType.TEX2D,
            gfx.TextureUsageBit.COLOR_ATTACHMENT | gfx.TextureUsageBit.SAMPLED,
            gfx.Format.R8,
            this._width,
            this._height,
        )));

        this._ssaoRenderData.depthTex = this.device.createTexture(new gfx.TextureInfo(
            gfx.TextureType.TEX2D,
            gfx.TextureUsageBit.DEPTH_STENCIL_ATTACHMENT,
            this.device.depthStencilFormat,
            this._width,
            this._height,
        ));
        this._ssaoRenderData.frameBuffer = this.device.createFramebuffer(new gfx.FramebufferInfo(
            this._ssaoRenderPass!,
            this._ssaoRenderData.renderTargets,
            this._ssaoRenderData.depthTex,
        ));

        this.descriptorSet.bindTexture(BINDING_UNIDING ._ssaoRenderData.frameBuffer.colorTextures[0]!);
        const sampler = renderer.samplerLib.getSampler(this.device, samplerHash);
        this.descriptorSet.bindSampler(UNIFORM_SSAOMAP_BINDING, sampler);
    }


    public destroy(): boolean {
        this._destroyRenderData();
        return  super.destroy();
    }

    private  _destroyRenderData () {
        if  (!this._ssaoRenderData) {
            return ;
        }
        if  (this._ssaoRenderData.depthTex) {
            this._ssaoRenderData.depthTex.destroy();
        }
        if  (this._ssaoRenderData.renderTargets) {
            this._renderTargets.Data. forEach((o) => {
                o.destroy();
            })
        }
        if  (this._ssaoRenderData.frameBuffer) {
            this._ssaoRenderData.frameBuffer.destroy();
        }
        this._ssaoRenderData = null;
    }
}
Modify the rendering pipeline to a custom SSAO pipeline through the project settings:
Sampling core
We need to generate a large number of samples along the surface normal. As mentioned earlier, I want to generate samples that form a hemispherical shape. Since generating a sampling core for each surface’s normal direction is very difficult and impractical, the sampling core will be generated in the Tangent Space, and the normal vector will point to the positive z-direction.

Assuming there is a unit hemisphere, generate a sampling core with a maximum of 64 sample values:
// ssao-stage.ts
activate(pipeline: DeferredPipeline, flow: RenderFlow) {
    super.activate(pipeline, flow);
    const device = pipeline.device;

    this._sampleBuffer = device.createBuffer(new gfx.BufferInfo(
        gfx.BufferUsageBit .UNIFORM | gfx.BufferUsageBit.TRANSFER_DST,
        gfx.MemoryUsageBit.HOST | gfx.MemoryUsageBit.DEVICE,
        UBOSsao.SIZE,
        UBOSsao.SIZE,
    ));

    this._sampleBufferData = new Float32Array(

    UBOSsao.OFFSS = AOsconst sampleOffset = AO / 4;

    // 64 sample value sampling core, here is not too detailed. You can combine the LearnOpenGL CN tutorial to deepen your understanding

    for  ( let  i = 0; i <UBOSsao.SAMPLES_SIZE; i++) {
        let sample = new Vec3(
            Math.random() * 2.0-1.0, Math.random() * 2.0-1.0
            ,
            Math.random() + 0.01, // here is a little different from the original tutorial. A small value slightly increases z, Can improve the effect of flat ripple (Banding), which may affect the accuracy
        );

        sample = sample.normalize();
        let  scale = i / UBOSsao.SAMPLES_SIZE;
        // By interpolation, the core sample is distributed close to the origin
        scale = lerp (0.1, 1.0, scale * scale);
        sample.multiplyScalar(scale);
        const index = 4 * (i + sampleOffset);
        this._sampleBufferData[index + 0] = sample.x;
        this._sampleBufferData[index + 1] = sample.y;
        this._sampleBufferData[index + 2] = sample.z;
    }

    this._pipeline.descriptorSet.bindBuffer(UBOSsao.BINDING, this._sampleBuffer);
}
We transform the x and y directions within the range of -1.0 to 1.0 in the tangent space and transform the z-direction of the sample within the range of 0.0 and 1.0 (if the range of -1.0 to 1.0 is used, the sampling core becomes spherical). Since the sampling core will be aligned along the surface normal, the resulting sample vector will be in the hemisphere. Through weight interpolation, a core distribution with most samples close to the origin is obtained.
Get depth data
Obtain the linear depth value through the PostionMap in the G-buffer:
float  getDepth(vec3 worldPos) {

// Go to the observation space

vec3 viewPos = (cc_matView * vec4(worldPos.xyz, 1.0)).xyz;
// cc_cameraNFLSInfo.y -> Camera Far, update the
float through the ssao-stage.ts script  depth = -viewPos.z / cc_cameraNFLSInfo.y;
return  depth;
}
The depth map is as follows:
SSAO shader
/**
* ssao-effect.effect
*/
CCProgram ssao-fs %{
  precision highp  float ;
  #include <cc-global>
  #include <cc-shadow-map-base>
  #include <ssao-constant>

   // maximum 64
  #define SSAO_SAMPLES_SIZE 64

  in  vec2 v_uv;

  #pragma builtin(global)
   layout ( set  = 0, binding = 7) uniform sampler2D cc_gbuffer_positionMap;
  #pragma builtin(global)
   layout ( set  = 0, binding = 8) uniform sampler2D cc_gbuffer_normalMap;

  layout( location = 0) out vec4 fragColor;

  // random number  0.0-1.0
  float rand(vec2 uv,  float  dx,  float dy)
  {
    uv += vec2(dx, dy);
    return  fract(sin(dot(uv, vec2(12.9898, 78.233))) * 43758.5453);
  }

  // Randomly rotate the sample core vector
  vec3 getRandomVec(vec2 uv){
    return  vec3(
      rand(uv, 0.0, 1.0) * 2.0-1.0 ,
      rand(uv, 1.0, 0.0) *  2.0-1.0 ,
      0.0
    );
  }

  // Get linear depth
  float getDepth(vec3 worldPos) {
    vec3 viewPos = (cc_matView * vec4(worldPos.xyz, 1.0)).xyz;
    float  depth = -viewPos.z / cc_cameraNFLSInfo.y;
    return  depth;
  }

  // depth map
  // void  main  () {
  // vec3 worldPos = texture(cc_gbuffer_positionMap, v_uv).xyz;
  // fragColor = vec4(getDepth(worldPos));
  //}

  void  main  () {
    vec3 worldPos = texture(cc_gbuffer_positionMap, v_uv).xyz;
    vec3 normal = texture (cc_gbuffer_normalMap, v_uv).xyz;
    vec3 randomVec = getRandomVec(v_uv);

    float  fragDepth = -getDepth(worldPos);

    // Create a TBN matrix and transform the vector from the tangent space to the observation space
    vec3 tangent = normalize(randomVec-normal * dot(randomVec, normal));
    vec3 bitangent = cross(normal, tangent);
    mat3 TBN = mat3(tangent, bitangent, normal);

    // sampling radius
    float  radius = 1.0;
    float  occlusion = 0.0;
    for(int i = 0; i <SSAO_SAMPLES_SIZE; ++i)
    {
      vec3 ssaoSample = TBN * ssao_samples[i].xyz;
      ssaoSample = worldPos + ssaoSample * radius;
      float  aoDepth = -getDepth(ssaoSamples);
      vec4 offset , 1.0);
      offset = (cc_matProj * cc_matView) * offset; // Convert to clipping space
      offset.xyz /= offset.w; // Perspective division
      offset.xyz = offset.xyz * 0.5 + 0.5; // From NDC ( Standardized device coordinates, -1.0-1.0 )
      transform to 0.0-1.0 vec3 samplePos = texture(cc_gbuffer_positionMap, offset.xy).xyz;
      float  sampleDepth = -getDepth(samplePos);

      // Range check
      float rangeCheck = smoothstep(0.0, 1.0, radius / abs(fragDepth-sampleDepth));

      // Check whether the current depth value of the sample is greater than the stored depth value. If it is, add it to the final contribution factor
      occlusion += (sampleDepth >= aoDepth? 1.0: 0.0) * rangeCheck;
    }

    // Normalize the occlusion contribution according to the size of the core, and output the result
    occlusion = 1.0-(occlusion /  float (SSAO_SAMPLES_SIZE));
    fragColor = vec4(occlusion, 1.0, 1.0, 1.0);
  }
}%
The following IMAGEshows the texture produced by the ambient occlusion shader:
It can be seen that the environmental occlusion produces a very strong sense of depth. It is clear that the model must be lying on the floor instead of floating in the air just through the texture of the environment occlusion.
The current effect still does not look perfect, and the discrete noise is clearly visible. In order to create a smooth environment occlusion result, it is necessary to blur the environment occlusion texture for noise reduction.
Apply SSAO texture
Finally, the SSAO texture is blurred and denoised, and the environmental occlusion factor is multiplied by the environmental lighting component fragment by fragment, and the built-in lighting shader (internal/effects/pipeline/deferred-lighting.effect) is copied and named ssao-lighting.effect.
/**
* Comments have been added to the changes in this article
*/
CCProgram lighting-fs %{
  precision highp  float ;
  #include <cc-global>
  #include <shading-standard-base>
  #include <shading-standard-additive>
  #include <output-standard>
  #include <cc-fog-base>


  in  vec2 v_uv;

  #pragma builtin(global)
   layout ( set  = 0, binding = 6) uniform sampler2D cc_gbuffer_albedoMap;
  #pragma builtin(global)
   layout ( set  = 0, binding = 7) uniform sampler2D cc_gbuffer_positionMap;
  #pragma builtin(global)
   layout ( set  = 0, binding = 8) uniform sampler2D cc_gbuffer_normalMap;
  #pragma builtin(global)
   layout ( set  = 0, binding = 9) uniform sampler2D cc_gbuffer_emissiveMap;
  #pragma builtin(global)
   layout ( set  = 0, binding = 11) uniform sampler2D cc_ssaoMap;

  layout(location = 0) out vec4 fragColor;

  vec4 gaussianBlur(sampler2D Tex, vec2 UV,  float  Intensity)
  {
    // omitted, see demo project for details
    return  texture(Tex, UV);
  }

  // screen display SSAO texture
  // void  main () {
  // // noise reduction
  / / vec4 color = gaussianBlur(cc_ssaoMap, v_uv, 3.0);
  // // No noise reduction
  // vec4 color = texture(cc_ssaoMap, v_uv);
  // fragColor = vec4(vec3(color.r), 1.0);
  //}

  void  main  () {
    StandardSurface s;

    vec4 albedoMap = texture(cc_gbuffer_albedoMap,v_uv);
    vec4 positionMap = texture(cc_gbuffer_positionMap,v_uv);
    vec4 normalMap = texture(cc_gbuffer_normalMap,v_uv);
    vec4 emissiveMap = texture(cc_gbuffer_emissiveMap,v_uv);
    // ssao environment occlusion factor, single-channel texture, so only the R channel
    vec4 ssaoMap = vec4(vec3(gaussianBlur(cc_ssao, 3.0), v_ ), 1.0);

    s.albedo = albedoMap * ssaoMap; // Multiply on the irradiance map and apply the masking texture
    s.position = positionMap.xyz;
    s.roughness = positionMap.w;
    s.normal = normalMap.xyz;
    s.metallic = normalMap.w;
    s.emissive = emissiveMap.xyz;
    s.occlusion = emissiveMap.w;
    // fixme: default value is 0, and give black result
    float  fogFactor;
    CC_TRANSFER_FOG_BASE(vec4(s.position, 1), fogFactor);

    vec4 shadowPos;
    CC_TRANSFER_SHADOW_BASE (vec4(s.position, 1), shadowPos);

    vec4 color = CCStandardShadingBase(s, shadowPos) +
                 CCStandardShadingAdditive(s, shadowPos);

    CC_APPLY_FOG_BASE(color, fogFactor);
    fragColor = CCFragOutput(color);
  )
)%
Finally, let’s take a look at the final rendering result comparison. First of all, the effect of SSAO is turned on:
The effect of SSAO turned off:

Screen space environment occlusion is a highly customizable effect, and its effect largely depends on the parameters that we adjust according to the scene type. There is no perfect combination of parameters for all types of scenes. Some scenes only work with a small radius, and some scenes require a larger radius and a more significant number of samples to look more realistic. The current demo uses 64 samples, which is quite a lot. You can adjust the core size and radius to get the appropriate effect.
Known issues with my demo
- The editor camera preview will render incorrectly.
- Click on the custom pipeline resource file in the resource manager. The editor console will report an error, which may cause the editor to become unresponsive (currently, it is recommended that you do not touch it and restart the editor to return to normal).
- When using the maximum sampling core (64) under the mobile browser (Xiaomi 10 Pro), the number of frames is only a single digit. It can be determined that the current version cannot be applied to actual projects and needs to be optimized.
- The custom rendering pipeline under Native also needs to customize the Engine-Native engine, so Native has not yet supported it. You can refer to PR 3934 to add support for Native. I want to thank Kristine from Cocos Support for the information.
Related tutorials
LearnOpenGL-CN->Catalogue->Advanced Lighting->SSAO
Real-time rendering (video starts at 00:46:25)