
Adding time-reversed gameplay in Cocos Creator to create time backtracking
Cocos Star Writer, Nowpaper, likes to study various interesting effects, and has previously shared with us an implementation of the same 2.5D perspective of “Don’t Starve” and the use of RenderTexture to implement minimaps and portals, etc. This time he will discuss Cocos Creator Physics, realizing that the time-reversed gameplay similar to “Braid” or “Blinx: The Time Sweeper” is doable in Cocos Creator.
"Braid" was the first time I was exposed to the time-reversed gameplay in a video game, and I was really shocked by how it performed. The feeling of controlling time in the game wasn’t everything I wanted. However, not many such games build off this gameplay technique. One of the reasons is that the time-reversed function will have extremely high requirements for the gameplay design. But I wanted to try it out and see why the program processing is more complicated. This article will use Cocos Creator 3.3 to achieve a cool time backtracking effect.
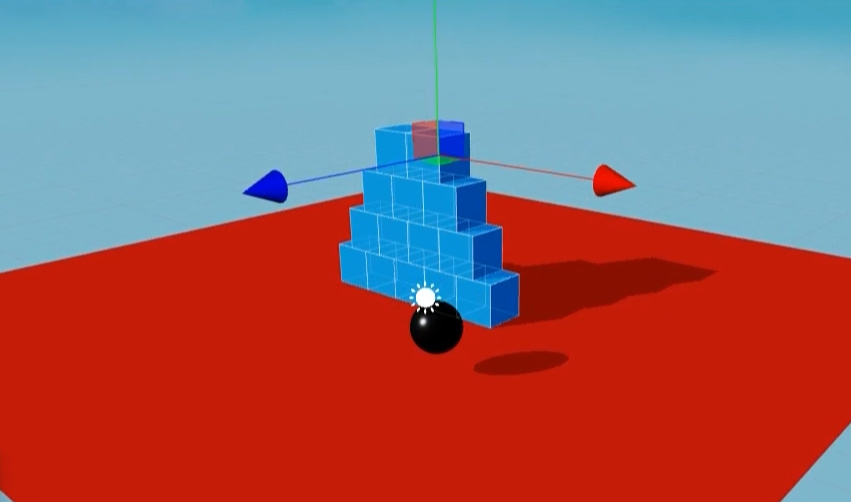
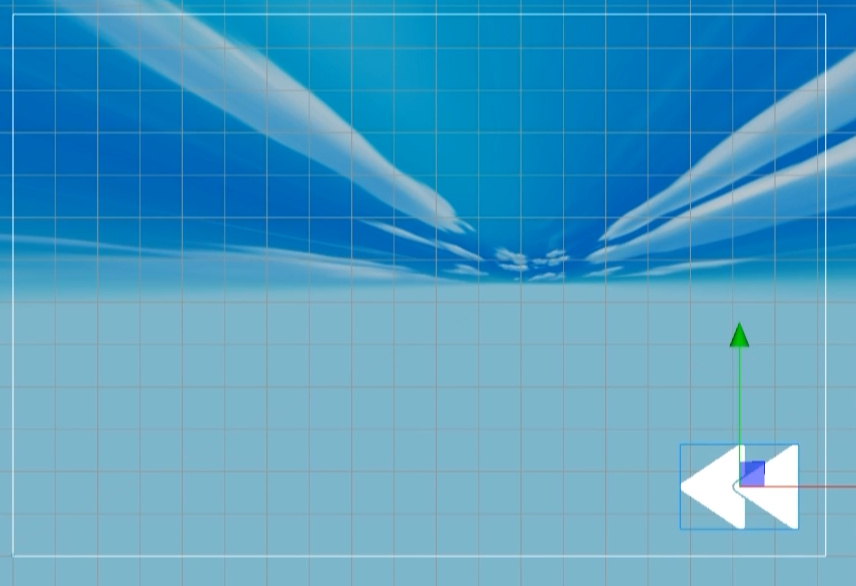
The 2D and 3D time-reversal technical solutions are basically the same. This article will use 3D physics to achieve the effect of the above picture. You can use a ball to break up the block wall on the platform, press and hold the key to cause the time to reverse, release the key, and the passage of time continues.
The principle of retrospective effect is not complicated. We only need to record the object state data at different time points, and the number of recordings directly affects the level of memory. Generally speaking, playback only records a small time range and then plays it backward in the game loop logic.

How much each recording interval depends on your data design. We don’t need to record every frame because it is so fast. The general approach is to record the status data at a fixed time interval and then do intermediate interpolation. Fast reverse playback does not even need to do intermediate interpolation. This time, the realization effect is that there is no rapid reverse playback of the intermediate difference.
Prepare the demo scene
First, build a scene for display. The scene is not complicated. It contains a platform, a block wall, and a prefab of a ball. The materials are from Cocos Store.
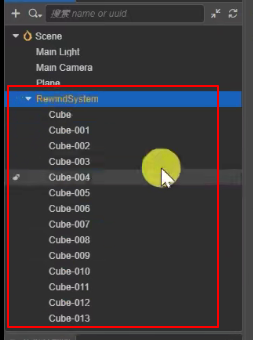
After the scene is ready, we create a node in the world called RewindSystem. All the objects below this node will record the data status according to the rules, and none of them will be recorded. The specific implementation will be discussed later.
Add a Canvas node and a backward icon to mark whether it is in the backward state.
Now we create a script to launch the ball, such as a component called SphereShooter, enter code editing, and add the referenceable properties of Canvas, Camera, and Prefab. Register key events in Start, and listen to a KeyUp event through the on method. In the event acquisition, the KeyCode determines whether the space bar is up and triggers a launch method. For convenience, we encapsulate the launch into a shooting method. To pass in the coordinates of the click on the screen, we expect it to be emitted from the center of the screen, so just pass in the (0,0) point. The core code is as follows:
private shoot(x:number,y:number){
    const outRay = new geometry.Ray();
    this.camera.screenPointToRay(x,y,outRay);
    let clone = instantiate(this.sphere);
    clone.setPosition(this.camera.node.position);
    this.node.addChild(clone);
    clone.getComponent(RigidBody).applyImpulse(outRay.d.multiplyScalar(40));
}
// Try in the store: https://store.cocos.com/app/detail/3407
In this method, through the camera screenPointToRay method, a ray starting from the camera and passing through the screen click point is obtained. This ray is the thrust vector to be emitted by the small ball. The launch position of the ball is directly in line with the camera’s position, add it to the parent node, and finally set the thrust to it.
Save it and return to the Creator. Add the component script you just wrote to the RewindSystem node. In the properties, refer to the Prefab of Camera and the ball to the component properties. Run it to see the effect: When you press the space bar, the ball is launched. The sphere hits the wall made of blocks, the environment of the scene changes, and the test scene is ready.
Creating playback
The current goal is to press a button to execute playback and release the button to stop playback. Create a new playback system component and define the isRecording property in the component script to determine whether the control is playing back. Register the KeyDown and KeyUp events in Start, and use the KeyCode value to determine whether the R key is pressed to modify the member variables for playback.
Record and playback
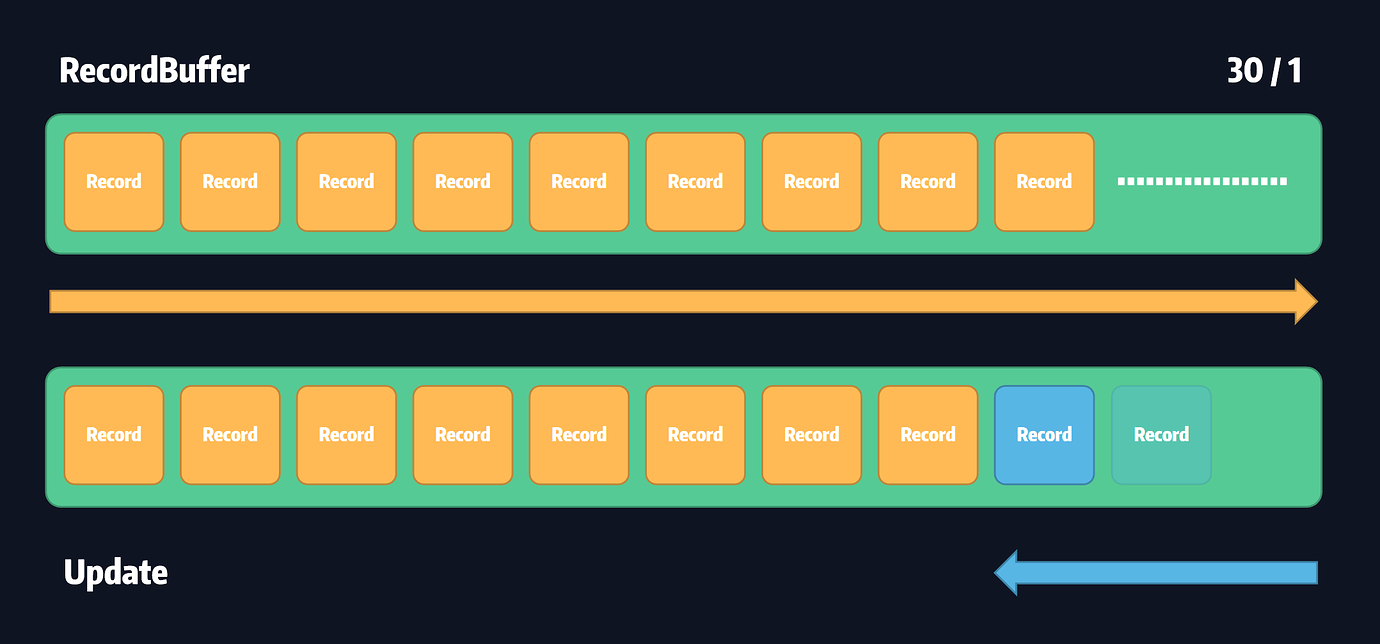
We need to record important information about all replayable objects in the entire playback system. So first, define a record class, which stores coordinate and rotation data. Use a static method to set the playback data and define an array class RecordBuffer based on this record class. Its function is to continuously push data records. During playback, use Pop to retrieve the last data and restore it to the corresponding object. Data structure code:
class RecordItem{
    public vec3:Vec3;
    public quat:Quat;
    public linearVelocity:Vec3 = new Vec3();
    public angularVelocity:Vec3 = new Vec3();
    public constructor(rig:RigidBody){
        this.vec3 = rig.node.position.clone();
        this.quat = rig.node.rotation.clone();
        rig.getLinearVelocity(this.linearVelocity);
        rig.getAngularVelocity(this.angularVelocity);
    }
    public static Rewind(rig:RigidBody,item:RecordItem){
        rig.node.setPosition(item.vec3);
        rig.node.setRotation(item.quat);
        rig.setLinearVelocity(item.linearVelocity);
        rig.setAngularVelocity(item.angularVelocity);
    }
}
class RecordBuffer extends Array<RecordItem>{

}
// Try in the store: https://store.cocos.com/app/detail/3407
Add its Map data structure to the system. Key is used to record UUID, and Value is used to store RecordBuffer. In Start, we enable a schedule to record the data of each child node under this node in a specified time interval. We need to continuously push these recorded data to the Buffer in the logic. I set the time interval to within 1 second—record 30 times.
In the update, judge whether to replay, if it is in the replay state (that is, press the R key), traverse the recorded Map data, find the corresponding record cache by UUID, take out the last record point, and restore the data back.
KINEMATIC and DYNAMIC
Here is an important point. The game time does not change during reverse playback, and the physics system is still running. At this time, the playback system is constantly setting the position and rotation. Therefore, the physics of dynamic objects may cause many inconsistencies due to constant assignment. Necessary calculations and errors. To avoid such problems, when the button is pressed, set the physical type of all objects to KINEMATIC, and when the button is lifted, set the physical type of all objects to DYNAMIC.
// Need to be set for playback
RigidBody.type = ERigidBodyType.KINEMATIC
// Normal settings
RigidBody.type = ERigidBodyType.DYNAMIC
Preliminary success
Add the component script just written to the node for playback control, add the free camera control component to the main camera, and add a reference to the reverse UI. Start it, hit a few balls, and then press the R key to see the effect:
How good is it! The faster playback speed is because the changes we performed in the update were recorded 30 times per second before, and the update here is usually 60 frames, which is 60 assignment changes per second, so it seems faster.
Optimization correction
Linear speed and rotational (angular) speed
So far, there are still some flaws. The first is that when the playback returns to normal in the middle, the object will not behave according to the previous physical state. In the preliminary effect preview above, when the object is halfway back, it will fall in the air or move according to the physical movement when it is restored. Our expectation is what it was like before playback, and what it was like when it was restored after playback, as follows picture:
To achieve this effect, in addition to recording position and rotation information, we also need to record the linear velocity and rotation velocity of the rigid body. Therefore, we need to modify the recording data structure, do some recording processing, and add the linear and angular velocity records. These data will be restored when recovering. This is not enough. The most important thing is that the last record is cached on a Map. When the button is lifted, the last record is restored to the object to restore the physics data. After completion, save and return to the Creator to run. Now the physics is playing back. Before and after playback are almost the same.
private lastRecords = new Map<string,RecordItem>();
OnKeyUp(event:EventKeyboard){
    if(event.keyCode == KeyCode.KEY_R){
        this.isRewind = false;
        this.playbackIcon.active = false;
        for(let node of this.node.children){
            this.changeRigidBodyType(node.getComponent(RigidBody),ERigidBodyType.DYNAMIC);
            const item = this.lastRecords.get(node.uuid);
            if(item){
                RecordItem.Rewind(node.getComponent(RigidBody),item);
                this.lastRecords.delete(node.uuid);
            }
        }
    }
}
// Try in the store: : https://store.cocos.com/app/detail/3407
Retract to generate extra objects
The second problem is that the ball will not disappear after returning. This is because the ball was created by Prefab, and it has no previous data. Therefore, you only need to judge whether the ball is off the screen when the queue is empty. If it’s yes, destroy it directly.
Concluding remarks
By creating the time-tracking effect, I found it a small but interesting technical point. In fact, whether for 2D or 3D games, it takes a lot of work to achieve perfect playback. The strategy of recording the value of the playback point depends on your game structure design. This function can be optimized by counting calls, over-interpolation, and backward animation. However, there are many issues to consider, so that I won’t expand it here.
The video version of the tutorial is posted on Bilibili
If you think this is cool, please also like to support it. I hope this article is helpful to you. See you next time.