
This tutorial comes from our evangalist Iwae. Check out his stuff at our Chinese forums.
I used to create a lot of 2D content before, but recently I’ve been busy with other work. So, I decided to share some of my previous work. I’ll mainly introduce the effects and performance comparisons of different lighting models.
Link: Cocos Creator | LightModelTest1
In computer graphics, a lighting model is used to simulate the reflection effects of object surfaces under the illumination of light. Below is a brief introduction and example code (using GLSL language) for commonly used lighting models.
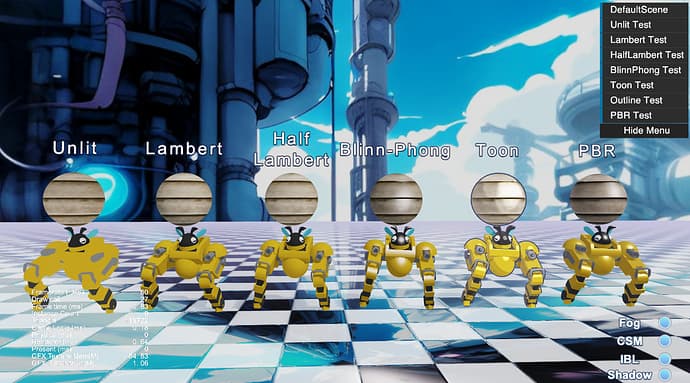
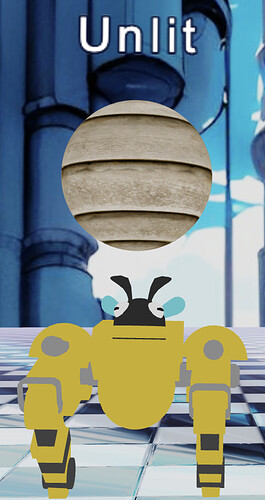
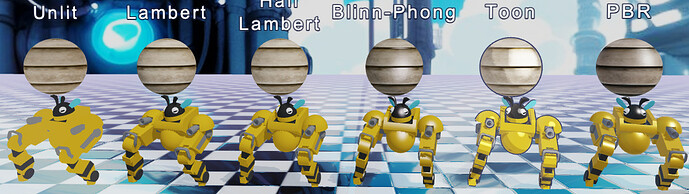
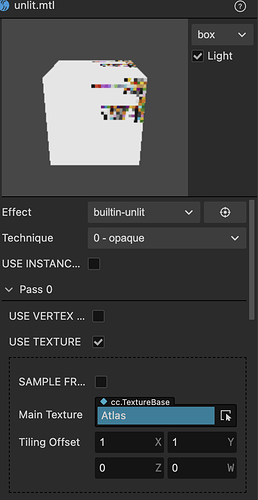
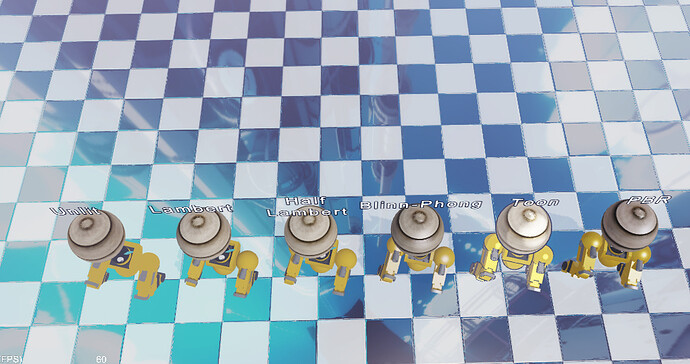
Unlit (No Lighting)
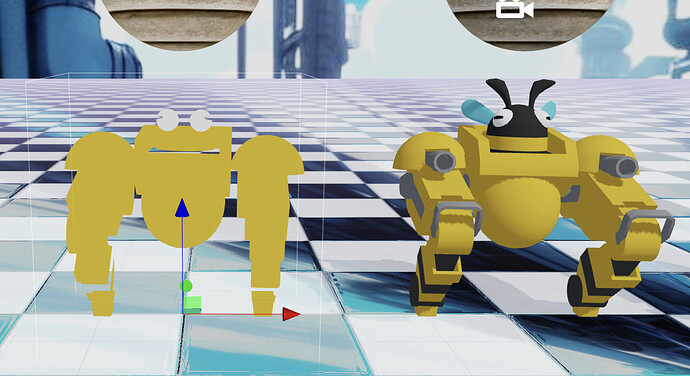
The unlit model does not consider the effects of lighting and directly renders the object’s color or texture to the screen. This model is suitable for scenes that do not require the effects of lighting, such as billboards or ground guidance. It’s not quite suitable for low-poly or color-card-textured models, like the mecha bee in this demo.
void main()
{
    vec4 o = mainColor; //Material Color
    return CCFragOutput(o);
}
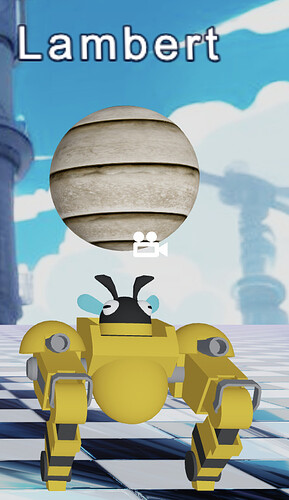
Lambert Model
The Lambert model is a lighting model that describes diffuse reflection, assuming that the surface of an object reflects light independent of the viewer’s position. This model is commonly used to simulate non-metallic, non-mirrored object surfaces.
Lambert’s light model is shown
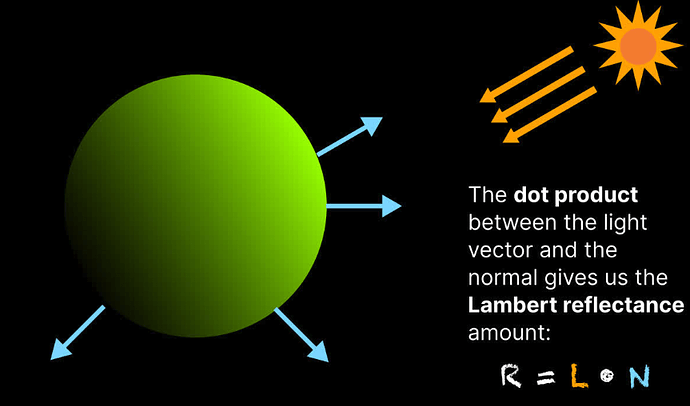
void Lambert(inout vec4 diffuseColor,in vec3 normal)
{
    vec3 N = normalize(normal);
    vec3 L = normalize(cc_mainLitDir.xyz * -1.0);
    float NL = max(dot(N, L), 0.0);
    vec3 diffuse = NL * (diffuseColor.rgb * cc_mainLitColor.xyz);
    vec3 ambient = cc_ambientGround.rgb * diffuseColor.rgb * cc_ambientSky.w;
    diffuseColor.rgb = ambient + diffuse;
}
Half Lambert Model:
The Half Lambert model is a variant of the Lambert model. It changes the interpretation of light reflection so that when the light is at a 90-degree angle to the normal, the reflection intensity is 0.5 instead of 0, making the shadow part not so dark. This model is often used for cartoon or non-realistic rendering.
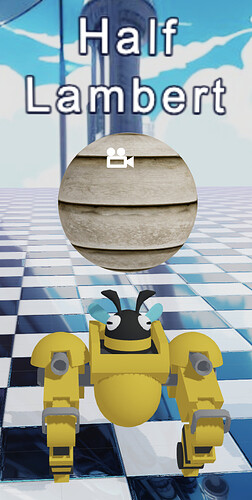
Half Lambert light model is shown
void HalfLambert(inout vec4 diffuseColor,in vec3 normal)
{
    vec3 N = normalize(normal);
    vec3 L = normalize(cc_mainLitDir.xyz * -1.0);
    float NL = max(dot(N, L), 0.0);
    vec3 diffuse = pow(NL * diffuseWrap + (1.-diffuseWrap),2.0) * (diffuseColor.rgb * cc_mainLitColor.xyz);
    vec3 ambient = cc_ambientGround.rgb * diffuseColor.rgb * cc_ambientSky.w;
    diffuseColor.rgb = ambient + diffuse;
}
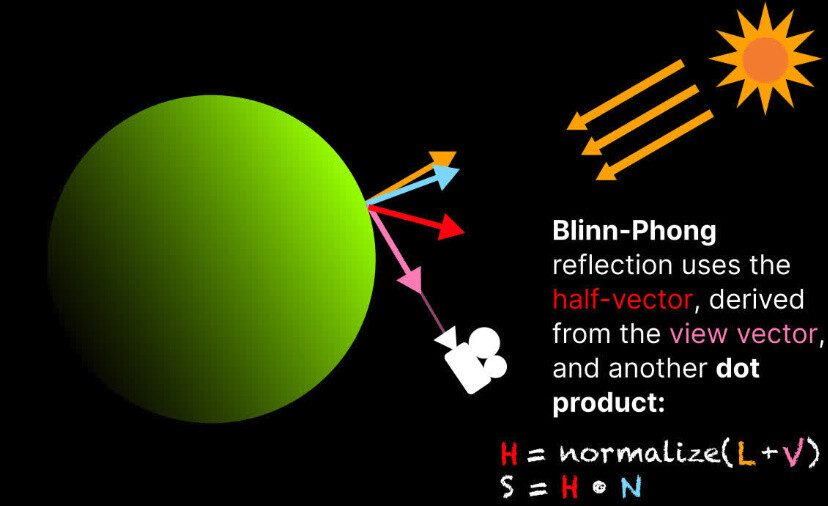
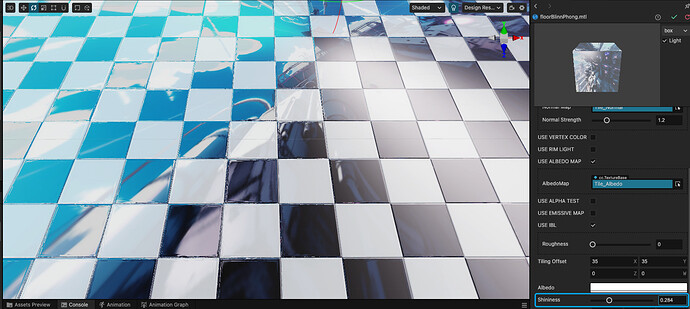
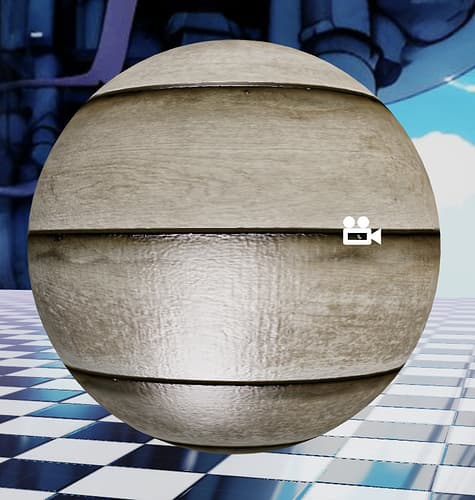
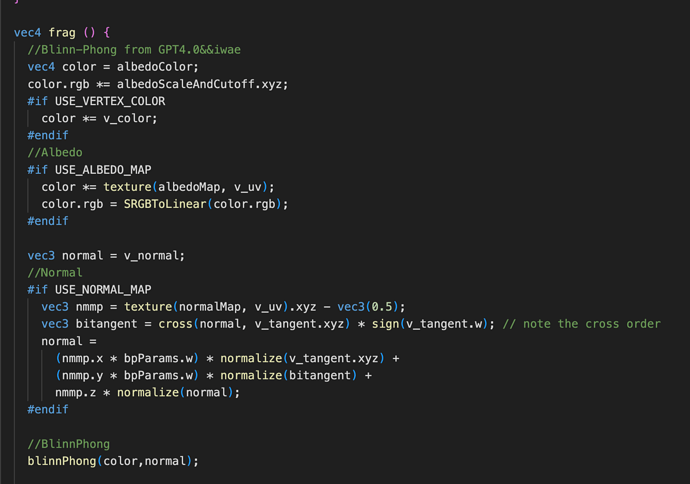
Blinn-Phong Model:
The Blinn-Phong model is an improved version of the Phong model. It introduces the concept of “half vector”, making the calculation of specular highlights closer to the micro-surface theory. It is suitable for simulating glossy object surfaces.
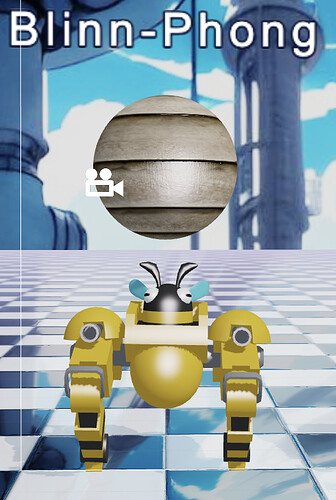
Half Lambert’s light model is shown
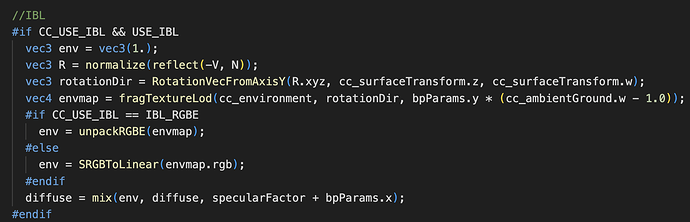
Using “Shininess” to blend Image-Based Lighting (IBL) textures.
void blinnPhong(inout vec4 diffuseColor,in vec3 normal)
{
    vec3 N = normalize(normal);
    vec3 L = normalize(cc_mainLitDir.xyz * -1.0);
    float NL = max(dot(N, L), 0.0);
    vec3 diffuse = NL * diffuseColor.rgb * cc_mainLitColor.xyz;
    vec3 position;
    HIGHP_VALUE_FROM_STRUCT_DEFINED(position, v_position);
    vec3 cameraPosition = cc_cameraPos.xyz / cc_cameraPos.w;
    vec3 V = normalize(cameraPosition- position);
    vec3 H = normalize(L + V);
    float specularFactor = pow(max(0.0, dot(H,N)), bpParams.x*50.);
    vec3 specular = (specularFactor * cc_ambientSky.rgb * cc_mainLitColor.xyz);
    float shadowCtrl = 1.0;
    #if CC_RECEIVE_SHADOW && CC_SHADOW_TYPE == CC_SHADOW_MAP
      if (NL > 0.0) {
      #if CC_DIR_LIGHT_SHADOW_TYPE == CC_DIR_LIGHT_SHADOW_CASCADED
        shadowCtrl = CCCSMFactorBase(position, N, v_shadowBias);
      #endif
      #if CC_DIR_LIGHT_SHADOW_TYPE == CC_DIR_LIGHT_SHADOW_UNIFORM
        shadowCtrl = CCShadowFactorBase(CC_SHADOW_POSITION, N, v_shadowBias);
      #endif
      }
    #endif
    diffuse = (diffuse + specular) * (shadowCtrl);
}
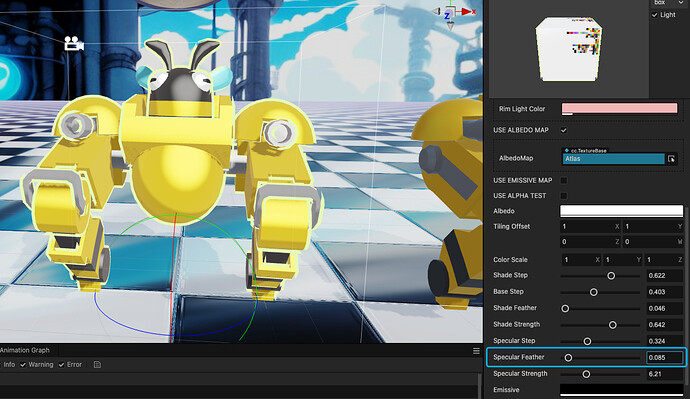
Toon Model:
The Toon model, or Cel-shading, discretizes the light intensity into several levels to simulate the effect of hand-drawn animation. It is suitable for cartoon or art style rendering.
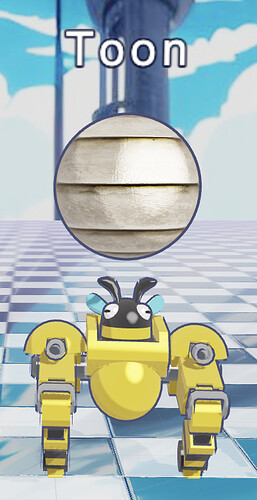
Compared to the official built-in Toon Shader, I’ve added additional features like Rim Light and a softened Specular highlight. I’ve also streamlined the settings for the two shading layers.
void ToonShading (inout vec4 diffuseColor,in vec3 normal) {
    vec3 position;
    HIGHP_VALUE_FROM_STRUCT_DEFINED(position, v_position);
    vec3 V = normalize(cc_cameraPos.xyz - position);
    vec3 N = normalize(normal);
    vec3 L = normalize(-cc_mainLitDir.xyz);
    float NL = 0.5 * dot(N, L) + 0.5;
    float NH = 0.5 * dot(normalize(V + L), N) + 0.5;
    vec3 lightColor = cc_mainLitColor.rgb * (cc_mainLitColor.w * shadeParams.x);
    float shadeFeather = shadeParams.y;
    float shadeCtrl = mix(1., (1.-shadeParams.z), clamp(1.0 + (shadeParams.x - shadeFeather - NL) / shadeFeather, 0.0, 1.0));
    shadeCtrl *= mix(1., (1.-shadeParams.z*0.5), clamp(1.0 + (shadeParams.w - shadeFeather - NL) / shadeFeather, 0.0, 1.0));
    float specularWeight = 1.0 - pow(specularParams.x, 5.0);
    float specularMask = 1.0-smoothstep( NH, NH+ specularParams.y, specularWeight + EPSILON_LOWP);
    float shadowCtrl = 1.0;
    #if CC_RECEIVE_SHADOW && CC_SHADOW_TYPE == CC_SHADOW_MAP
      if (NL > 0.0) {
      #if CC_DIR_LIGHT_SHADOW_TYPE == CC_DIR_LIGHT_SHADOW_CASCADED
        shadowCtrl = CCCSMFactorBase(position, N, v_shadowBias+0.1);
      #endif
      #if CC_DIR_LIGHT_SHADOW_TYPE == CC_DIR_LIGHT_SHADOW_UNIFORM
        shadowCtrl = CCShadowFactorBase(CC_SHADOW_POSITION, N, v_shadowBias+0.1);
      #endif
      }
    #endif
    float diffuseCtrl = (shadowCtrl+specularMask*specularParams.z)*shadeCtrl;
    vec3 envColor = cc_ambientGround.rgb*cc_ambientSky.w;
    diffuseColor.rgb *= (envColor + (lightColor*diffuseCtrl));
  }
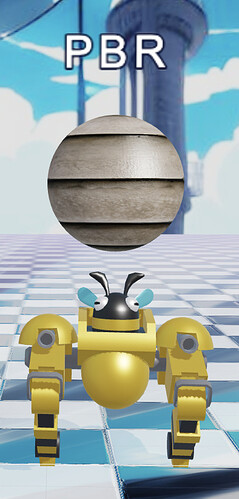
PBR (Physically Based Rendering):
PBR is the latest lighting model, which tries to more realistically simulate the interaction between light and the surface of an object, including diffuse and specular reflection. PBR models usually include principles of physics like energy conservation and Fresnel effect, and they are suitable for simulating rendering in the real world.
PBR’s GLSL code is quite long, typically including calculations for multiple physical characteristics, such as roughness, metallicity, etc. Therefore, the complete PBR GLSL code is not provided here.
Also, since this model does not have PBR textures, the effect is not significantly different from Blinn-Phong.
The above is just a simplified shader code; the actual implementation would be more complex because it involves dealing with textures, shadows, indirect lighting, and other factors. Additionally, the variables used in the code, such as lightPos, FragPos, norm, lightColor, ambient, objectColor, etc., would be calculated and passed in the vertex shader or other parts of the code.
In addition, different lighting models are suitable for different rendering styles, and you can choose them based on specific requirements and scenes. For example, the unlit model is ideal for billboards or ground guides, the Lambert model works well for matte surfaces, the toon model is ideal for cartoon or hand-drawn styles, and PBR is great for simulating high-quality rendering in a realistic world.
Common Features:
In shaders, there are often standard techniques and terms that serve various functions and purposes. Here’s an explanation of some of the concepts you mentioned:
Color: This is typically an RGBA value, representing the basic color of a pixel. R, G, and B stand for red, green, and blue, respectively, while A stands for transparency. These values are usually in the range of 0 to 1.
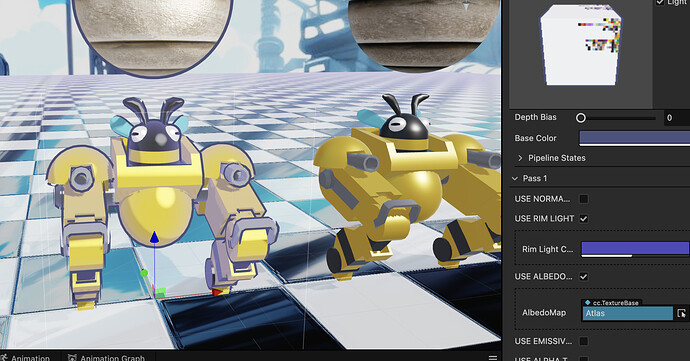
Albedo Map: Also known as a Diffuse Map, it’s a texture that primarily represents the inherent color of an object’s surface unaffected by lighting.
Alpha Test: Alpha testing is a technique that determines whether to discard a pixel by comparing its alpha value to a preset threshold. This is often used to achieve transparency and translucency effects.
Normal Map: Normal mapping is a technique used to simulate surface details. It uses RGB values to represent a vector describing the normal direction of the surface at each point. This gives more detail to the object’s surface, but normal maps increase VRAM usage and GPU texture parsing load.
Emissive Map: An Emissive Map is a texture used to represent an object’s self-emitted color and brightness when it’s not influenced by external lighting. Using an Emissive Map increases VRAM usage and GPU texture parsing load.
Fog: Fog is a technique used to simulate atmospheric effects. It can make objects farther from the observer appear blurrier, and the color transitions toward the color of the fog. Adding fog doesn’t introduce significant overhead and is cost-effective for creating atmospheric ambiance.
Image-Based Lighting (IBL): IBL is a technique that uses panoramic images to simulate environmental lighting. It can produce more realistic reflections and shadow effects. IBL comes with a higher computational cost and is recommended to be toggle-controlled for lower-end devices.
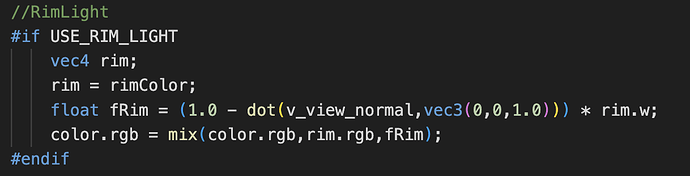
Rim Light: Rim lighting simulates the effect of an object’s edges being illuminated by a backlight. It can enhance the three-dimensional appearance of 3D models. Rim lighting can be applied to various materials, incurring minimal performance overhead. It’s particularly useful for enhancing the three-dimensionality of toon-style rendering or portraying character or monster injuries.
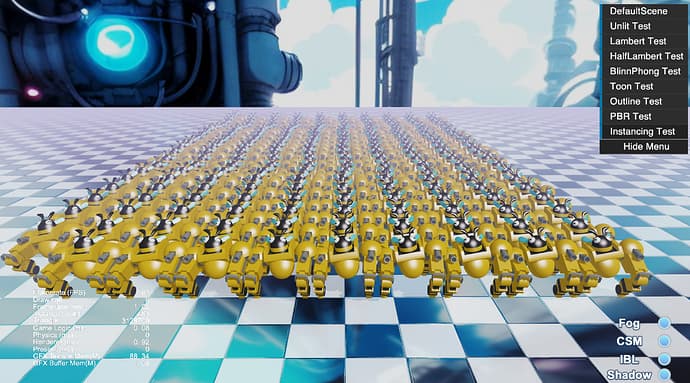
GPU Instancing is a highly efficient technique that allows for rendering a large number of identical objects in a 3D scene without significantly impacting performance. This is achieved by having the GPU render multiple instances simultaneously rather than individually rendering each instance.
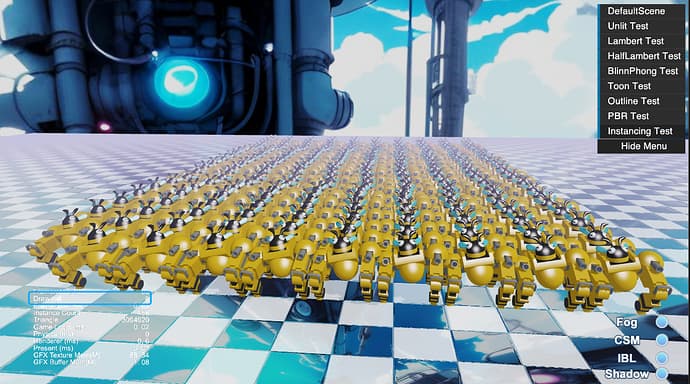
*Through GPU Instancing, a significant reduction in draw calls is achieved.
These steps are typically performed in the Fragment Shader in the following order:
- Color: First, you need to determine the primary color of the object, which is often achieved by reading the Albedo texture.
- Normal Map: Next, you can apply a Normal Map to alter the surface normals of the object, thus simulating more details.
- Lighting Calculation: Afterward, you can perform lighting calculations, typically calculating ambient light, diffuse reflection, specular reflection, and more. During this process, you might use Rim Light to enhance the brightness at the edges.
- IBL: You can then calculate the IBL based on the panoramic image, making the reflection and shadow effects of the environment more realistic.
- Emissive Map: You can then add an Emissive Map so that objects can glow without a light source.

- Alpha Test: Finally, you can perform an Alpha Test and decide whether to discard pixels based on the test results.

- Fog: After all the colors and lighting have been calculated, you can apply the Fog effect to make the color of objects away from the observer’s transition to the fog’s color.
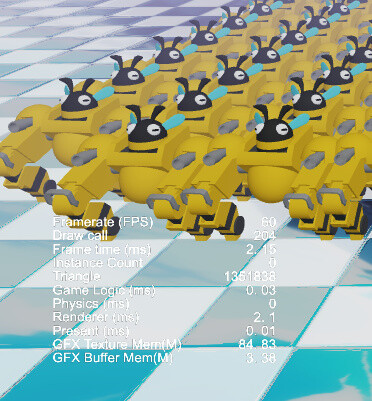
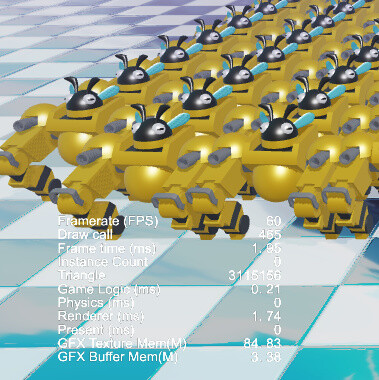
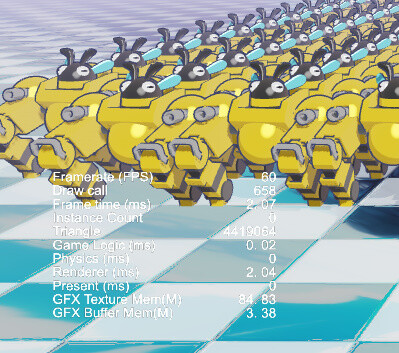
Performance Analysis:
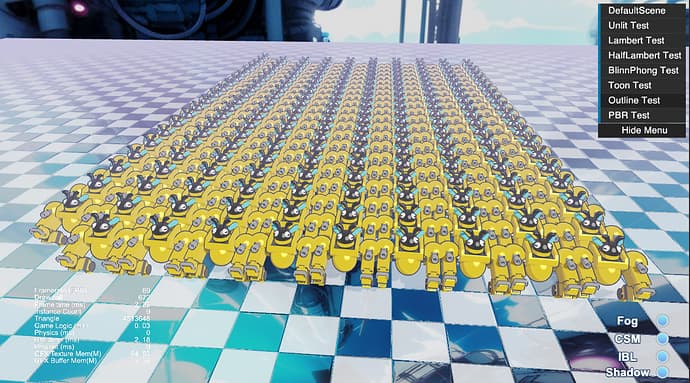
Negligible Impact of Lighting Models on Performance In this test, intentional omission of instancing and baked animations was done to assess the rendering cost of different lighting models solely. The #instancing data is provided below:
We observed that modern GPUs on PCs exhibit nearly indistinguishable performance when processing these lighting models. Additionally, high-end mobile devices also experience minimal impact, with only a few low-end devices showing slightly weaker performance for PBR than Lambert.
Furthermore, we observed that using shadows and outlines can double the number of vertices, which is the primary reason for performance degradation. This is mainly due to two factors:
Shadow Generation: Shadows are typically achieved by generating shadow maps. During this process, the scene needs to be rendered once more from the perspective of the light source. This means that each vertex needs to be processed and rasterized again, effectively doubling the number of vertices.
Outlining: Adding outlines to objects involves rendering them again with an expanded version. This enlarged version of the object is then drawn with a different color to create the outline effect. As a result, vertices are duplicated, leading to an increase in the vertex count.
These additional rendering processes can significantly impact performance, especially on devices with limited GPU resources or scenarios with a high vertex load.
Generating outlines creates additional geometry: A slightly larger version of the original model is generated, and then the back side of this enlarged version is rendered to create the outline effect. This approach results in a doubling of the vertex count because you’re effectively rendering two models.
So, the recommendation is for everyone to choose the lighting model based on their game style. Based on actual tests, the primary reason for the weaker performance of PBR is often due to enabling Image-Based Lighting (IBL) and the various texture resolutions required for PBR and Normal Maps.
I’ve also included a simplified version of IBL within the Blinn-Phong and Lambert models. You can download the demo to experience it.
As always, the demo is available on my GitHub. Writing code is not an easy task. XD!