
Making 3D Video Walls For Your 2D Game
Introduction
Thanks to Yuefu Notes for this incredible demo, and we hope you enjoy learning from them.
On a particular day in March 2022, in a central building in Shanghai, a front-end Cocos Creator programmer at a big game company entered the company building as usual. The moment he walked into the elevator, he saw the advertisement screen on three sides of the elevator. A video ad is playing, as shown in the image below.
Can this effect of this three-sided advertising be added to a 3D parkour game scene? It has many advantages, such as using 3D scenes with high flexibility, high resource utilization, and low consumption. In other games, it can also be applied like this:

Video slide and click effect on loop list.
So how about another question: “Can I make this effect in my 2D project made with Cocos Creator?” Today, let’s explore it together!
Target
This tutorial will help us use Cocos Creator to achieve the effect of the above advertising wall in a 2D project. There are two main problems to be solved:
-
Goal 1: In-game video playback. I hope that the video playback node is the same as an ordinary node, which can arbitrarily set the level, size, event response, etc.
-
Goal 2: Simulate the perspective effect of near objects big and far objects small. The advertising wall must have a perspective effect, and it also needs to support more post-effects (such as blur, mask, watermark, etc.) on the video screen.
Action
Let’s achieve the above two small goals within Cocos Creator:
-
Starting from goal 1, we need the nodes that support video playback to have the same characteristics as ordinary Node nodes, so the traditional playback method is first excluded: playback using the native platform interface.
-
Starting from goal 2, if the cc.Sprite component is used as the node for playing the video. It is easy to do post-effect processing on the video image.
Combining the above two requirements, we found a breakthrough: extracting each frame of video data using cc.Sprite to display and then post-processing the texture to get the desired effect. So the requirement becomes "convert video frames to texture frames and then some post-processing."
There are two processing methods here:
a. Convert the video format to webp video format. You can read video data by each frame and then generate SpriteFrame for cc.Sprite display.
b. Read the frame data of mp4 and other video formats by frame through the FFmpeg library, and then generate SpriteFrame for cc.Sprite display.
It can be seen that the above two methods are basically similar. The difference lies in the format of the source video. Here option a takes precedent because the implementation of webp is more straightforward than FFmpeg.
How we accomplish
overall design
Read webp video frames
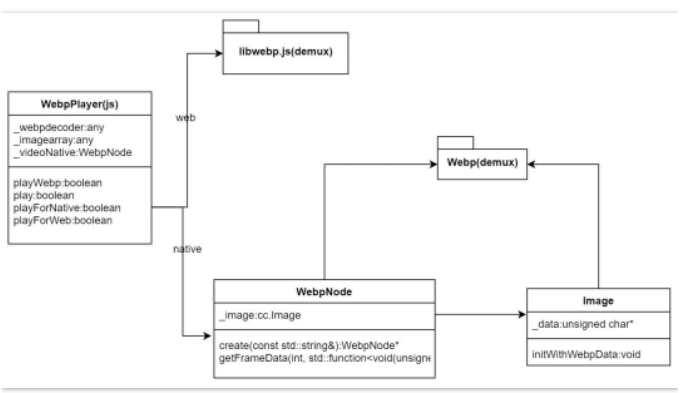
First, we implement the webp playback component in ts: WebpPlayer.ts. The following is part of the core code:
export default WebpPlayer extends cc.Component{
    // Omit unimportant code
    private _spriteModel:cc.Sprite = null
    private _texture:cc.Texture2D = null

    private _webpdecoder = null
    private _imagearray = null

    public static create( node:cc.Node ) : WebpPlayer {
        if (!cc.isValid(node)) {
            return null
        }
        let webp = node.getComponent(WebpPlayer)
        if (!webp) {
            webp = node.addComponent(WebpPlayer)
        }
        let sprite = node.getComponent(cc.Sprite)
        if (!sprite) {
            sprite = node.addComponent(cc.Sprite)
        }

        webp.init(sprite)
        return webp
    }

    protected init(sprite:cc.Sprite) {
        this._spriteModel = sprite
    }

    public playWebp( res:string, repeatCount:number = 1 ) : boolean {
        let webpAsset = cc.resources.getInfoWithPath(res, cc.Asset);
        if (!webpAsset) {
            return false;
        }

        let webpAssetUrl = cc.assetManager.utils.getUrlWithUuid(webpAsset.uuid, {isNative: true, nativeExt: '.webp'})
        return  this.play(webpAssetUrl,
            {adapterScreen:ENUMWebpAdaptScreenType.min_adapt,
                repeatCount:repeatCount,}
            )
    }

    public play(webpPath:string, param:EnterParams, callback:WEBP_CALLBACK = null) : boolean {
        if (param) {
            this._adapterScreenType = param.adapterScreen || ENUMWebpAdaptScreenType.min_adapt
            this._startFrame = param.startFrame || 0
            this._endFrame = param.endFrame || -1
            this._repeatCount = param.repeatCount || 1
            if (param.alignToScreen) {
                this.alignToScreen()
            }
        } else {
            this._repeatCount = 1
        }

        this._curRepeatIndex = 0
        this._webpCallback = callback

        if (this._webpPath != webpPath) {
            this._destroyNode()
        }

        return cc.sys.isNative ? this.playForNative(webpPath) : this.playForWeb(webpPath)
    }
    // Omit unimportant code
 }
For the Web: Read through the third-party library libwebp.js(+demux). (Note: This is only to verify the effect, and the more efficient webassembly library is not used.)
_readyForWeb & toload (load webp file):
protected _readyForWeb(webpPath:string, callback: Function) {
    if (!this._webpdecoder) {
        let self = this
        let request = new XMLHttpRequest()
        request.open("GET", webpPath, true)
        request.responseType = "arraybuffer"
        request.onload = function () {
            switch (request.status) {
                case 200:
                    self.toload(request.response, callback)
                    break
                default:
                    if (callback) {
                        callback(request.status)
                    }
                    break
            }
        }
        request.send(null)
    } else if (callback) {
        callback()
    }
 }

 protected toload(arrData: any, callback: Function) {
    if (!this._webpdecoder) {
        this._webpdecoder = new window['WebPDecoder']()
    }

    let response = new Uint8Array(arrData)
    this._imagearray = window['WebPRiffParser'](response, 0)
    this._imagearray['response'] = response
    this._maxFrameCount = this._imagearray['frames'].length

    if (callback) {
        callback()
    }
 }
doPlayFrameWeb: Read frame data and populate cc.Texture2D:
protected doPlayFrameWeb( frameIndex:number ) {
    let frame = this._imagearray.frames[frameIndex]
    let response = this._imagearray['response']
    let heightData = [0]
    let widthData = [0]
    let rgba = this._webpdecoder.WebPDecodeRGBA(response,
        frame['src_off'], frame['src_size'], widthData, heightData)
    let data = new Uint8Array(rgba)
    if (data) {
        frame['data'] = data
        frame['imgwidth'] = widthData[0]
        frame['imgheight'] = heightData[0]

        if (!this._texture) {
            this._texture = new cc.Texture2D()
        }
        this._texture.initWithData(frame['data'],
            cc.Texture2D.PixelFormat.RGBA8888, widthData[0], heightData[0])
        this._onRefreshTexture(frameIndex, this._texture)
    } else {
        this.onException()
    }
    // Omit other code
}

_onRefreshTexture: Update SpriteFrame data and display:
protected _onRefreshTexture(frameIndex: number, tex:cc.Texture2D) {
        let spriteFrame = new cc.SpriteFrame()
        spriteFrame.setTexture(tex)
        this._spriteModel.spriteFrame = spriteFrame

        this._curFrameIndex = frameIndex

        if (frameIndex >= this._endFrame) {
            this.onPlayToEnd()
        }
        // Omit other code
    }
native: read through the webp library (webp, webpmux, webpdemux).
class WebpNode {
        protected:
                WebpNode();
        public:
                virtual ~WebpNode();
                void release();

                // Omit other code
                static WebpNode* create(const std::string& fileName);

                bool getFrameData(int index, std::function<void(unsigned char *, size_t)> callback);

        protected:
                bool initWithFile(const std::string& filename);
        private:
                std::vector<unsigned char*> _datas;
                std::vector<size_t> _lengths;
                uint32_t _width;
                uint32_t _height;

                cocos2d::Image* _image = nullptr;
                // Omit unnecessary code
        };
initWithFile(c++): Parse data such as frame number and resolution of webp file:
bool WebpNode::initWithFile(const std::string& filename)
 {
    cocos2d::Data data = cocos2d::FileUtils::getInstance()->getDataFromFile(fullpath);
    if (data.isNull())
    {
        return false;
    }

    WebPData webData = { data.getBytes(), (size_t)data.getSize() };
    WebPDemuxer* demux = WebPDemux(&webData);

    _width = WebPDemuxGetI(demux, WEBP_FF_CANVAS_WIDTH);
    _height = WebPDemuxGetI(demux, WEBP_FF_CANVAS_HEIGHT);

    WebPIterator iter;
    if (WebPDemuxGetFrame(demux, 1, &iter)) {
        do {
            WebPData fData = iter.fragment;
            unsigned char* data = new unsigned char[fData.size];
            memcpy(data, fData.bytes, fData.size);
            _datas.push_back(data);
            _lengths.push_back(fData.size);

        } while (WebPDemuxNextFrame(&iter));
        WebPDemuxReleaseIterator(&iter);
    }
    WebPDemuxDelete(demux);

    // Omit unnecessary code
    return true;
 }
getFrameData(c++): Read the data of each frame by frame. It is read by the js layer, and the callback returns the data and length of each frame to the js layer:
bool WebpNode::getFrameData(int index, std::function<void(unsigned char *, size_t)> callback) {
    if (index < 0 || index >= _datas.size()) {
            return false;
    }

    if (callback) {
        unsigned char* buff = _datas.at(index);
        size_t buffLen = _lengths.at(index);

        bool ret = _image->initWithWebpData(buff, buffLen);
        if (ret) {
            callback(_image->getData(), _image->getDataLen());
        }
    }

    return true;
 }
In actual operation, you may find that there are two memory hot spots:
a. When parsing the Image data every frame, the Image memory will re-create a new _data to save the texture data by default, so it is necessary to reuse the Image object and the _data buffer to avoid creating a texture-sized buffer data per frame.
bool Image::initWithWebpData(const unsigned char * data, ssize_t dataLen)
 {
    // Omit unnecessary code

    auto needLen = _width * _height * (config.input.has_alpha ? 4 : 3);
    if ( (_dataLen > 0 && _dataLen != needLen) || _dataLen < 1 || !_data) {
        _dataLen = 0;
        CC_SAFE_DELETE(_data);
        _data = nullptr;

        _dataLen = _width * _height * (config.input.has_alpha ? 4 : 3);
        _data = static_cast<unsigned char*>(malloc(_dataLen * sizeof(unsigned char)));
    }

    // Omit unnecessary code
 }
b. The complete data of each frame of texture is passed to the js layer, which will also cause a data buffer of the size of one frame of texture to appear in the js layer (this object needs to wait for gc to release). Therefore, this buffer needs to be reused here. Otherwise, the memory consumption caused by playing the video will increase significantly.
static se::Value* s_sharedValue = nullptr;
 static bool js_cocos2dx_WebpNode_getFrameData(se::State& s)
 {
    // Omit unnecessary code
    auto lambda = [=](unsigned char* szBuff, size_t size) -> void {
        se::AutoHandleScope hs;
        se::Value dataVal;
        CC_UNUSED bool ok = true;
        se::ValueArray args;

        se::HandleObject retObj(se::Object::createPlainObject());

        if (s_sharedValue) {
            se::Object* valueObj = s_sharedValue->toObject();
            v8::Local<v8::Object> obj = valueObj->_getJSObject();
            v8::Local<v8::TypedArray> arrBuf = v8::Local<v8::TypedArray>::Cast(obj);
            v8::ArrayBuffer::Contents content = arrBuf->Buffer()->GetContents();
            uint8_t* ptr = (uint8_t*)content.Data() + arrBuf->ByteOffset();

            size_t byteLength = content.ByteLength();
            if (byteLength < size) {
                delete s_sharedValue;
                s_sharedValue = nullptr;
            }
            else {
                memset(ptr, 0, byteLength);
                memcpy(ptr, szBuff, size);
            }
        }

        if (!s_sharedValue) {
            s_sharedValue = new se::Value();
            cocos2d::Data data;
            data.fastSet(szBuff, size);
            Data_to_seval(data, s_sharedValue);
            data.takeBuffer();
        }
        retObj->setProperty("data", *s_sharedValue);
        args.push_back(se::Value(retObj));

        se::Value rval;
        se::Object* thisObj = jsThis.isObject() ? jsThis.toObject() : nullptr;
        se::Object* funcObj = jsFunc.toObject();
        bool succeed = funcObj->call(args, thisObj, &rval);
        if (!succeed) {
                se::ScriptEngine::getInstance()->clearException();
        }
    };
     // omit non-critical code
 }
 SE_BIND_FUNC(js_cocos2dx_WebpNode_getFrameData)
WebpPlayer reads data frame by frame and populates cc.Texture2D:
protected doPlayFrameNative(frameIndex:number) {
    let self = this
    if (!this._videoNative.getFrameData(frameIndex, function (buffList: any) {
        let buff = buffList.data
        let pixelFormat = self._videoNative.pixelFormat()
        if (!self._image) {
            self._image = new Image(self._width, self._height)
        } else {
            self._image.width = self._width
            self._image.height = self._height
        }

        let image = self._image
        image._data = buff
        image._glFormat = self._glFormat
        image._glInternalFormat = self._glInternalFormat
        image._glType = self._glType
        image._numberOfMipmaps = 0
        image._compressed = false
        image._bpp = self._bpp
        image._premultiplyAlpha = false
        image._alignment = 1
        image.complete = true

        if (!self._texture) {
            self._texture = new cc.Texture2D()
        }
        self._texture.initWithData(image, pixelFormat, self._width, self._height)
        self._onRefreshTexture(frameIndex, self._texture)
    })) {
        this.onException()
    }
 }
The above completes the dual-platform webp reading and display process.
Simulate the display effect of the middle advertising wall
Add three groups of Sprite nodes and their frame Sprite nodes in the interface to display the video playback of the three advertising walls.

Display the nodes and video frames of the three advertising walls
Add the playback code of the intermediate video:
let leftWebp = WebpPlayer.create(this._video_middle_Spr.node)
 leftWebp.playWebp("advert-board/videos/game-demo", -1)
You can get the playback effect of the middle advertising wall:
Simulate the display effect of the side advertising wall
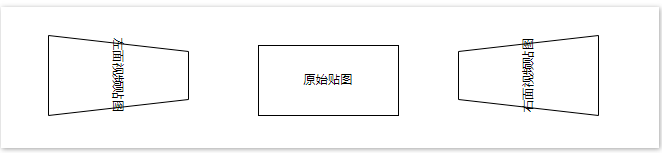
Attempt 1: Modify the uv mapping
By modifying the uv mapping, we can map the quadrilateral into a left trapezoid and a right trapezoid (assuming the display effect is an isosceles trapezoid) to simulate the perspective effect on the left and right sides of the elevator. This method is relatively simple. Let’s try it first. The specific illustration is as follows:
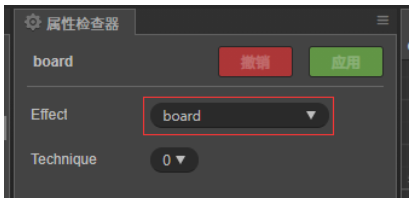
a. Create board.effect, board.mtl (binding board.effect):
b. Modify some of the code in board.effect:
CCEffect %{
  techniques:
  - passes:
    - vert: vs
      frag: fs
      blendState:
        targets:
        - blend: true
      rasterizerState:
        cullMode: none
      properties:
        texture: { value: white }

        offset: { value: 0.1, editor: {range: [0.0, 0.6]} }
        transFlag: { value: 1.0}
 }%

 CCProgram fs %{
    // Omit unnecessary code
    void main () {
        vec4 o = vec4(1, 1, 1, 1);

        vec2 uv = v_uv0;
        if (transFlag > 0.0)
          uv.y = uv.y + (uv.y - 0.5)*uv.x*offset;
        else
          uv.y = uv.y + (uv.y - 0.5)*(1.0 - uv.x)*offset;

        #if USE_TEXTURE
          CCTexture(texture, uv, o);
        #endif

        if (uv.y < 0.0 || uv.y > 1.0) {
          o.a = 0.0;
        }

        o *= v_color;

        ALPHA_TEST(o);

        #if USE_BGRA
          gl_FragColor = o.bgra;
        #else
          gl_FragColor = o.rgba;
        #endif
      }
  }%
Property description:
transFlag: Transform to right trapezoid when > 0. Otherwise, transform to a left trapezoid.
offset: V value difference between the top and bottom sides of the trapezoid / 2, the range is [0, 0.6].
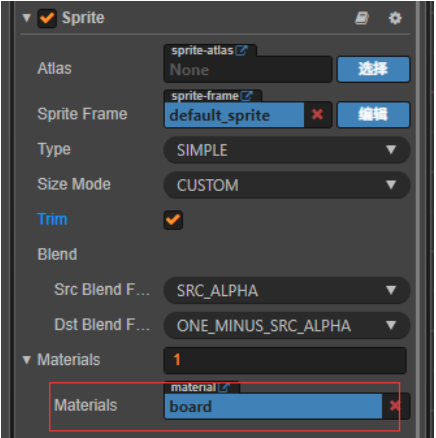
c. Assign the 0 subscript position of the Material array of the cc.Sprite component used to display the video texture frame to board.mtl.
d. Set the transFlag and offset parameters for the video node on the right, and play the video:
let rightMaterial = this._video_right_Spr.getMaterial(0)
 rightMaterial.setProperty("transFlag", -1.0)
 rightMaterial.setProperty("offset", 0.5)

 let rightFrameMaterial = this._frame_right.getMaterial(0)
 rightFrameMaterial.setProperty("transFlag", -1.0)
 rightFrameMaterial.setProperty("offset", 0.5)

 let rightWebp = WebpPlayer.create(this._video_right_Spr.node)
 rightWebp.playWebp("advert-board/videos/game-demo", -1)
The resulting effect of the right advertising wall is as follows:
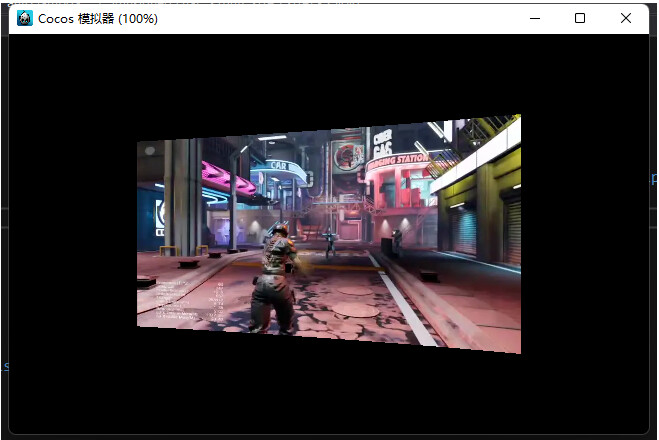
Static effect on the right
Overall dynamic effect
The effect is almost the same, but after a closer look, it is found that the pictures of the two advertising walls on the side are distorted: the top and bottom edges of the image have become curved.
A careful analysis revealed the reasons:
uv.y = uv.y + ( uv.y - 0.5)* uv.x *offset;
The result of this calculation is nonlinear, so the y value of the uv map is nonlinear, and it is reasonable to have curves on the upper and lower sides.
TIPS: You may have a question: Is it possible to put the uv mapping into vs or use vertex mapping? I tried it, and it was even more complicated, so I won’t expand it here, and interested friends can try it.
3D flip in a 2D camera
According to the scheme of the article “3D flip with a 2D camera”, the effect in the example at the beginning is finally achieved. The specific modifications are as follows:
a. Use the new modified board.effect: delete the transFlag, offset attributes, and increase the map_vp attribute:
mat_vp: {value:[0.0,0.0,0.0,0.0,0.0,0.0,0.0,0.0,0.0,0.0,0.0,0.0,0.0,0.0,0.0,0.0]}
Restore the code in fs and modify vs:
CCProgram vs %{
  precision highp float;

  #include <cc-global>
  #include <cc-local>

  in vec3 a_position;
  in vec4 a_color;
  out vec4 v_color;

  in vec2 a_uv0;
  out vec2 v_uv0;
  uniform UNIFORM{
      mediump mat4 mat_vp;
  };

  void main () {
    vec4 pos = vec4(a_position, 1);
    #if CC_USE_MODEL
    pos = mat_vp * cc_matWorld * pos;
    #else
    pos = mat_vp * pos;
    #endif
    v_uv0 = a_uv0;
    v_color = a_color;
    gl_Position = pos;
  }
 }%
b. Call the following method to initialize the video playback node:
public static setVPMatToNode(node:cc.Node) {
    //Calculate the width/height of the device
    let aspect = (cc.view as any)._viewportRect.width / (cc.view as any)._viewportRect.height
    //Get the view matrix matView
    let matView:any = cc.mat4()
    let matViewInv:any = cc.mat4()
    cc.Camera.main.node.getWorldRT(matViewInv)
    cc.Mat4.invert(matView, matViewInv)

    //Get the pivot matrix
    let matP:any = cc.mat4()
    let fovy = Math.PI / 4
    cc.Mat4.perspective(matP, fovy, aspect, 1, 2500)

    //VP = Perspective Matrix*View Matrix
    let matVP = cc.mat4()
    cc.Mat4.multiply(matVP, matP, matView);

    let arr = new Float32Array(16);
    for (let i=0;i<16;i++){
        arr[i]= matVP.m[i]
    }
    let material = node.getComponent(cc.Sprite).getMaterial(0)
    material.setProperty("mat_vp", arr)
 }
Call the setVPMatToNode method on the video playback node to set the map_vp attribute and set the rotation angle:
public onLoad() {
    // Middle advertising screen node
    PerspectiveCamera.setVPMatToNode(this._video_middle_Spr.node)
    PerspectiveCamera.setVPMatToNode(this._frame_middle.node)

    // Left advertising screen node
    PerspectiveCamera.setVPMatToNode(this._video_left_Spr.node)
    this._video_left_Spr.node.rotationY = 90
    PerspectiveCamera.setVPMatToNode(this._frame_left.node)

    // Right advertising screen node
    PerspectiveCamera.setVPMatToNode(this._video_right_Spr.node)
    this._video_right_Spr.node.rotationY = -90
    PerspectiveCamera.setVPMatToNode(this._frame_right.node)
 }
c. Set the video playback nodes to 3D and set the depth value:
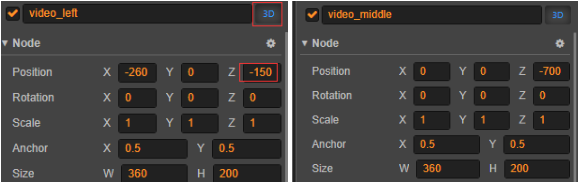
3D attribute and depth value settings on three nodes
At this point, we are done, and we have the final effect shown at the beginning of this article: