
Shanghai Salon | ZQGame’s new large-scale MMO is exposed for the first time! Listen to the project owner Mei and talk about those things about art development.
At the Shenzhen Salon last month, ZQGame unveiled the team’s first large-scale MMO game developed with Cocos Creator for the first time. The project owner of this unnamed game, Mei Yang Tian, shared with everyone the problems she encountered during the art production of this game and their experience. Below is a shared excerpt.
Mei Yang Tian
Hello everyone, I am Mei Yang Tian, the project owner at ZQgame, and I am responsible for the research and development of art effects in this MMO game. With the in-depth cooperation of the Cocos technical team, the beta version of the project has entered the optimization stage and will share very soon.
game demo screen
This is the first large-scale MMO game developed by ZQgame using Cocos Creator. With the support of the engine, the game can communicate data between exe, web, apk, HTML5, and console versions. In the context of the current concept of the metaverse, the interconnection of five platforms is bound to become a significant trend in the future, which also proposes new exploration directions for game production and player experience.
It is worth mentioning that the ability of the Cocos engine to communicate with other engines is not available in other engines. I believe that with the accumulation of time and experience and the efforts of domestic gamers, this engine will catch up and continue to bring you more surprises and a better experience.
It was our team member’s first time working with Cocos Creator, and it is inevitable to fall into a pit during the first run-in process. Taking this opportunity, I will share some of the problems I encountered in the art production process of this game from the perspective of the leading art of the project, as well as the experiences I think are significant.
Resource Library
It is necessary to look at the stage of the project from a global perspective, manage the existing art resources, and understand the lack of resources. As the saying goes, “Sharpen your knives without chopping firewood.” We have spent a lot of energy building a resource library and integrating and classifying shared resources, such as:
Models: buildings, props, plants…
Texture classification: four-party contact texture, two-party contact texture, transparent texture…
In particular, since the transparent texture is more resource-intensive in the engine, we plan on a few textures from the beginning to avoid using less transparent shaders.
Model LOD
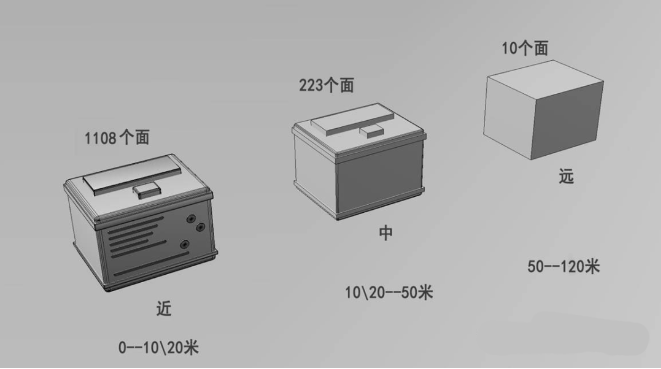
First of all, we have to determine whether to do LOD and which ones are needed and which don’t.
Complex objects and terrains that do not use LOD or the distance of setting LOD are not properly grasped, which will lead to waste of resources and fail to achieve the best results. The best distance for LOD is nearly 0-20 meters, 20-50 meters, and 50-120 meters. The understanding of LOD is as follows:
Texture size and size
The resource specification involves several issues with the software, units, naming, size, dimensions, etc. We’ve mainly fallen in the hole with mapping. Some of the front art used 4096 size mapping for effect or mapping that wasn’t a power of 2.
Therefore, it is essential to set up rules before the project, and it is recommended that models that need to share decals have a standard range set up in advance. For this project, we specify that very complex models can individually use 2048 size decals, while all others must be below 2048 size decals, and try to compress the decal size (non-size) as much as possible without affecting the art. In addition, the optimization of art scene resources mainly starts from the model, mapping, lighting, special effects, etc., which corresponds to improving the efficiency of CPU, GPU, memory, and other hardware usages.
Second set of UVs (light UVs)
A second UV (light UV) is involved for the scene to be baked. In the beginning, we found that Cocos Creator required us to spread the lighting UV, which was relatively inefficient manually. After we gave feedback to our official technical partners, they wrote a plug-in to screen for unexpanded light UVs, and we wrote a plug-in to automatically expand light UVs so that we could import the model into the plug-in and expand light UVs with one click.
PBR
PBR, which can be called Physically Based Rendering (PBR), is a method of shading and rendering that provides a more precise way of representing how light interacts with surfaces.
There are many PBR workflows. Let’s take a look at the standard Shader that comes with Cocos Creator, as shown below:

The maps required for the metal/roughness workflow in the PBR process are Intrinsic Color, Metallicity, and Roughness, Ambient Occlusion (AO), and Normal. The following focuses on the texture of metalness and roughness, which occupies a significant position in the PBR process.
metalness map
The metallicity map acts as a mask, distinguishing between metallic and non-metallic data in the natural color map. When the Shader recognizes black in the metallicity map, it treats the corresponding area of the intrinsic map as an insulator. Still, of course, not all insulators are black, and a value of 4% is appropriate for most common insulator materials.
In practice, when the Shader sees white in a metallic map, it checks the corresponding area of the natural color map to get the corresponding reflectance value for the metal. In short, black is non-metallic, and white is metallic, with intermediate transition gray values to indicate details such as oxidized metal or dirt and grime.
roughness map
The roughness map describes the irregularity of the surface, which causes light to be diffusely reflected, and the direction of the reflection changes randomly according to the surface roughness. On the map, black represents smooth surfaces, and white represents rough surfaces. The roughness map is the most creative because it allows the artist to define surface features visually.
Essentially, it allows us to creatively tell the origin of the various states of the surface. What kind of environment is it in? Is it carefully kept or placed randomly? Has it ever been exposed to the elements? The state of the surface tells a lot about the environment it is in, so its state has a deep connection to the overall content of the world and the asset that you want to create.
There is no right or wrong about roughness. The 3D art designer has complete control. Starting with a normal map is a good starting point. Normal maps often contain critical surface details, and these surface details should also be represented in roughness maps.
Intrinsic color map
The natural color map is an RGB map. The natural color map has higher requirements on the color matching ability and overall control ability of the 3D artist. We need to enrich the color on the natural color map and deal with the relationship between light, shade, and volume.
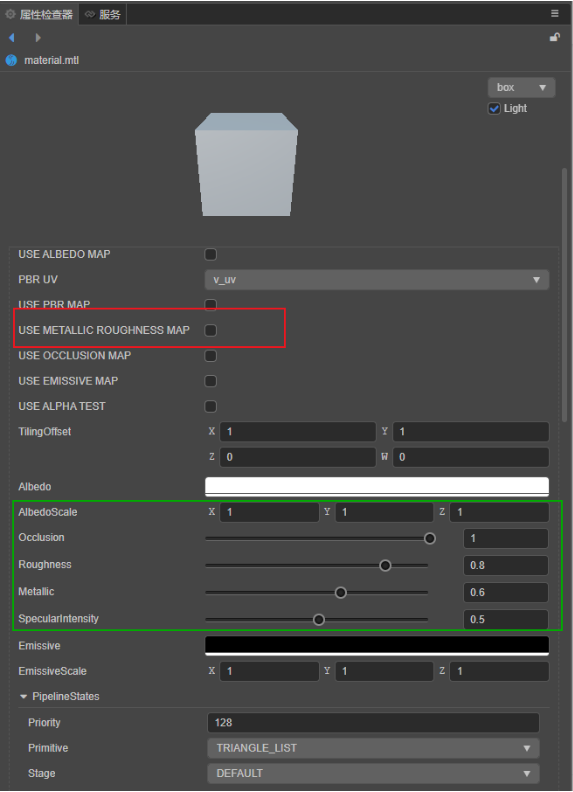
I focused on the metalness and roughness textures above. The Shader of Cocos Creator combined these two textures (the red box in the figure below), saving resources for our entire project development. While adjusting the texture, we can adjust the value with the slider (green box in the figure below) to achieve the artistic effect we want:
The engine PBR effect is still very good (the skin does not currently use 3S materials). The following is the performance of some of our game characters on Cocos Creator 3.x :
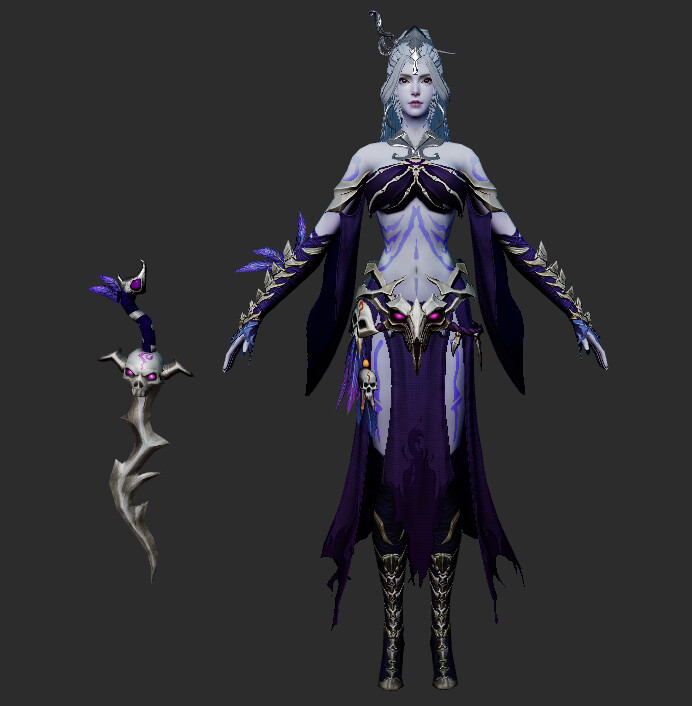
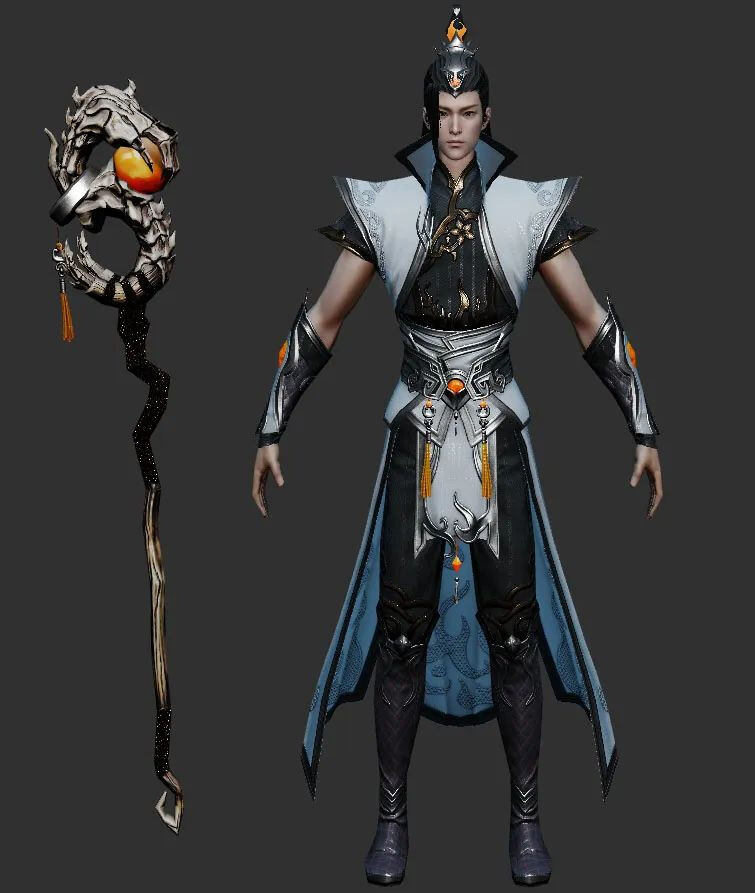
I hope it can be helpful to everyone. Thank you!