
Android SDK access is so easy. One article to understand the correct use of Cocos Creator’s native customization development!
Introduction
The author of this article, “Mr. Feather,” based on v3.4.2, will introduce the Android native customization development process of Cocos Creator and the process of JSB’s mutual call between the Android layer and the engine TS/JS layer. See the end of the article for the Demo source code.
Recently a game in the development into the Android SDK access related work, but after building the Android project, found that the structure and the previous jsb-link difference is relatively large, the project directory structure and also different from the last. This time, we will discuss the customization development of Android native for Cocos Creator and provide some references for the development partners.
Analysis process
First, check the instructions on the build directory [1] and customization development [2] in the official documentation.

build directory

Customization development
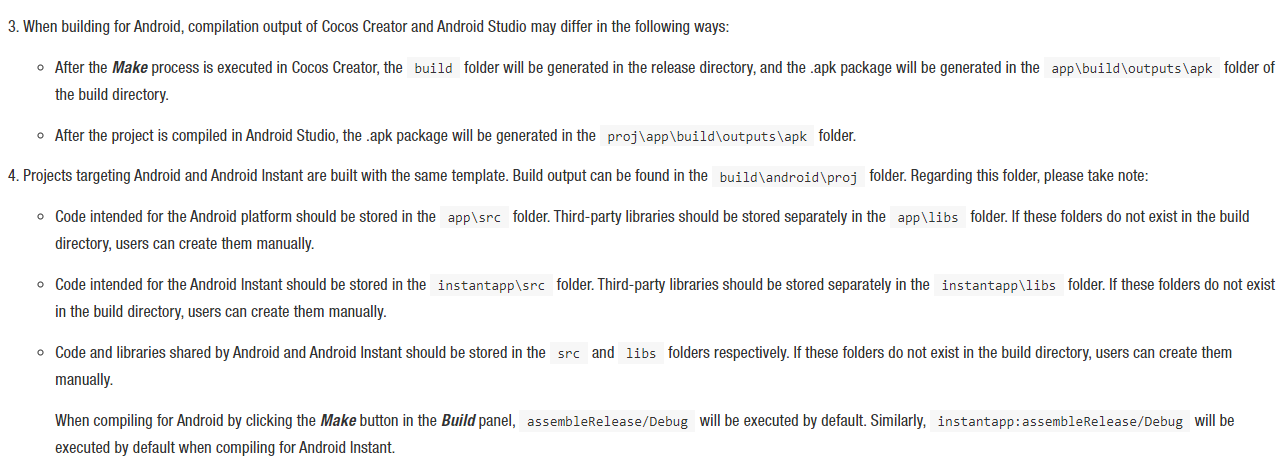
Precautions
Then look at the local file.
/build/android/proj contents:
- Looking at
/build/android/projdoes not reveal files such asAppActitivy.java, but Android-related files such asbuild.gradleare here. - directory can be opened and compiled successfully with Android Studio.
Native contents:
- Check the
/native/engine/android/appdirectories, there are files such asAndroidMainfest.xml,build.gradle, and others.
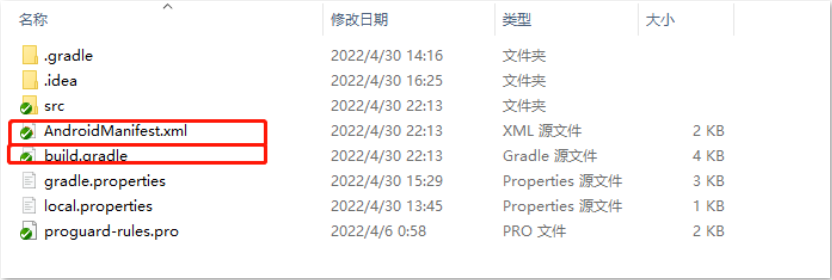
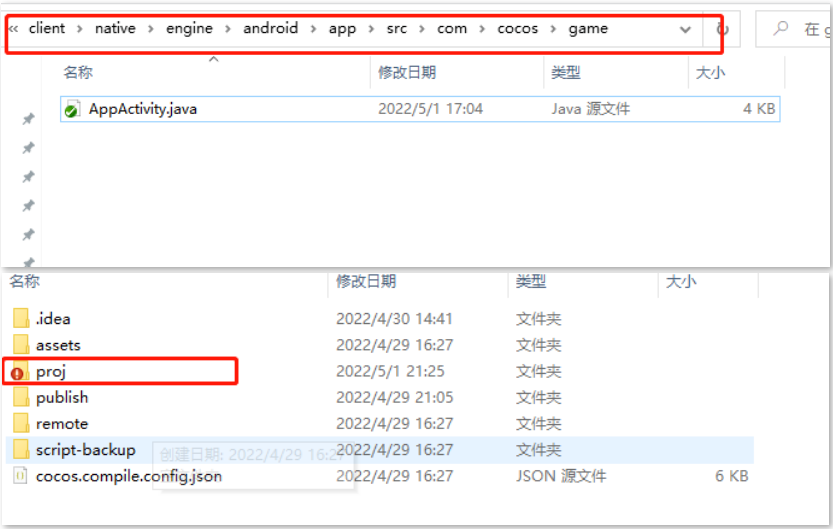
- Look at
/native/engine/android/app/com/cocos/game, and you can see AppActitivy.java is found above the familiar Android project directory structure. - Use Android Studio to open the directory and report an error.
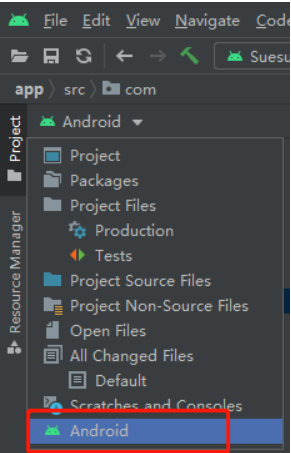
Follow the document, open it with Android Studio to open build/android/proj, and find that AndroidMainfest.xml, build.gradle, and /native/engine/android/app/com/cocos/game/Appactivity, cannot be found at this time. Just switch the display mode to Android.
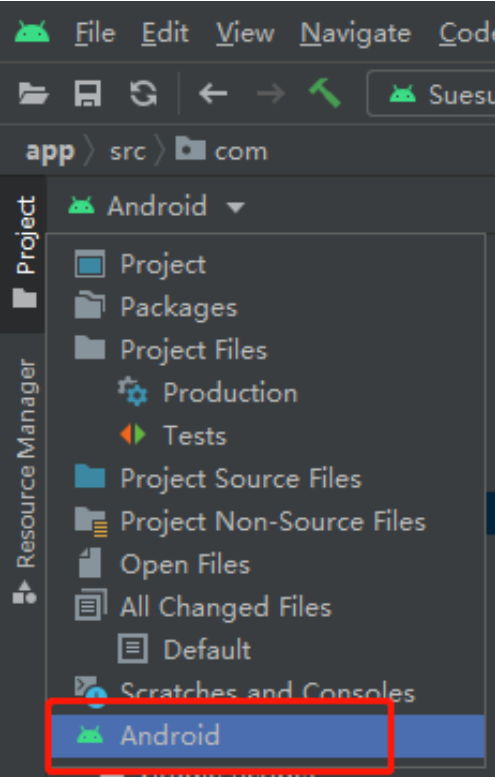
After switching, you can see the relevant native files.

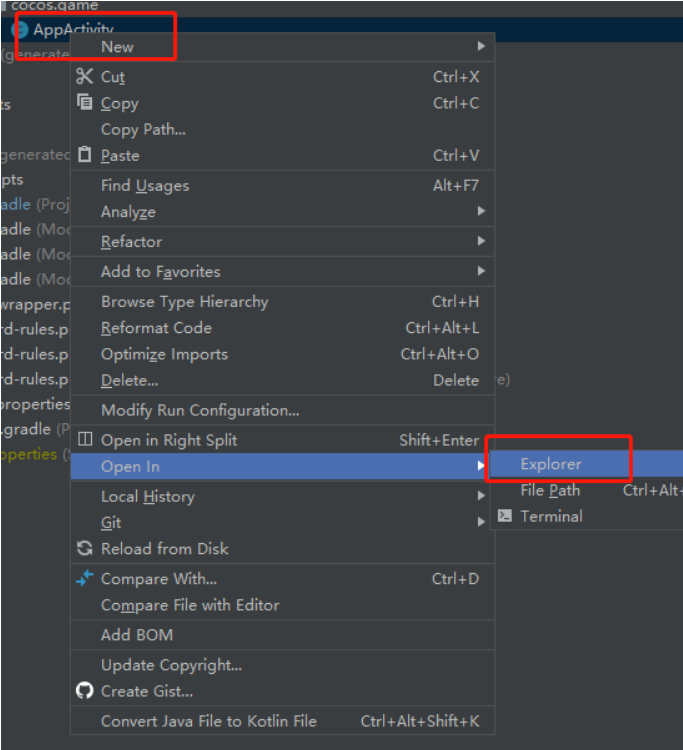
AppActivty.java can be found in the native/engine/android/app/src/com/cocos/game. Open AppActivty.java with Android Studio using Windows Explorer.

Summary: Use Android Studio in build/android/proj to develop with the practical files located in the native/engine/android version of the native directory, and remove the build directory under native (where the compilation process is temporarily generated content).
The service content configured for Cocos Creator in the build/android directory changes with the project and does not require separate version management.
Access process example
Next, take TalkingData SDK as an example to introduce the complete customization development process of Android native engineering. After downloading the SDK, open the SDK documentation and follow the documentation guidelines for access.
TalkingData SDK Access Documentation
First, do the Android native build in the editor. Please refer to the official document [3] for the appropriate options for the build. The document has a very detailed description.
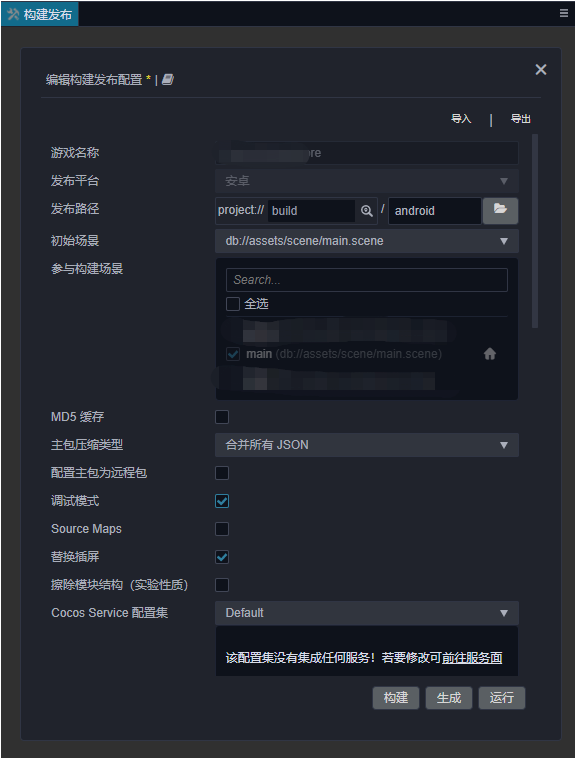
After the build is complete, you can see the native and build/android directories in the project directory.
Then use Android Studio to open build/android/proj and switch to Android display mode.
Then we will access according to the SDK access documentation.
- Import the SDK.
Import according to instructions by the developer, for TalkingData, they ask us to do this:
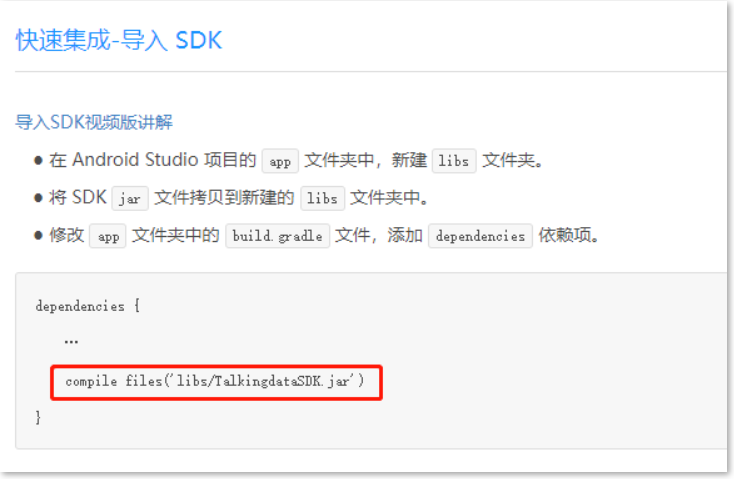
Create a new directory under the libs directory in native/engine/android/app (you can open it with Android Studio using Windows Explorer via show in explore to jump to this directory automatically).
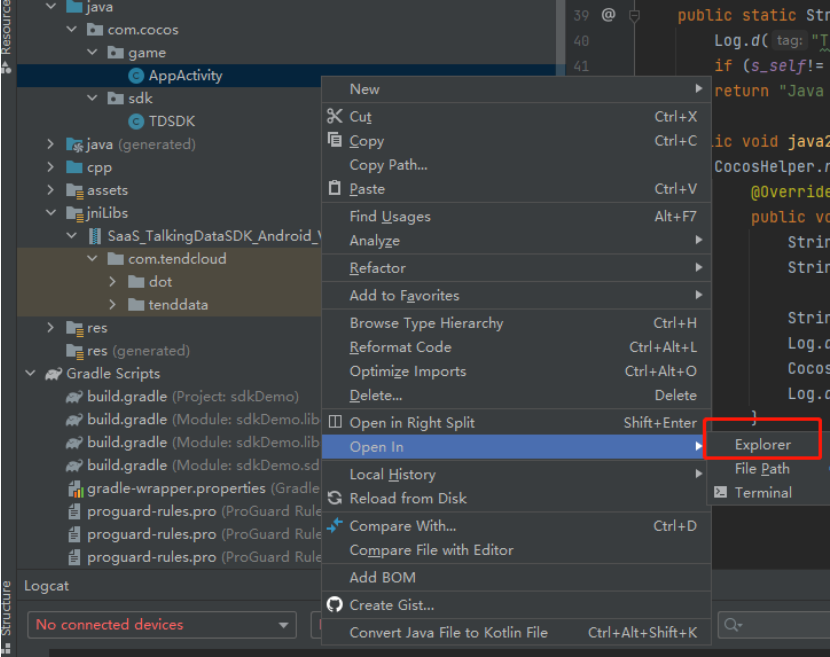
Create the libs directory under \native\engine\android\app. Create copy files such as aar and other files from the SDK to the libs and add dependencies to the build.gradle of the app module.

It should be noted here that the aar/jar files in the libs directory are not in the TalkingData access document TalkingdataSDK.jar, but SaaS_TalkingDataSDK_Android_V5.0.3.jar(the file name provided when downloading the SDK), and there are often such details when accessing other SDKs, so you need to pay attention to avoid being screwed.
- Configure obfuscation rules.
Again, follow the developer instructions:
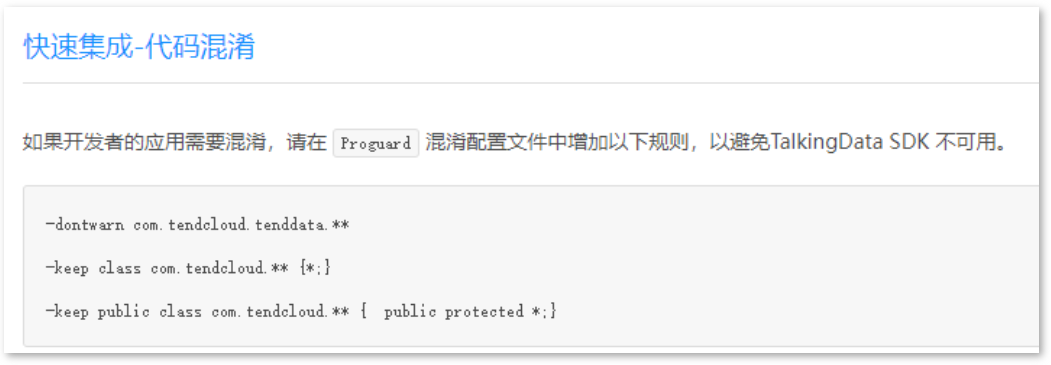
Open the app module belonging to proguard-rules.pro to add obfuscation rules.

- In the same way as above, configure permissions according to the documentation requirements.

- SDK initialization, interface implementation, etc., the content is similar so that I won’t go into details. The key code is shown here. For more information, see the Demo source code.
Image
TDSDK.java:
package com.cocos.sdk;
import android.util.Log;
import com.cocos.game.AppActivity;
import com.cocos.lib.CocosHelper;
import com.cocos.lib.CocosJavascriptJavaBridge;
import com.tendcloud.tenddata.TalkingDataProfile;
import com.tendcloud.tenddata.TalkingDataProfileType;
import com.tendcloud.tenddata.TalkingDataSDK;

public class TDSDK {
    static String AppID = "xxxxxxxxx";
    static String Chanel = "test_channel";
    static  TDSDK s_self = null;
    public static TDSDK getInstance(){
        if (s_self == null){
            s_self  = new TDSDK();
        }
        return  s_self;
    }
    public void init(){
        TalkingDataSDK.init(AppActivity.getContext(),AppID,Chanel, "");
    }
    public static void onResgister(String accountId){
        if (accountId==""){
            accountId = TalkingDataSDK.getDeviceId(AppActivity.getContext());
        }
        TalkingDataProfile profile = TalkingDataProfile.createProfile();
        profile.setName("");
        profile.setType(TalkingDataProfileType.ANONYMOUS);
        TalkingDataSDK.onRegister(accountId, profile,"");
    }
    public static String js2JavaTest(String str1, String str2){
        Log.d("TDSDK", String.format( "js2JavaTest Success param1:%s param2: %s",str1, str2));
        if (s_self!= null) s_self.java2js();
        return "Java Test Success";
    }
    public void java2js(){
        CocosHelper.runOnGameThread (new Runnable() {
            @Override
            public void run() {
                String str1 = "param3";
                String str2 = "param4";
                String funcStr = String.format("window.tdsdk.java2js('%s','%s')",str1,str2);
                Log.d("-----------------------", "Start Java2Js");
                CocosJavascriptJavaBridge.evalString(funcStr);
                Log.d("----------------------", "End Java2Js");
            }
        });
    }
}
Appactivity.java, it is recommended to briefly understand the execution timing and mechanism of each Android life cycle function:
 @Override
    protected void onCreate(Bundle savedInstanceState) {
        super.onCreate(savedInstanceState);
        // DO OTHER INITIALIZATION BELOW
        SDKWrapper.shared().init(this);
        TDSDK.getInstance().init();
    }
- After the access is completed, it can be packaged directly in Android Studio. apk generation path:
android-001\proj\build\sdkDemo\outputs\apk
android-001 is the name of the framework task for building the interface in Creator.

You can also package it by clicking Generate in the Cocos Creator build tool. apk generation path: \build\android-001\publish android-001 is the name of the framework task for building the interface in Creator.
If the JS layer code is modified, you also need to build the project through the editor’s construction process and then generate it to make the code take effect.
According to the engine design, after the native directory is generated, the rebuild will skip this part of the generation to avoid affecting the natively customized content such as Android SDK and native C++ that have been developed. It is also recommended that the native directory be added to the git/svn version control.
- After the package test, the operation is successful, and the activated device can be received in the background, and you’re done! ! !
JS/TS and Android method intermodulation
After the Android layer is connected, creating the intermodulation between Java and TS is necessary. Consult the official document [4] to know:
- TS calls Java:
jsb.reflection.callStaticMethod - Java calls TS, use
evalString, please observe the use of single quotes and double quotes in the parameters of the evalString function in the sample code to avoid errors.
Example:
Cocos Creator TS code:
const classPath = "com/cocos/sdk/TDSDK";
@ccclass('tdsdk')
export class tdsdk {
    private static _instance = null;
    static getInstance(): tdsdk {
        if (tdsdk._instance == null) {
            tdsdk._instance = new tdsdk();
        }
        return tdsdk._instance;
    }
    //js calls Java
    js2Java() {
        if (JSB) {
            log("********************start js2Java param1: title param2: content********************");
            let res = jsb.reflection.callStaticMethod(classPath, "js2JavaTest", "(Ljava/lang/String;Ljava/lang/String;)Ljava/lang/String;", "title", "content");
            log("return value", res);
            log("********************end js2Java param1: title param2: content********************");
        }
    }

    //java calls js
    java2js(param1: string, param2: string) {
        if (!JSB) {
        }
        log("java2js success param3: %s param4:%s ", param1, param2);
    }
}
window.tdsdk = tdsdk.getInstance();
Please note that the tdsdk is hooked to the Window at the end of the code, and a .d.ts file is created at the root of Cocos Creator to declare the tdsdk globally (the file name is optional, and it does not conflict with the existing one) so that you can get code hints when calling elsewhere.
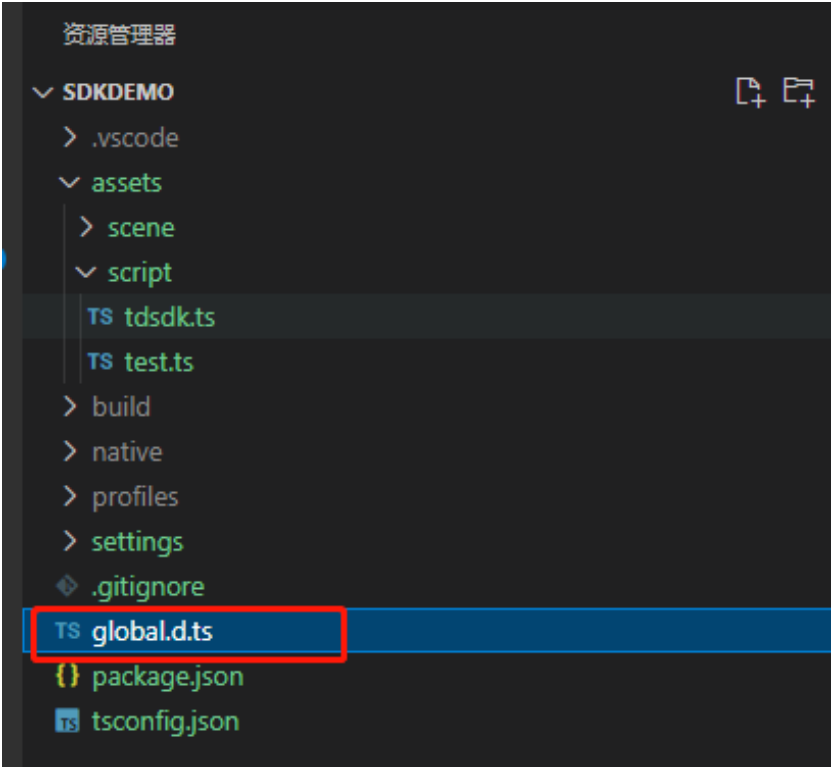
global.d.ts:
import { tdsdk } from "./assets/script/tdsdk";
declare global {
    interface Window {
        tdsdk: tdsdk
    }
}
Java code:
public static String js2JavaTest(String str1, String str2){
        Log.d("TDSDK", String.format( "js2JavaTest Success param1:%s param2: %s",str1, str2));
        if (s_self!= null) s_self.java2js();
        return "Java Test Success";
    }
    public void java2js(){
        CocosHelper.runOnGameThread (new Runnable() {
            @Override
            public void run() {
                String str1 = "param3";
                String str2 = "param4";
                String funcStr = String.format("window.tdsdk.java2js('%s','%s')",str1,str2);
                Log.d("-----------------------", "Start Java2Js");
                CocosJavascriptJavaBridge.evalString(funcStr);
                Log.d("----------------------", "End Java2Js");
            }
        });
    }
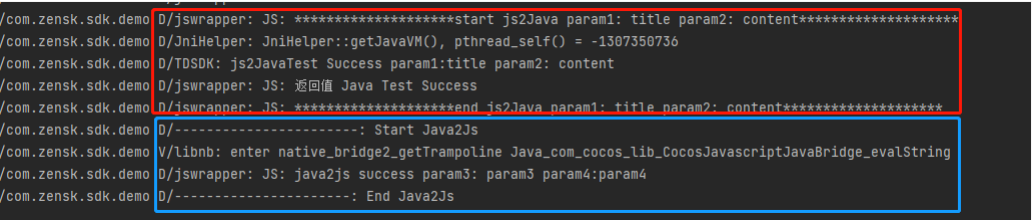
Note that when Java calls JS code if you need to operate the UI, please call (runOnGameThread) in the specified thread to avoid crashes. Here, the standard is established to call in the specified thread.
operation result:
For more advanced intermodulation methods, please refer to the JSB automatic binding scheme in “Tencent Online Education Ministry Technology Blog”, which mainly introduces the intermodulation between C++ and JS:
http://docs.cocos.com/creator/manual/en/advanced-topics/jsb-auto-binding.html?h=jsb
Download
Click to download the Demo source code.
Reference link
[1] Build Directory - Official Documentation
https://docs.cocos.com/creator/manual/en/editor/publish/native-options.html?q=#build-directory
[2] Customization development - official documentation
https://docs.cocos.com/creator/manual/en/editor/publish/native-options.html?q=#secondary-development
[3] Packaging and publishing to the native platform - official documentation
http://docs.cocos.com/creator/manual/en/editor/publish/native-options.html
[4] Java Reflection - Official Documentation
https://docs.cocos.com/creator/manual/en/advanced-topics/java-reflection.html