Blur at pause works very slow

First of all, some shader tipps:

1.) When possible, don’t use loops/ifs (or anything else that requires branching). The GPU is optimized the most for a linear flow of execution, meaning no jumps (other than from intstruction to instruction :smiley:). Modern desktop GPUs may be better at handling branches, but embedded and especially old GPUs are not.

2.) Reduce texture cache misses. The memory latency on GPUs is usually high. This means that fetching memory off chip, uses a quite significant amount of time. Although many GPUs try to hide this by doing other work while waiting for the texture data. To reduce off chip texture memory fetches, the GPU uses a texture data cache. When a cache miss happens (a texel is fetched that is not in the cache), the current gpu thread stalls and waits for the data to be read from memory.

One common root of cache misses are dependent texture reads/fetches. These happen when the texture coordinate (the second value passed to the texture2D function) is computed at pixel-shader time. Like in the following example:

varying vec2 texCoord;
uniform float value;
void main() {
    gl_FragColor = texture2D(tex, vec2(texCoord.x - value * 0.25, texCoord.y - value * 0.25));
}

Here the texture coordinate is computed at every pixel shader iteration. This is a dependent-texture-read. An independent-texture-read (don’t know if that’s really how it’s called, but I’ll call it that way for now :smiley:) looks like this:

varying vec2 texCoord;
void main() {
    gl_FragColor = texture2D(tex, texCoord);
}

The texture coordinate value passed to the texture2D function comes straight from a varying.

But since some calculation needs to be done on the texture coordinate the above can’t be done by just removing the calculations.

This: texCoord.x - value * 0.25 forms a linear (mathematical) function. With linear functions, the following statement can be made.

f(x) = x - value * 0.25
lerp(f(x1), f(x2), t) = f(lerp(x1, x2, t))

If you already know or don’t care you can skip the proof.

f(x) = x - v * c
lerp(x,y,t) = (y - x) * t + x
f(lerp(x1, x2, t)) = ((x2 - x1) * t + x1) - v * c
                   = (x2 - x1) * t + x1 - v * c
lerp(f(x1), f(x2), t) = (f(x2) - f(x1)) * t + f(x1)
                      = ((x2 - v * c) - (x1 - v * c)) * t + (x1 - v * c)
                      = (x2 - v * c - x1 + v * c) * t + x1 - v * c
                      = (x2 - x1 - v * c + v * c) * t + x1 - v * c
                      = (x2 - x1) * t + x1 - v * c

What the above states, is that it doesn’t matter for the result if you either lineary interpolate between the results of f(x1) and f(x2), or interpolate between x1 and x2 and then use it as input to the linear function. Since varying are lineary interpolated across the primitive, this behaviour can be exploited to move the calculations to the vertex shader.

(NOTE: Varyings are actually not lineary interpolated across the primitive in general, but rather interpolated with perspective correction. But since we are drawing a non-perspective rectangle (gl_Position.w = 1.0), the interpolation remains linear.)


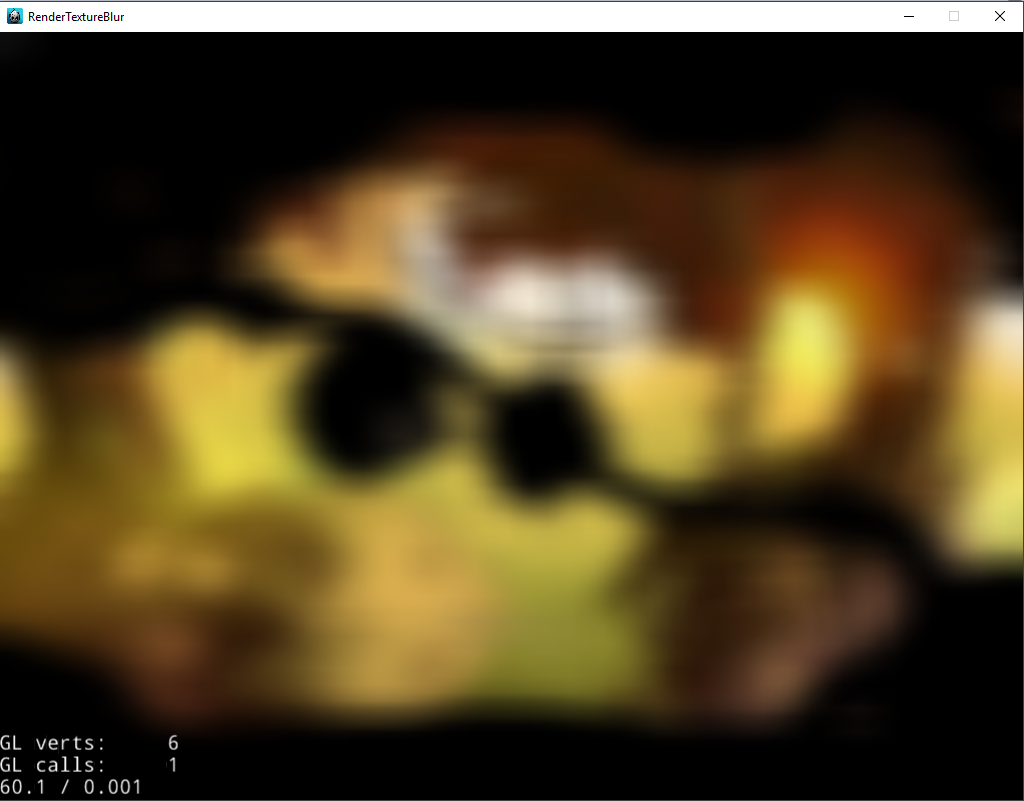
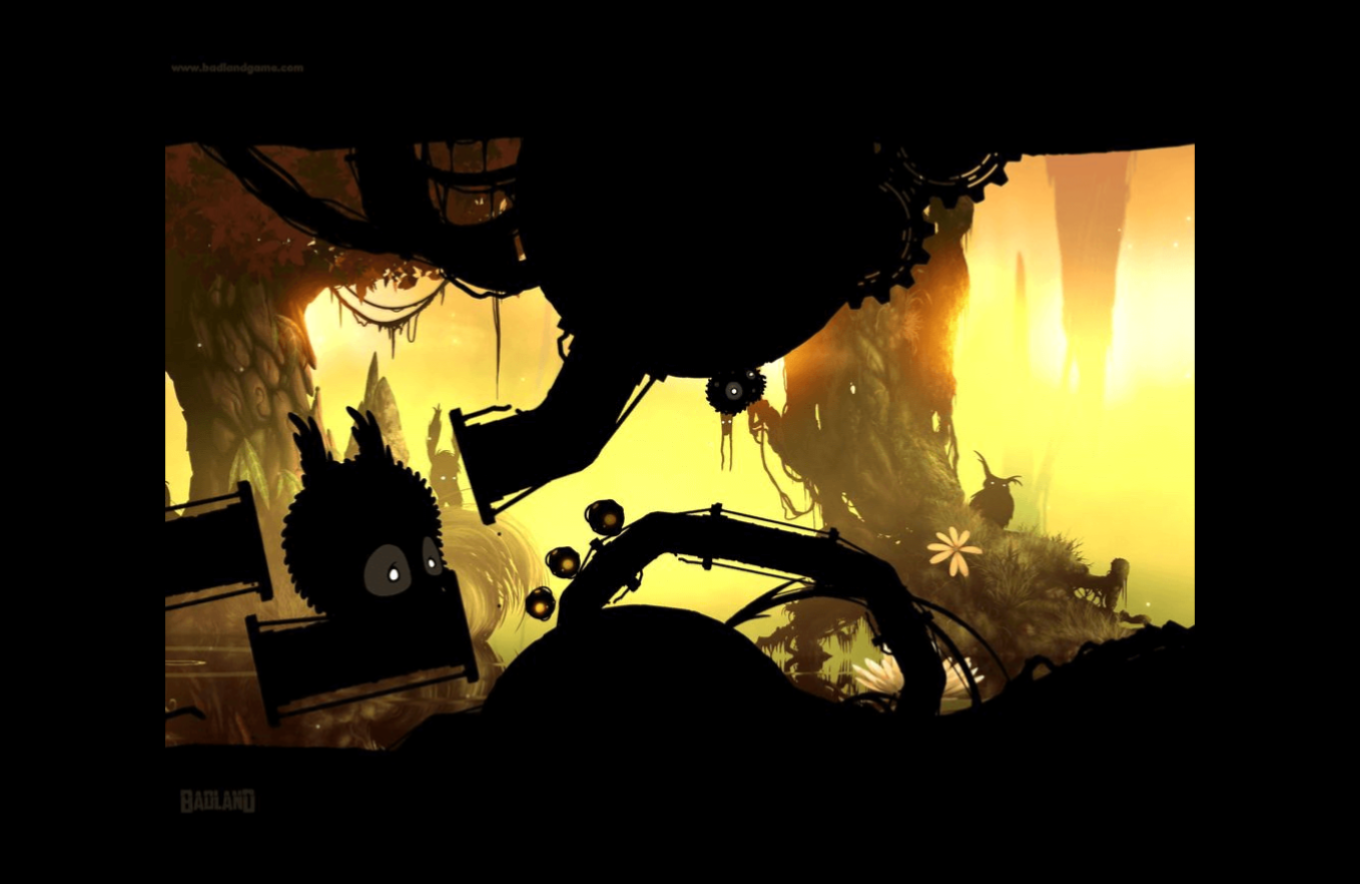
Now about the blur. The blur used in the video you provided seems to be a gaussian type of blur. One thing that is noticeable, is that there is almost no more detail left after blurring. This probably is the result of a very large blur radius or a heavily downscaled source image with a smaller blur radius.

Gaussian blur filters are usually very heavy (atleast on mobile), so they are avoided when possible. One trick is to downscale the source image in multiple passes to a size like 16px or so. Then draw it at full screen resolution with linear sampling enabled. This should give a reasonably fast blur effect.

3 Likes

Thats sounds like a very good answer :slight_smile: But, is there any working in real life code sample?
I’ve already posted link to the project created with help of people here, thanks again about that. And it works, but it’s different, quality if different too and speed I believe not so good as it can be.
And again I have no idea of shaders, can’t edit any shader or understand how it works… I don’t know openGL at all. But blur is a cool feature. So as a noob I just want to add some “blur panel” under pause popup or create a blur sprite with some simple function…

I used RenderTextures (not with blur) in my projects and one thing I noticed is that every single draw operation done on it (visit()) is quite slow! Even for very small image sizes.

It would be interesting to see if performance would improve if you just loaded a texture without using RenderTexture (just to try and see if the slowness issue is isolated to RenderTextures).

I don’t think it can be used in visit. It’s purpose to render once… however I would love to have so fast that it can be used in visit and update at live scene.

Hi, this looks ok to me.

Original Image:

Blurred Image:

I just downscaled the image by a factor of eight, applied a blur with a low radius and then upscaled the image to fit the screen.
RenderTextureBlur.zip (561.1 KB)

The shader is very fast, but render to texture is quite slow in mobile devices so I don’t know if there is a faster way to do it.

1 Like

Hey, but you can publish your changes at forked repo: https://github.com/zerodarkzone/RenderTextureBlur that would be easy to check. Thanks.

Also, I’ve already tried to downscale image, however after upscaling quality looks ugly(on iPhone most noticeable)… not like a pro … not like badland.

Maybe scaling should be smooth? Not just linear, like when you just setScale(); ?

And yes, shader works fast, however I’ve tried to apply it on a fly, so render scene every time in update(). But probably yes, RenderTexture is too slow.
I have a problem, because my game is moving fast vertically, and I want to apply blur at gameNode on a fly… Well, I have an idea - render a bigger part of the screen and move rendered image during pause popup animates and game slowing down… But renderTexture has some problems … I’ve created a new topic about it - RenderTexture setPosition()?

Hi,
I just made the changes to the github repo.
did you used “sprite->getTexture()->setAntiAliasTexParameters();”, this way, you apply antialising to the image when it’s scaled

Yes, I tried, scale down was 0.25 only. Results for my game was not good…
Well, it works fast currently even for a whole screen, so I probably leave as it is, without scaling down. Only one problem left is that renderTexture.(and actually main problem that image isn’t same type like badland… but I probably will accept it).

Try this branch


It is going to be slower but it looks better, I modified the code to use the first shader you tried to use but with all the changes already made so it is still a lot faster than the original example where you got the shader.

1 Like

check this out … it just might suit your needs:

Fragment shader:

#ifdef GL_ES
precision lowp float;
#endif

varying vec4 v_fragmentColor;
varying vec2 v_texCoord;

uniform vec2 PixelSize;
uniform vec2 PixelSizeHalf;

// Kernel width 35 x 35
const int stepCount = 9;
float gWeights[stepCount] = float[](
	0.10855,
	0.13135,
	0.10406,
	0.07216,
	0.04380,
	0.02328,
	0.01083,
	0.00441,
	0.00157
);
float gOffsets[stepCount] = float[](
	0.66293,
	2.47904,
	4.46232,
	6.44568,
	8.42917,
	10.41281,
	12.39664,
	14.38070,
	16.36501
);


vec3 GaussianBlur9(sampler2D tex0, vec2 centreUV, vec2 halfPixelOffset, vec2 pixelOffset) {
	vec3 colOut = vec3(0, 0, 0);
	
	vec2 texCoordOffset0 = gOffsets[0] * pixelOffset;
	vec3 col0 = texture(tex0, centreUV + texCoordOffset0).xyz + texture(tex0, centreUV - texCoordOffset0).xyz;
	
	vec2 texCoordOffset1 = gOffsets[1] * pixelOffset;
	vec3 col1 = texture(tex0, centreUV + texCoordOffset1).xyz + texture(tex0, centreUV - texCoordOffset1).xyz;
	
	vec2 texCoordOffset2 = gOffsets[2] * pixelOffset;
	vec3 col2 = texture(tex0, centreUV + texCoordOffset2).xyz + texture(tex0, centreUV - texCoordOffset2).xyz;
	
	vec2 texCoordOffset3 = gOffsets[3] * pixelOffset;
	vec3 col3 = texture(tex0, centreUV + texCoordOffset3).xyz + texture(tex0, centreUV - texCoordOffset3).xyz;
	
	vec2 texCoordOffset4 = gOffsets[4] * pixelOffset;
	vec3 col4 = texture(tex0, centreUV + texCoordOffset4).xyz + texture(tex0, centreUV - texCoordOffset4).xyz;
	
	vec2 texCoordOffset5 = gOffsets[5] * pixelOffset;
	vec3 col5 = texture(tex0, centreUV + texCoordOffset5).xyz + texture(tex0, centreUV - texCoordOffset5).xyz;
	
	vec2 texCoordOffset6 = gOffsets[6] * pixelOffset;
	vec3 col6 = texture(tex0, centreUV + texCoordOffset6).xyz + texture(tex0, centreUV - texCoordOffset6).xyz;
	
	vec2 texCoordOffset7 = gOffsets[7] * pixelOffset;
	vec3 col7 = texture(tex0, centreUV + texCoordOffset7).xyz + texture(tex0, centreUV - texCoordOffset7).xyz;
	
	vec2 texCoordOffset8 = gOffsets[8] * pixelOffset;
	vec3 col8 = texture(tex0, centreUV + texCoordOffset8).xyz + texture(tex0, centreUV - texCoordOffset8).xyz;
	
	colOut += gWeights[0] * col0;
	colOut += gWeights[1] * col1;
	colOut += gWeights[2] * col2;
	colOut += gWeights[3] * col3;
	colOut += gWeights[4] * col4;
	colOut += gWeights[5] * col5;
	colOut += gWeights[6] * col6;
	colOut += gWeights[7] * col7;
	colOut += gWeights[8] * col8;
	
	return colOut;
}

void main() {
	gl_FragColor.xyz = GaussianBlur9( CC_Texture0, v_texCoord, PixelSize, PixelSizeHalf );
    gl_FragColor.w = 0.05;
}

then in cocos2d :

	spr = Sprite::create("badland.png");
	spr->retain();
	spr->setPosition(center);
	auto texSize = spr->getTexture()->getContentSizeInPixels();

	std::string fragSource1 = FileUtils::getInstance()->getStringFromFile(FileUtils::getInstance()->fullPathForFilename("frag1.fsh"));
	auto prog1 = GLProgram::createWithByteArrays(ccPositionTextureColor_noMVP_vert, fragSource1.data());
	auto programState1 = GLProgramState::getOrCreateWithGLProgram(prog1);

	auto prog2 = GLProgram::createWithByteArrays(ccPositionTextureColor_noMVP_vert, fragSource1.data());
	auto programState2 = GLProgramState::getOrCreateWithGLProgram(prog2);

	programState1->setUniformVec2("PixelSize", Vec2(1.f / texSize.width, 0));
	programState1->setUniformVec2("PixelSizeHalf", Vec2(0.5 / texSize.width, 0));

	programState2->setUniformVec2("PixelSize", Vec2(0, 1.f / texSize.height));
	programState2->setUniformVec2("PixelSizeHalf", Vec2(0, 0.5 / texSize.height));

	rtA = RenderTexture::create(winSize.width, winSize.height);
	rtA->retain();
	rtA->getSprite()->setGLProgramState(programState1);
	rtA->getSprite()->setPosition(center);
	

	rtB = RenderTexture::create(winSize.width, winSize.height);
	this->addChild(rtB);
	rtB->getSprite()->setGLProgramState(programState2);
	rtB->getSprite()->setPosition(center);


	spr->getTexture()->setAntiAliasTexParameters();
	rtA->getSprite()->getTexture()->setAntiAliasTexParameters();
	rtB->getSprite()->getTexture()->setAntiAliasTexParameters();

	const int downScale = 8;
	spr->setScale(spr->getScale() / downScale);
	rtB->getSprite()->setScale(rtB->getSprite()->getScale() * downScale);

	rtA->beginWithClear(0, 0, 0, 0);
	spr->visit();
	rtA->end();

	rtB->beginWithClear(0, 0, 0, 0);
	rtA->getSprite()->visit();
	rtB->end();

Original img:

Blurred img:

i tried it in an update loop like this and it runs at 60fps!!

void GameScene::update(float dt) {
	rtA->beginWithClear(0, 0, 0, 0);
	spr->visit();
	rtA->end();

	rtB->beginWithClear(0, 0, 0, 0);
	rtA->getSprite()->visit();
	rtB->end();
}

and if you are curious … the shader is from here (zip file):

PS: am not an expert in shaders but i think the fragment shader can be improved even more by making the arrays uniform instead of initializing theme each time.

2 Likes

Looks very interesting.
60fps on what kind device? Some low android or like iPad mini or iPhone 4s, which is slow devices…?

i guess someone should write book on shaders for cocos2dx with c++ and how to implement them and bind them.
I have many shaders but cant use it because just don’t know how to bind them

am on win32 desktop platform.
but have you tried it first? what was the results? if you did and it didn’t give good performance you can also try this one maybe it will perform better:

#ifdef GL_ES
precision lowp float;
#endif

varying vec4 v_fragmentColor;
varying vec2 v_texCoord;

uniform vec2 dir;
uniform float radius;
uniform float resolution;

void main()
{
	//const float radius = 1.0;
	//const float resolution = 1024.0;
	
    vec4 sum = vec4(0.0);
    vec2 tc = v_texCoord;
    float blur = radius/resolution;
    float hstep = dir.x;
    float vstep = dir.y;
    //apply blurring, using a 9-tap filter with predefined gaussian weights

    sum += texture2D(CC_Texture0, vec2(tc.x - 4.0*blur*hstep, tc.y - 4.0*blur*vstep)) * 0.0162162162;
    sum += texture2D(CC_Texture0, vec2(tc.x - 3.0*blur*hstep, tc.y - 3.0*blur*vstep)) * 0.0540540541;
    sum += texture2D(CC_Texture0, vec2(tc.x - 2.0*blur*hstep, tc.y - 2.0*blur*vstep)) * 0.1216216216;
    sum += texture2D(CC_Texture0, vec2(tc.x - 1.0*blur*hstep, tc.y - 1.0*blur*vstep)) * 0.1945945946;

    sum += texture2D(CC_Texture0, vec2(tc.x, tc.y)) * 0.2270270270;

    sum += texture2D(CC_Texture0, vec2(tc.x + 1.0*blur*hstep, tc.y + 1.0*blur*vstep)) * 0.1945945946;
    sum += texture2D(CC_Texture0, vec2(tc.x + 2.0*blur*hstep, tc.y + 2.0*blur*vstep)) * 0.1216216216;
    sum += texture2D(CC_Texture0, vec2(tc.x + 3.0*blur*hstep, tc.y + 3.0*blur*vstep)) * 0.0540540541;
    sum += texture2D(CC_Texture0, vec2(tc.x + 4.0*blur*hstep, tc.y + 4.0*blur*vstep)) * 0.0162162162;
	
    //discard alpha for our simple demo, multiply by vertex color and return
    gl_FragColor = v_fragmentColor * vec4(sum.rgb, 1.0);
}

	spr = Sprite::create("badland.png");
	spr->retain();
	spr->setPosition(center);
	auto texSize = spr->getTexture()->getContentSizeInPixels();

	std::string fragSource1 = FileUtils::getInstance()->getStringFromFile(FileUtils::getInstance()->fullPathForFilename("frag1.fsh"));
	auto prog1 = GLProgram::createWithByteArrays(ccPositionTextureColor_noMVP_vert, fragSource1.data());
	auto programState1 = GLProgramState::getOrCreateWithGLProgram(prog1);

	auto prog2 = GLProgram::createWithByteArrays(ccPositionTextureColor_noMVP_vert, fragSource1.data());
	auto programState2 = GLProgramState::getOrCreateWithGLProgram(prog2);

	programState1->setUniformVec2("dir", Vec2(1, 0));
	programState1->setUniformFloat("radius", 1.f);
	programState1->setUniformFloat("resolution", 1024);

	programState2->setUniformVec2("dir", Vec2(0, 1));
	programState2->setUniformFloat("radius", 1.f);
	programState2->setUniformFloat("resolution", 1024);


	rtA = RenderTexture::create(winSize.width, winSize.height);
	rtA->retain();
	rtA->getSprite()->setGLProgramState(programState1);
	rtA->getSprite()->setPosition(center);
	

	rtB = RenderTexture::create(winSize.width, winSize.height);
	this->addChild(rtB);
	rtB->getSprite()->setGLProgramState(programState2);
	rtB->getSprite()->setPosition(center);


	spr->getTexture()->setAntiAliasTexParameters();
	rtA->getSprite()->getTexture()->setAntiAliasTexParameters();
	rtB->getSprite()->getTexture()->setAntiAliasTexParameters();

	const int downScale = 12;
	spr->setScale(spr->getScale() / downScale);
	rtB->getSprite()->setScale(rtB->getSprite()->getScale() * downScale);

	rtA->beginWithClear(0, 0, 0, 0);
	spr->visit();
	rtA->end();

	rtB->beginWithClear(0, 0, 0, 0);
	rtA->getSprite()->visit();
	rtB->end();

Update:

i never seen a high quality gpu blur shader like the one used by badland.

the best ever blur quality that i ever seen is a cpu blur called stackblur but it will never be usable even on desktop platforms and specialty if used in a 60fps update loop let alone mobile devices.

even with that being said i can’t help it but show you how good its quality is:

first cocos2d code:

spr = Sprite::create("badland.png");
spr->retain();
spr->setPosition(center);


auto rt = RenderTexture::create(winSize.width, winSize.height);
rt->retain();
rt->beginWithClear(0, 0, 0, 0);
spr->visit();
rt->end();
_director->getRenderer()->render();

auto img = rt->newImage();
stackblur(img->getData(), img->getWidth(), img->getHeight(), 127);

auto tx = new Texture2D;
tx->initWithImage(img);
img->release();

spr->release();
spr = Sprite::createWithTexture(tx);
spr->setPosition(center);
this->addChild(spr);

cpu stackblur with radius 127 :

now that is a Blur!! … and we can even go higher on the radius!!

stackblur_sequential_version.cpp (9.6 KB)

it’s from here if you wanna check:
http://vitiy.info/stackblur-algorithm-multi-threaded-blur-for-cpp/

PS: i say it again i don’t think that it will suit your needs and i just posted it just for the sake of curiosity and exploration.

2 Likes

Thanks a lot for your posting. Last looks like what I need! Soon I will try it(just need to get to pc).
I believe it should work fast when just working with one static Sprite…

What I’m trying to do next - render scene in update and apply blur. So scene can be “alive”, animating under blur… so that spr should be re-rendered on mobile device each update…

A little update: @Joseph39 I want to use current scene and apply blur on a fly. Can you please help with sample code to do so. I’m not sure how to better do this, should I just create a new render and get sprite from it then render it in rtA? Also, to test, say on the scene we have a some rotating sprite, and it should be blurred while rotating, is that possible :slight_smile: ?

upd2: tried stackblur - looks really cool and what I want! But … works very slow on mobile device…

Just tried this and it looks very strange on the device - some part of the scene going to black color… Previous version looks good and works fast. THank anyway. I’m even don’t use downscaling, but just full size image.

i think i discovered something that might give you a chance at using stackblur even in mobile phones if you down scale properly!

the idea is to apply the stackblur function at a heavily downscaled image with a smaller blur radius.

spr = Sprite::create("badland.png");
spr->retain();
spr->setPosition(center);

// remember that you can even downscale more in here
const int downSample = 24;// 16-24-32
rt = RenderTexture::create(winSize.width / downSample, winSize.height / downSample);
rt->retain();
rt->setKeepMatrix(true);

rt->beginWithClear(0, 0, 0, 0);
spr->visit();
rt->end();
_director->getRenderer()->render();

auto img = rt->newImage();
// stackblur now will work on a very downscaled/small texture width and height which will make it much faster!!
stackblur(img->getData(), img->getWidth(), img->getHeight(), 5);

auto tx = new Texture2D;
tx->initWithImage(img);
img->release();

sp2 = Sprite::createWithTexture(tx);
sp2->setPosition(center);
this->addChild(sp2);

sp2->setScale(spr->getScale() * downSample);

i think now you can even use it in an update loop with a combination of Texture2d::updateWithData to update the texture instead of creating a new one each time

Results:

first this is how the image looks like when downscaled 24 times:

blurred and upscaled 24 times:

Update:

this is how you should use stackblur combined with Texture2d::updateWithData in an update loop

const int downSample = 24;// 16-24-32

spr = Sprite::create("badland.png");
spr->retain();
spr->setPosition(center);

rt = RenderTexture::create(winSize.width / downSample, winSize.height / downSample);
rt->retain();
rt->setKeepMatrix(true);

rt->beginWithClear(0, 0, 0, 0);
spr->visit();
rt->end();
_director->getRenderer()->render();

auto img = rt->newImage();
auto tx = new Texture2D;
tx->initWithImage(img);
img->release();

sp2 = Sprite::createWithTexture(tx);
sp2->setPosition(center);
this->addChild(sp2);

sp2->setScale(rt->getSprite()->getScale() * downSample);

void GameScene::update(float dt) {
	
	rt->beginWithClear(0, 0, 0, 0);
	spr->visit();
	rt->end();
	_director->getRenderer()->render();
	
	auto img = rt->newImage();
	stackblur(img->getData(), img->getWidth(), img->getHeight(), 5);

	sp2->getTexture()->updateWithData(img->getData(), 0, 0, img->getWidth(), img->getHeight()); 
	img->release();
}

it runs at 60fps in case you were wondering!!

2 Likes

Thanks a lot! :thumbsup: For static downsampled image it works very fast and looks perfect!
Now I should try it at runtime for an active scene… very very interesting.

Hey @Joseph39 after a long time I rethought all this… and also found some game(made with unity) on the App Store, which has exactly that blur effect at pause I need for my game:

So it’s nice fadeIn-fadeOut blur effect. How I can achieve this?
The problem of downsampled image like to 24 times - is that when any animation runs it will be noticeable ugly looking. Specially if art in that animation of thin. On image bellow it’s not downsampled, because moving hand looks very nice… if you try to downscale it will look badly…

Currently, stackblur works well and cool even for downsampled images, but I can’t use small resolution image for it when doing fade for blur image, because it will look very bad.
So, blur should be applied gradually for example from 0 to 50 for full size(1136x640 ) scene image that are dynamic, notice that hand behind blur is moving and been blurred correctly.
Any ideas how to achieve this with cocos2d-x?

There are already some throughs about this How to efficiently blur Scene Background [C++] [Shader] and How can I add a post process shader?(with example of full code for FrameBuffer).
By the way @zhangxm is that FrameBuffer is really experimental? Can we use it for production games?

Also, I’ve found these games with kind of blur: Badland 2(which written in cocos2d-x? first version for sure) and King of thieves uses blur in their games. I tested on really slow iOS and android devices - it works very fast and nice.
Here is recorded screen from devices:


There’s definitely some tricks used… like downsampling… but I think with start small radius of blur it firstly uses full image and then if blur radius becomes large - image start downsampling. Because if you use downsample 24times image with start and small blur radius - it will looks like pixel art. @zhangxm By the way, how I can dynamically get different rendered images from render texture? Re-created rendered texture each time with new sizes in loop sounds not really good…

However these blurs are not live, as I see it applied only for static image, but I need it for animation like shown in my previous post in this topic. So animation runs under blur.

The idea is to downsample the image and the apply the blur shader on it.
This will make the fragment do less work and thus be faster.
I did it in my game “Run Cow Run” and it have a great blur performance.