
You should really fix the broken installation. I really think this is the issue you have. @R101 what do you think?
Reinstalled cocos 5 times. Or maybe, i am not uninstalling it correctly? I delete just the cocos2dx root folder. And then unpack the new archive again
what happens when you run
cocos -v
and
which cocos
I’m not sure Windows has this last command.
Do you have git installed?
Cocos -v displays the version i have, i don’t use git
so I’d get rid of everything cocos (not VS or CMake), install git and then clone our repo and obtain cocos that way.
Can i just get the archive from github?
You are talking about this: https://github.com/cocos2d/cocos2d-x ?
Yes to both. However, using the archive isn’t quite as easy for updates.
I feel git is the best solution because I can update it, I can update the dependencies, submodules, et with just a few commands and not worry about conflicts, etc.
don’t forget to update the dependencies after.
I downloaded the new archive, ran setup.py. Now, cmd can’t find cocos
yup, that makes sense, finish the rest of the steps!
and show us the values you used for setup.py
What steps? The building of cpp tests? And what values? I just clicked setup.py -> enter -> enter
There is another step you need to run after setup.py. ./download-deps.py
Oh. There was no mention of that in the installation guide, i guess
-
if you use the official .zip from our website, you don’t need this step.
-
If you had cloned from GitHub, you would have seen this step in the setup process.
-
You chose to download the archive from GitHub which is in-between cloning and downloading the official .zip in terms of what it provides.
You really need to use git for a simple workflow that removes the potential roadblocks of being a new game developer and also new to our products. Writing a game is going to be hard if you can’t get everything working.
You seem to be a little confused about this aspect. To start off, you always need to create the cocos2d-x project structure from the template by using that command, like this example:
cocos new gamename -p com.example.gamename -l cpp -d .
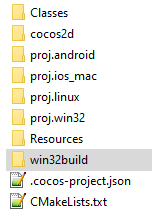
It will create the folder gamename, with the following contents:

Now, ignore the proj.win32 folder, but do not delete it. In a command prompt, go into the gamename folder, and then type the following to create the real Visual Studio project/solution:
mkdir win32build
cd win32build
cmake .. -G"Visual Studio 16 2019" -Tv142 -A Win32
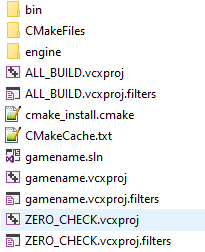
Now you’ll have the win32build folder:
Inside it you’ll see this:
Open the gamename.sln solution file in Visual Studio.
When you want to add source files to your build, you edit the CMakeLists.txt file that is in the gamename root folder:
Inside CMakeLists.txt you’ll see this section:
# add cross-platforms source files and header files
list(APPEND GAME_SOURCE
     Classes/AppDelegate.cpp
     Classes/HelloWorldScene.cpp
     )
list(APPEND GAME_HEADER
     Classes/AppDelegate.h
     Classes/HelloWorldScene.h
     )
That’s where you can add your files. You then either re-build the solution in Visual Studio, which automatically updates the project based on the CMakeLists.txt changes, or you can manually run this again in a command window to force the update of the solution/project files:
cd win32build
cmake .. -G"Visual Studio 16 2019" -Tv142 -A Win32
If you add new resources to the resource folder (images/audio files etc), you MUST delete the CMakeCache.txt, and the gamename.sln/.pvcxproj files:
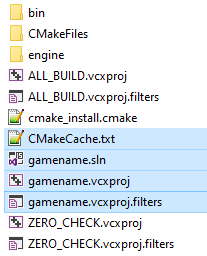
Then re-run the CMake command again:
cd win32build
cmake .. -G"Visual Studio 16 2019" -Tv142 -A Win32
That updates the list of resources to be copied correctly. It’s because the copy commands are stored inside the gamename.vcxproj file, and they don’t get updated unless you delete that file and remake it with CMake.
If you use source control, then do not check in the win32build folder, since you can recreate it any time you want using the above CMake commands.
2 Likes
As @slackmoehrle mentioned, you really need to fix the cocos2d-x installation first. The instructions given for how to install it are straightforward. Don’t skip any steps.
1 Like
These are pretty good instructions, mind if I use them to make sure our docs are in the best shape they can be? @R101
Sure, please do. If you want me to take better screenshots or something, or maybe use the oval tool to highlight stuff instead of my amazing freehand skills, I can do that too.
If you don’t mind, saves me from spinning up a VM
 Now, going to test