
Let’s Build Our Own Wack-A-Mole Game with Cocos Creator!
Preface
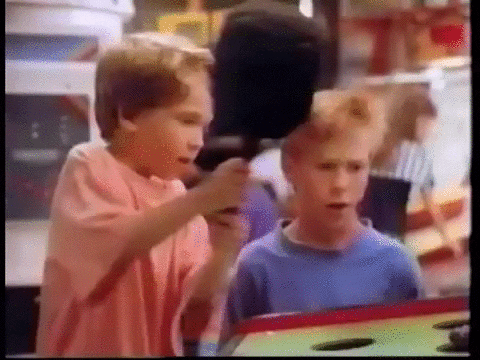
If you have ever been to a Chuck E. Cheese, you have probably at least seen a Whack-A-Mole game. Hopefully you have played one. Just in case you are unfamiliar with this game, it looks like this:
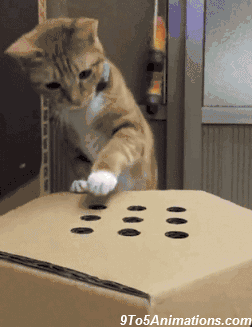
It’s a fun game for all ages and even cats can play:
Whack-A-Mole was probably one of the first arcade games to become a huge success, right alongside pinball. Shall we build our own version?
Are you sure you are ready?
If you haven’t yet built a game in Cocos Creator, then this tutorial is for you. We will start by rigging up the logic, animations, sounds, and other items to make a Whack-A-Mole game. In this first part, or a multi-part series, we will be learning about animating characters as well as creating collisions between the mouse character and the hammer Sprite that whacks the mouse.
Before you start building this game, let’s download the tutorial from Github. You can download the completed version as well, at the end of this tutorial, but try to develop it yourself along-side this tutorial.
If you have trouble with this lesson, please study the following documentation:
- Development Environment
- Cocos Creator v2.1.2 Windows MacOS
- Visual Studio Code
- Systems
- API
- Other Documentation
Getting Started
1. Use Animation System
In this section, we will be preparing all of the Animations and Actions of the mouse character. This will begin to make the game feel playable.
1.1 Add mouse sprite to the scene:
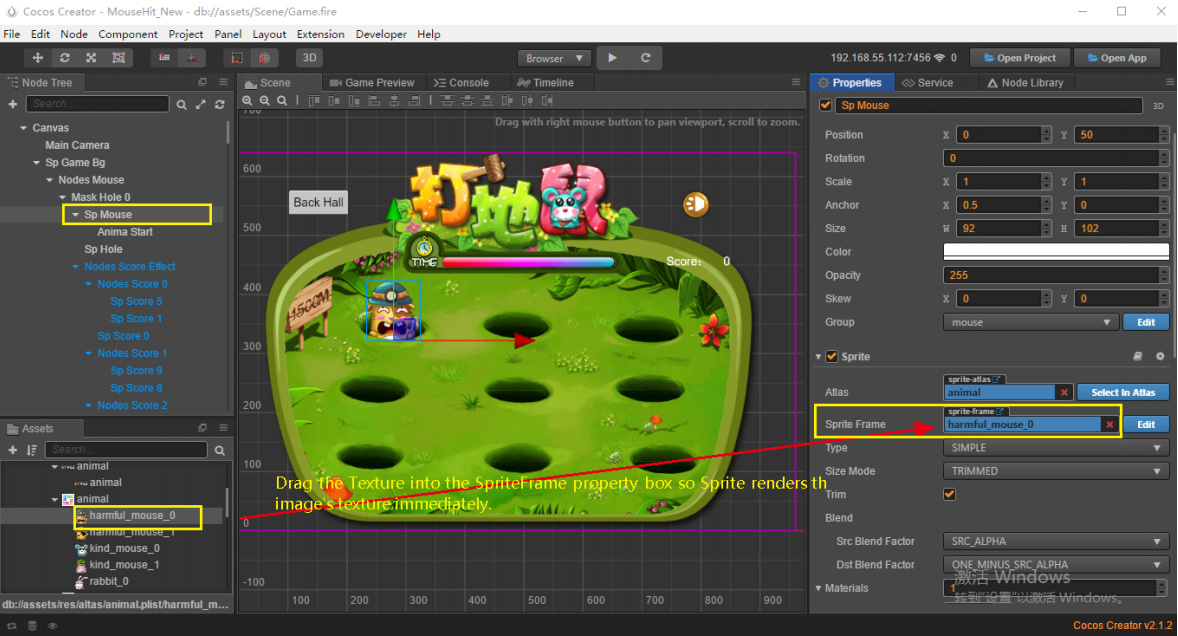
First, we need to add the mouse character Sprite as a resource in Cocos Creator. To do this, we need to create a Node inside Sp Mouse and add the images to it. Let’s add a Sprite component to Sp Mouse. Now, drag the picture harmful_mouse_0 into the SpriteFrame property box in the Sprite component.
1.1.1 Add game logic:
Next, we add the game play script into the Game.js script for the game and add the required property inspector parameters to it. In your assets folder, open the script area, open the Game.js source file and let’s add this code:
var Difficult = cc.Enum({
    Simple: 1000,
    Ordinary: 2500,
    Difficult: 5000
});

properties: {
        hammer: {
            default: null,
            type: cc.Prefab
        },

        countDown: {
            default: null,
            type: cc.Prefab
        },

        gameOver: {
            default: null,
            type: cc.Prefab
        },

        mouseNodes: {
            default: null,
            type: cc.Node
        },

        animalAtlas: {
            default: null,
            type: cc.SpriteAtlas
        },

        animalDeathAtlas: {
            default: null,
            type: cc.SpriteAtlas
        },

        timeRollerBar: {
            default: null,
            type: cc.Sprite
        },

        icon: {
            default: null,
            type: cc.SpriteAtlas
        },

        gameRule: {
            default: null,
            type: cc.SpriteFrame
        },

        gameScore: {
            default: null,
            type: cc.Label
        },

        timeRollerStep: {
            default: 1,
            range: [0, 2, 0.1],
            slide: true
        },

        gameScoreEffect: {
            default: null,
            type: cc.Prefab
        },

        gameDifficultScore:{
            default: Difficult.Simple,
            type: Difficult,
            tooltip: "Simple:2000\n Ordinary:4000\n Difficult:6000",
        },

        gameGitHubUrl:"",

        _isCollider: false,
        _mouseNode: null,
        _mouseIndexArr: [],
        _score: 0
},

1.2 Add animation effects to the mouse sprite:
Next, we need to make the animation of the mouse coming out of the hole and going back in. To do that, we need to add an Animation component to the Sp Mouse node and create a new Animation Clip inside the assets folder named mouseout.
The Animation Clip holds the animation script for your sprite and can be edited inside the Timeline area. The Animation Clip we just created reacts when the node property changes, and the Animation component will start when that change occurs.
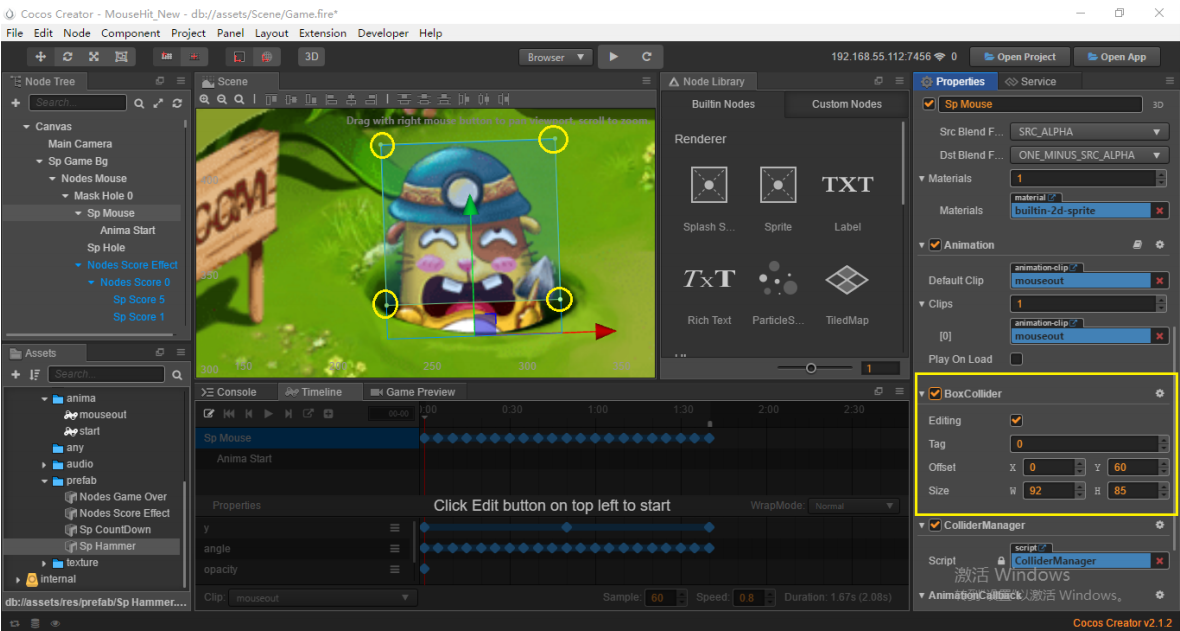
Open the node Sp Mouse and let us edit the animation from there. You can find it from Canvas -> Sp Game Bg -> Nodes Mouse -> Mask Hole 0 -> Sp Mouse.
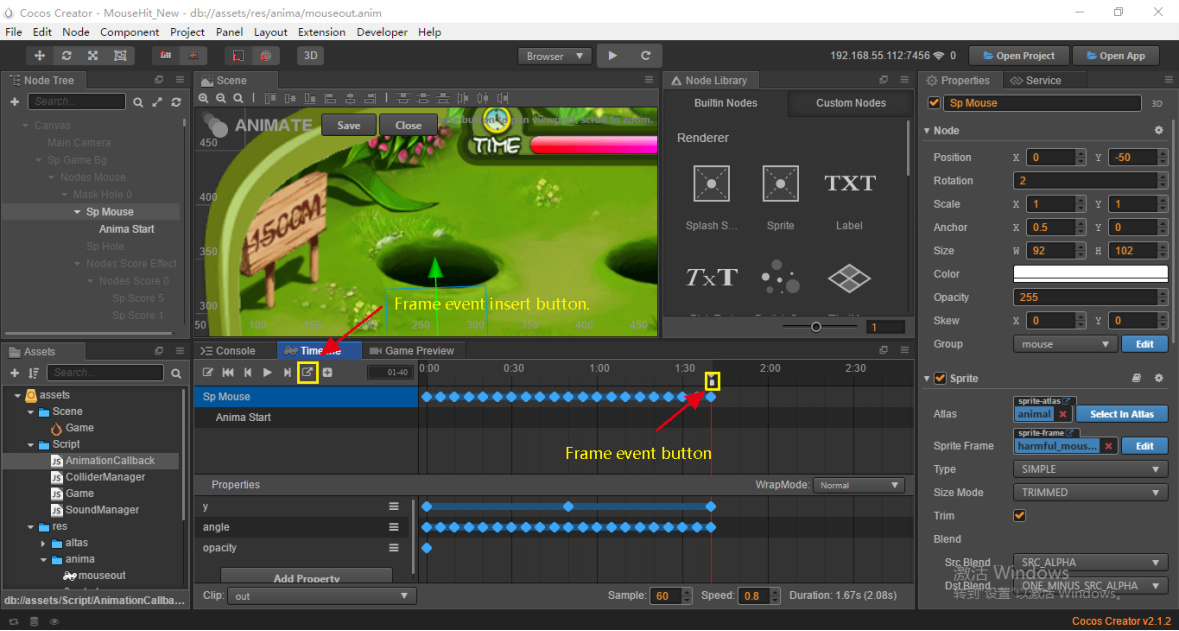
1.3 Insert keyframes for the clip and adjust the animation.
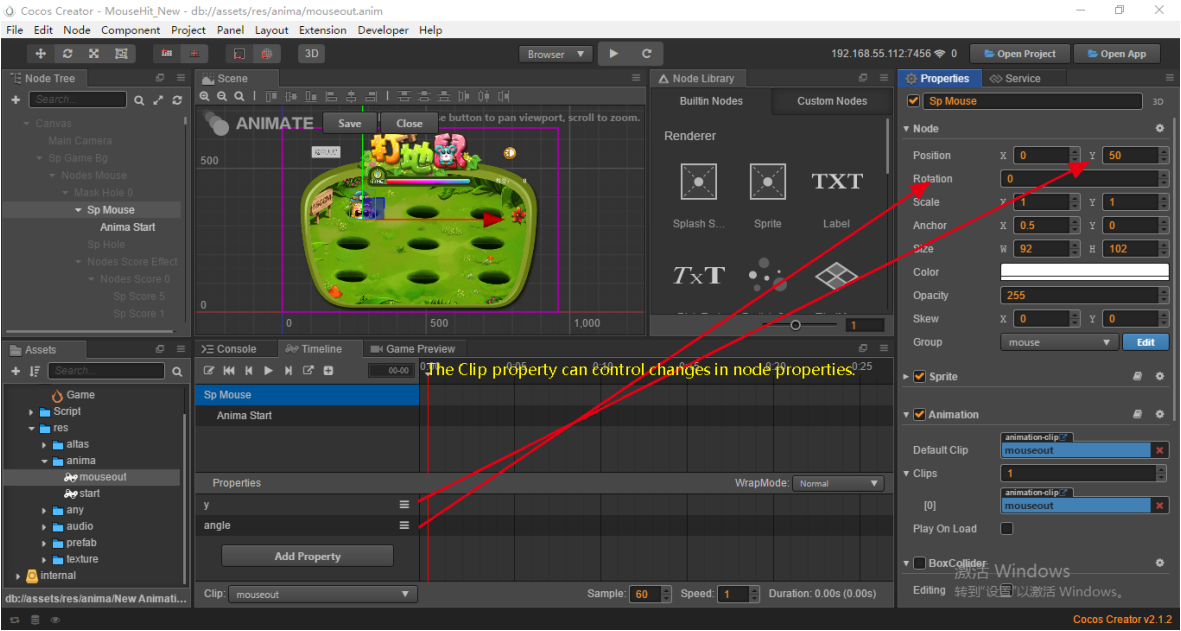
To gain access to the Animation editor, first, highlight Sp Mouse and click on the Timeline section. Then, click the small button on the top left of the window to unlock it. Remember to lock it after you are finished editing.
Go to a section of the animation and right-click. After right-clicking, choose insert keyframe, you can now create an animated frame on the specified timeline. When it is created, the properties related to the Clip attribute of the node can be edited using the properties in the timeline. If we continue to add animation frames that have different Clip attributes in the timeline, we can produce continuous animation changes such as movement, rotation, animation, and more.
At this time, we want the rats to appear and disappear from the mouse hole, so we need to set the Y coordinates of the nodes at 0: 00, 0: 50, 1:40 and so on. To do this, click on Add Property and add the Y: property. The corresponding Y coordinate are -50, 0, 50, respectively. Because we want the mouse to shake constantly, it is necessary to set different angles at different time periods, with a corresponding angle equal to -2, 0, 2. You can add this with the angle property as shown in the picture below.

1.4 Continue adding a frame callback for this animation frame
Let’s create a script named AnimationCallBack.js to clean up the Sprite that is released after it goes back in the hole. We add a function called onFinish to the cc.Class and added it to the Sp Mouse node properties:
onFinish () {
    this.node.opacity = 0;
    this.node.getChildByName("Anima Start").opacity = 0;
    this.node.getChildByName("Anima Start").getComponent(cc.Animation).stop();
    this.node.getComponent(cc.BoxCollider).enabled = false;
},
Back in the Animation Editor for Sp Mouse, we select the timeline of the last frame and insert a frame event. Double-click on the frame event to open the event properties. Select Edit, to enter the frame event editing interface, enter onFinish, in the input box, and then click the save button to exit the animation editor mode, and the frame event will be added successfully.

At this point, we have completed the mouse animation settings.
2. Turn your computer mouse into a hammer
Now it’s time to create the hammer that hits the mice, so we need to know where the computer mouse moves and clicks, so you can stun the mice at any time.
2.1 Turn the mouse into a hammer by listening to system events.
System events are the most basic way for us to monitor game inputs. We need to know the location of the mouse on the screen (MOUSE_MOVE) and when the mouse enters the window (TOUCH_MOVE). We can access them by accessing a callback parameter event. It is the EventTouch object, and we can use an API call in ccTouch to get the information contained in this object, which includes the coordinates and the current mouse interaction.
We need to write a function called initEventListener, which can listen to the mouse. After you write the function, add it to the Game.js script so that this function takes effect once Game.js is initiated.
initEventListener () {
        this.node.on(cc.Node.EventType.MOUSE_MOVE, (event)=>{
            this.onBeCreateHammerEvent(event.getLocation());
        },this);

        this.node.on(cc.Node.EventType.TOUCH_MOVE, (event)=>{
            console.log(event);
            this.onBeCreateHammerEvent(event.getLocation());
        },this);

        this.node.on(cc.Node.EventType.TOUCH_START, (event)=>{
            this.onBeCreateHammerEvent(event.getLocation());
            this.onHammerClicked();
            if (this.gameRuleNode) {
                var gameRuleFadeOut = cc.fadeOut(1);
                this.gameRuleNode.runAction(gameRuleFadeOut);
            }
        },this);

        this.node.on(cc.Node.EventType.TOUCH_END, (event)=>{
            this.onHammerClicked();
        },this);
}
2.2 Generate a hammer
Now that we know the location of the mouse and when the mouse is on the screen, we need to create a function called onBeCreateHammerEvent to generate a hammer Sprite when it’s on the screen and make sure we can build the hammer again and again if it goes off the screen.
Let’s first create an Sp Hammer node, let’s add the hammer.png image to the node. To make sure it’s redrawing, again and again, let make the node a prefab by dragging the node into the assets folder. This will enable it to come back with all the same properties every time. So when we let the mouse enter the game screen, we initialize the Sp Hammer prefab into the game and become the hammer until it leaves the game window. We need to add this code into your Game.js script to complete the process:
onBeCreateHammerEvent (position) {
     if (!this.hammerNode && !cc.isValid(this.hammerNode)) {
         this.hammerNode = cc.instantiate(this.hammer);
         this.hammerNode.zIndex = cc.macro.MAX_ZINDEX;
         this.hammerNode._isCollider = false;
         this.node.addChild(this.hammerNode);
     }
     this.hammerNode.position = this.node.convertToNodeSpaceAR(position);
},
3 Use collision system
Next, we need to have it so that if the mouse hits the hammer, it is stunned. But if you don’t click on the mouse, it’s okay. We can use a collision system to help us quickly implement the ability to detect whether the dropped hammer meets the mouse.
3.1 Change packets for nodes that need collision detection and use collision components
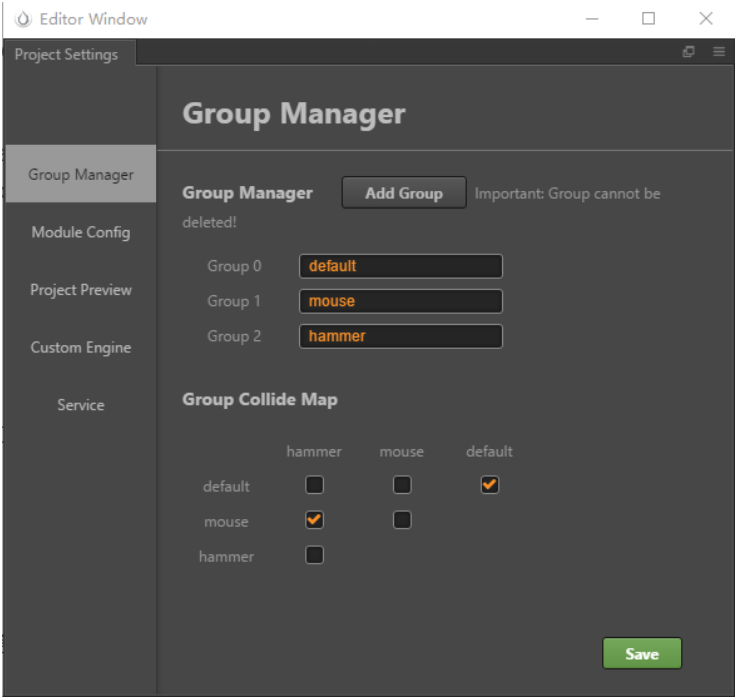
We need to create two new groups, mouse and hammer. The menu path is Project-> Project Settings… > Group Manager. Follow the image to help know what collides with what. We can change the packet for the nodes that need collision detection, then we also need to change the Group property of the Sp Mouse node to mouse, and change the prefab Sp Hammer to hammer.
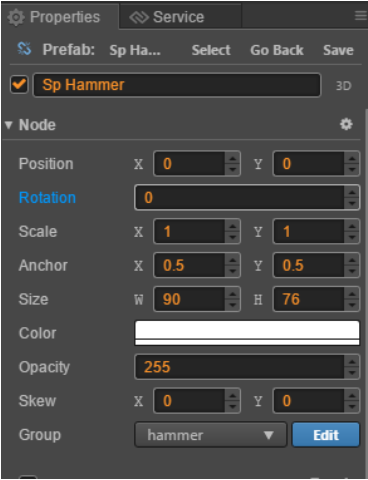
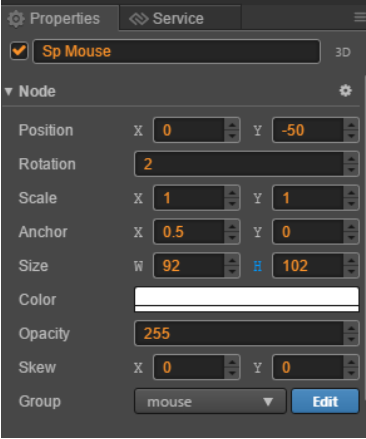
We can now add BoxCollider components to the Sp Mouse node and Sp Hammer by double-clicking the Sp Hammer prefab. Click Add Component, add Box Collider, and start building the collision box. You are free to drag the four-sided spot to change the size of the collision box. You can turn the BoxCollider component on Sp Mouse off for now as the collision only occurs when you click your mouse button.
3.2 Using scripts to control collision systems
The collision system in Cocos Creator is turned off by default, so we need to start it manually. And we need to add callback functions for collision generation and when a collision ends into the collision system. So we need to create a JavaScript script called ColliderManager.js and add it as a component to the Sp Mouse node.
You can get to the collision manager by accessing cc.director, and change its enabled property to true, to turn on the collision system. Then add the name onCollisionEnter and onCollisionExit to the script. The two functions are the callbacks of collision generation and collision end, so now the simple collision management system is complete:
initMouseOutEvent () {
        if (this._mouseIndexArr.length === 0) {
            let mouseAmount = Math.floor((Math.random() * (this.mouseNodes.childrenCount - 1) + 1));

            if (mouseAmount === 0) {
                mouseAmount = 1;
            }

            for (let i = 0; i < mouseAmount; i++) {
                let randomNodeIndex = Math.floor(Math.random() * (this.mouseNodes.childrenCount));
                let randomSpriteFrameIndex = Math.floor(Math.random() * (this.animalAtlas.getSpriteFrames().length - 1))

                if (this._mouseIndexArr.indexOf(randomNodeIndex) === -1) {
                    var mouseNode = this.mouseNodes.children[randomNodeIndex].getChildByName("Sp Mouse");
                    this.updateMouseNodeInfo(mouseNode, randomSpriteFrameIndex);
                    mouseNode.getComponent(cc.BoxCollider).enabled = true;
                    this._mouseIndexArr.push(randomNodeIndex);
                    mouseNode.getComponent(cc.Sprite).spriteFrame = this.animalAtlas.getSpriteFrames()[randomSpriteFrameIndex];
                    mouseNode.getComponent(cc.Animation).play();
                }
            }
        }
    },
4. Perfect the logic of the game
Now that we have everything ready, let’s add some simple logic to the game.
4.1 Let the mice show up randomly
In the game, there are nine mouse holes in the game. Let’s first determine how many mice there will be coming out at the same time, and where these mice will appear at random, and what kind of mice will appear randomly. Once your questions have been determined, we can design the code. After the function is created, it takes effect once in the start callback of Game.js. Please add this into the Game.js script:
initMouseOutEvent () {
        if (this._mouseIndexArr.length === 0) {
            let mouseAmount = Math.floor((Math.random() * (this.mouseNodes.childrenCount - 1) + 1));

            if (mouseAmount === 0) {
                mouseAmount = 1;
            }

            for (let i = 0; i < mouseAmount; i++) {
                let randomNodeIndex = Math.floor(Math.random() * (this.mouseNodes.childrenCount));
                let randomSpriteFrameIndex = Math.floor(Math.random() * (this.animalAtlas.getSpriteFrames().length - 1))

                if (this._mouseIndexArr.indexOf(randomNodeIndex) === -1) {
                    var mouseNode = this.mouseNodes.children[randomNodeIndex].getChildByName("Sp Mouse");
                    this.updateMouseNodeInfo(mouseNode, randomSpriteFrameIndex);
                    mouseNode.getComponent(cc.BoxCollider).enabled = true;
                    this._mouseIndexArr.push(randomNodeIndex);
                    mouseNode.getComponent(cc.Sprite).spriteFrame = this.animalAtlas.getSpriteFrames()[randomSpriteFrameIndex];
                    mouseNode.getComponent(cc.Animation).play();
                }
            }
        }
    },
4.2 We need to get the mouse to reappear.
The mouse appears once and then falls into the hole. Then, the mouse repeats this in another hole. Because we used animation components to get mice in and out of rat holes, we can add a monitor to the animation components that ends when the animation is over, which is when the mouse enters the rat hole.
In-order for mice to appear in droves, we use the _mouseIndexArr array to record the hole number of each random mouse, and when the mouse returns to the hole, the number is eliminated. So only when all the mice go back to the hole can the hole be used again. Let’s have the mice randomly appear. First, add a callback at the end of the animation named onAnimationFinishEvent inside the Game.js script:
onAnimationFinishEvent () {
   this._mouseIndexArr.pop();
   this.initMouseOutEvent();
},
Next, add the initEventListener Function, to listen to the animation:
initEventListener () {
    this.node.on(cc.Node.EventType.MOUSE_MOVE, (event)=\>{
    this.onBeCreateHammerEvent(event.getLocation());
},this);

this.node.on(cc.Node.EventType.TOUCH_MOVE, (event)=\>{
    this.onBeCreateHammerEvent(event.getLocation());
},this);

this.node.on(cc.Node.EventType.TOUCH_START, (event)=\>{
    this.onBeCreateHammerEvent(event.getLocation());
    this.onHammerClicked();

    if (this.gameRuleNode) {
        var gameRuleFadeOut = cc.fadeOut(1);
        this.gameRuleNode.runAction(gameRuleFadeOut);
    }
},this);

this.node.on(cc.Node.EventType.TOUCH_END, (event)=\>{
    this.onHammerClicked();
},this);

    for (let i = 0; i \< this.mouseNodes.childrenCount; i++) {
        this.mouseNodes.children[i].getChildByName("Sp
Mouse").getComponent(cc.Animation).on(cc.Animation.EventType.FINISHED,
this.onAnimationFinishEvent, this);
    }
},
4.3 Logic and expression of Hammer under Hammer
When the hammer is going down, we need to change its angle, so it’s pounding down. The mouse will only hit one time per click and should not be pounding mice continuously.
onHammerClicked () {

this.hammerNode.angle = this.hammerNode.angle === 0 ? 30 : 0;

if (this._mouseNode && this._mouseNode._isCollider && this._mouseNode._isLive &&
cc.find("Canvas/Sp Game Bg")) {

this._mouseNode._scoreUpdateFunc();

this.showScoreEffectByTag(this._mouseNode,
this._mouseNode.parent.getChildByName("Nodes Score Effect"));

this._score = this._score \< 0 ? 0 : this._score;

this.gameScore.string = this._score;

this._mouseNode._isLive = false;

let oldSpriteFrameName =
this._mouseNode.getComponent(cc.Sprite).spriteFrame.name;

let newSpriteFrameName = oldSpriteFrameName + "_death";

this._mouseNode.getComponent(cc.Sprite).spriteFrame =
this.animalDeathAtlas.getSpriteFrame(newSpriteFrameName);

this._mouseNode.getChildByName("Anima Start").getComponent(cc.Animation).play();

}

},
4.4 Animate the mice getting hit:
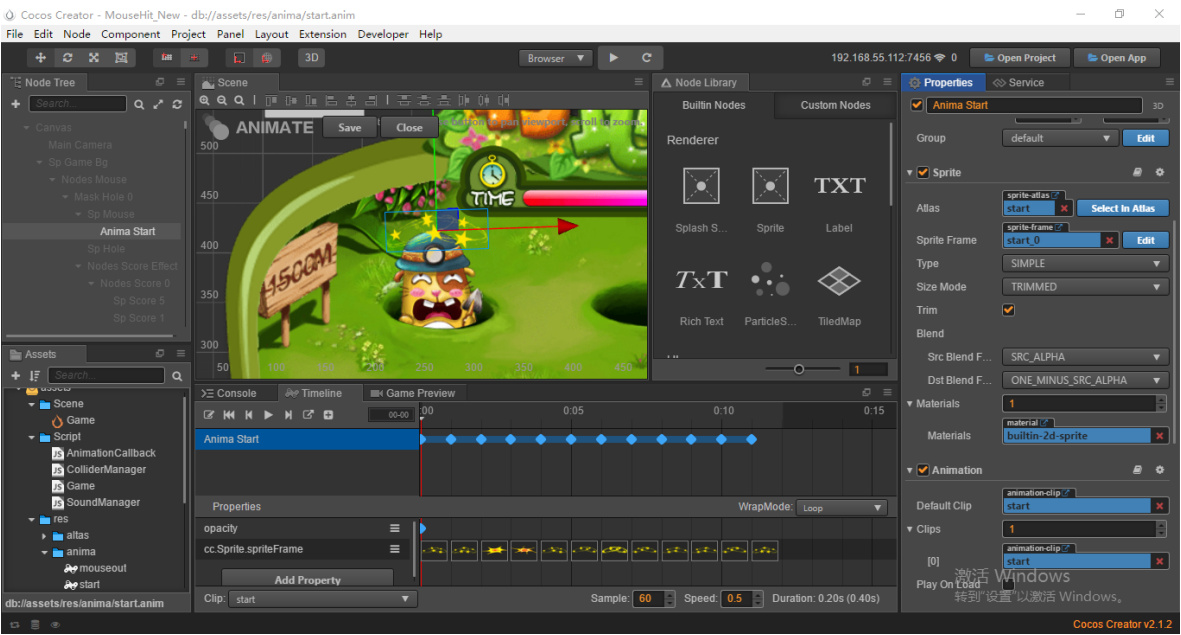
To add animation effects to the mice when they get knocked out, we need to use animation components. First, create a new Animation Start node inside ‘Sp Mouse’, double click on it and add an animation component to it. Create a new Animation Clip, in the assets folder named ‘start’, which will playback until the mouse returns to the hole. Add it to the animation component of Animation Start.
The animation needs to use a set of pictures to make it animate, and we need to control the SpriteFrame attribute in the Sprite component of the node so that it follows the sprite as it moves. So we need to add multiple animation frames and set a different SpriteFrame. To do this, open the Animation Start node and go to the timeline. Add a timeline (if they ask for one, use the start animation you just built). You’ll need to add two properties. One for opacity, so it slowly disappears as the mouse falls, and cc.Sprite.spriteFrame to follow the sprite. Add the images to look like the example below.
5. Try your game out
Now go ahead and test if your game is running correctly. If there is an issue, go back and check if you made an error with your code. If not, congratulations on getting the core game design of a Whack-A-Mole game started. In the next article will supplement the game score, game sound effect, adding a game peripheral, and so on. As promised, here is the completed tutorial on GitHub.