
Use RenderTexture to Implement Small Maps and Portals in 3D Scenes
RenderTexture is one of the more impressive technologies of the Cocos Creator game engine. Its principle is to render the camera picture into a texture. The advanced application is to attach to the material and become the corresponding function, such as:
- Minimap looking down on the character
- Split-screen display with different angles on the screen
- A portal that can see a destination scene
- The picture in the scope of a sniper rifle
- Preview of the camera in the engine
- Canvas UI in the engine
Cocos Creator 3.x provides complete 3D world development capabilities, enabling us to achieve the above functions. This time, “Cocos Star Writer” Nowpaper will use RenderToTexture in v3.x through video + text tutorials to implement minimaps and portals. The video is in Chinese, but it’s easy to follow along with.
Original article in the forum discussion thread
Note: first of all, I prepared a test scene to facilitate the display of results. This test scene was built by myself, and there are still many problems with it, I will not provide it in my tutorial.
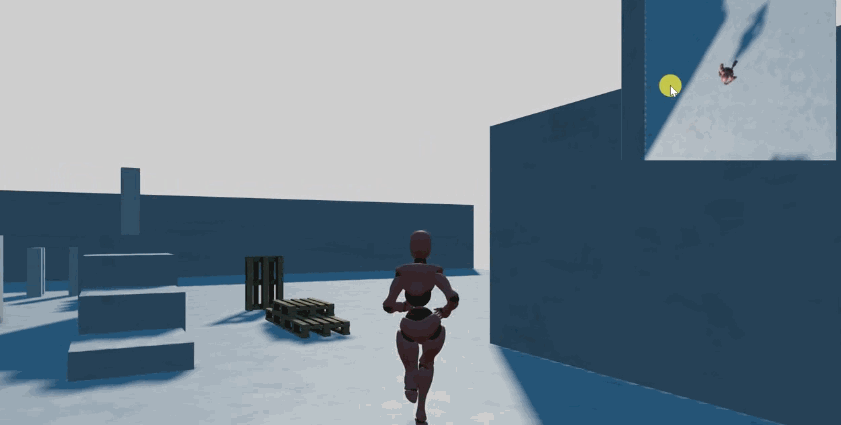
Small Map
Let’s implement the minimap first. The implementation of the minimap is relatively simple, almost without writing code.
Other small map methods on the forum are to directly move and control the second camera screen. This article uses sprites to accept and display the rendering texture to better customize your UI screen. The specific methods are as follows:
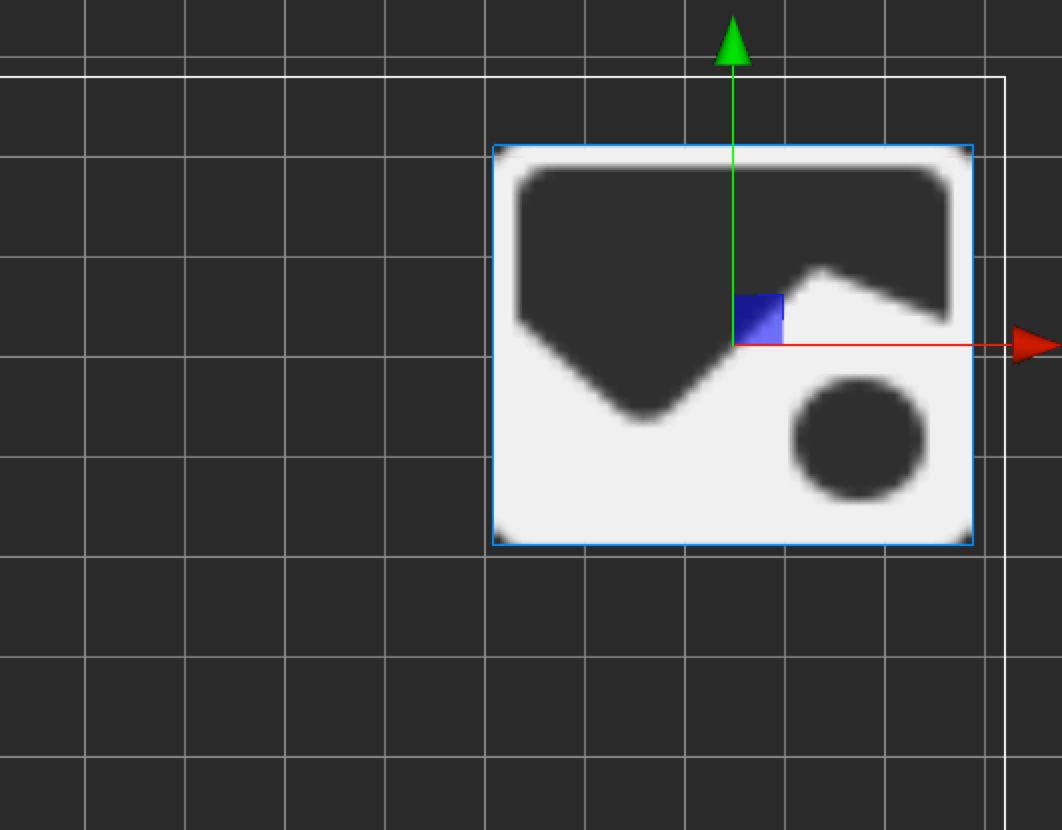
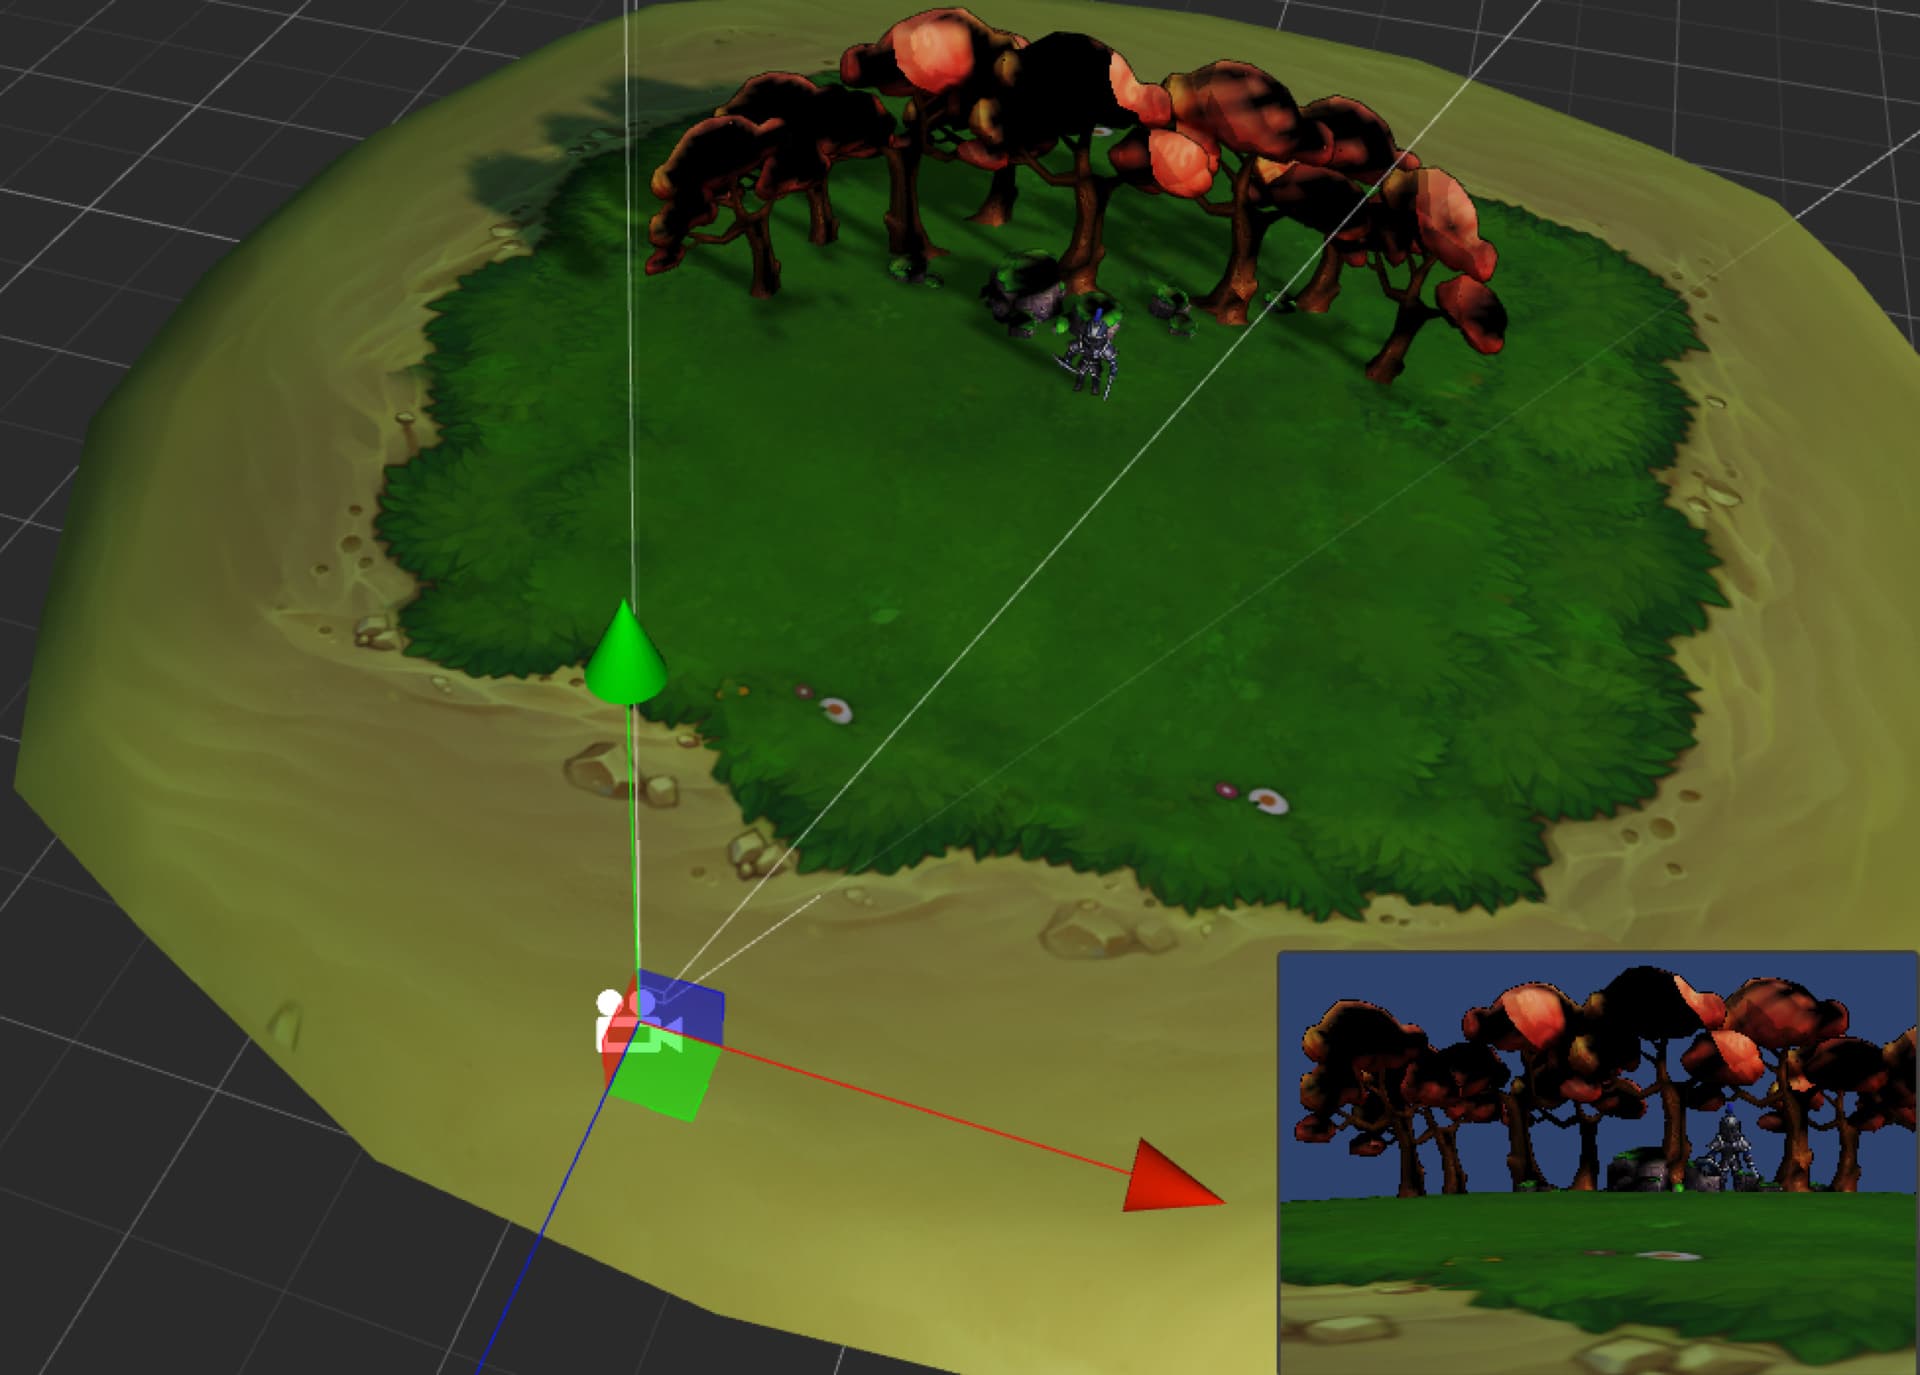
First, create a UI Canvas, place a Sprite in this UI, and adjust it to your desired position.
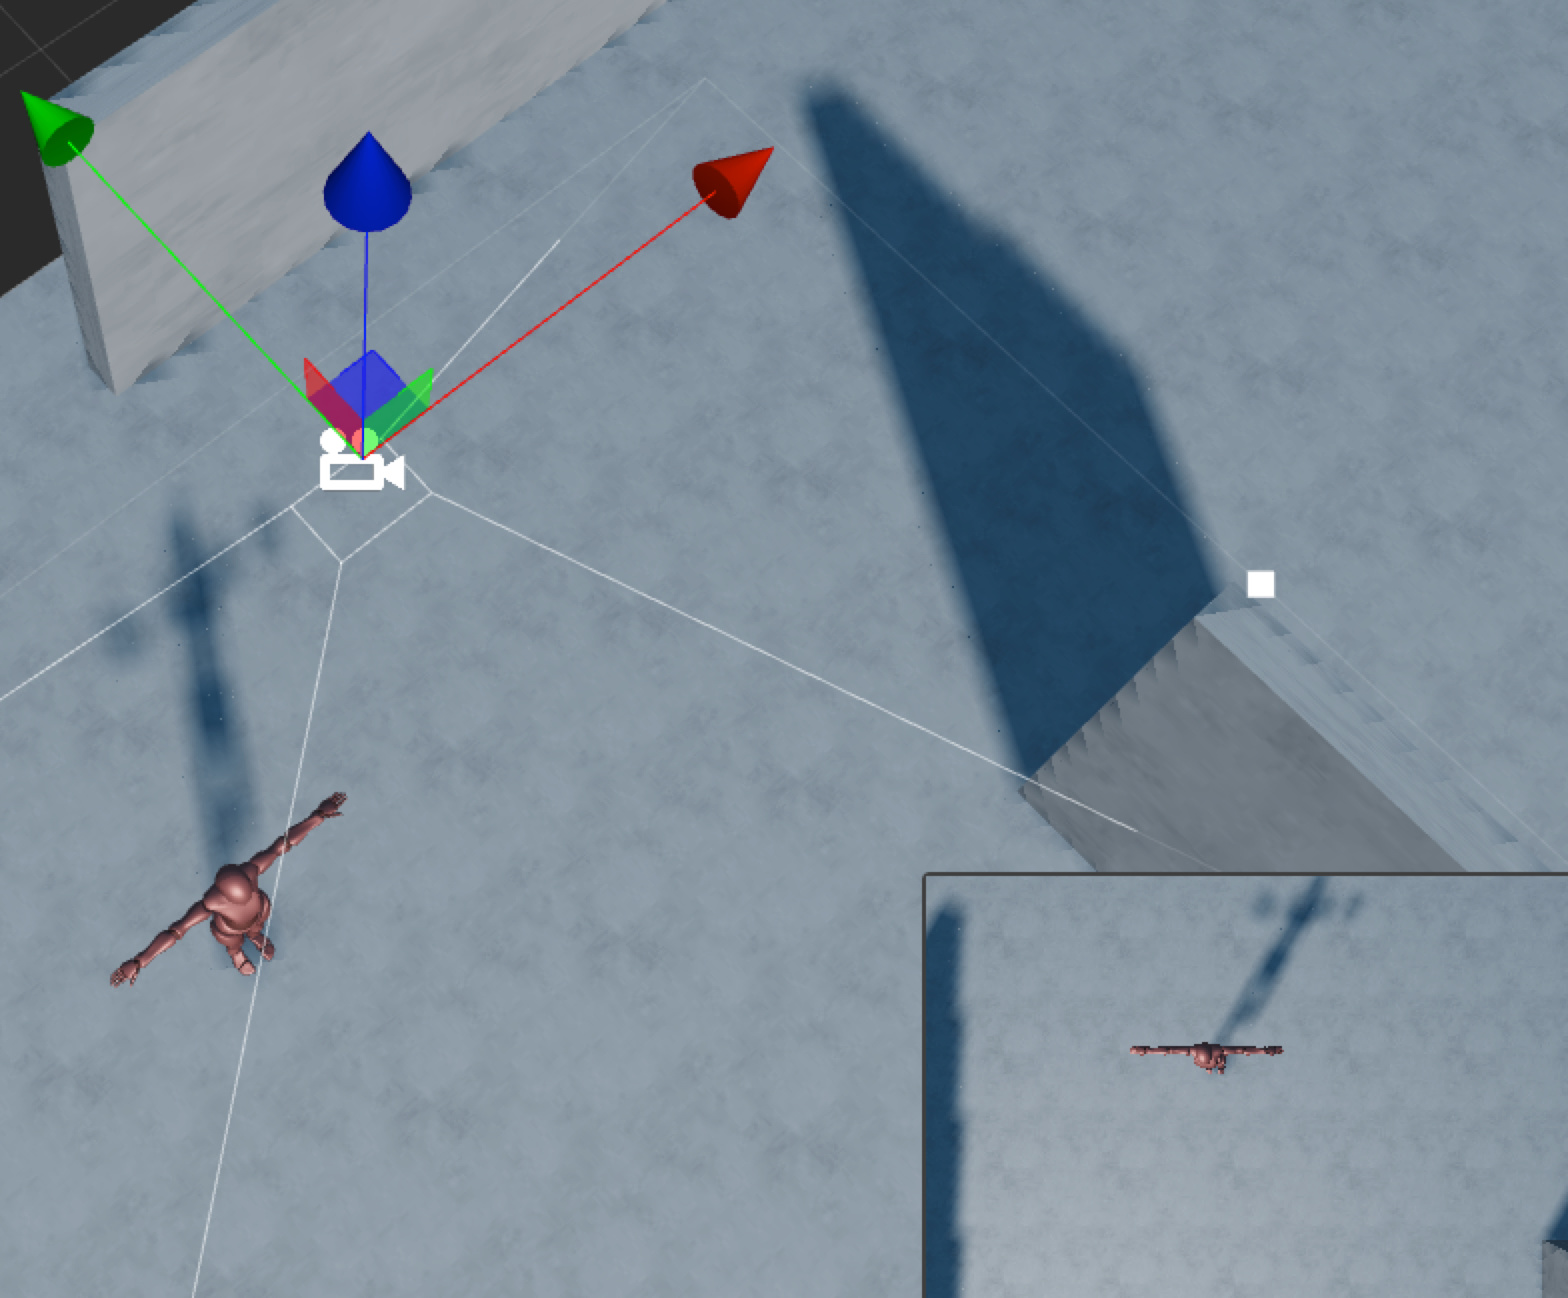
Then set up a camera, the camera and light looks downwards, set the position and rotation parameters, and adjust to the viewing position and angle you want.
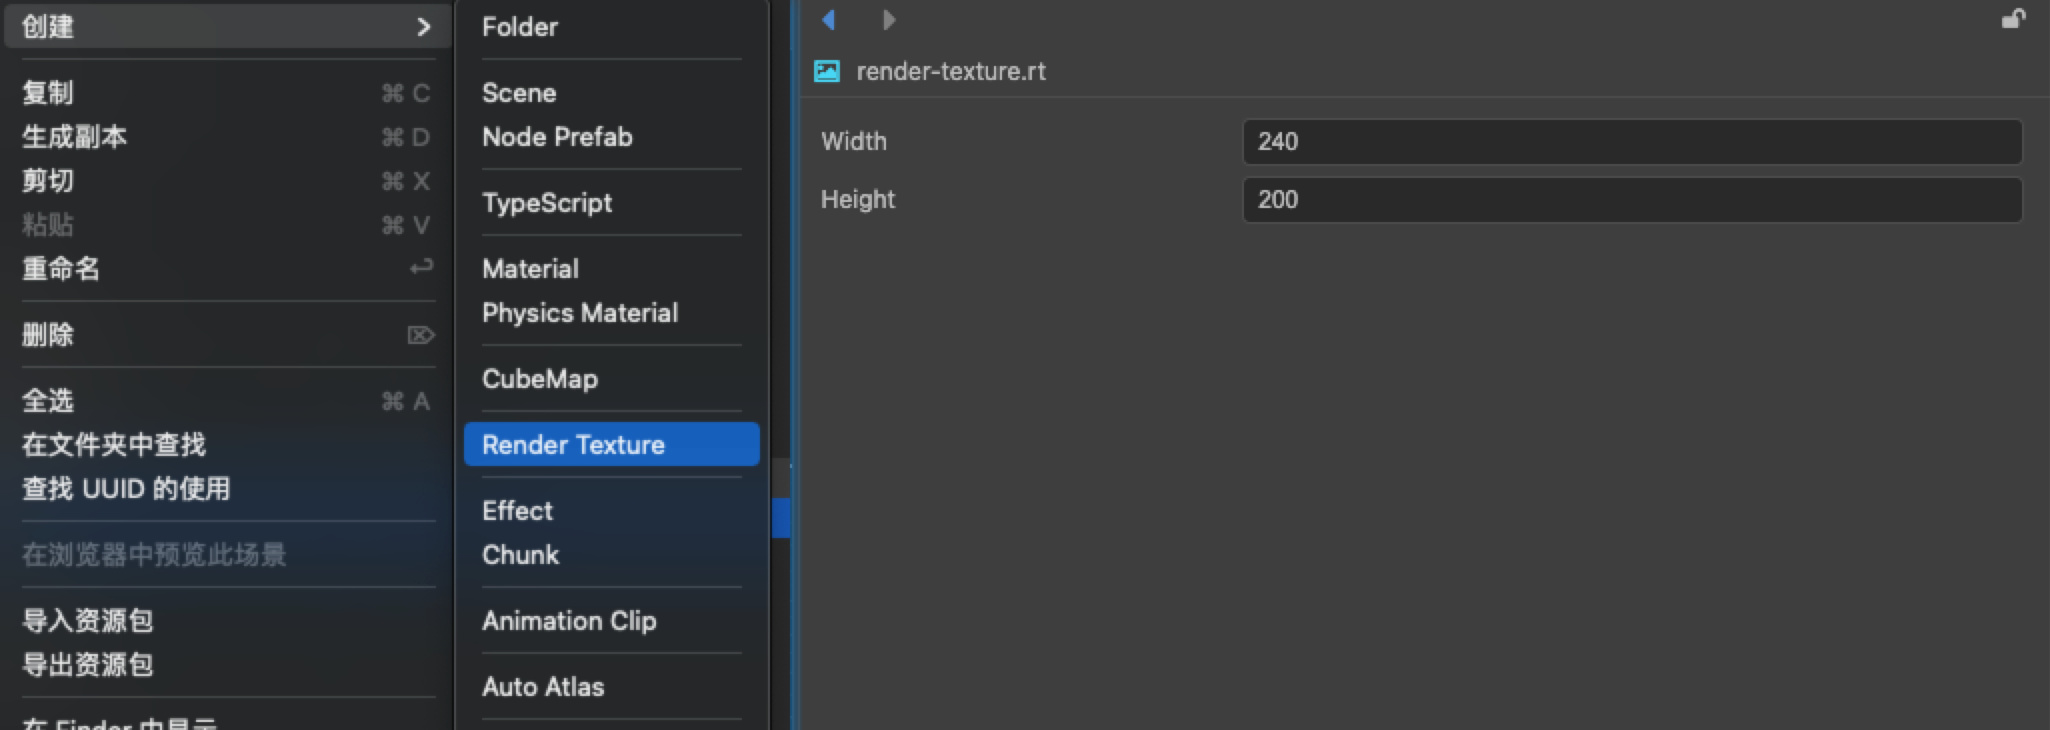
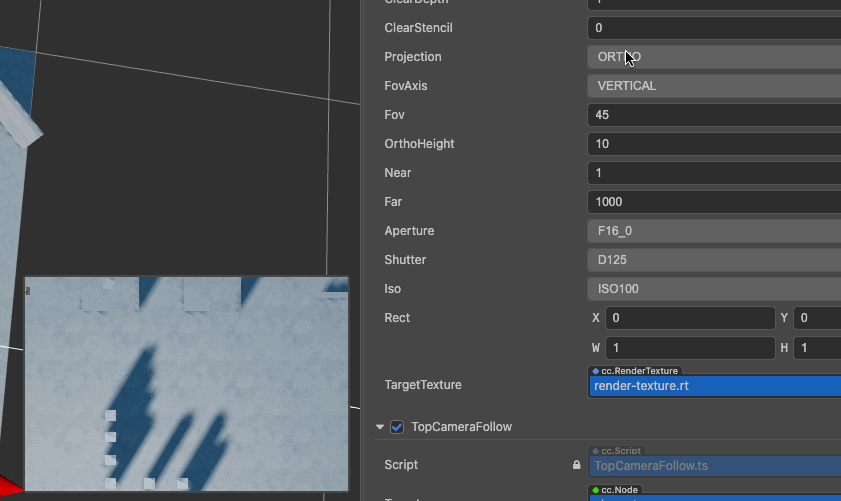
Then in the asset, create a RenderTexture asset, simply set the parameters, mainly set the Width and Height of the asset to the same proportion of the small map. Otherwise, it will not be displayed.
Select the camera and point the target of the camera’s RenderTexture to this asset.

Then select the previous sprite and assign the assets of this RenderTexture to the properties of its SpriteFrame.

Save and run to see the effect. You can achieve the rendering effect, but now we find that moving does not follow the character.
Simply create a TopCamareFollow script for the camera. In the update of the script, keep setting the position information of x and z the same as the character. Add a target point to this script, add the following code in Update. All axis coordinates except y are updated synchronously with the target. The code is as follows:
import {_decorator, Component, Node}  from'cc ' ;
const {ccclass, property} = _decorator;

@ccclass( 'TopCameraFollow' )
export  class TopCameraFollow extends Component {
    @property(Node)
    target:Node = null;

    start  () {
    }

    update (deltaTime: number) {
        this.node.setWorldPosition(
            this.target.worldPosition.x,
            this.node.worldPosition.y,
            this.target.worldPosition.z
        )
    }
}
Add it to the camera and use the character as the target to follow. Now the camera can follow the character.
In the camera and RenderTexture assets, there are a lot of interesting parameters that you can try. For example, if you dislike the small map with a perspective effect, you can also set the camera’s shooting parameters to orthogonal to a non-perspective effect. In fact, many games implemented this style.
Portal
Maybe playing the famous game “Portal” shocked you the first time you played it. Maybe you thought being able to build one was your childhood dream. Now we let you have one in your dreams come true through simple development.

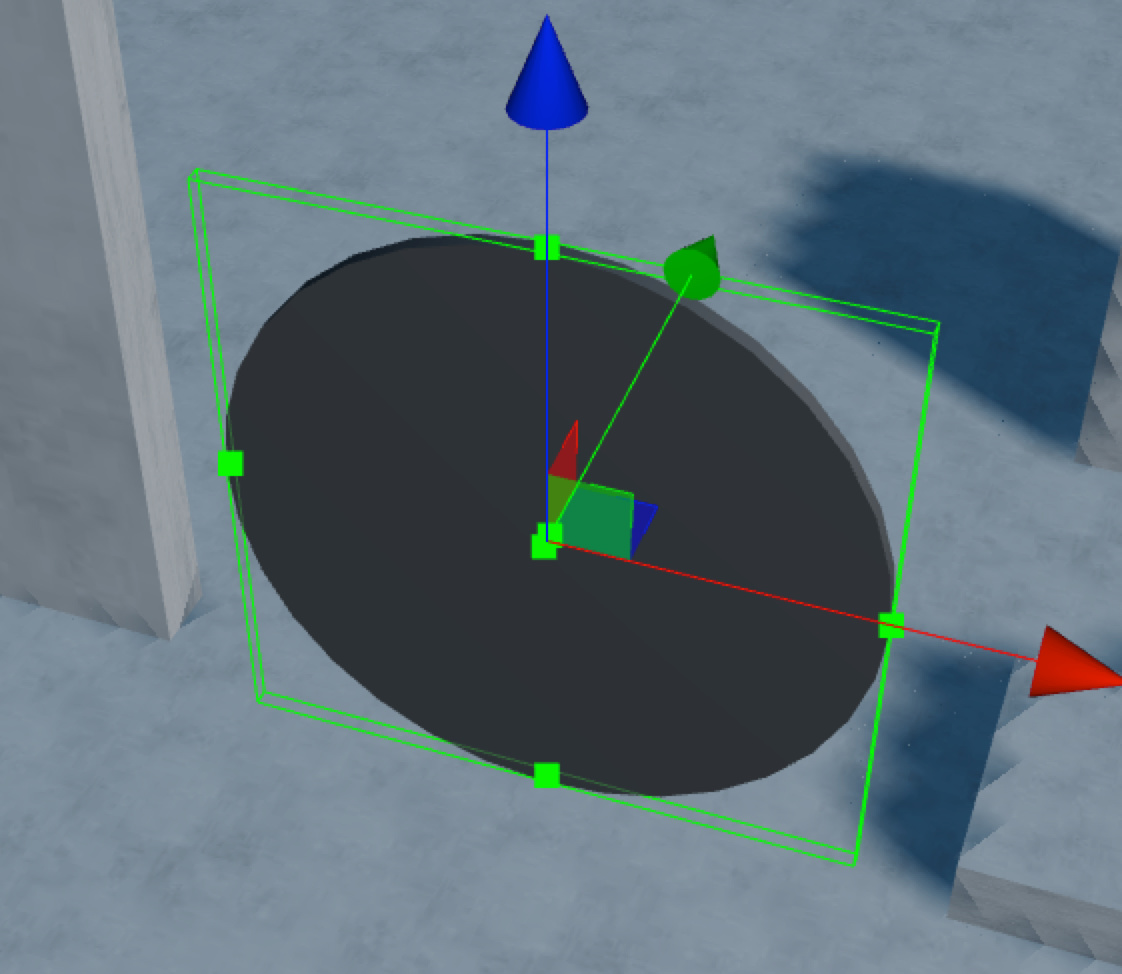
First, set up a camera at the target point. For example, in a remote place, there is an island. Remember that this is the same scene. Create a camera and adjust it to the position you want to shoot.
Then make a script for it, call it Portal Observer. Set a target point in the code to point to what object the rendered picture will be projected onto, and then write the following code at first.
Official Document-SpriteFrame Resource (SpriteFrame)
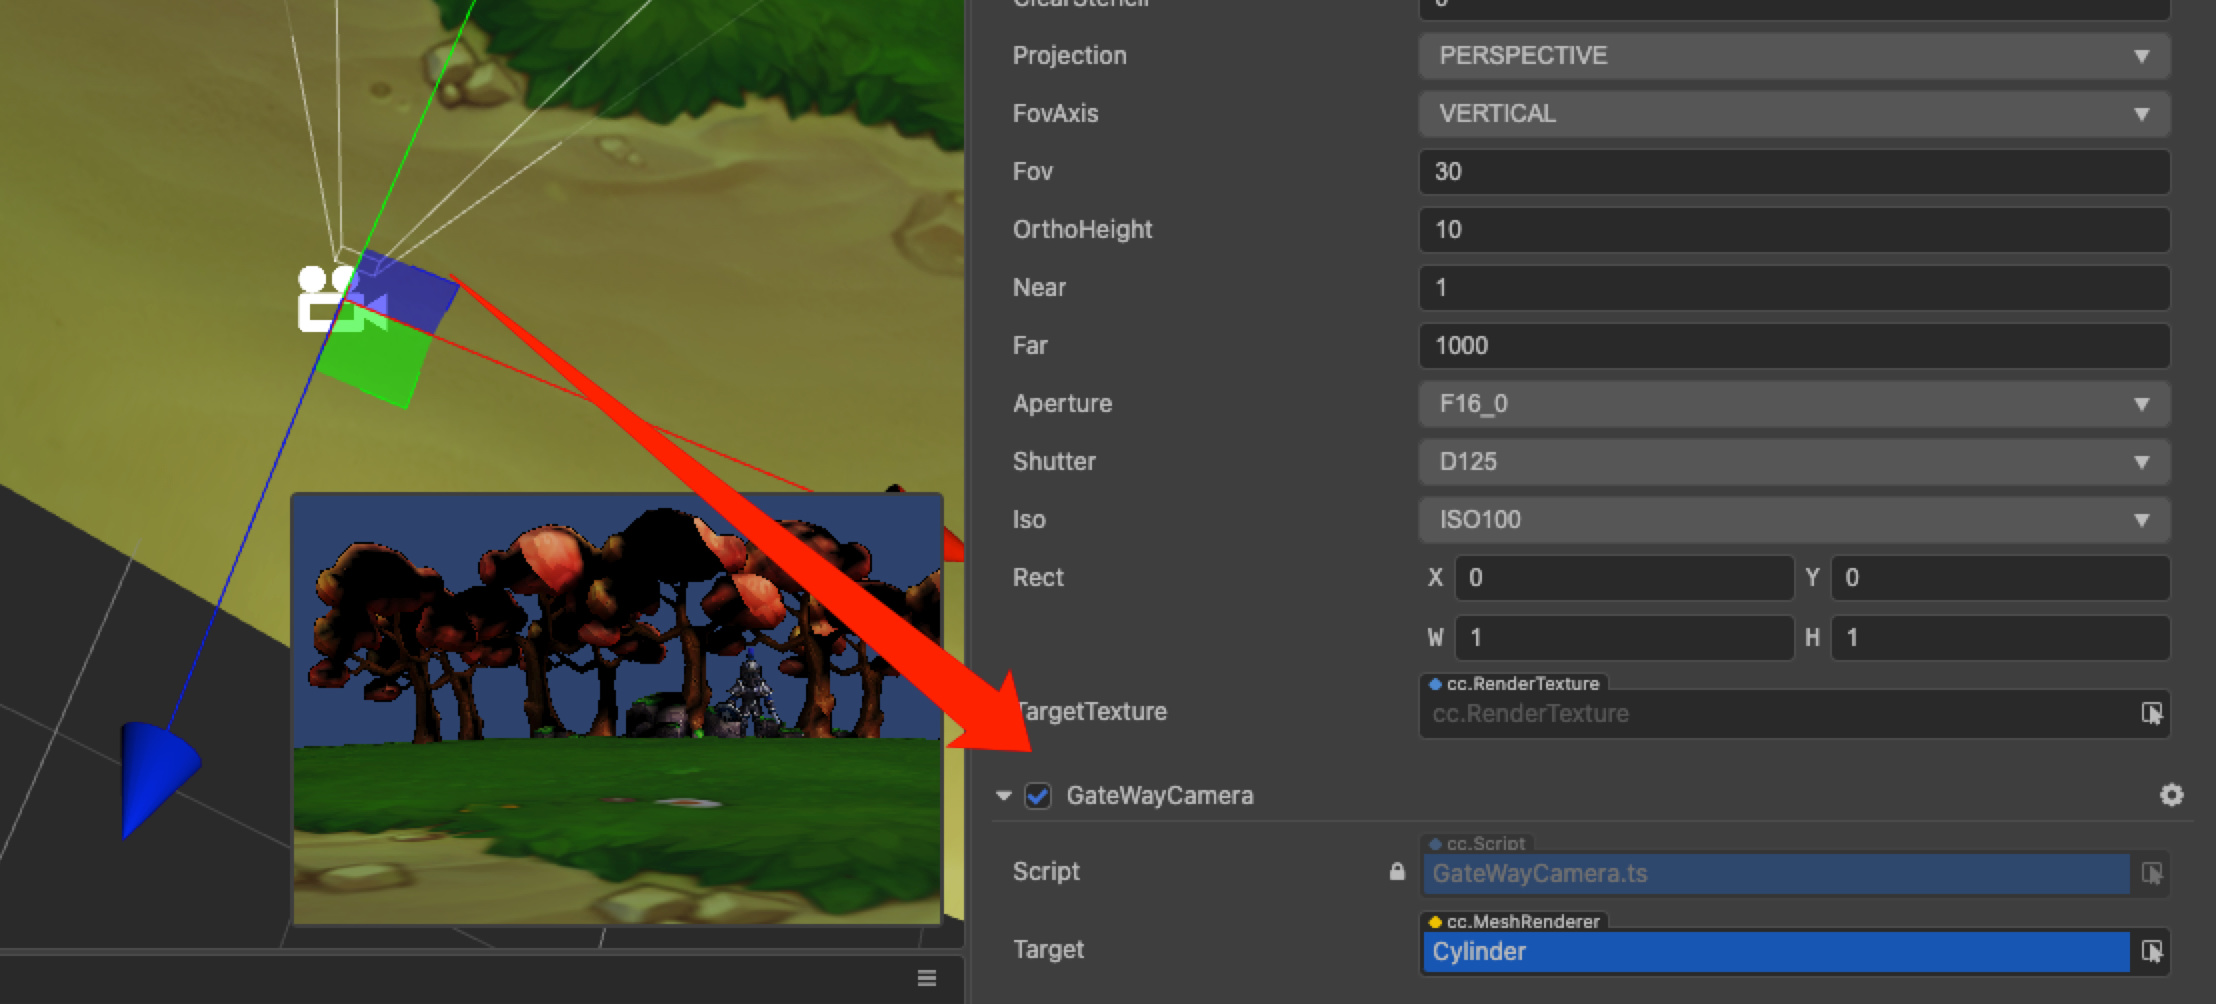
This code is introduced in the official version. But there will be some errors in v3.3, update it a bit and then set the material to be projected and apply it to the target model. My code is like this:
import {_decorator, Component, Node, MeshRenderer, Camera, RenderTexture, Material} from'cc ' ;
const {ccclass, property} = _decorator;
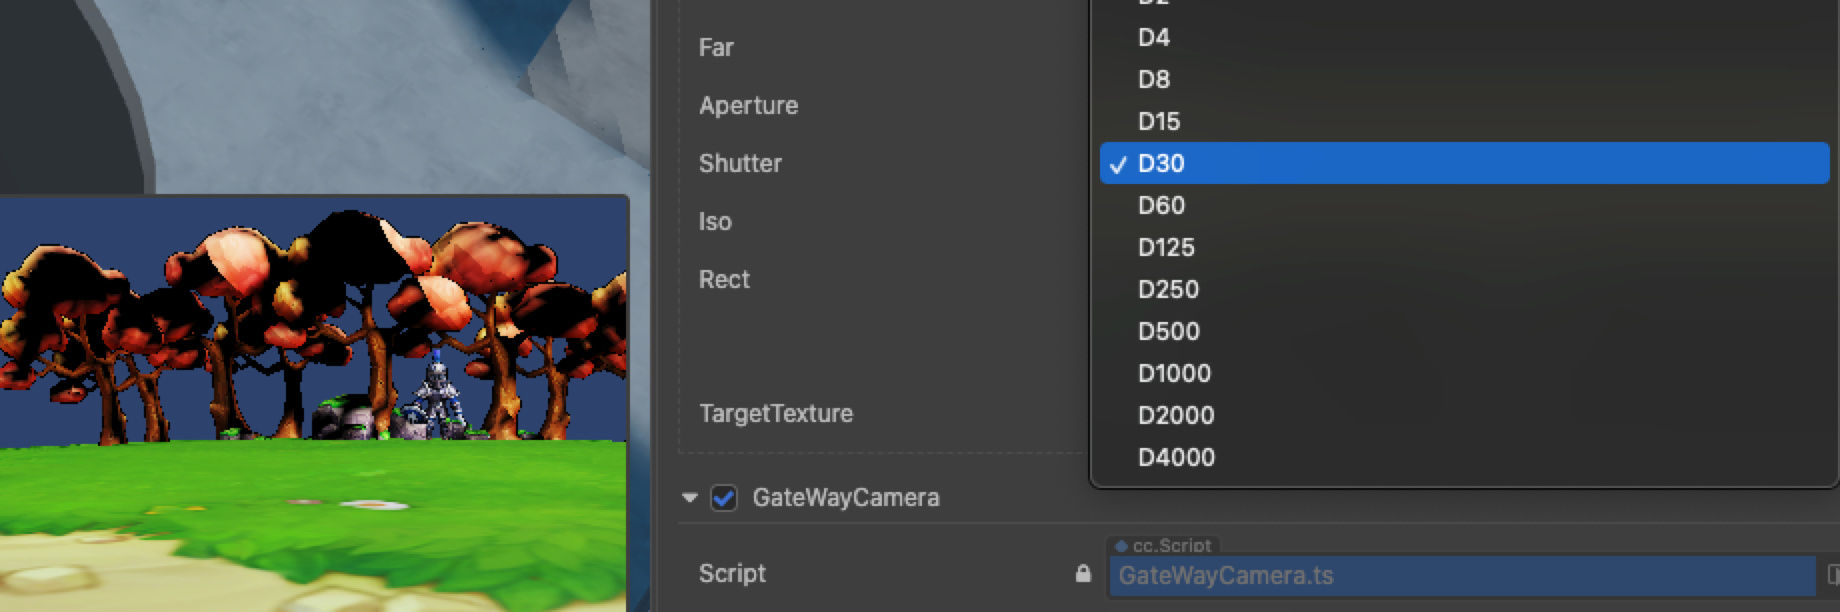
@ccclass( 'GateWayCamera' )
export class GateWayCamera extends Component {
@property(MeshRenderer)
target: MeshRenderer = null;
start () {
const renderTex = new RenderTexture();
renderTex.reset({
width: 256,
height: 256
});
const cameraComp = this.getComponent(Camera);
cameraComp.targetTexture = renderTex;
const pass = this.target.material.passes[0];
const defines = {SAMPLE_FROM_RT: true , ...pass.defines };
const renderMat = new Material();
renderMat.initialize({
effectAsset: this.target.material.effectAsset,
defines,
});
this.target.setMaterial( renderMat, 0);
renderMat.setProperty( 'mainTexture' , renderTex, 0);
}
}
Go back to Creator, make a model in the position you want. Any shape will do, depending on what form your portal is in.
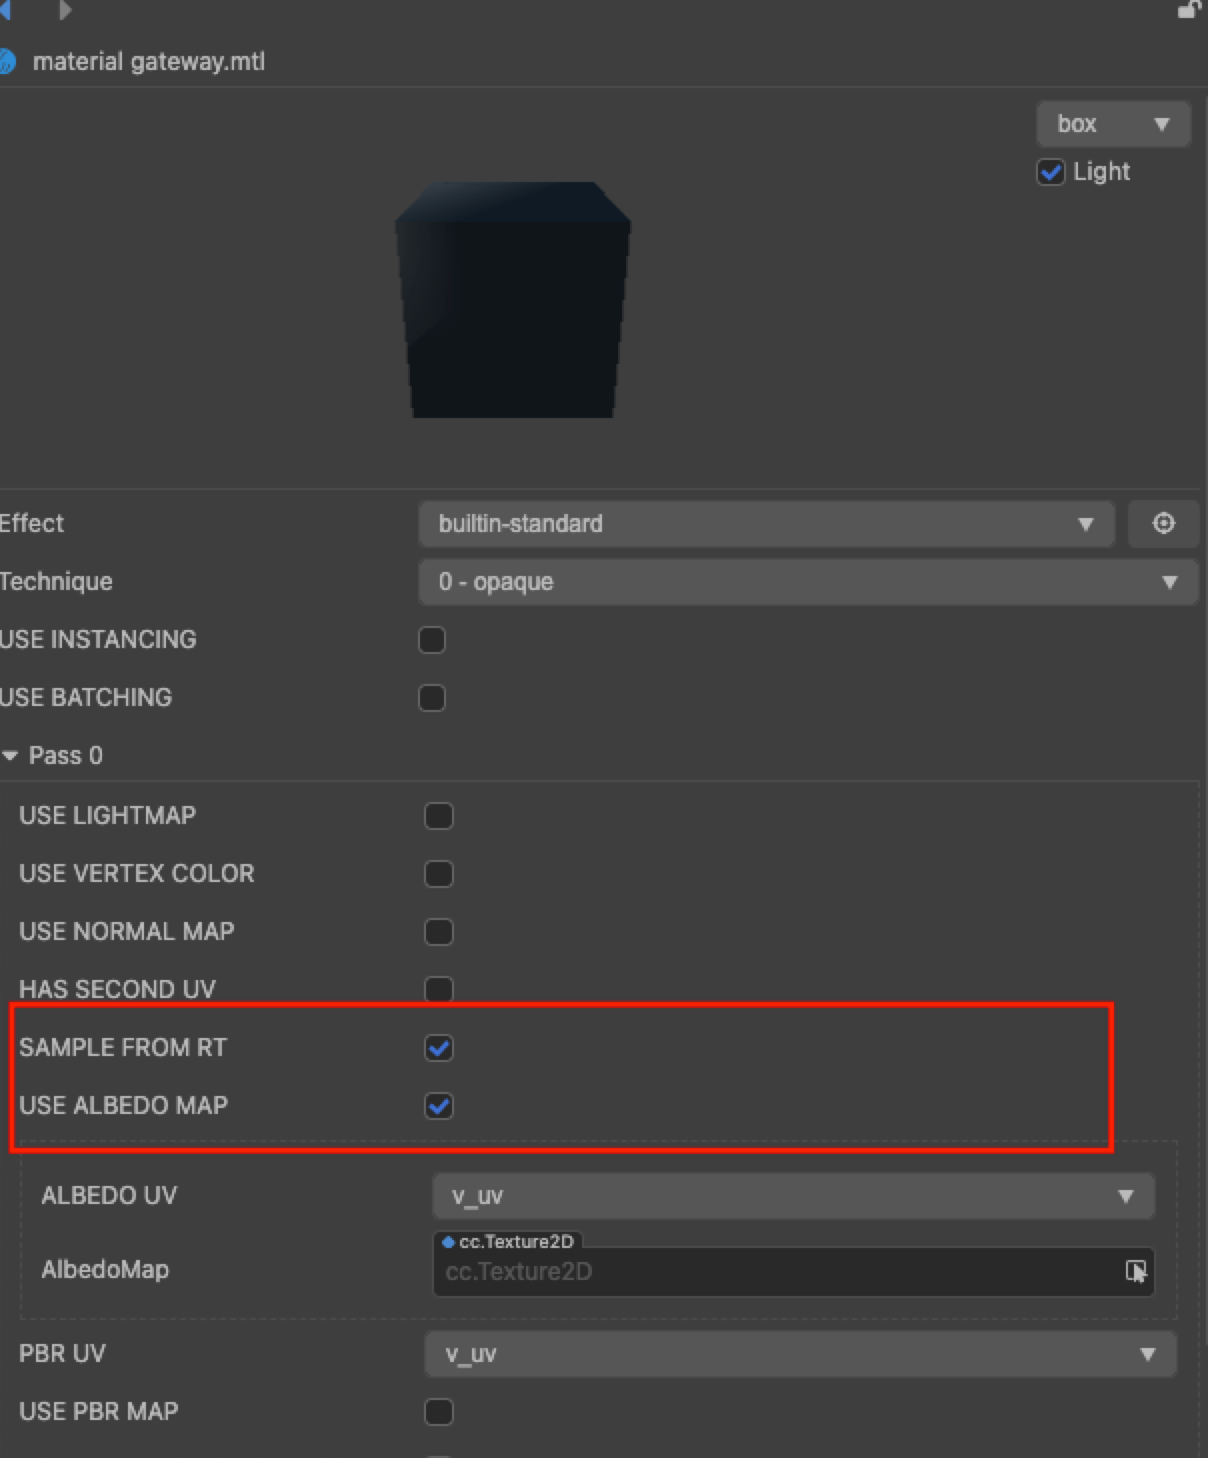
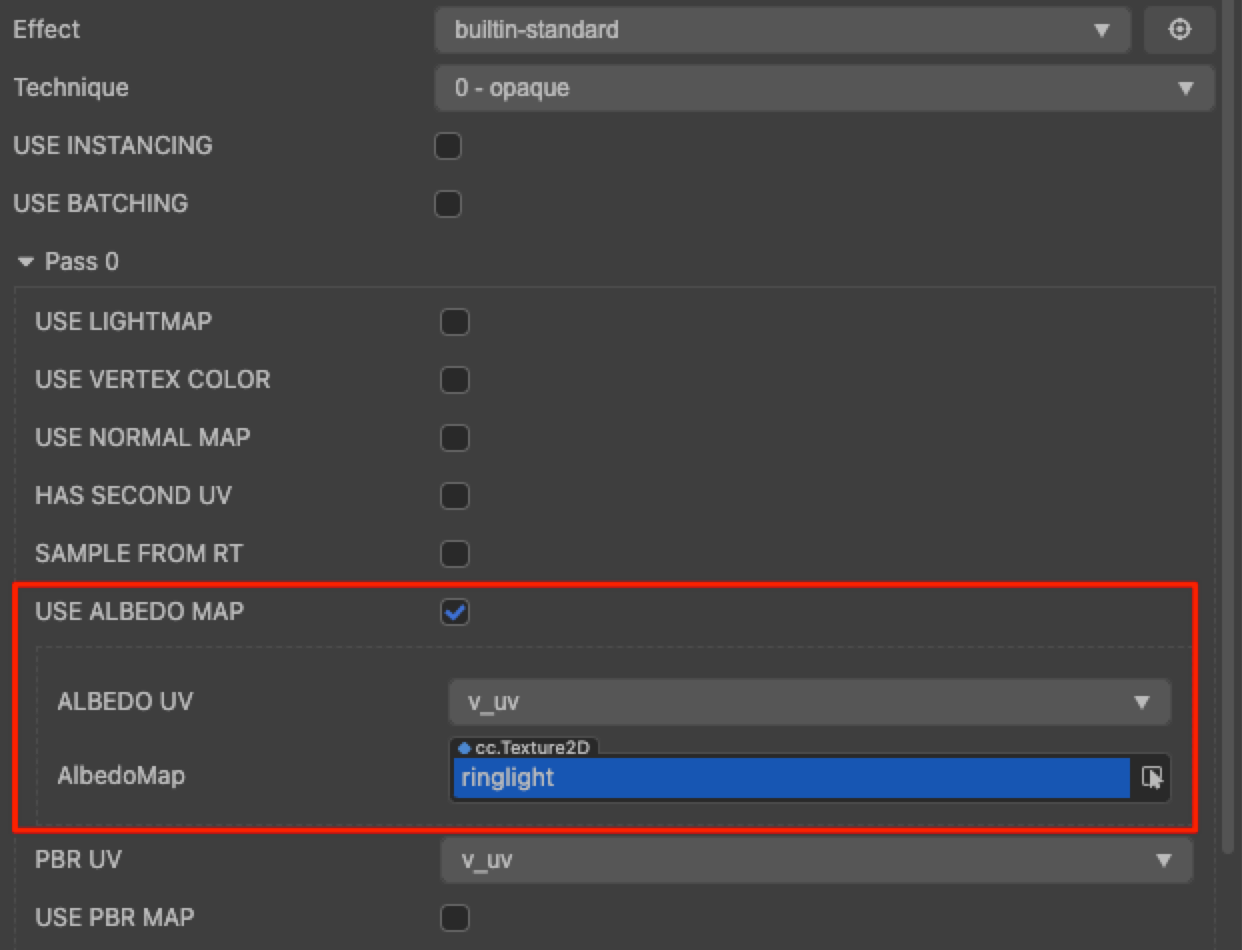
Then we need to change the material for it to receive the RenderTexture. Create a new material, select the Sample From RT option, turn on the diffuse reflection map (Use Albedo Map), and save the settings.
Apply this material to the displayed model of the portal, replacing the default material with the first 0 index.

Add the script just written for the portal camera, and reference the attributes of the Target to the model just created;
Run, control the character to take a look, you can find that the target screen has been projected on the model. If there is a problem with the angle, it means that the model coordinates are not correct. Just adjust the rotation.
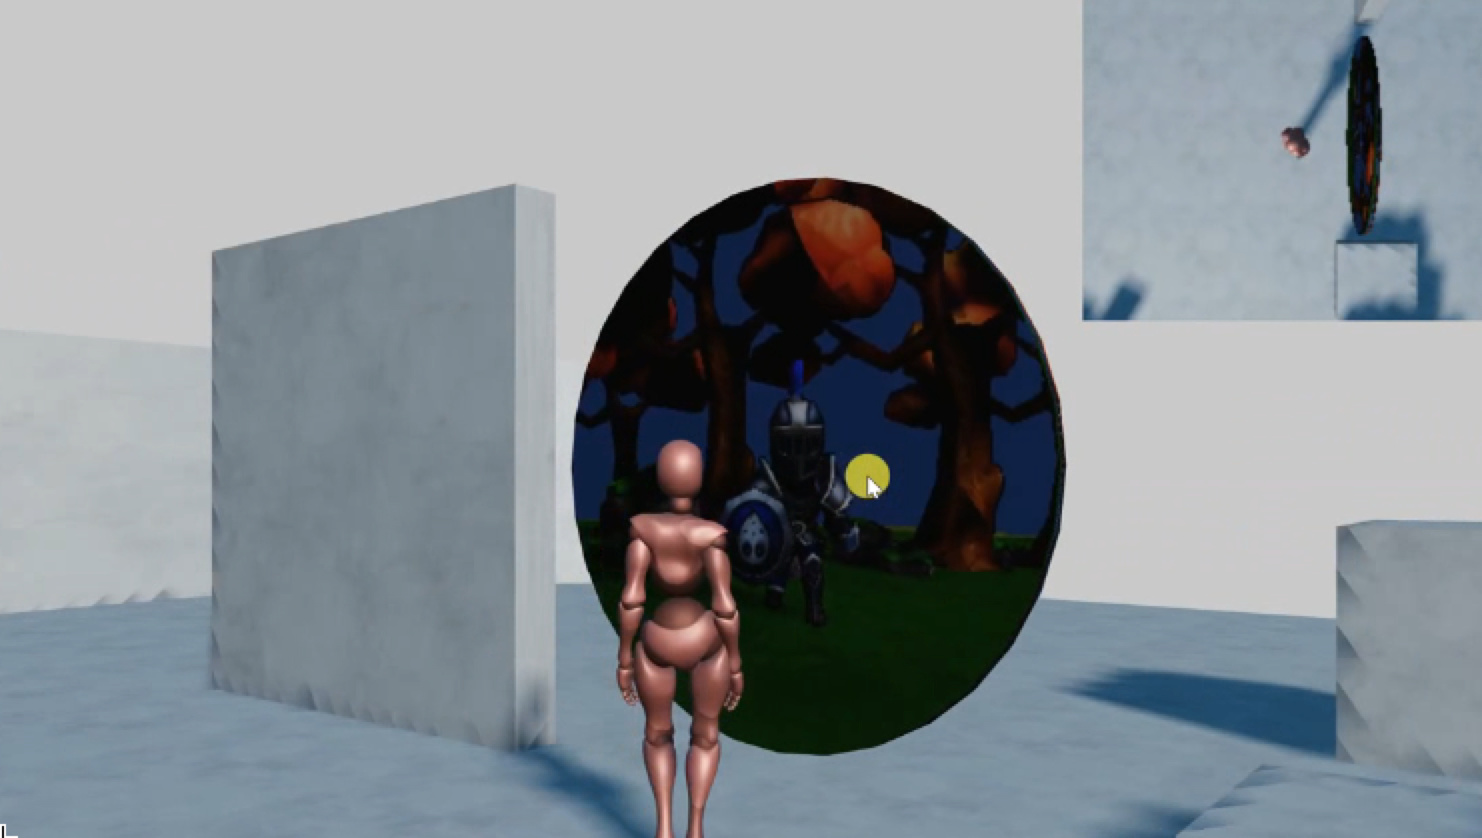
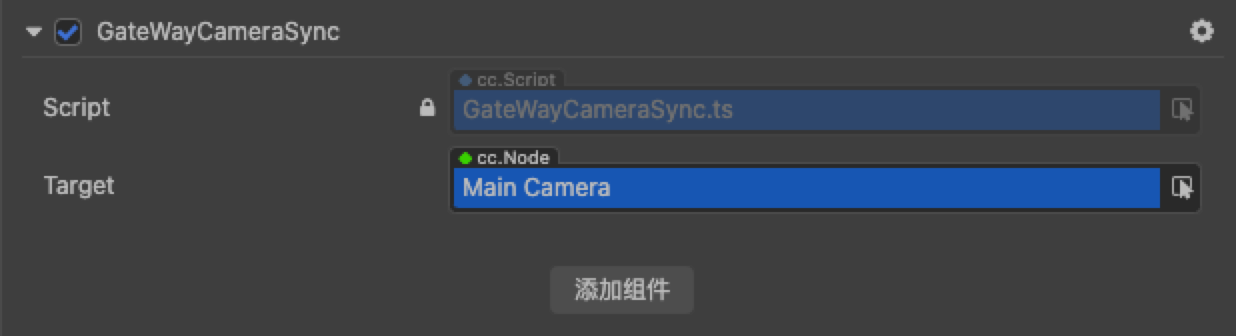
The image of the target camera has been rendered on this model, but it is currently only a fixed camera, which seems too rigid to observe from different angles. It should be synchronized with your main camera when the character is moving. To achieve this function, write a synchronization script. First, create a script called GateWayCameraSync:
import {_decorator, Component, Node, Vec3, v3} from'cc  ' ;
const {ccclass, property} = _decorator;

@ccclass( 'GateWayCameraSync' )
export  class GateWayCameraSync extends Component {
    @property(Node)
    target:Node = null;
    private offset:Vec3 = null;
    private vec3:Vec3 = v3();
    start  () {
        this.offset = this.node.worldPosition.clone().subtract(this.target.position);
    }

    update (deltaTime: number) {
        if (this.target){
            Vec3.add(this.vec3,this.target.worldPosition,this.offset);
            this.node.setWorldPosition(this.vec3);
            this.node.setWorldRotation(this.target.worldRotation);
        }
    }
}
At the very beginning, it needs to calculate the difference with the main camera and refer to the target camera through the Target attribute. At the beginning of the script, through the vector subtraction, the offset relative to the world coordinate of the target is obtained, and then in Update Synchronize continuously.
Now, return to Creator, add this script for the camera, add a reference to the main camera. To be more natural, adjust the camera’s position a bit because the initial position and the portal are not very suitable.
True Transmission
The effect of the portal must be teleportation, so we have to complete the teleportation operation. To achieve this ability, we will use triggers.
Select the model of the portal, add a collision body to it, and tick the option as a trigger. Since it is not a physical object, there is no need to add a physical entity.
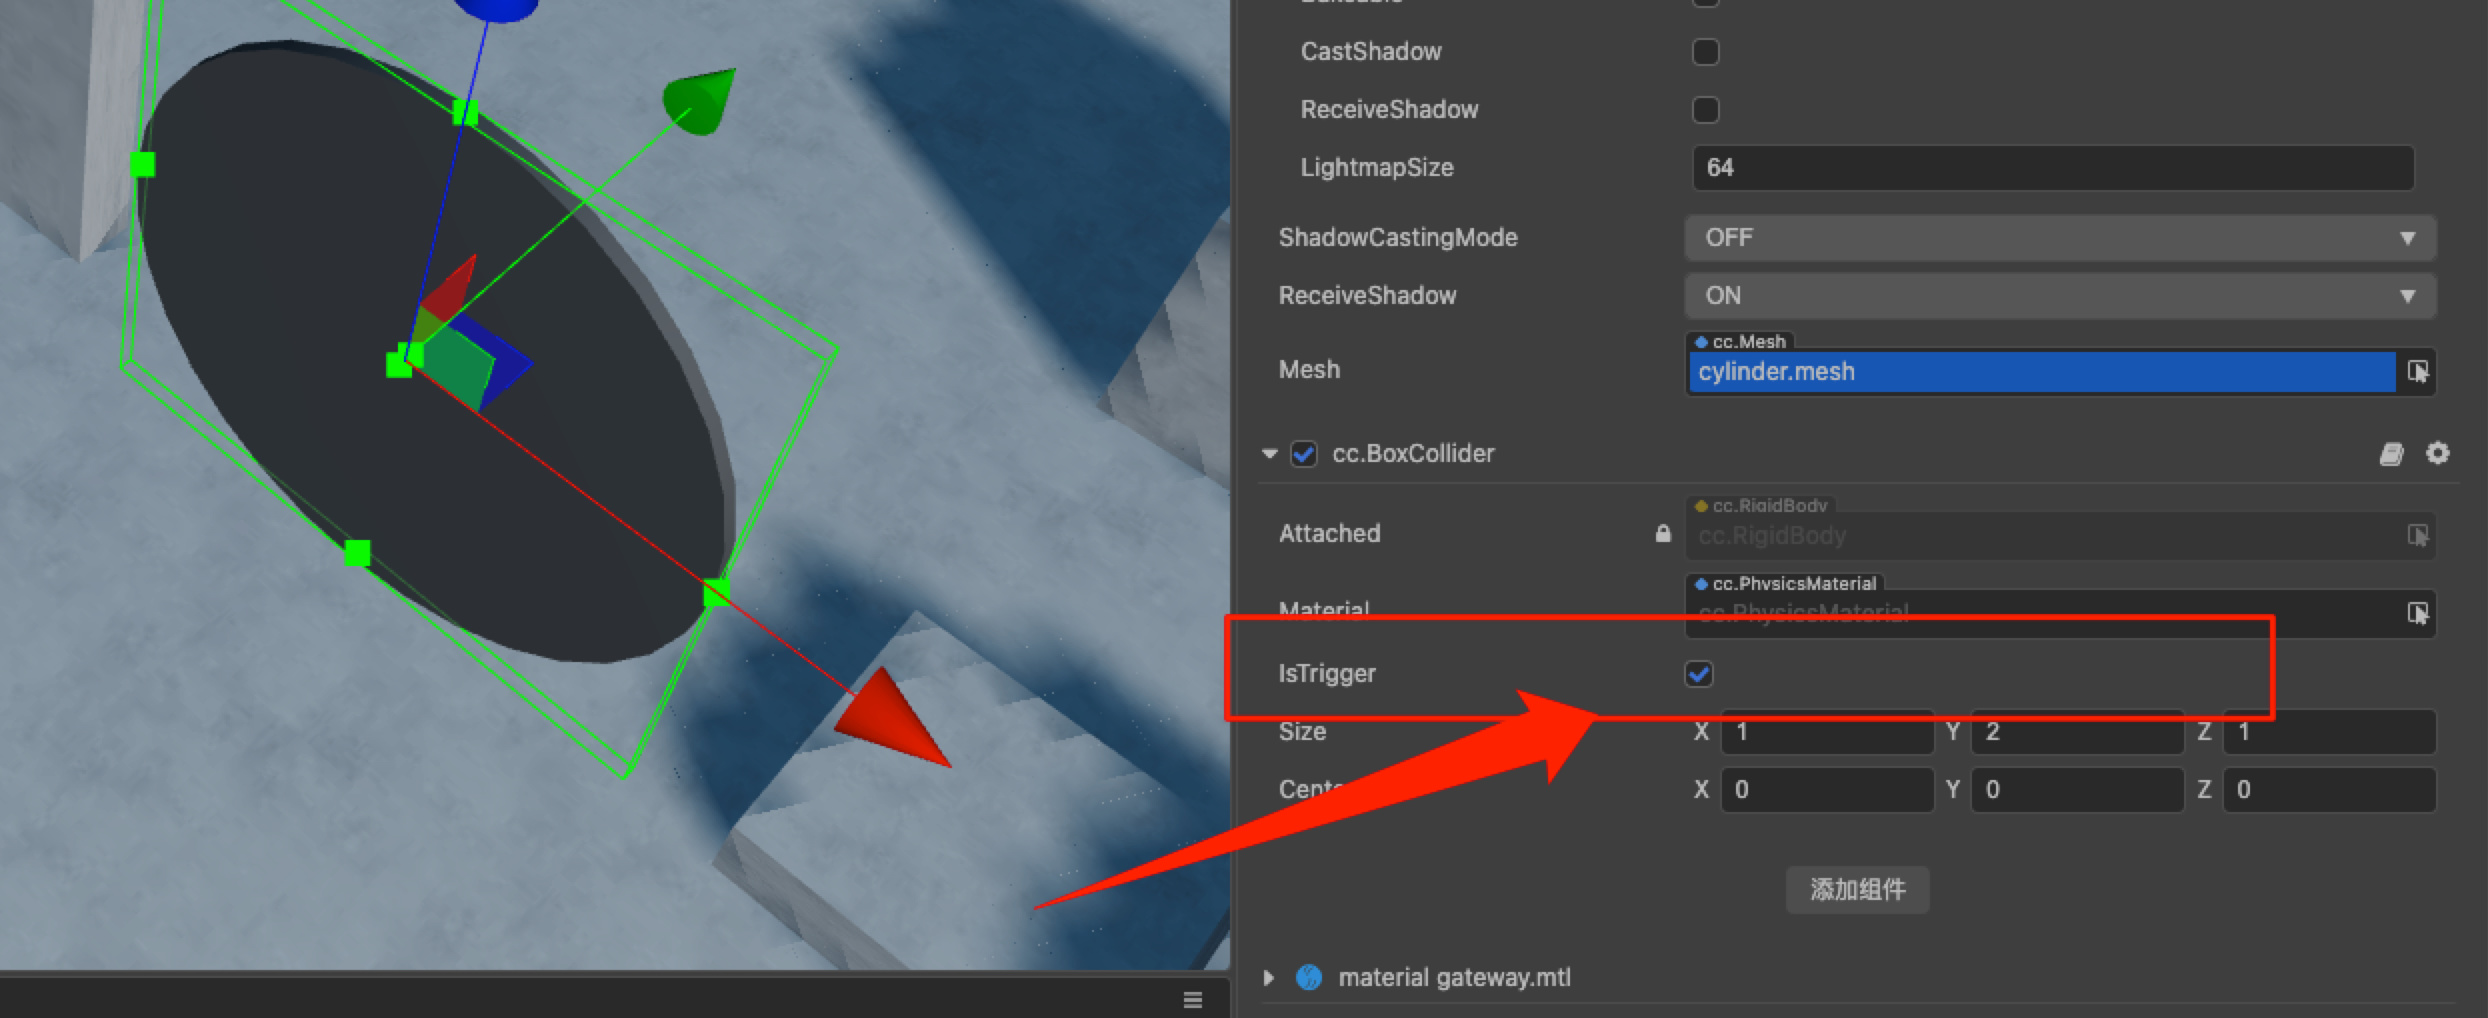
Then add a script called Trigger Teleport, which will teleport yourself to the target point after the trigger collides:
import {_decorator, Component, Node, Collider} from'cc ' ;
const {ccclass, property} = _decorator;
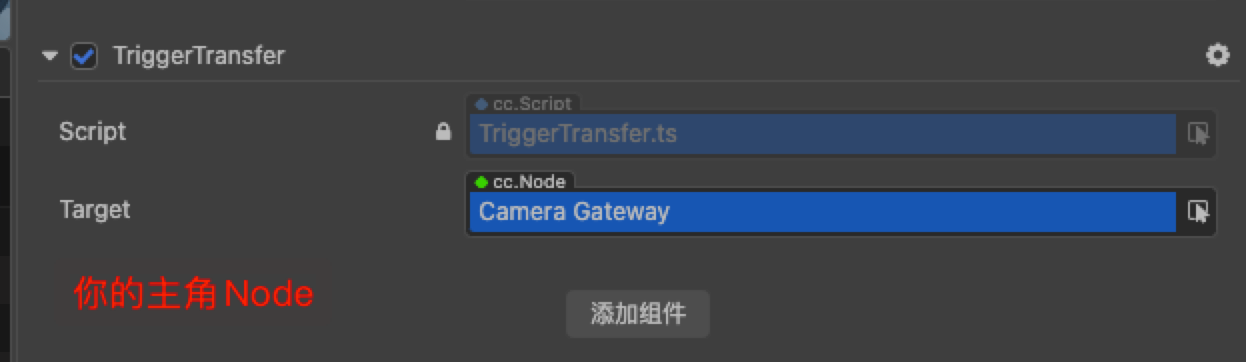
@ccclass( 'TriggerTransfer' )
export class TriggerTransfer extends Component {
@property(Node)
target:Node = null;
start ( ) {
const c = this.getComponent(Collider);
c.on( 'onTriggerEnter' ,this.onTriggerEnter,this);
}
private onTriggerEnter (){
this.node.setWorldPosition(
this.target.worldPosition
);
}
}
In the above code, a reference to a target is used to quickly teleport to its coordinate point. In fact, it is also possible to manually input a coordinate, but there is a node object as a reference, which is more intuitive.
Now start to listen to the trigger event at Start. When the trigger event is triggered, set your position directly as the target position attribute to achieve the teleport effect.
Now go back to Creator, add the script to the character, and find the referenced object. I simply set the target point directly to the portal camera.
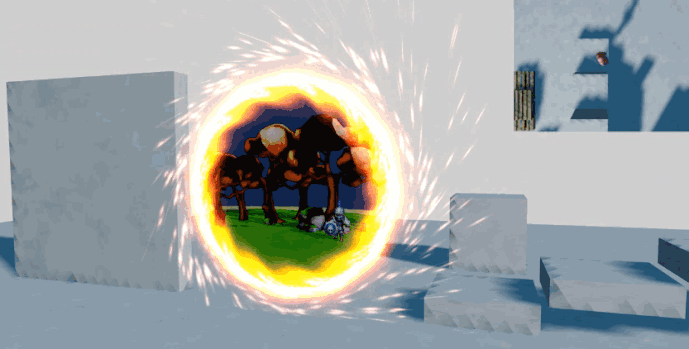
Take a look at the effect. When the character hits the portal object, it triggers a collision event, thus teleporting himself to the target point.
Optimization
The picture does not look very clear. This can be solved by modifying the size of the rendered image.
const renderTex = new RenderTexture();
renderTex.reset({
    width: 512,
    height: 512
});
The picture in the portal is a bit dark and looks very discordant. The solution is to directly increase the exposure of the portal camera and adjust it to two levels.
Pros and cons. In fact, the content you see on the front and back of the portal should be the same, but since we have adopted the camera to fully synchronize, it will be weird to look at the back. If you want to modify this part, do some mathematical calculations, which will not be realized here. You only need to make a reverse judgment on the target position of the portal.
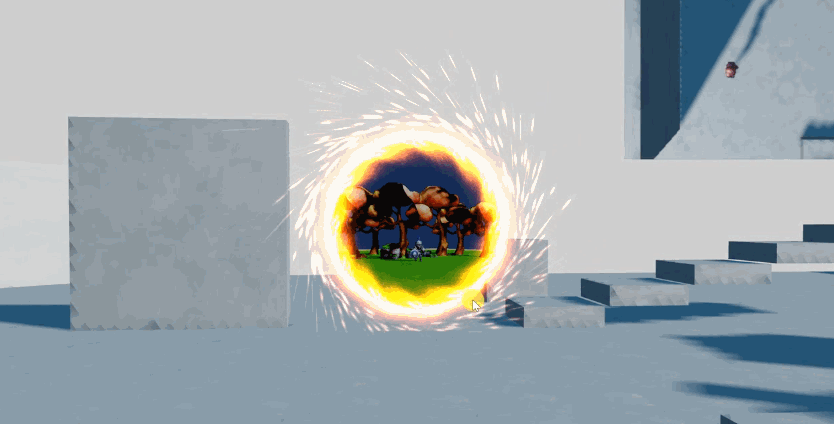
Special effects
This bare portal is definitely not as advanced as the blessing with special effects. Later we will use the particle system to complete the cool effect.
First, prepare an image and make a transparent aperture.
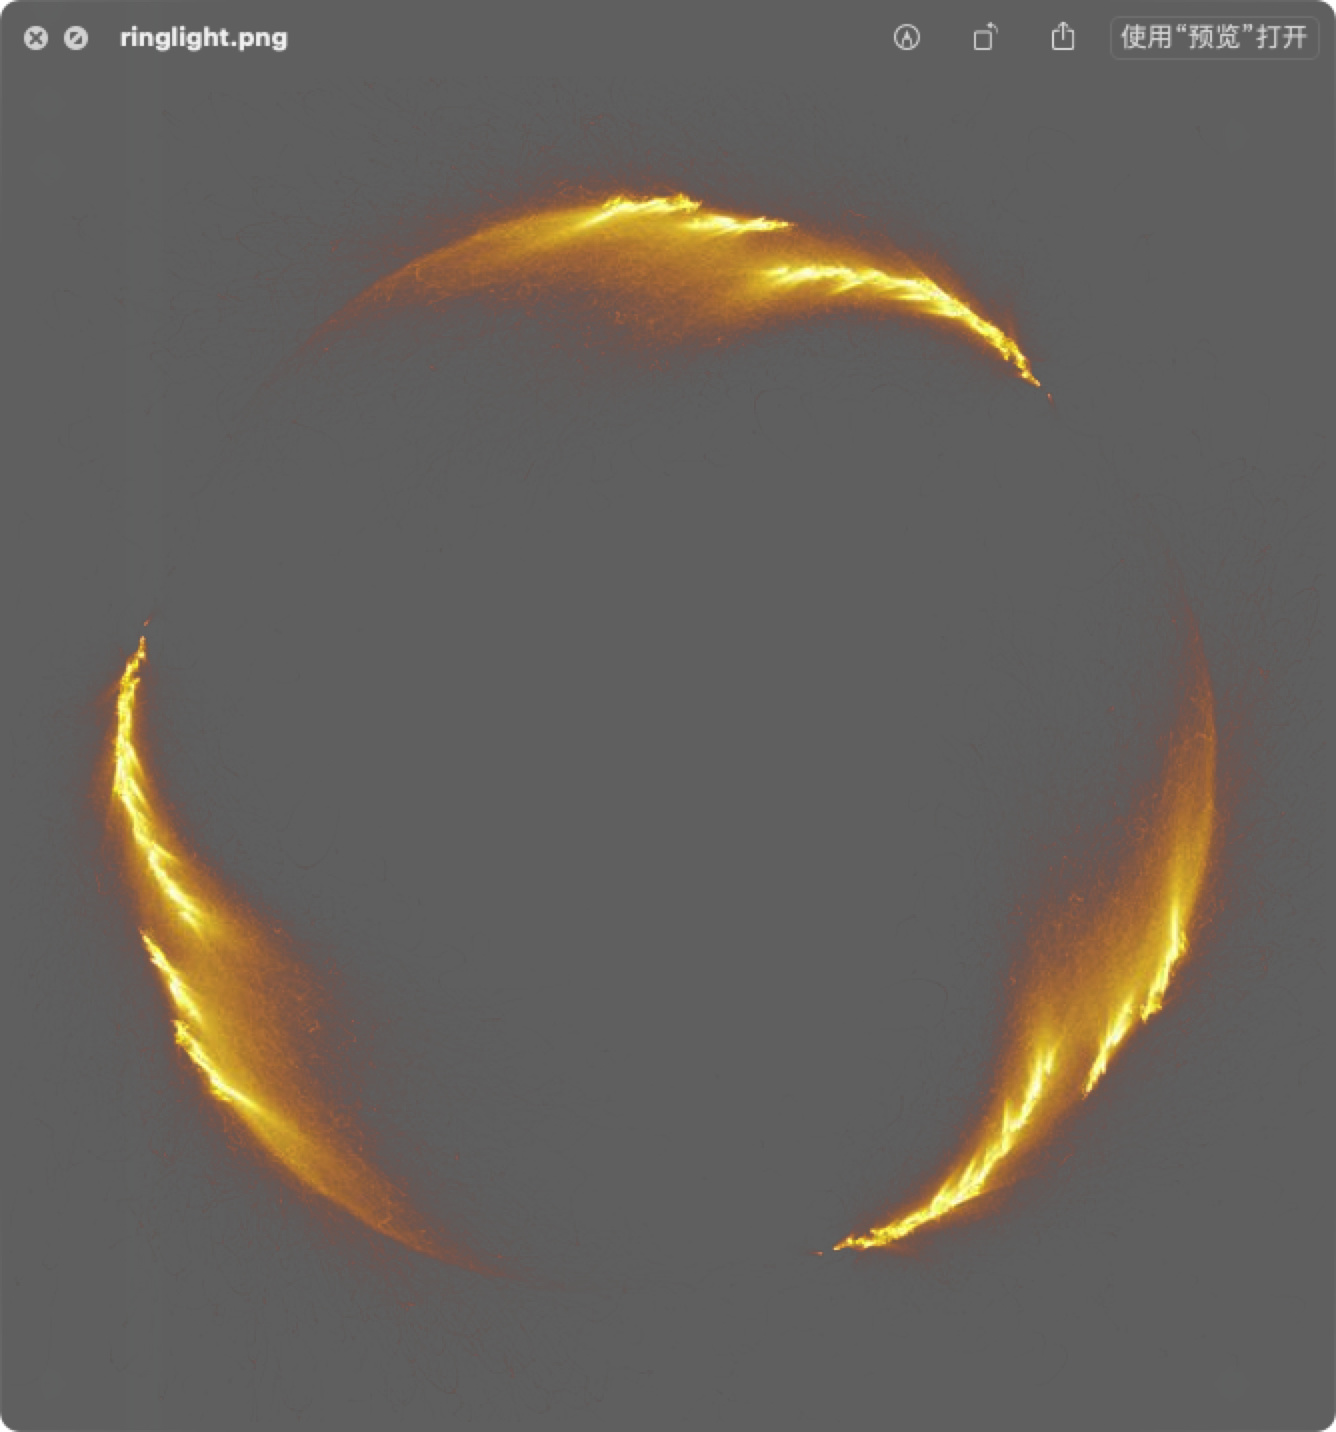
To make adjustments according to your needs. Put the texture in the project, and create a new material for the particles at the beginning because since the version of Creator 3.x and later, the image texture cannot be directly applied to the particles. A material is needed to take over the texture. Open the diffuse reflection map, put the aperture texture imported earlier, and click “Agree” to apply.
Create a new particle system in the scene, remove the emission module, adjust the size and position parameters, modify the particle material and replace it with the one we just created, change the rendering mode to the model, and select the patch as the basic Model.
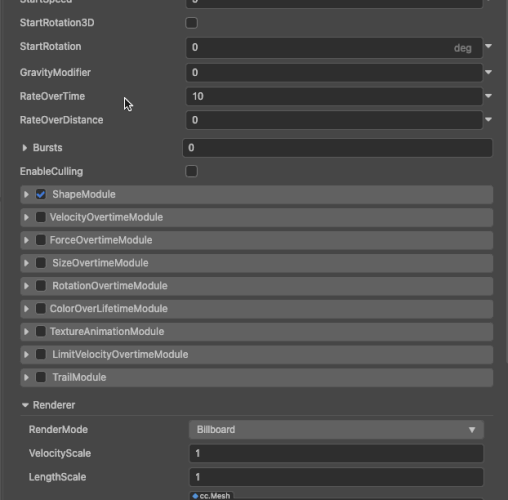
There is a small bug in v3.3 here. You will find that the previously referenced material is missing. Don’t worry if it just doesn’t show up. Due to the direction problem, some basic parameters and sizes need to be modified to make it fit the model of the portal, depending on the size and orientation of your portal.

Check the rotation module on the particle system and set the angle of the rotation z-axis to -180. After that, you can basically see the overall effect.

Additional features, for example, could be to add other jets. The rest is to play each. I hope you can find more interesting applications for it.
Concluding remarks
With Creator 3.x, there are more complete 3D game engine features, which enables many interesting gameplay to be brought into play. From v3.0 to v3.3, Cocos has made a lot of optimization and improvements, and I believe it will get better and better in the future.
I’m Nowpaper, a dad in the game industry. If you like this tutorial, welcome to follow my BiliBili page. This is my motivation to make more videos. See you next time!