
How to make a simple Snooker game with Cocos Creator
Note: This tutorial is written for Cocos Creator v2.0.10. You can click here to get it and install it.
Before Starting
Before starting to build games with Cocos Creator, you should have a familiar understanding with Cocos Creator. If you have any questions, or need a quick refresher, please review Cocos’s official documentation: Physics System, UI, Listening to and launching events, Actions and Action Lists, Prefab and Atlas Asset.
Let’s start
Use the physics system
We use physical simulation to achieve the movement of the balls, so that the balls can move as realistically as possible. The physics system is closed by default in Cocos Creator, but we can start to use it with this code:
let physicsManager = cc.director.getPhysicsManager();
physicsManager.enabled = true;
Also, we can set the physics system to debug mode so that we can see more debug info in preview:
cc.director.getPhysicsManager().debugDrawFlags = cc.PhysicsManager.DrawBits.e_aabbBit |
    cc.PhysicsManager.DrawBits.e_pairBit |
    cc.PhysicsManager.DrawBits.e_centerOfMassBit |
    cc.PhysicsManager.DrawBits.e_jointBit |
    cc.PhysicsManager.DrawBits.e_shapeBit
    ;
You can copy this code in your script to open the physics system, but usually it is suggested that developers create a physics manager component to implement setting features. Example:
/**
 * physics manager component script
 */

cc.Class({
    extends: cc.Component,

    properties: {
       active: {
           default: true,
           tooltip: 'open physics system on component enabled',
       },
       aabb:{
           default: true,
           tooltip: 'drawing AABB rect debug info',
       },
       pair: {
           default: true,
       },
       centerOfMass: {
           default: true,
           tooltip: 'drawing collider's center of mass'
       },
       joint: {
           default: true,
           tooltip: 'drawing joint info between colliders'
       },
       shape: {
           default: true,
           tooltip: 'drawing shape info of colliders'
       },
       gravity: {
           default: cc.v2(0,-960),
           tooltip: 'the physics worl gravity, default is -960 y-axis'
       }
    },

    onEnable() {
        //open or close physics system
        let physicsManager = cc.director.getPhysicsManager();
        if (physicsManager.enabled && this.active) {
            cc.warn('The physical system is enabled!');
        }
        physicsManager.enabled = this.active;

        if (!this.active) {
            return;
        }
        //set gravity value
        physicsManager.gravity = this.gravity;

        //set physics debug flag info
        let drawBits = cc.PhysicsManager.DrawBits;
        if (CC_PREVIEW) {
            physicsManager.debugDrawFlags =
            (this.aabb && drawBits.e_aabbBit) |
            (this.pair && drawBits.e_pairBit) |
            (this.centerOfMass && drawBits.e_centerOfMassBit) |
            (this.joint && drawBits.e_jointBit) |
            (this.shape && drawBits.e_shapeBit);
        } else {
            physicsManager.debugDrawFlags = 0;
        }
    },

    onDisable() {
          //close physics system when this component is disabled
        let physicsManager = cc.director.getPhysicsManager();
        physicsManager.debugDrawFlags = 0;
        physicsManager.enabled = false;
    }
});
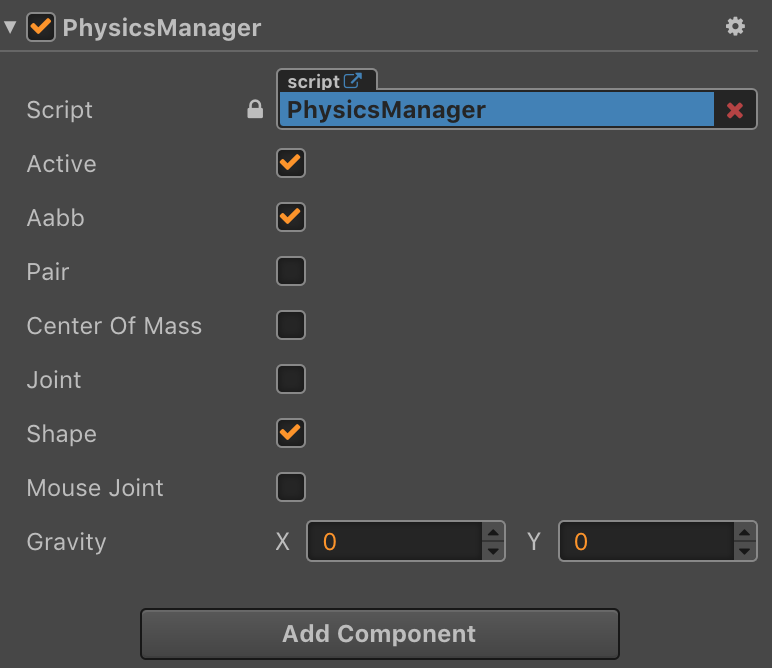
When you’ve completed this script, you can add it to Canvas node, Then you can see its Property Settings Panel.
Example: make sure that you have set gravity to 0,0 and open the physics system. For a good preview, select the Shape option.
Why do we set gravity to 0,0? Because our game is a top view game, if we use the default gravity of 0,-960, then the balls will fall down to the bottom of the screen, influenced by gravity. We do not want this behavior, so we use 0,0.
Create the table node
Create a Sprite node named table. Its parent is the Canvas node. This node is our billiard table. Set its SpriteFrame property using the name bg.
Now we implement its physics features:
- Since the table is motionless, we set the
Typeproperty withStatic. - Unselect the
AwakeOnLoadproperty, because we do not want it awakened.
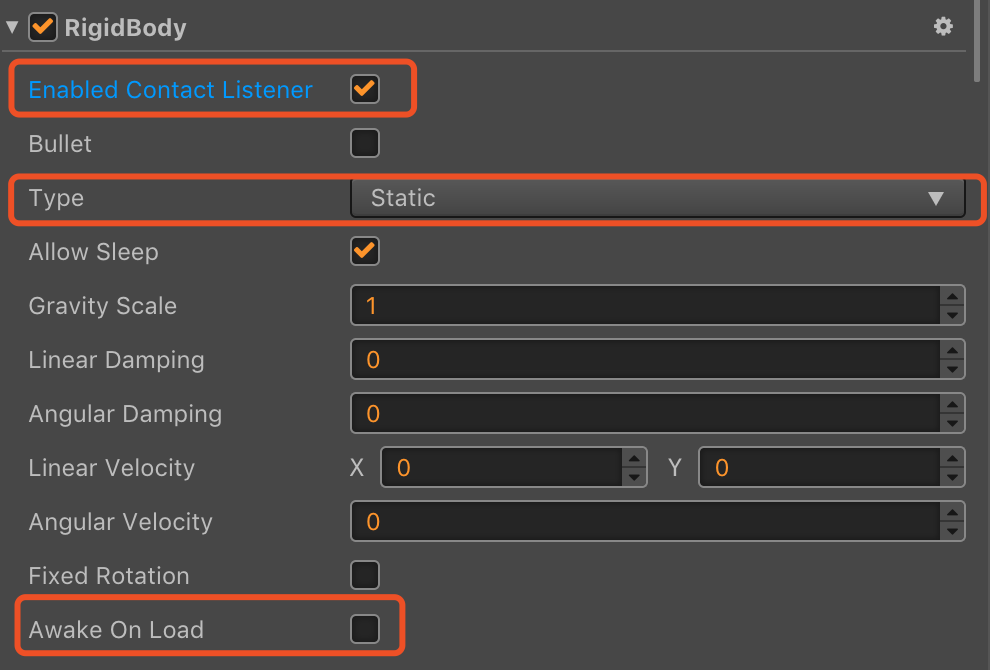
- Make sure to select the option
Enable Contact listener. - Add a 4 four-box collider component, through these collisions. The balls can not be dropped outside the table.
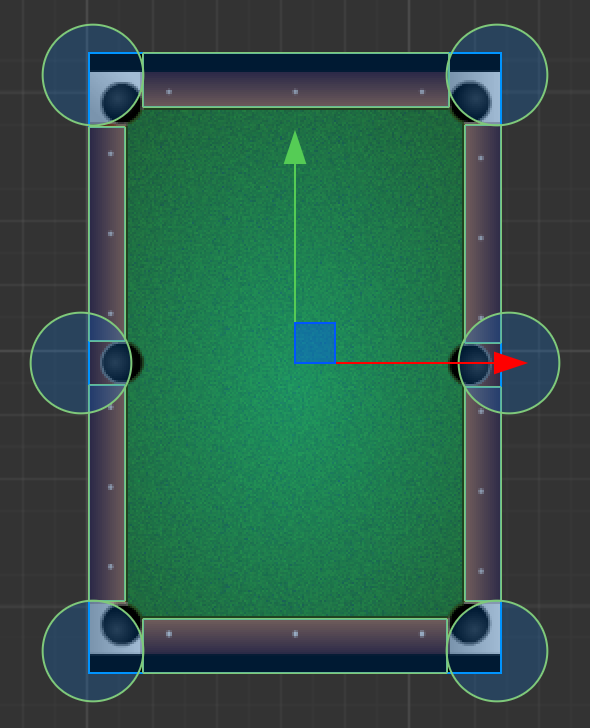
- You can select the option
Editing, and then you can change the collider size or position at scene editor. - The box colliders
tagproperty should be0. - Add six circle collider components. Through these collisions, we can know when the ball goes into the bag.
- Set these circle collider
tagproperty to1. This property will help us to know which collider is colliding .
When you finish these steps, you will see the table in the scene editor with debug info drawing. Example:
Red balls
- First, create a Sprite node named
rballand give theball_red.pngtexture to its spriteframe property. - The ball also needs a circle collider to simulate a real hit. To do this we add it and adjust the size to fit with the ball.
- Select the
Bulletproperty of the collider that we added. This is because the ball sometimes will have a burst in movement., If we did not selectBullet, the ball would cross other balls that also had a burst movement. - Unselect
Enabled Contact Listener, we do not need to handle any callback on the red balls. - Set
Typeproperty withDynamic, because the balls are movable. - Select
Allow Sleep, we need sleep status to help us judge when we could go to the next round and hit more balls. If all the balls are asleep, we can move on in the game; otherwise we can not handle the cue. - Set
Linear Dampingto1.2, and setAngular Dampingto0.8, though those properties we can let the balls slow down and sleep.
Ok, when those steps above are finished, a red ball is implemented. We can copy it and paste to create more red balls, also we can adjust those balls’ position, like this:
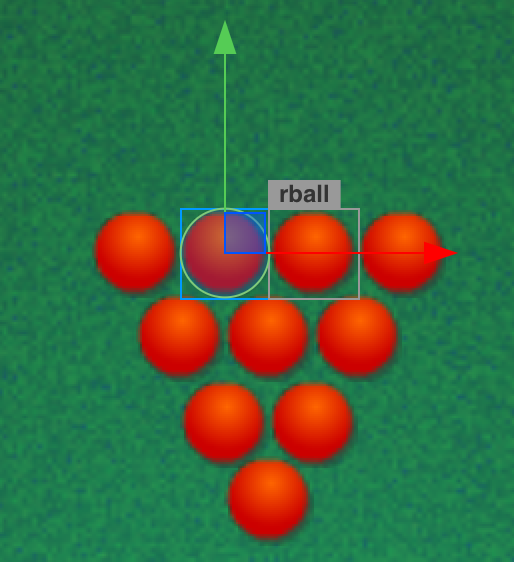
Next, we can make those red ball nodes, the child node, of an empty node named RedBalls. After editing the RedBalls Node in the scene, we drag it directly from Node Tree to Assets, thus, we create a prefab. Though this prefab, we can dynamically create red balls conveniently.
Cue ball
The cue ball is the same as a red ball. Only the spriteFrame property is different, used ball_white, it’s named wball
Cue
Create an empty node named cue as a child node of the wball node (the cue-ball node), and create a sprite node, as a child node, of this empty node that we just created.
Set the spriteframe property with cue asset. Adjust position like:
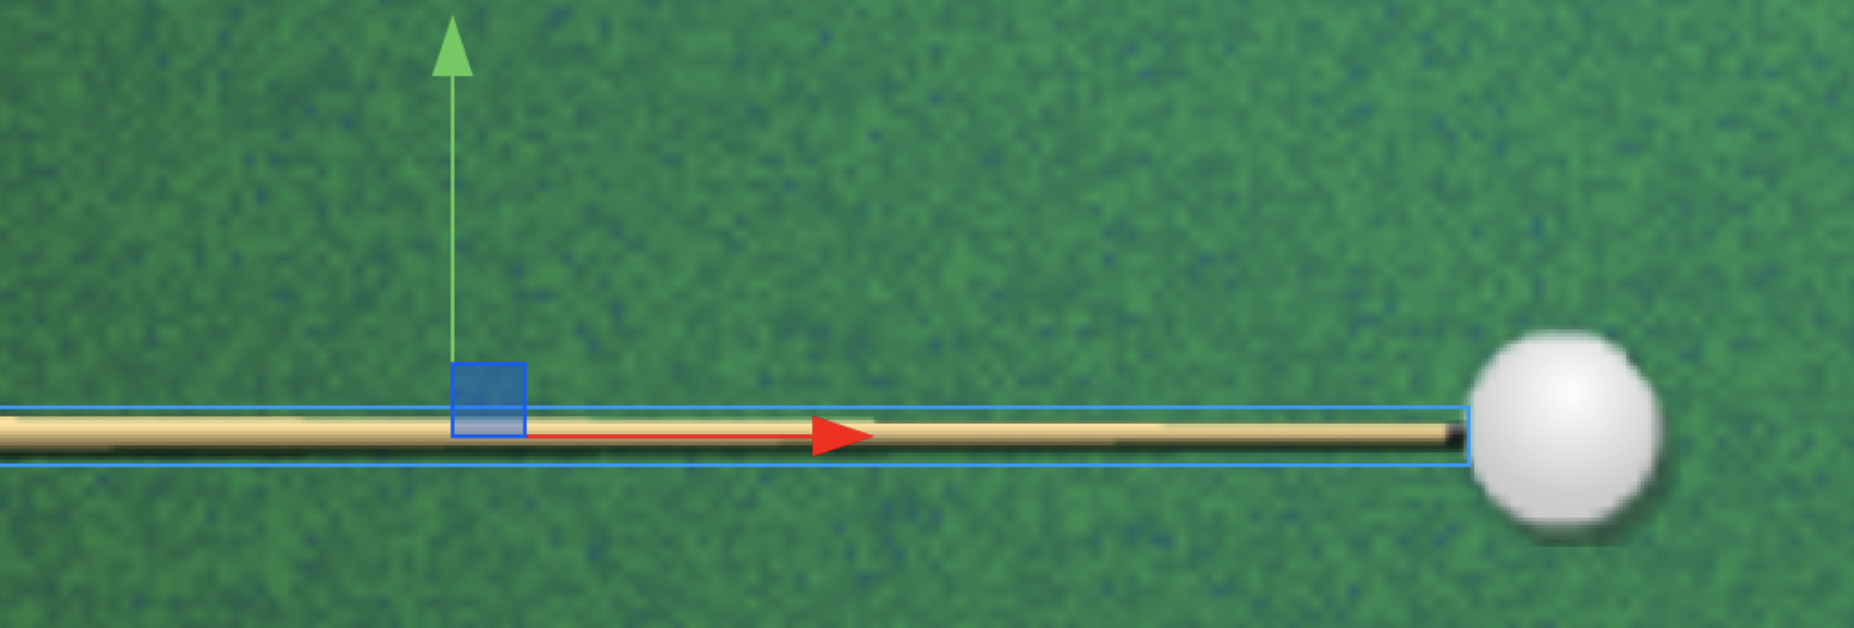
The hierarchical relationship of the nodes is designed for to easily calculations of the cue angle. Also, we make cue-ball and cue node as a prefab, and then we can dynamically create it conveniently.
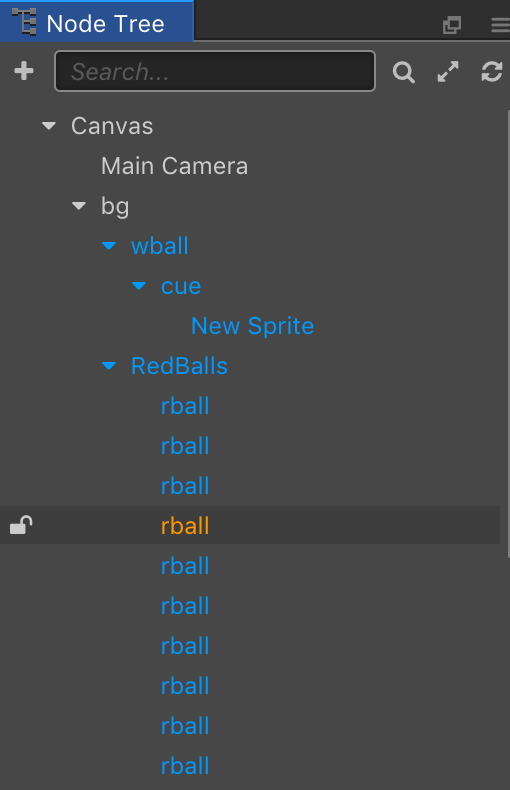
when you do that steps all above, your node tree should be like this:
Logic Scripts
Next, we will develop the scripts for our game logic.
Cue Script “Cue.js”
This script component will be added to the Cue node. As we know, the cue needs to implement the following feature:
- Listen to mouse events and control the direction of the cue through the movement of the mouse.
- Listen the to the press event of the left mouse button to control the strength of the cue by the pressing time.
- When the left mouse button is pressed, the cue moves backward, when the left mouse button is released, the cue moves forward and strike the cue-ball
- When the cue strikes the cue-ball, a custom event is sent to the cue-ball and makes it move to a new location.
- Listen to the custom event sent by the cue-ball, so that during the cue-ball movement, the cue cannot operate and hide from the display
After defining the requirements, we can start coding now:
The first thing to do is register some event listener in the start method:
start () {
    //register mouse movement event
    cc.Canvas.instance.node.on(cc.Node.EventType.MOUSE_MOVE, this.onMouseMove, this);
    //register pressing event of left mouse button
    cc.Canvas.instance.node.on(cc.Node.EventType.MOUSE_DOWN, this.onMouseDown, this);
    //register uppend event of left mouse button
    cc.Canvas.instance.node.on(cc.Node.EventType.MOUSE_UP, this.onMouseUp, this);
    //register the custom event sent by cue-ball when the cue-ball is stop
    cc.Canvas.instance.node.on("wball-sleep", this.onwballSleep, this);
},
After registering the events, we set a property of type cc.Node named cue,this property refer to the child node of cue,this is, the node that displays cue texture.
properties: {
        //the sprite node of cue
        cue : cc.Node
    },
next, we implement callbacks of those events one by one:
the callback of mouse move event
onMouseMove (event) {
    //When the mouse is pressed or the cue is not displayed,
    //the cue does not move any more. Invalid operation for cue
    if (this._mouseDown || this.node.opacity != 255) {
        return;
    }
    //Get the current position of the mouse
    var loc = event.getLocation();
    this._mousePosition = loc;
    //Converting the mouse position to parent coordinates
    loc = this.node.parent.convertToNodeSpaceAR(loc);
    //Calculate the pin with (-1,0) vector, which is the angle of the cue that need to rotate
    var angle = loc.signAngle(cc.v2(-1,0));
    angle = cc.misc.radiansToDegrees(angle);
    //set the rotation of the cue
    this.node.rotation = angle;
},
the callback of left mouse button pressing event:
onMouseDown (event) {
    //Invalid operation for cue when it is not displayed
    if (this.node.opacity != 255) {
        return;
    }
    //set the mouse down flag to true
    this._mouseDown = true;

    //Move the cue backward by 50 pixels per second
    //Here you can let the value of - 50 to component properties then we can easy to debug
    this.cue.runAction(cc.repeatForever(cc.moveBy(1, cc.v2(-50, 0))));
},
the callback of left mouse button upped event
onMouseUp (event) {
    if (this.node.opacity != 255) {
        return;
    }
    //Calculate the pixels of the cue moving backward,
    //and use this value to calculate the strength of the striking
    var force = this.cue.x - 182;
    //Stop the moveing backward action
    this.cue.stopAllActions();
    //use sequence action
    this.cue.runAction(cc.sequence(
        //here (-182,0) is the original position of the cue
        //you can let the value of -182 to component properties then we can easy to debug
        cc.moveTo(0.1, cc.v2(-182,0)).easing(cc.easeSineOut()),
        cc.callFunc(() => {
            //set the mouse down flag to false
            this._mouseDown = false;
            //create a custom event 'cue', and dispatch it
            //we designed two params for the custom event
            //the first param is the force value though it we can calculate the strike strength
            //the second param is the mouse position through it we can calculate the strike angle
            var customEvent = new cc.Event.EventCustom("cue", true);
            customEvent.force = force;
            customEvent.cue = this._mousePosition
            this.node.dispatchEvent(customEvent);
            //hide the cue
            this.node.opacity = 0;
        })
    ));
},
the custom event sent by cue-ball when the cue-ball is stopped
onballSleep () {
    //display the cue when the cue-ball has stopped
    this.node.opacity = 255;
},
Then we finished the coding of Cue.js script.
Cue-ball Script “wball.js”
The requirement of the cue-ball is simple, send the cue ball is all we need to do:
- Listen to the custom event ‘cue’ that is sent by cue.js and use it to calculate the velocity of the cue-ball after it has been hit.
- When the cue-ball has stopped, that is, when the awake property of the cue-ball rigidbody is false, then send a custom event named wball-sleep to the cue . The cue could know that it can be displayed and operated.
Let’s start coding!
First, is register event listeners in the start method
    start () {
        //listen the custom event 'cue'
        this.node.on("cue", this.onCue, this);
        //this flag is used for sign whether the cue-ball has stopped
        //it mainly used to send custom events only once during cue-ball is quiet
        //the cue-ball is start with sleep status, so we set the defualt value is true
        this._sleep = true;
    },
next is implement the callback when we received the cue event
    onCue (event) {
        if (this && this.node.parent) {
            //cue-ball start to move,so this flag turn to false
            this._sleep = false;
            //calcuate the direction of cue-ball movement
            var direction = this.node.parent.convertToNodeSpaceAR(event.cue);
            direction = direction.sub(this.node.position);
            direction = direction.normalize();
            //calcuate the linear velocity of the cue-ball and apply it according to the direction and force
            this.node.getComponent(cc.RigidBody).linearVelocity = direction.mul(-Math.pow(1.016, Math.abs(event.force)));
        }
    },
Finally is send wball-sleep event when the cue-ball is stopped
    update (dt) {
        if (!this.node.getComponent(cc.RigidBody).awake && !this._sleep) {
            //when the movement of cue-ball had stopped, we turn this flag to true,
            //and send the custom event 'wball-sleep' to tell the cue that the cue-ball had stopped
            this._sleep = true;
            cc.Canvas.instance.node.emit("wball-sleep");
        }
    },
Table Script “table.js”
This script is used to for the table. It helps us to implement these features:
The logic of ball-in-bag:
- Scored when we let the red ball into the bag, and decision og winning or losing.
- Reset the position of the cue-ball when it comes into the bag.
- When we start or restart the game, reset all the balls including the cue-ball and red balls, and reset the score.
The most important code is to implement the logic of bagging. This part of the code requires us to implement the onBeginContact method. onBeginContact callback is invoked when a collision is detected. If the script, which belongs to the same node with the collider component that implemented it.
Note: The Collider Components in the same node, will not do collision detecsion detection with each other forever.
Note: We need to select Enable contact listener in the rigidbody component properties, so that a corresponding callback will be generated, that is, we did it before.
This callback has 3 params: contact, selfCollider, otherCollider. It is easy to understand. As the name suggests, selfCollider refers to the collider on the node of the callback script, otherCollider refers to the other collider. The most important information is included in contact, like the location of the collision, the normal vector. Let’s implement this callback:
    onBeginContact(contact, selfCollider, otherCollider) {
        //if the tag property of the selfCollider is 1,
        //that means a collision occurs between a ball and the bag
        if (selfCollider.tag === 1) {
            //if the ball is cue-ball
            if (otherCollider.node.name === "wball") {
                //emit a custom event for reset cue-ball
                this.node.emit("wball", otherCollider.node);
            }
            else {
                //if the ball is red ball
                //the numbers of remaining red balls reduced by 1
                this._ballNum--;
                //update the label display
                this.ballLabel.string = "Remaining" + this._ballNum + "ball";
                //when the remaining red balls is 0, we win the game
                if (this._ballNum <= 0) {
                    this.gameUI.active = false;
                    this.winUI.active = true;
                }
            }
            //remove the node of ball from node tree
            otherCollider.node.removeFromParent(true);
        }
    },
Next, is the logic of reset cue-ball and red balls. It is simple. At this point, we will use the prefab of cue-ball and red ball that we made before:
    resetTable () {
        this.node.removeAllChildren(true);
        this.resetWhiteBall();
        this.resetRedBalls();
        this._ballNum = 10;
        this.winUI.active = false;
        this.startUI.active = false;
        this.endUI.active = false;
        this.gameUI.active = true;
        this.ballLabel.string = "Remaining" + this._ballNum + "ball";
    },

    resetWhiteBall () {
        var node = cc.instantiate(this.wballPrefab);
        node.parent = this.node;
    },

    resetRedBalls () {
        var node = cc.instantiate(this.redBalls);
        node.parent = this.node;
    },
Now, when we invoke resetTable function, we can reset the game easily. We can also easily reset cue-ball and red ball by calling resetWhiteBall and resetRedBalls.
Don’t forget register the custom event wball that we used in onBeginContact callback:
    start () {
        this.node.on("wball", (node) => {
            setTimeout(() => {
                this.resetWhiteBall();
            }, 100);
        })
    },
Ultimate
At this point, our billiard game had completed the core part, leaving behind some logic on UI, it is simple, but doesn’t implement every step. I hope that through the production of this mini-game can help you to understand Cocos Creator and its physics system
Here is the url of the completed code and project of the game on GitHub

 I’ll see what I can change, if it is text.