
Learn How To Build Your Own Bridge Building Race Game
Hypercasual continues to be hot as many different game types keep popping up and more fun gameplay is being created. One of these is 3D bridge building, where you collect bridge items and try to either get to the finish first or go the furthest.
This past week, a Cocos developer officially launched the source code for their game Run Fairy, a single-player hypercasual racing game you can purchase from the Cocos Store. The source code package of this project contains complete planning documents, project source code, art source files, and official support provides free WeChat mini-game online source code authorization services. The game can also be exported to HTML5 and mobile phones.

In the game, the character will move forward automatically. Players need to slide their finger left and right on the screen to control the direction of the character’s movement. By collecting water-resistant swiss rolls, you can build candy bridges to cut corners across the water. A total of 5 people participate in the game (One player and four AI players), and the player who reaches the end the fastest is the winner.
Running Fairy has a complete tutorial, including how to start the scene, how a camera follows, water surfaces and sky settings, player and AI control, how to load data, related configuration files, and more. In addition, it also has a map editor for players to extend their use.
Note: All instructions are in Chinese.
Today, the developer gave us some of the key technical points of this project to give to Cocos developers so everyone can analyze and study how the game works. The following four aspects they gave us are:
- Game scene and map generation
- Player control and AI
- Map editor
- Performance optimization
Game scene and map generation
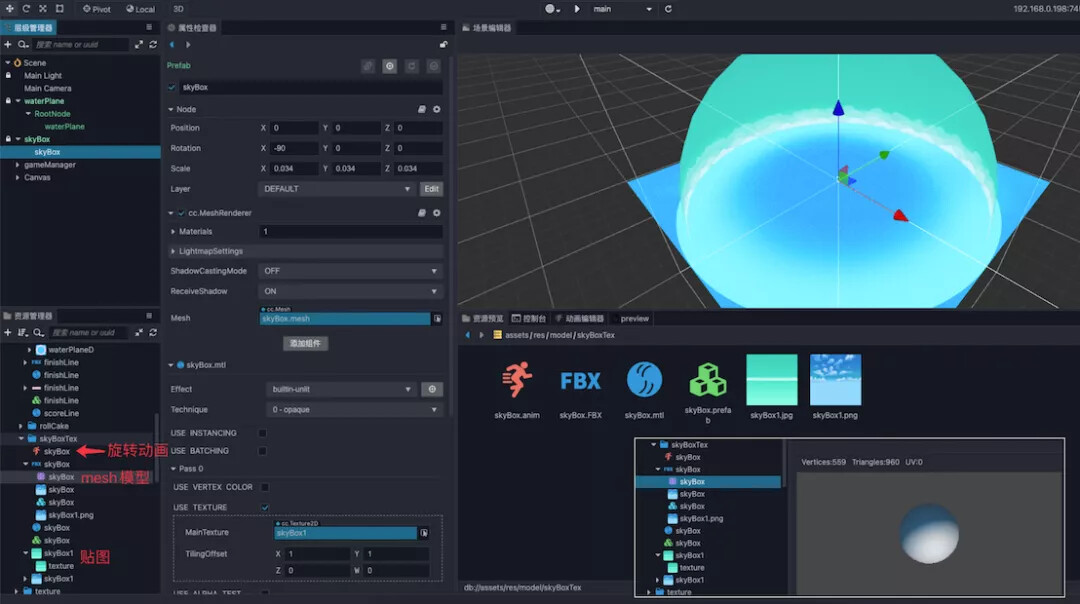
Running Fairy is set in a waterpark. For this beautiful environment, we added sky ball and water surface effects to the scene.
We only need simple pictures and simple models to achieve good-looking results!
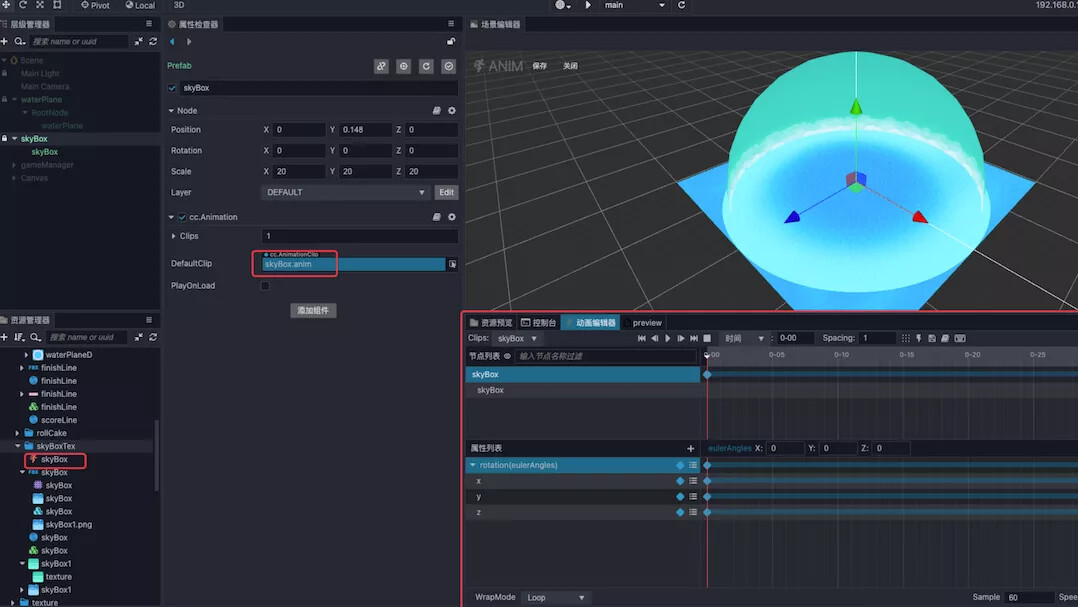
The sky ball consists of the following:
- Ball model
- Texture
- A rotating animation
- A builtin-unlit material
The water surface is composed of the following parts:
- Plane model (a square)
- Noise map (Shows water ripples)
- Depth map (control the color of water, the change from center to edge)
- A small piece of shader code
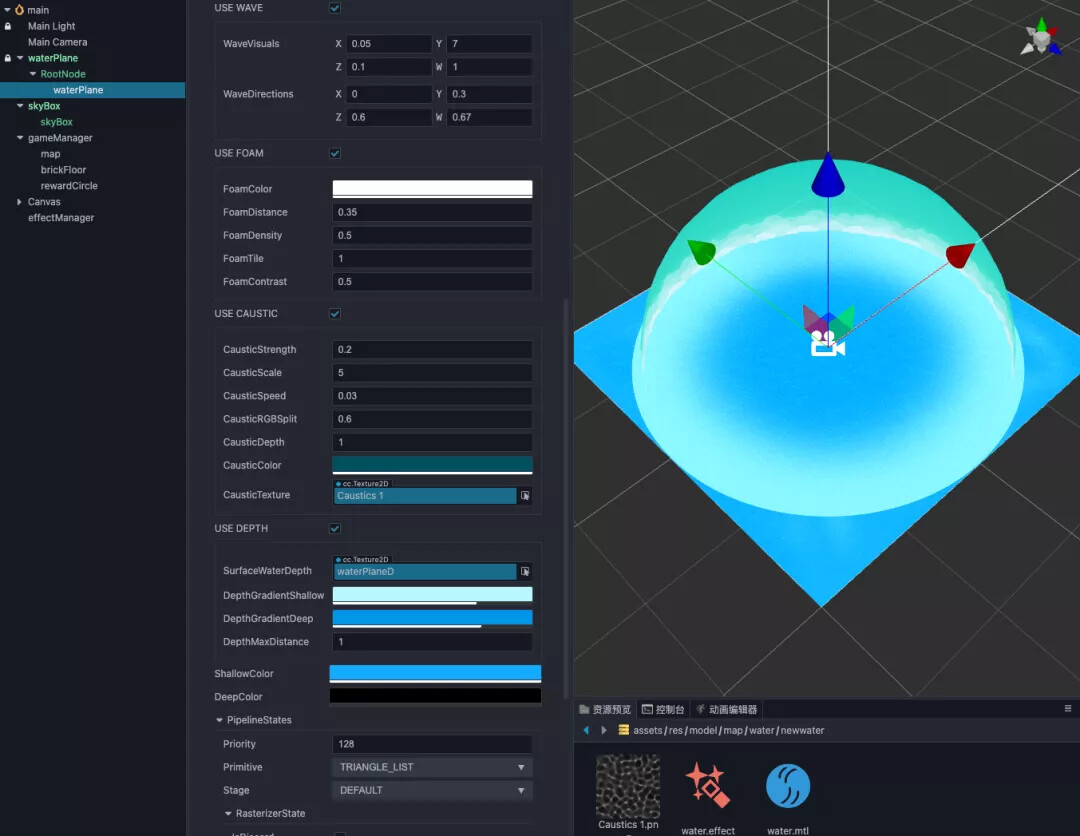
Vertex offset animation, up and down:
#if USE_WAVE
  vec3 offset;
  vec3 tangent;
  vec3 bitangent;
  gerstnerWaves(worldPos.xyz, waveVisuals.xyz, waveDirections, offset, v_normal, tangent, bitangent);
  worldPos.xyz += offset;

  #if USE_NORMAL_MAP
    v_tangent = tangent;
    v_bitangent = bitangent;
  #endif
#endif
Water base color:
// color
vec4 waterColor = shallowColor;
Calculate the water ripple:
// caustic
vec4 finalCausticColor = vec4(0.);
#if USE_CAUSTIC
    float causticDepth = causticParams2.x;
    vec3 causticColor = causticParams2.yzw;

    finalCausticColor.rgb = caustic() * causticColor;
#endif
Calculate the depth color:
    #if USE_DEPTH
      float waterDepth = texture(surfaceWaterDepth, v_uv).r;
      float depth = clamp(1. - waterDepth / depthMaxDistance, 0., 1.);
      vec4 depthColor = mix(depthGradientShallow, depthGradientDeep, depth);
      waterColor = alphaBlend(depthColor, waterColor);
    #endif
Final color:
// final
vec4 finalColor = waterColor + finalFoamColor + finalCausticColor;
The map is designed in the form of map blocks. A few map blocks are preset first, and then a complete map is generated according to information such as the location zoom of the map blocks in the configuration table.

// Layout map blocks according to configuration table information ndItem.position = gameUtils.setStringToVec3(itemData.position);
ndItem.scale = gameUtils.setStringToVec3(itemData.scale);
ndItem.eulerAngles = new Vec3(0, Number(itemData.eulY), 0);
Player control and AI
Camera following and easing
How can the little fairy run without a photographer? To better capture the movement of the little fairy, a follower camera is designed here.
Just a small lookAt() plus a smooth interpolation, the camera follows as you wish!
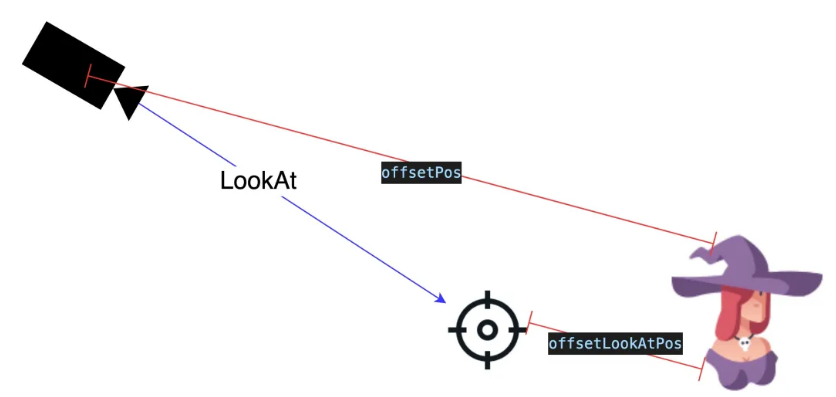
Core code explanation:
/**
  * Move the camera position/angle to run every frame
  * @param lerpPosNum coordinate modified lerp parameter
  * @param lerpEulNum Angle modified lerp parameter
 */
private followTarget(lerpPosNum: number, lerpEulNum: number ) {
    // The location of the target node
    const targetPos = this.ndTarget.getPosition();
    // The rotation of the target node on the y axis
    const eulerY = this.ndTarget.eulerAngles.y;
    const _quat = Quat.fromEuler(new Quat(), 0, eulerY, 0);
    // The y rotation matrix relative to the position of the target node, used to shift the offset vector to the coordinate system
    const _mat4 = Mat4.fromRT(new Mat4(), _quat, targetPos);
    // Camera position offset vector
    v3_pos.set(this.offsetPos);
    // Find the offset vector in the coordinate system of the target node
    v3_pos.transformMat4(_mat4);
    // Find an interpolation
    v3_selfPos.lerp(v3_pos, lerpPosNum);
    // Set the position of the camera
    this.node.position = v3_selfPos;

    // Find the target point coordinates of lookAt
    v3_pos.set(targetPos.add(this.offsetLookAtPos));
    // find an interpolation
    v3_look.lerp(v3_pos, lerpEulNum);
    // Set camera lookAt
    this.node.lookAt(v3_look);
}
Combination of code control role movement and movement trigger
The little fairy is currently running on a horizontal plane, so the moving position of the little fairy can be controlled according to the speed and the orientation of the character.
// Fall movement
this._nowSpeedY += gameConstants.ROLE_GRAVITY_JUMP * dt;
pos.y += this._nowSpeedY * dt;

// Move forward
let speed = dt * this._speed;
const eulYAngle = eul.y * macro.RAD;
const addX = speed * Math.sin(eulYAngle);
const addZ = speed * Math.cos(eulYAngle);
pos = pos.subtract3f(addX, 0, addZ); //The character’s forward direction is the opposite of the current direction
this.node.setPosition(pos);
Because some roadblocks have unique shapes, we added collision triggers for the little fairy and roadblocks. The triggering of the trigger can be controlled by setting the grouping and mask.
//As long as the following conditions are true, it will be tested
//(GroupA & MaskB) && (GroupB & MaskA)
//Collision group/mask

COLLIDER_GROUP_LIST: {
    DEFAULT: 1 << 0,
    PLAYER: 1 << 1,
    FLOOR: 1 << 2,
    AI: 1 << 3,
},
// Set the grouping and mask of the floor
let colliderList = ndItem.getComponents(Collider)!;
for (let j = 0; j < colliderList.length; j++) {
    colliderList[j].setGroup(gameConstants.COLLIDER_GROUP_LIST.FLOOR);
    colliderList[j].setMask(gameUtils.getAiAndPlayerGroup());
}
// Set role grouping, mask
const rbAi = this.node.addComponent(RigidBody);
rbAi.setGroup(gameConstants.COLLIDER_GROUP_LIST.AI);
rbAi.setMask(gameConstants.COLLIDER_GROUP_LIST.FLOOR);
The information on whether the little fairy has reached the end and the road under her feet are recorded based on trigger events.
// Trigger event
collider.on('onTriggerEnter', this._triggerEnter, this);
collider.on('onTriggerExit', this._triggerExit, this);

_triggerEnter(event: ITriggerEvent) {
   if (ndOther.name === gameConstants.CSV_MAP_ITEM_NAME.FINISH_LINE) {
        // reach destination
        return;
    }
    // The character is in contact with the ground, join the list
this._onFloorList.push(ndOther);
}

_triggerExit(event: ITriggerEvent) {
    if (!event.otherCollider) return;
    let ndOther = event.otherCollider.node;
    let findIndex = this._onFloorList.indexOf(ndOther);
    if (findIndex !== -1) {
        // The character leaves the ground, remove the list
        this._onFloorList.splice(findIndex, 1);
    }
}
Of course, the main logic of Little Fairy adopts the mode of the state machine to control and design.

The action of the little fairy is judged according to the state mode:
set roleState(state: number) {
    this._roleState = state;
    // Play the corresponding action
    this._aniRole.play(gameConstants.ROLE_STATE_NAME[this._roleState]);
}
AI
Most of the logic of the AI fairy is connected with the logic of the player-controlled fairy. The difference is that AI reads the configuration and generates a path.
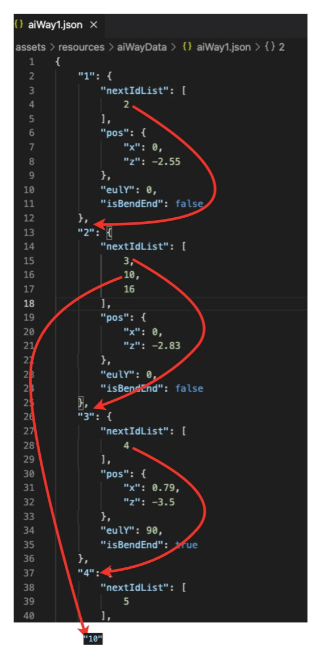
When moving, calculate the interpolation between the two path points according to the speed to calculate the final position.
// Move through the xz axis of the Bezier path point
this._bezierNowId += dt * this._speed;
let bezierNowId = Math.floor(this._bezierNowId);

if (bezierNowId >= this._bezierList.length - 1) {
    this._isOver = true;
    // reach destination
    return;
}

if (bezierNowId !== this._bezierlastId) {
    // Processing direction
    this._bezierlastId = bezierNowId;
    const sub = this._bezierList[bezierNowId].clone().subtract(this._bezierList[bezierNowId + 1]);
    this._nextEul.set(0, Math.atan2(sub.x, sub.y) * macro.DEG, 0)
}

// Interpolation
const subIndex = this._bezierNowId - bezierNowId;
this.node.setRotationFromEuler(this._nextEul);
const nextPos = this._bezierList[bezierNowId].clone().lerp(this._bezierList[bezierNowId + 1], subIndex)
this.node.setPosition(nextPos.x, pos.y, nextPos.y);

this._checkSpeed(dt);
Map editor
The map configuration and AI path configuration mentioned above are not configured out of thin air.
For this reason, a map.scene scene is specially added to the Cocos Creator editor to provide visual configuration for planning.
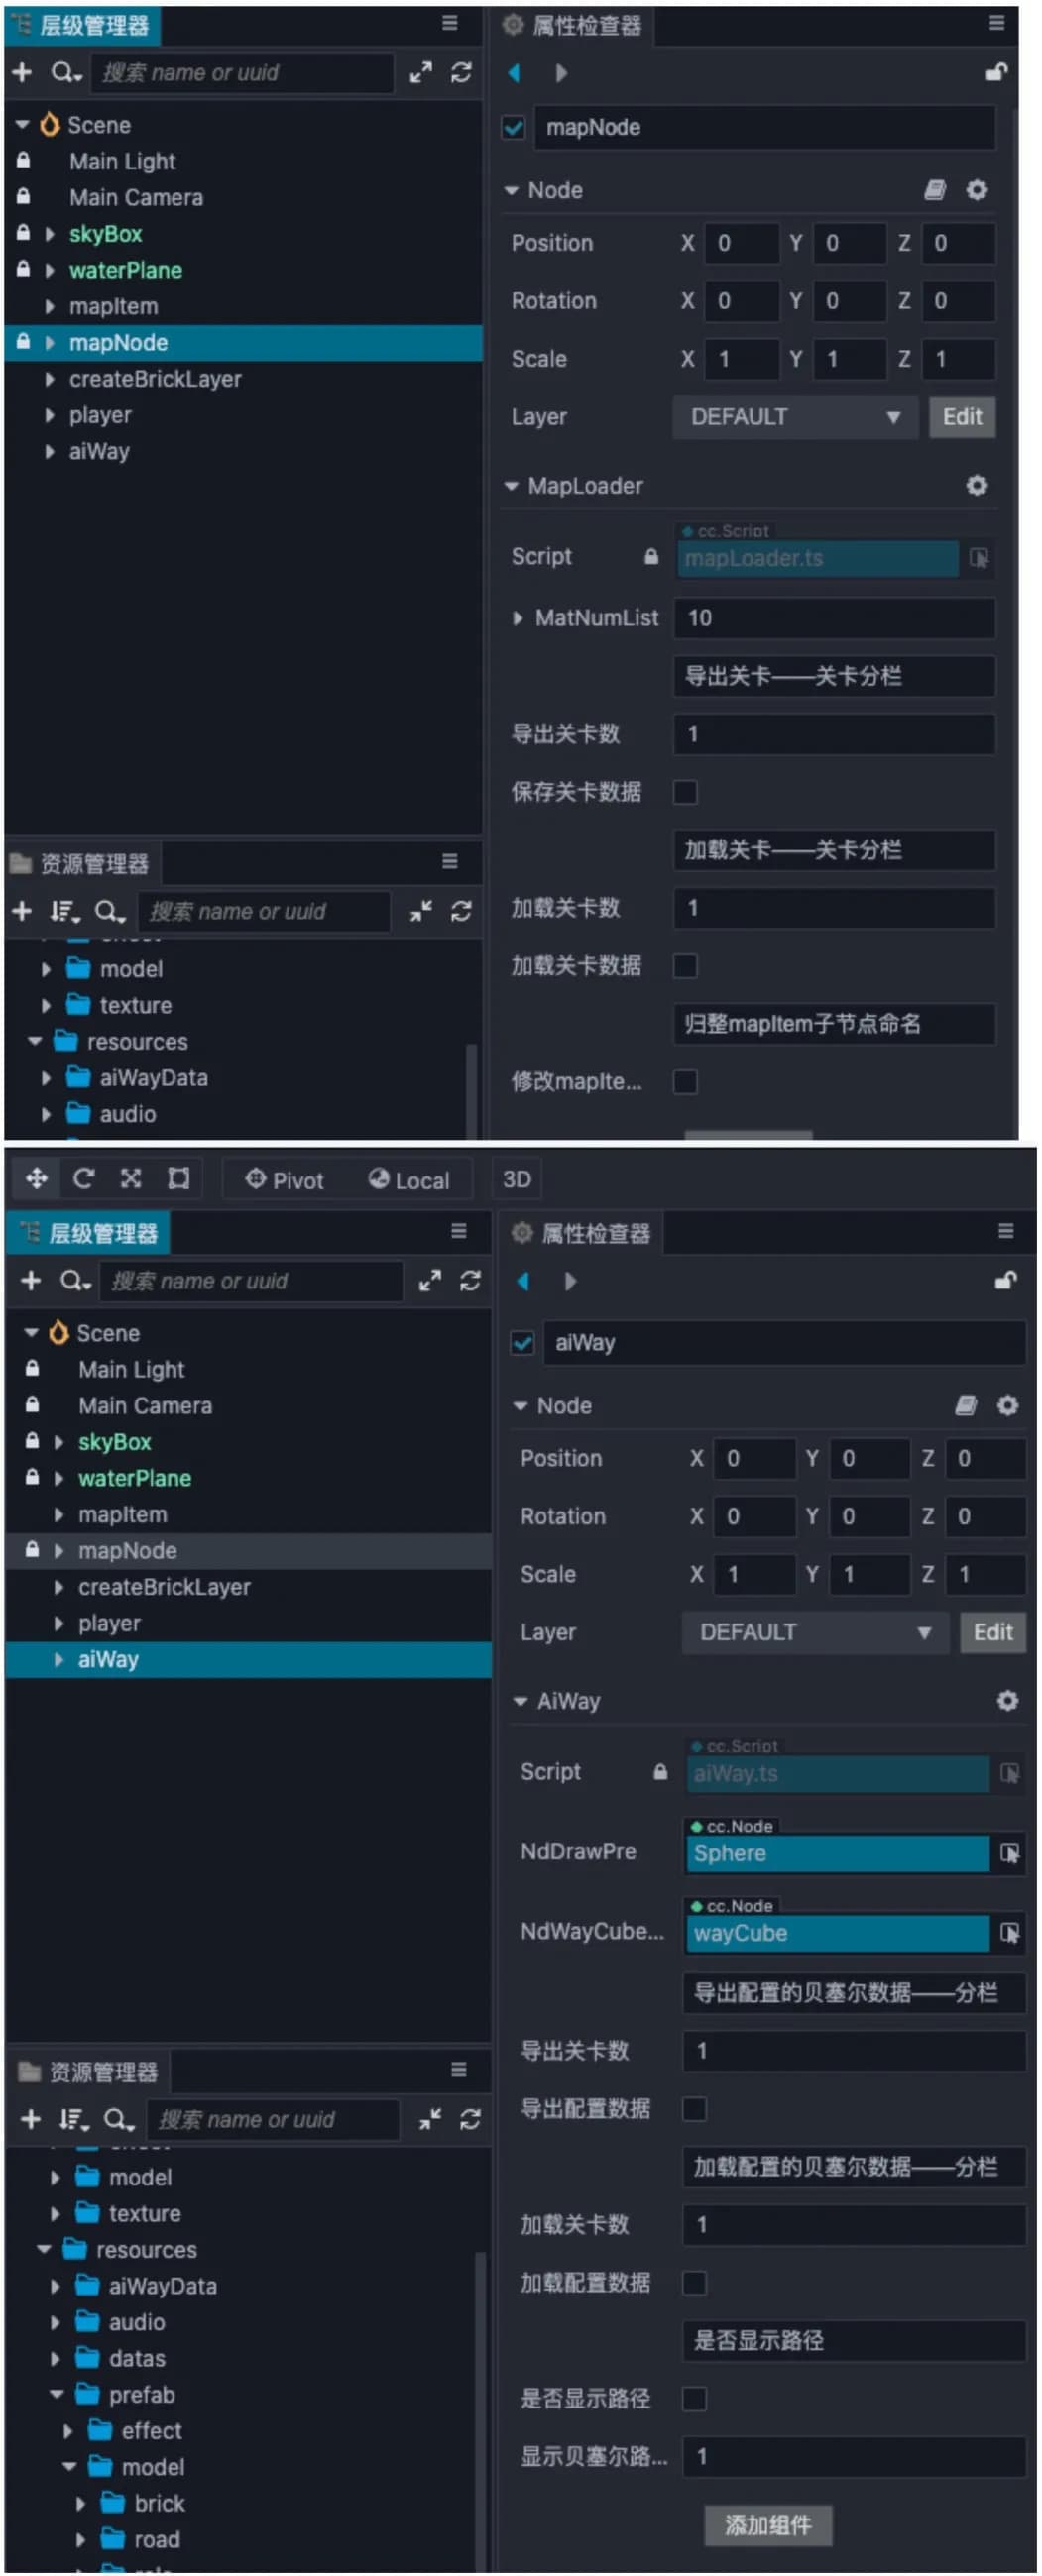
You only need to edit the map block (or AI location) at the specified node and click the export button.
The program generates corresponding configuration data based on the information of the node.
// Current project file path
const projectPath = window.cce.project as string;
projectPath.replace("\\", " / ");

const filePath = `${projectPath}/` + MAP_PATH;
// One-click file operation
const fs = require('fs');
// Level data processing
let data = MAP_DATA_FIRST + '';
for (let i = 0; i < this.node.children.length; i++) {
    let ndItem = this.node.children[i];
    //Coordinates/size/rotation are stored with up to two decimal places
    const pos = this._getNumberToFixed2(ndItem.getPosition());
    const scale = this._getNumberToFixed2(ndItem.getScale());
    const eulY = ndItem.eulerAngles.y;//this._getNumberToFixed2(ndItem.eulerAngles.clone());
    // Generate sting data, separate the data with, and add a newline at the end of \n
    let itemData = `${i + 1},${ndName},${pos},${scale},${eulY}` + '\n';
    data += itemData;
}
// Write file
fs.writeFile(filePath + MAP_PREFIX + this.mapNameSave + '.csv', data, (err: Error) => {
    //...
});

// Read file
const path = `${projectPath}/` + MAP_PATH + MAP_PREFIX + this.mapNameLoad + '.csv';
fs.readFile(path, 'utf-8', (err: Error, data: any) => {
    //...
})
Performance optimization
Collisions
Collision bodies that do not need to be used will collide with multiple groups to generate a calculated model. You can temporarily close the collision body on the model first and judge whether the model needs to open the collision body according to the distance. Or save unnecessary collision bodies and use distance calculation suitable for prop-type items in the scene.
In the current project:
- The bricks that can be picked up on the road use the distance calculation method and the bricks are divided into blocks.
- Walkable bricks laid on the ground also use distance calculation to determine whether bricks are under the current foot.
Divide into the following steps:
-
Calculate the interval of the brick corresponding to the current z (for example: currently divide all the bricks according to the distance 1 of the z-axis)
public static checkNowBrickIndex(posZ: number) { //Take the remainder of gameConstants.BRICK_CAN_GET_INTERVAL on the current coordinate z value and round up return Math.abs(Math.floor(posZ / gameConstants.BRICK_CAN_GET_INTERVAL)); } -
Put the coordinate z of the current brick into the array after dividing it according to the distance.
let nowRow = gameUtils.checkNowBrickIndex(pos.z); if (!GameManager.canGetBrickList[nowRow]) { //To determine whether it does not exist, it needs to be declared as an array GameManager.canGetBrickList[nowRow] = []; } GameManager.canGetBrickList[nowRow].push(ndNowBrick); -
The character judges whether to pick up according to the current coordinates and the ground bricks.
const pos = this.node.getPosition();
let index = gameUtils.checkNowBrickIndex(pos.z)
let nowBrickList = GameManager.canGetBrickList[index];
if (!nowBrickList) return;
for (let i = nowBrickList.length - 1; i > -1; i--) {
//Further determine whether the distance between the current brick and the protagonist is picked up
}
Framed execution
There will be no need to refresh the code every frame, and it will be executed at intervals of a certain number of frames.
update(){
    const num = 3;  //Execute the method once every num frames
    //director.getTotalFrames() Gets the total number of frames the game has run since the director started
 if (director.getTotalFrames() % num === 0) {
      //Perform the corresponding action
     }
}
If you would like to purchase the source code, visit the Cocos Store.
The game is only available in the Chinese store and only purchasable with WeChat Pay or Alipay.
Download and installation guidelines
Video tutorial: Creator 3.x 3D source code analysis and actual combat CHINESE ONLY
A big thank you to community member Boyi Creation for his passion for making these nine lessons into video tutorials. They all are free of charge and are now online.