How To Flexibly Use The Huge Amount Of npm Resources In Cocos Creator 3.0
Cocos Creator 3.0 has fully supported TypeScript as the default language, and all code is organized in the form of modules, regardless of the functionalities provided by the engine or the scripts provided by users.
It is supported and recommended to use ECMAScript module format (hereafter ESM ), i.e. files in the project assets directory with the .ts suffix. For example, assets/scripts/foo.ts.
This does not mean that the JavaScript language is not supported; after all, TypeScript is a superset of JavaScript and TypeScript is tightly dependent on JavaScript.
Therefore, Cocos Creator 3.0 also supports the CommonJS module format (hereinafter referred to as CJS module format) to some extent for the use of external modules (e.g. npm modules).
Therefore, a clear understanding of Cocos Creator’s support for module formats will make it easier to use the vast amount of resources in npm.
01 Modules
Module Specifications
Currently, the mainstream module specifications are:
-
UMD
-
CommonJS
-
ES6 module
Here we will focus on CommonJS and ES6 modules that are relevant to this article.
CommonJS Module Specification
The module system used in the Node.js environment is based on the CommonJS specification, and most of the CommonJS specification is now referred to as the Node.js module system.
CommonJS Module Export
The keywords exports and module.exports are used.
// Exported separately
module.exports.a = 10;
module.exports.b = function(){};
exports.c = 20;

// exported as a whole
module.exports = { a: 10, b: funtion(){}, c: 20 }

// exports and module.exports both point to the same address, but the final return is module.exports
exports.a = 10;
module.exports = { b: function(){} };

// exports cannot be exported separately, otherwise it will lose its association with module.exports
exports = { a: 10, b: funtion(){}, c: 20 };
CommonJS Module Import
The keyword import is used.
const foo = require('. /foo.js')
Next, let’s look at the module import (required) rules, assuming the file directory is src/project/index.js.
-
Start with a relative path (assuming the module you are looking for here is
moduleA)If the suffix is not specified, the engine will first look for a
moduleAfile in the sibling directorysrc/project. If there is nomoduleAfile in the sibling directory, it will go to the siblingmoduleAdirectorysrc/project/moduleA.-
Determine if there is a
package.jsonfile insrc/project/moduleA, if so, return the file defined by the main field, if there is no main field, try to return the following file. -
src/project/moduleA/index.js -
src/project/moduleA/index.json -
src/project/moduleA/index.node
-
-
Start with an absolute path (the same as 1).
-
Doesn’t start with a path (similar to React)
Without the path beginning, it is regarded as importing a package. Prioritize whether moduleA is a core module, such as fs, path. Otherwise, it will look in the same level directory node_modules of the current file. The search rule is the same as that of 1, under the path of src/project/node_modules, take the search for moduleA.js as an example, moduleA.js → moduleA.json → moduleA.node → moduleA directory → package.json main under moduleA → index.js → .... If it is not found, continue to look in the node_modules of the parent directory.
ES6 module specification
ES6 Module export
The keyword export is used.
// Export a single
export const a = 10;
export const b = function(){};

// export a list
export { a, b }

// Rename the export
export { a as ma, b as mb, ..., };

// deconstruct the export and rename it
export const { a, b: bar } = o;

// Export a collection of modules
export \* from 'export-name'; // Cannot be used in the current module (export-name).
export { a } from 'export-name' // Cannot be used in the current module (export-name).

// Default export
export default expression; // A module can only have one default export
ES6 Module Import
// Import a collection of modules
import { a, b } from "module-name";
import \* as moduleA from "module-name";

// rename import
import { a as ma, b as mb } from "module-name";

// default import
// foo.js
export const a = 1;
export const b = 2;
export default 10;

// bar.js
import defaultExport from 'foo'; // defaultExport: 10
import defaultExport, { a, b as mb } from 'foo';
import defaultExport, \* as foo from 'foo';

// Run only modules
import 'module';
The above, module.exports and export.default are similar, so ES6 modules are easily compatible with CommonJS. Next, it’s important to understand the module format that Cocos Creator 3.0 uses.
Cocos Creator 3.0 Module Format
In Cocos Creator 3.0, JavaScript code may be derived from:
-
Code created in the project.
-
Functionality provided by the engine.
-
Code that is not created in the project nor provided by the engine, but referenced by the project (npm installation or external import).
Different sources may lead to JavaScript code with different module formats themselves. A clear understanding of Cocos Creator 3.0’s module identification rules will make it easy to solve most module usage problems.
Cocos Creator 3.0 Module Identification
Cocos Creator chooses similar rules as Node.js to identify module formats. The core of module identification is divided into two main parts:
-
ESM module format identification standard:
-
Files with
.mjsas a suffix. -
Files with
.jsas a suffix and their closestpackage.jsonfile with the top-level “type” field “module”. -
CJS module format identification standard:
-
Files with the
.cjssuffix. -
Files with a
.jssuffix and their closest package.json file with a top-level “type” field of “commonjs” or without a “type” field. -
Files with the
.jssuffix that are not in the above conditions.
Cocos Creator 3.0 Module Usage
The ESM module interacts with the target module through standard import and export statements, as described above for the ES6 module specification. The string following the keyword from in the import/export statement is called the module specifier. The module specifier can also appear as an argument in the dynamic import expression import().
The module specifier is used to specify the target module so that it can be correctly parsed by the specifier.
Common module specifiers in Cocos Creator:
-
Relative Specifiers
Relative specifiers , such as ‘./foo’, ‘./foo’. They refer to the path relative to the location of the imported file. It is not necessary to carry a suffix. -
Bare Specifiers
Bare specifiers , which can refer to the main entry point of a package by a package name, or to a specific functional module within a package, respectively, are prefixed with the package name.
Cocos Creator uses the node.js module parsing algorithm.
-
foojsis parsed as the entry module of the npm packagefoojs. -
foojs/barjsis parsed as a module in thesubpath ./barjsinfoojsof the npm package.
Using the import keyword to understand relative specifiers according to the above specifier rules:
If the target file is suffixed with .mjs or .js, the module specifier must specify a suffix. Node.js-style directory imports are not supported.
import './foo.mjs'; // correct
import './foo'; // error: the specified module could not be found

// Node.js directory import is not supported
import '. /foo/index.mjs'; // Correct
import '. /foo'; // error: module could not be found.
The module specifier does not allow a suffix if the target file has a .ts suffix. Node.js-style directory import is supported.
import './foo'; // Correct: resolves to the `foo.ts` module in the same directory
import './foo.ts'; // error: the specified module could not be found

// Supports Node.js directory import
import './foo'; // correct: resolves to the `foo/index.ts` module
02 Case Studies
1. ESM interacts with CJS
After understanding the content of the module, the biggest question is how to apply it to a actual scenario, and how to do the interaction between ESM and CJS. This point is mentioned in theofficial Node.js documentation.
CommonJS modules consist of a module.exports object, which can be imported reliably using the default import method for ES modules or their sugar syntax counterparts.
import { default as cjs } from 'cjs';

// Syntax sugar form
import cjsSugar from 'cjs';
console.log(cjs); // \<module.exports
console.log(cjs === cjsSugar); // true
The default export of an ESM module points to the exports of a CJS module.
The non-default part of the export is provided by Node.js as a separate ES module through static analysis.
Example:
// foo.js
module.exports = {
a: 1,
b: 2,
}

module.exports.c = 3;

// test.mjs
// default points to module.exports

import { default as foo } from '. /foo.js' or import foo from '. /foo.js'
console.log(JSON.stringify(foo)); // {"a":1, "b":2, "c":3}

// Import all exports of the foo module
import \* as module\_foo from '. /foo.js'
console.log(JSON.stringify(module\_foo)); // {"c":3, "default":{"a":1, "b":2, "c":3}}

import { a } from '. /foo.js'
console.log(a); // Error: a is not defined

// According to the third point above, c has a separate export
import { c } from '. /foo.js'
console.log(c); // 3
2. About the use of the protobufjs package
protobufjs is an npm package, so it needs to be installed via npm. For more information about downloading npm packages, please refer to the use npm mirrors documentation.
First, open a terminal in the project directory and execute npm i protobufjs. If the project is a multi-person collaboration, you can even write the protobufjs package as a dependency in package.json, or you can add npm install --save protobufjs to the naming line above and the package can be automatically written to package.json using the command line.
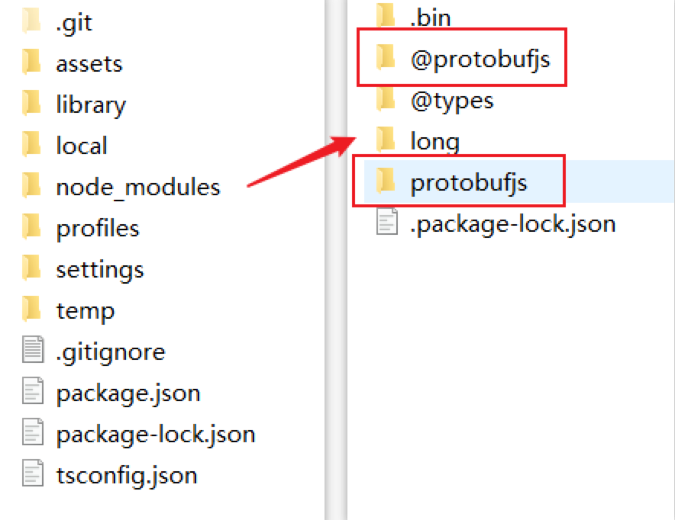
Once executed, the protobufjs related folder can be found in the node_module folder in the project directory, and the @protobufjs folder is used to store the protobufjs declaration files.
If the protobufjs module package is in the node_module folder, the next step is to determine the module format.
-
Look at the main field in the
package.jsonfile and determine the entry file index.js. -
Look at the type field in the
package.jsonfile and observe that there is no type field.
Based on the previous module identification, it can be inferred that it is a CJS module. Each Javascript file corresponds to a .d.ts file in the package, which means that the protobufjs package comes with a TypeScript declaration file, so the internal methods can be easily obtained through code hints after importing the protobufjs module.
Next, in index.js you can see how it is written.
"use strict";
module.exports = require("./src/index");
This defines the module format and export method. The next step is about how to use the protobufjs module in the scripting resource.
First, create a test.ts script under assets. Next, write the following code in the header of the script:
// Most npm modules can be used by directly importing the module name.
import protobufjs from 'protobufjs';
console.log(protobufjs);
After running in Chrome, the console output looks like this:
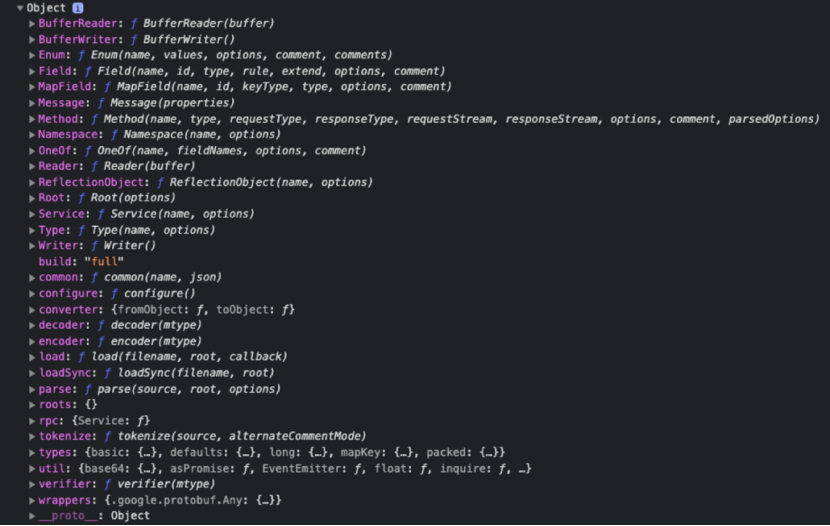
protobufjs-print-default
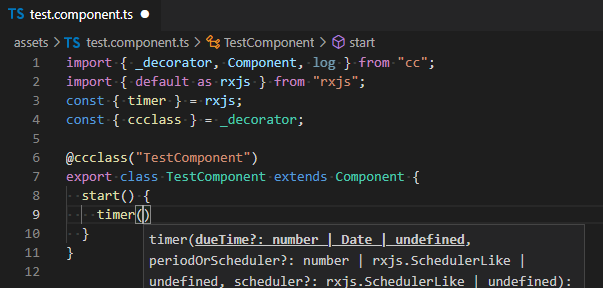
Some people may get an error when writing the above code import protobufjs, indicating that the module has no default export. This is because CJS does not have default export, and ESM and CJS interact with each other by treating module.exports as export default.
Therefore, to keep the original way of writing, add the following line to the project’s tsConfig.json:
// tsconfig.json
"compilerOptions": {
"allowSyntheticDefaultImports": true
}
Next, all the submodules provided by protobufjs can be directly used. They can also be used by directly importing the required submodules, which are found directly under the module name path.
import minimal from 'protobufjs/minimal.js';
3. Compile proto files into JavaScript files
This section describes how to compile a proto file into a JavaScript file. In fact, it can be found in the protobufjs documentation that it provides its own command-line tools for converting static modules and ts declaration files. In this section, I’ll take an empty 3.0 project as an example.
First, install protobufjs via npm and write it to the package.json dependency in the project directory.
Second, create a new Proto directory in the project directory and define several proto files.
// pkg1.proto
package pkg1;
syntax = "proto2";

message Bar {
required int32 bar = 1;
}

// pkg2.proto
package pkg2;

syntax = "proto2";

message Baz {
required int32 baz = 1;
}

// unpkg.proto is not part of any package
syntax = "proto2";

message Foo {
required int32 foo = 1;
}
Next, define it in package.json.
"scripts": {

"build-proto:pbjs": "pbjs --dependency protobufjs/minimal.js --target static-module --wrap commonjs --out . /Proto.js/proto.js . /Proto/\*.proto",

"build-proto:pbts": "pbts --main --out . /Proto.js/proto.d.ts . /Proto.js/\*.js"

},
The first directive build-proto:pbjs roughly means to compile the proto file into Javascript, where the --dependency protobufjs/minimal.js argument directly require protobufjs when executed, but only its submodule minimal.js is used.
Then, the Javascript is generated into the Proto.js folder (note: if there is no Proto.js folder, you need to create it manually). The second command, build-proto:pbts, generates a type declaration file based on the output of the first paragraph.
Following the above steps successfully completes the process of converting the proto file into a Javascript file. Next, you can import the js file in the script under project assets.
import proto from '... /Proto.js/proto.js';
console.log(proto.pkg1.Bar);
For the record, if anyone gets an error when importing, indicating that proto has no default export, there are two solutions:
-
Allow
tsconfig.jsonto use the default import field for modules that contain a default export."compilerOptions": { "allowSyntheticDefaultImports": true, } -
Add a default export
Create a
Tools/wrap-pbts-result.jsfile in the project directory with the following script code:const fs = require('fs'); const ps = require('path'); const file = ps.join(\_\_dirname, '...' , 'proto.js', 'proto.d.ts'); const original = fs.readFileSync(file, { encoding: 'utf8' }); fs.writeFileSync(file, ` namespace proto { ${original} } export default proto; `);
Replace the original build-proto:pbts command with:
"build-proto:pbts": "pbts --main --out . /Proto.js/proto.d.ts . /Proto.js/\*.js && node . /Tools/wrap-pbts-result.js"
Eventually, it will be ready to run directly. For the complete project, please refer to: npm-case
Note: the packaged javascript files can be placed in the project assets directory or in other locations. js files in the assets directory no longer need to be checked “import as plugin”, please be aware of that.
4. About the use of lodash-es package
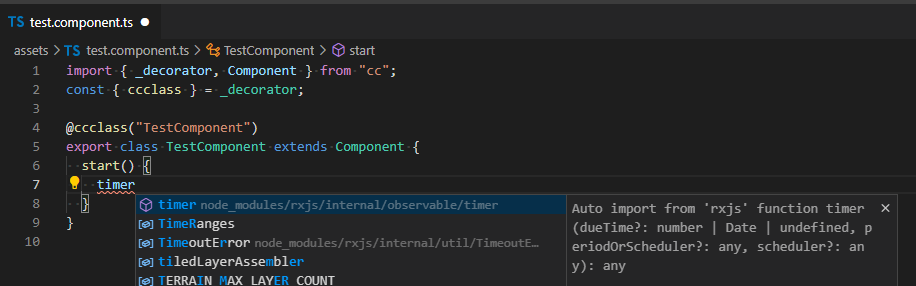
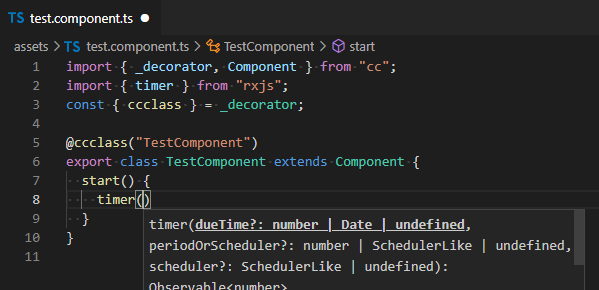
Similar to the use of the protobufjs package, install the lodash-es package. We know that the entry file is lodash.js, and the entry file automatically helps to export all submodules under it in ESM module format, and the type also confirms that it is currently an ESM module. Therefore, it is possible to import any module directly. I’ll take the test.ts script resource under assets as an example, and introduce the submodules within lodash.
import { array, add } from 'lodash-es';
In this case, an error will be reported in the code level, but it will actually work. This is because there is a clear distinction between JavaScript, which is dynamically typed, and TypeScript, which is statically typed, so there is no way to know the exact type of the exported module when using Javascript scripts, and the best thing to do is to declare a type definition file .d.ts.
Fortunately, but when hovering over the error, we are prompted to install the type declaration file for the lodash module by running npm i --save-dev @types/lodash-es. Once installed, restart VS Code and you will see that the error disappears, along with the code hint.
5. MGOBE
Here is an example of MGOBE v1.3.6. Unzip the downloaded MGOBE file and get a copy of a js file and its type declaration file .d.ts.
Place these two files anywhere in the project. The following is an example of placing the files in a new lib folder at the same level as assets.

MGOBE
It can be found in the Javascript file that the code has been compressed. There are module.exports and exports, but no package.json file. Therefore, it can be defined as a CJS module and imported as a CJS module.
import MGOBE from '... /lib/MGOBE\_v1.3.6/MGOBE.js';
console.log(MGOBE);
After writing the code, an error could be reported:

MGOBE-no-module
A careful reading of the error report reveals that there is a problem with the type declaration file MGOBE.d.ts, which suggests that it is not a module. In the contents of the declaration file, there is a module namespace, but no module export, and this is the culprit for not being able to use it. At this point, there are two solutions:
-
Since there is no export, just add export default MGOBE to the bottom of the type declaration file to use the module namespace directly as an export.
-
Import the js file directly, the module namespace MGOBE will be available as a global variable.
import '... /lib/MGOBE\_v /lib/MGOBE\_v1.3.6/MGOBE.js';
console.log(MGOBE);
More examples
socket.io-client use case: Solution after an error involving a reference to a built-in Node.js module.