Tutorial: Fixing Jittering and Floating With A Front Facing Parkour Game
Learn how to make your charachter run up and down hills with less issues!
Introduction
This 3D parkour game simulates the technical problems encountered by having a character go uphill and downhill in the game, and provides solutions.
Development environment
• Engine version: Cocos Creator 3.2.0
• Programming language: TypeScript
• Physics uses the bullet physics engine
• The character uses a capsule collider
• The map’s road model uses a mesh collision body
Game introduction
Touch the screen to control the character to move left and right on the runway
Contact the author
You can leave a message at the bottom of this product page to reply
You can also focus on the discussion in the Cocos forum
Copyright Notice
This resource is officially produced by the Demo Team of the Cocos engine. You can use the code and model resources in the project for your own projects or for secondary commercial use.
Fixing Jittering and Floating With A Front Facing Parkour Game
App Annie recently released data showing that the total number of casual game downloads in China in May has reached 30.72 million, of which parkour/racing, puzzle/brain teasers and io games were the top three download categories. In addition, parkour/racing games also occupies the second place in the May casual game downloads category in the App Store and Android markets in the United States. Parkour/racing games are still the “sweet treat” in the casual game market.

This article will focus on not only building your own parkour game, but some climbing requirements that frequently appear in parkour games, and analyze the reasons and solutions for the shaking of characters when climbing. The bullet physics engine is used and may not follow other physics engines. So please research if you use other physics engine.
Download
The demo project for this explanation case is officially produced by the Cocos engine Demo Team . You can use the code and model resources in the project for your own projects or for secondary commercial use. Download link:
Demo of the final effect
Static grid
The road in this demo is made up of multiple road models (refer to the figure below), and the road parts have many ups and downs. In order to allow the character to “sit” on the ground, a rigid body component is usually added to the character to let the character fall onto the ground due to gravity.
At the same time, a mesh collision body will be added to the road model, but there is no need to add a rigid body at this time. The collision body comes with a static rigid body by default (a rigid body with great mass that is not affected by physical effects). The mesh collision body will automatically detect the mesh information of the model, and record the mesh information on the current collision body for subsequent collision detection.
After adding a mesh collision body onto the entire road, the effect is as follows:
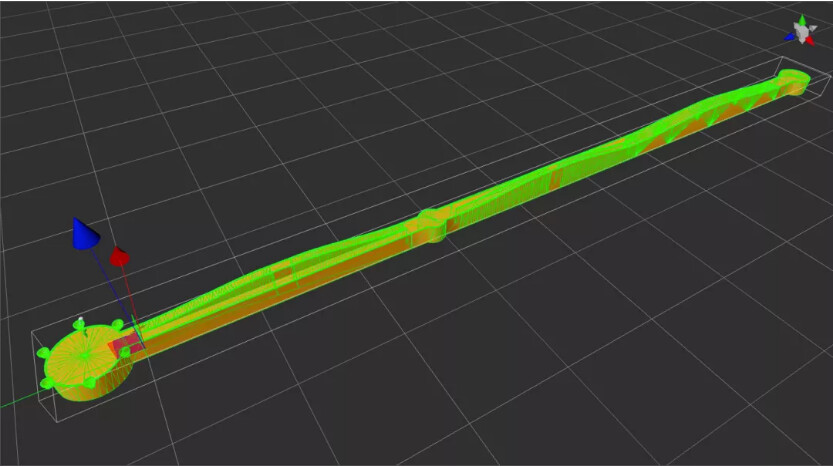
When we run the demo and see how the final effect works (the green line on the character in the image represents the collision is normal, and the black line on the road is the collision grid information):
Observing the green figure in the picture, it can be seen that when moving on one of the flat “planes”, when running to the intersection of two triangles on the floor, there is an extra copy of the collision information. This is because the bullet physics engine automatically recognizes this plane as two “planes” or a triangular surface.
Even if this is a plane in our perspective, only one collision information should be returned, but because the bullet physics engine divides it into two triangles for detection, two pieces of collision information is returned, which causes the final character to shift during the movement on its own.
In order to solve this problem, it is necessary to cancel the static grid and adopt the convex hull.
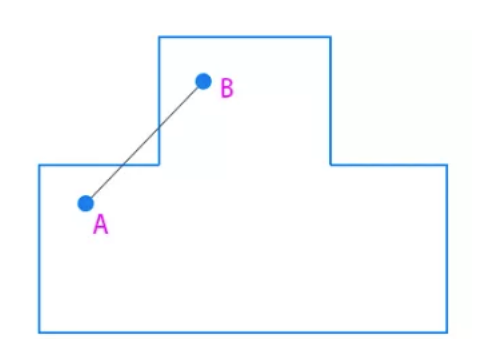
Before understanding a convex hull, let’s first understand what a convex polygon is. A convex polygon is intuitively a polygon without any depressions (no inner angle more than 180 degrees), for example, triangles, squares, etc. are all convex polygons. So, is the following “convex” shape a convex polygon?
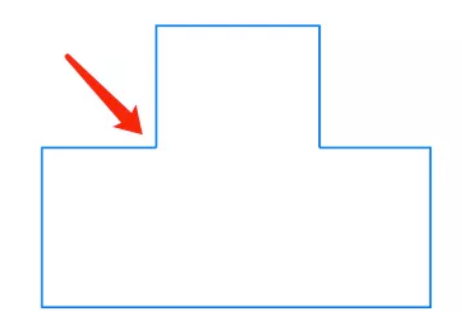
It’s not. Convex polygons are strictly defined in mathematics. Suppose any two points are taken on a polygon (including the inside of the polygon) and connected by a line segment. If every point on the line segment stays in the polygon, then the polygon is said to be convex.
Take two points on this “convex” shape. As shown in the figure below, the line segment connecting the two points A and B will find that part of it is not inside the polygon. Therefore, it is judged that this “convex” shape is not a convex shape.
After understanding the principle of convex shape, you can easily know what a convex hull is. The convex hull is actually the smallest convex polygon that can contain all given points on the plane.
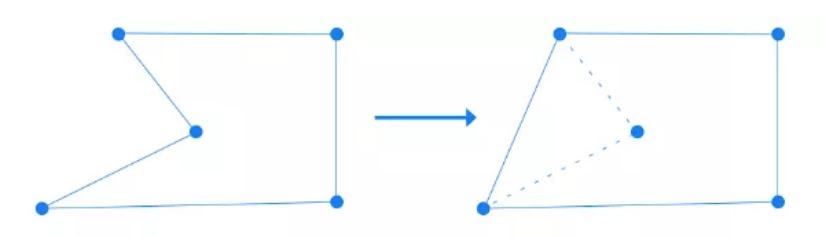
Grid convex hull
If you understand what a convex hull is, you can use the convex hull to deal with it here. The principle of the convex hull is to use the “face” to solve the issue, and reduce the triangular face, so that the phenomenon of jitter will not appear.
Therefore, the model resources provided by the art need to be split, and the track is subdivided into the following:
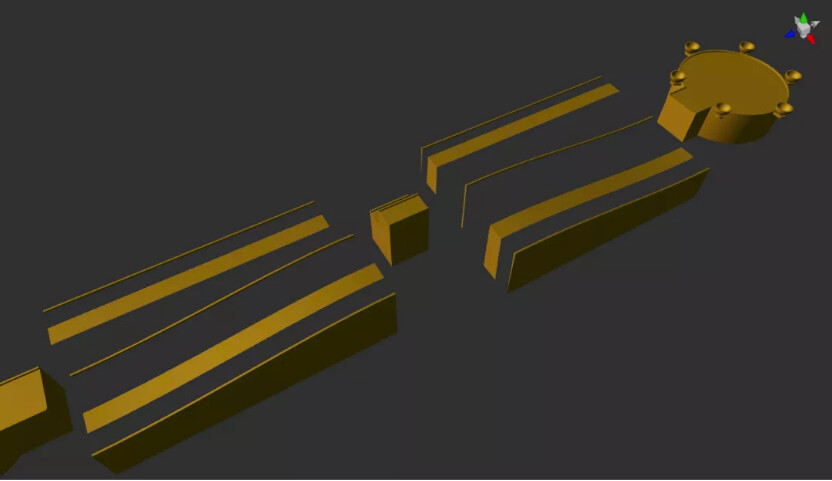
Note: The reason why the road surface and the edge are split separately here is because there is a raised part on one side. If a convex hull grid is used, the height of this part will also be calculated, and the character will appear to be “floating” on the runway.

At this time, the ground and the guardrails on both sides of the track and the flat ground above the ramp can directly use a box collision body.
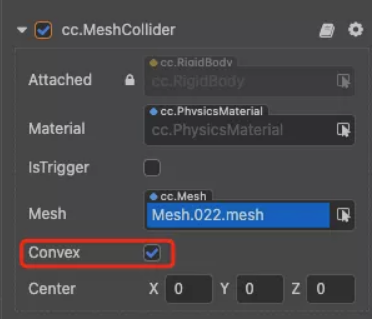
Only the ramp needs to use a mesh collision. At the same time, check the convex attribute on the mesh collision component to change the collision detection to the convex hull form.
The grid of the final ramp changes as follows:
Run to see the effect:
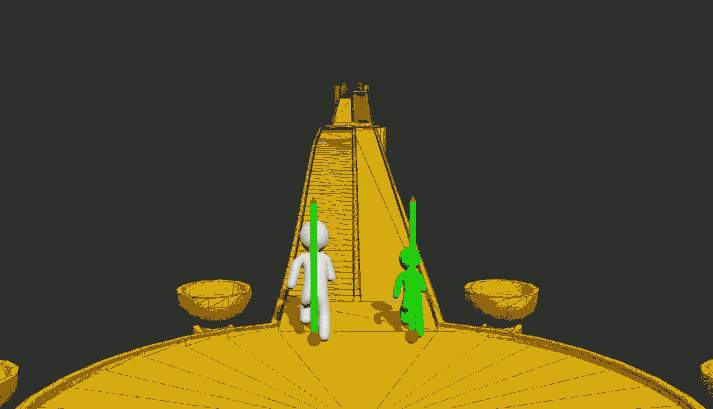
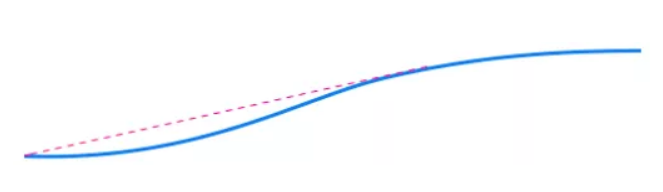
At this time, the problem of character deviating has been solved, and the problem of jitter has also been greatly improved. But at the same time, there is also a new problem, that is, every time when going uphill and downhill, the characters will jump. We’ll use a picture to illustrate the cause of the problem:
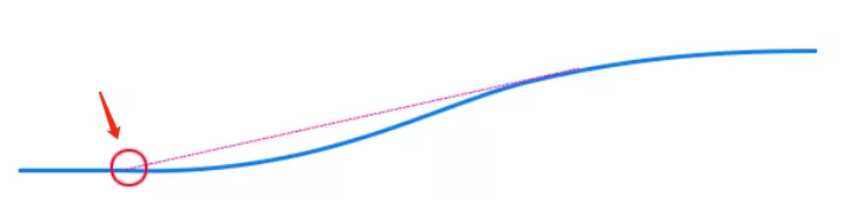
It can be seen from the figure that the current practice is prone to produce a very obvious seam on parallel roads and slopes. This is like riding a bicycle to go on a flyover, suddenly there is a bend, and there is no buffer at this time, naturally it will suddenly shake. Of course, attentive developers will also find that there is actually a slight “floating” phenomenon in the character during this process, which is also caused by this reason.
Smooth motion
Judging from the effect, the above-mentioned processing ideas and methods need to be corrected. Therefore, after understanding the reasons for the jumping and levitation of the characters, you only need to make some optimization adjustments to avoid any jitters.
Since the character is running on the so-called ground of physical detection at this time, we can detect the ground provided by the model by means of ray detection, that is, the ground where the character should be located, and then “float” the position of the character “down” with some “pressure” can solve such problems. Let’s see how to deal with it.
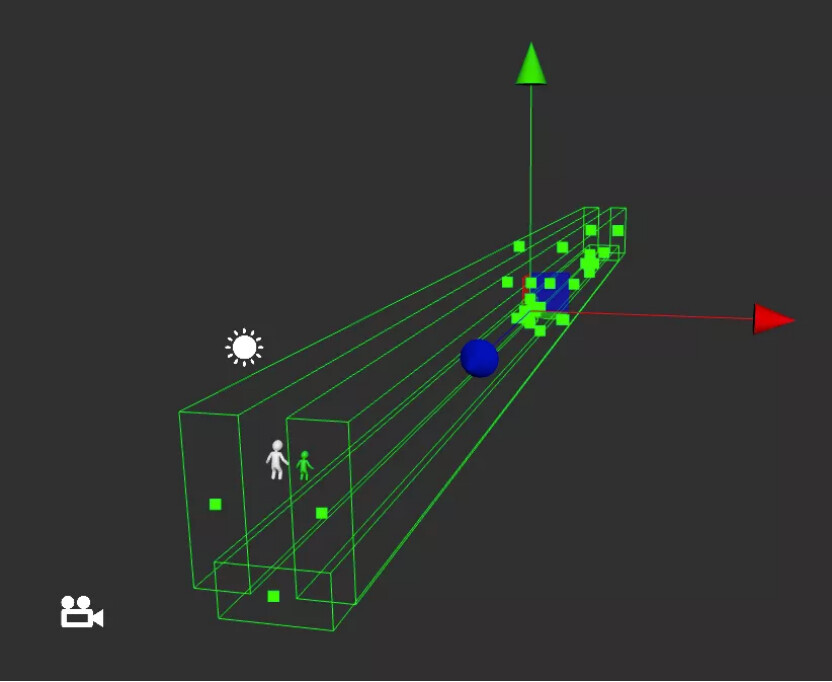
First, create a collision group for the real ground of the person to be ray detected. This group is only set up to detect the real ground position. Set a separate group in Project Settings → Physics.
Secondly, copy the node tree structure of the model as it is (you can remove the nodes of the guardrail part). This model node tree does not need to be rendered, but all mesh collisions need to be added (whether it is a flat road or a ramp, this is because Bullet physics engine’s algorithm model determines that jitter is inevitable, so the approach here is to avoid jitter as much as possible), and configure new physical groups for rigid bodies.

Then, at runtime, according to the position of the ray detection, the position of the character can be updated again (the script is hung on the character):
import { _decorator, Component, Node, director, Director, PhysicsSystem, geometry, Vec3, physics } from 'cc';
const { ccclass, property } = _decorator;
const tmpRay = geometry.Ray.create(0, 0, 0, 0, -1, 0);
@ccclass('VerticalRaycast')
export class VerticalRaycast extends Component {
    @property({ type: physics.PhysicsGroup })
    group: physics.PhysicsGroup = 0;
    start() {
        director.on(Director.EVENT_AFTER_PHYSICS, this.raycast, this);
    }
    raycast() {
        const pos = this.node.worldPosition;
        let y = pos.y;
        Vec3.copy(tmpRay.o, pos);
        tmpRay.o.y += 1;
        if (PhysicsSystem.instance.raycastClosest(tmpRay, this.group, 1.1)) {
            y = PhysicsSystem.instance.raycastClosestResult.hitPoint.y
        }
        tmpRay.o.y = y;
        this.node.worldPosition = tmpRay.o;
    }
}
In Summary
When the physics engine bullet physics engine is used to have the character climbing, the runway is usually divided into multiple parts, and the mesh collision body is used for collision detection. Because the bullet physics engine will detect a plane (with two triangular meshes) separately, two pieces of collision data appear where the triangles touch, causing the character to yaw or even shake. At this time, the solution that can be adopted is to change the mesh collision to the convex hull detection mode.
The use of convex hull detection requires the model to be separated at the resource level. For example, a mesh originally contains an uphill on the left and a flat on the right. At this time, it needs to be split into a single mesh uphill and a mesh flat. If there is a guardrail on the side of the uphill road, and the guardrail is higher than the road, then the guardrail and the road will be split again. Then, the sloped road surface uses mesh collision and the convex hull detection is enabled, and the flat road uses box collision.
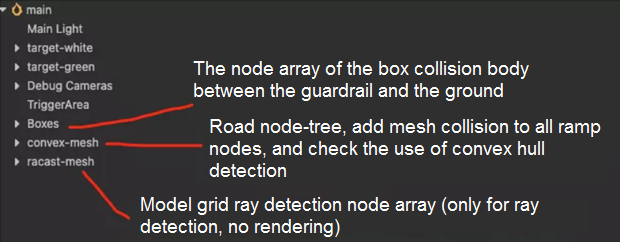
Finally, a set of grid collision groups of actual running roads is established for ray detection, and the position of the “floating” characters caused by the convex hull detection is “pressed” back to the correct position on the y-axis. The specific node tree organization is as follows: