
Explanation of the Gameplay Framework
Previous Tutorials

Cocos Cyberpunk is a complete open-source TPS 3D game developed by the official Cocos engine team to showcase the engine’s capabilities for creating high-quality 3D games and to boost community learning motivation. It supports multi-platform publishing on Web, IOS, and Android.
This series of articles will provide an in-depth interpretation of the source code from various perspectives, enhancing everyone’s learning efficiency. We hope it will help you advance further in the journey of 3D game development.
Free source code download page:https://store.cocos.com/app/detail/4543
Kylin(me) believes that this article can save you several days of research time.
Don’t believe it? Keep reading!
Table of Contents
Actually, this article didn’t start like this. When it was almost finished, the person who is in charge of Cocos Cyberpunk gameplay told me that this part would continue to be adjusted.
Then I realized that explaining too many logic details would lose the reference value of this article as the version updates.
After understanding some of the future plans from the game team, I decided to start over and create a guide from the perspective of code-writing and logic mechanisms.
The contents is shown as below:
- Preloading
- 【Important】Data and Action
- Game Module Guide
- Level Module Guide
- Actor Module Guide
- Main Character Control
- Character Animation Masking and IK
- Monster Spawn Mechanism
- Item Drop Mechanism
- …
Preloading
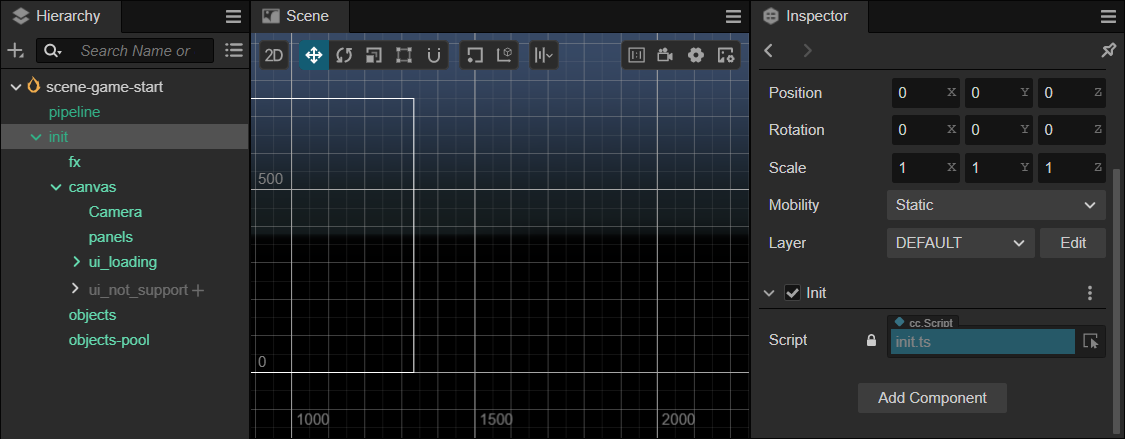
Entry Script init.ts
The previous article briefly mentioned this entry script named init.ts. It checks if the device supports WEBGL adn give a prompt if it is not supported. It also sets the init node to be persistent to ensure the normal execution of the game logic.
Next, let’s focus on the following initialization function:
...
// Load the resource cache data and execute the initialize game function.
ResCache.Instance.load(async () => {
    console.time('loadTextures')
    await loadTextures();
    console.timeEnd('loadTextures')
    Game.Instance.init();
});
...
As you can see, init.ts first calls ResCache.load for initialization, and after the initialization is complete, it executes the callback.
In the callback function, it call the loadTextures function to preload all textures in the resources/textures/ folder.
Finally, it calls Game.Instance.init to start the game logic.
ResCache
ResCache is a singleton class responsible for loading and caching the required resources.
In addition to providing loadXXX series methods, it also offers getXXX series methods, it allows all resources can be used directly after successfully preloaded.
In the ResCache.load function we can see, it first loads the data/data-res-cache.json file and the, preloads the corresponding json,sprite and sound files based on the configuration.
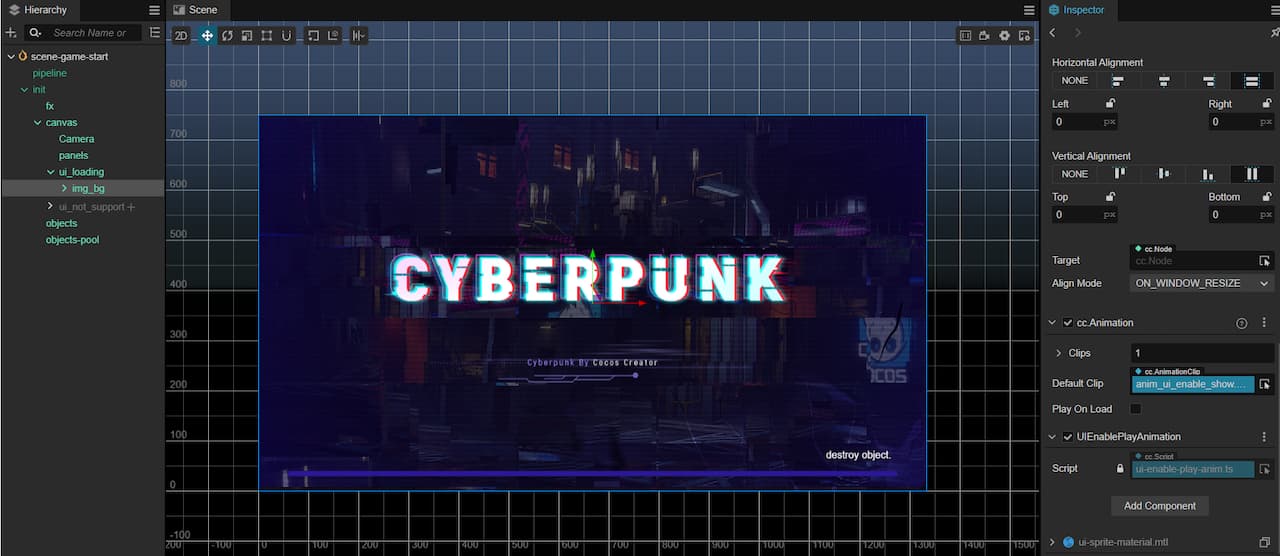
At the same time, it emits a msg_loading event.Due to the UILoading is listening to this event, it will display when the event is fired.
During the loading stage, ResCache also takes the responsibility of loading progress statistics. You can easily see this by checking where the addLoad and removeLoad methods are called.
When the resource preloading is complete, the scene will switch from scene-game-start.scene to the scene.scene and display resources/ui/ui-logo.prefab.
< Important > Data and Action
Many friends may like me, have tried to find the relevant code for scene switching and UI display but haven’t found it.
After consulting with the person in charge of gameplay, I suddenly realized: The entire game logic code refers to the node design mechanism of the behavior tree and is driven by data and actions.
In the game, the player is an object, the enemy is an object, and global managers such as game and level are also objects.
Data
Each object has a data-xxx.json configuration file, which you can find in resources/data, such as:
- game: data-game.json
- level: data-level.json
- player: data-player.json
- enemy: data-enemy_1.json
- boss: data-boss_0.json
The data fields in these files correspond one-to-one with the classes used to parse them. For example:
- game → game.ts
- level → level.ts
- player → actor.ts
- enemy → actor.ts
- boss → actor.ts
So, you will find that the content format of data-player.json, data-enemy_1.json, and data-boss_0.json is similar. However, there is significant difference from data-game.json and data-level.json
Action
Each object has an action-xxx.json configuration file, which you can find in the resources/action/folder/, such as:
- game: action-game.json
- level: action-level.json
- player: action-player.json
- enemy: action-enemy_1.json
- boss: action-boss_0.json
Similar to Data, the content of Action configuration files is also related to the class that executes it, and similar classes will use a similar configuration format.
Each Action file defines as series of Action Nodes.
Objects can trigger different Action Nodes based on conditions.
Each Action Node has two commands: start and end.
The start command is executed when the Action Node is entered, and the end command is executed when the Action Node is exited.
And each start and end can execute multiple operations in sequence when executed.
The class used to parse the action-xxx.json files is in defined in the action.ts script.
Going into action.ts, we can see that the Action class has two main functions:
- on: Executes the start command
- off: Executes the end command
In UtilAction, all operations that start and end can perform are defined. For example:
- on_ui/off_ui: Open/Close UI
- on_inst_pool: Initialize the object pool
- on_bgm: Play background music
- on_scene: Switch scenes
- …
Next, let’s use the game object to explain the operation mechanism of Data & Action.
Game Module
The Game module involves 3 main files:
- data-game.json
- action-game.json
- game.ts
First, let’s take a look at the key content of the two json configurations files:
data-game.json
{
    ...
    "fps":60,
    "start_node":"logo",
    "action_data":"action-game",
    "version":"version:202302271037",
    "show_version":"V1.2",
    ...
    "res_ui_root":"ui/",
    ...
}
In the data-game.json file, we can see it defines many things, such as frame rate, version etc,
Here we should also pay attention to the values of start_node and action_data, which are the key data for game startup process.
- action_data: Used to specify the corresponding Action file
- start_node: Used to specify the default Action Node
action-game.json
{
    "logo": {
        "start": [ ... ],
        "end": [ ... ]
    },
    "level": {
        "start": [ ... ],
        "end": [ ... ]
    },
    ...
As you can see, the action-game.json defines many actions, the two most critical ones are listed below:
- logo: Used to show the Logo and start button
- level: Used for gameplay
game.ts
In the init method of game.ts, we can see the following tow lines of code.
// Initialize the game data.
this._data = dataCore.DataGameInst._data;
// Initialize game action data.
this._action = new Action(this._data.action_data);
...
// Push the game initial node into the stack data.
this.push(this._data['start_node']);
The first line of code gets the configuration data loaded from data-game.json.
The second line of code creates an Action using action_data (value is action-game.json)
The third line of code uses start_node (value is logo) as the initial action for the game.
Next, let’s take a closer look at the specific content of the logo node in action-game.json.
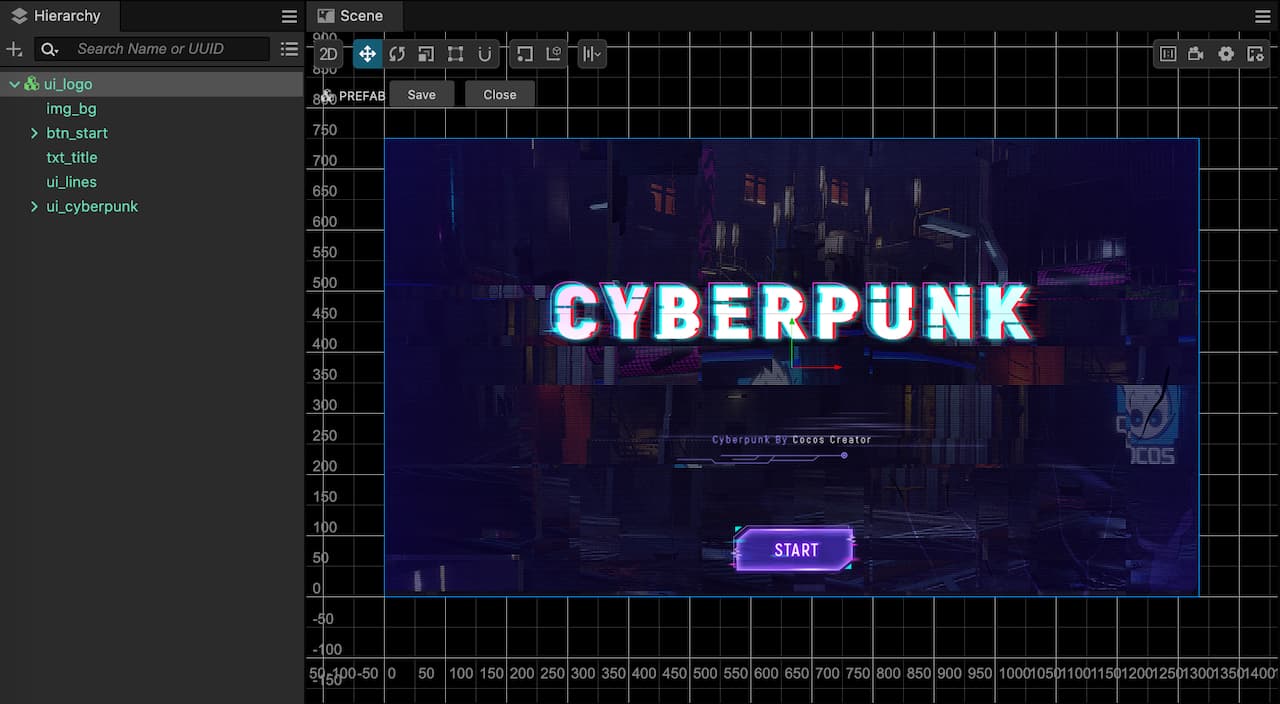
{ "time": 0, "name": "on_ui", "data": "ui_logo" },
{ "time": 0.1, "name": "on_inst_pool", "data": "gun_tracer_pool"},
{ "time": 0.15, "name": "on_inst_pool", "data": "sfx_heart"},
{ "time": 0.2, "name": "on_inst_pool", "data": "random-fly-car"},
{ "time": 0.3, "name": "on_inst_pool", "data": "level_events"},
{ "time": 0.4, "name": "on_bgm", "data": "bgm_logo"},
{ "time": 0.5, "name": "on_scene", "data": "scene"}
The translated execution process is:
- Display ui_logo
- Initialize objects and put them in the object pool
- Play background music bgm_logo
- Switch scene
Tips: The unit of
timeis seconds, used for frame-by-frame processing. If you want to process quickly, you can fill in all 0.
By this point, the introduction to the Game module is over. With the explanations above, reading the code for the Game module should be much easier.
Level Module
The Level module is responsible for controlling level-related states, and it does not have specific behaviors.
It is just a container that connects the protagonist,monsters,items,path-finding,saving and other functions together.
When the users click on the START button, the level Action in the action-game.json will be executed.
"level": {
    "start": [
        { "time": 0, "name": "on_bgm", "data": "bgm_level"},
        { "time": 0, "name": "on_ui", "data": "ui_fx" },
        { "time": 0, "name": "on_msg", "data": "msg_level_start" },
        { "time": 0.2, "name": "on_msg_str", "data": { "key":"msg_set_camera", "value": false } },
        { "time": 2, "name": "on_ui", "data": "ui_level" }
    ],
    ...
}
As you can see, the following actions are performed here:
- Play background music bgm_level
- Display UI ui_fx
- Send event msg_level_start
- Send msg_set_camera, false
- Display UI ui_level
The Level module also involves the following 3 main files:
- data-level.json
- action-level.json
- level.ts
data-level.json
{
    "name":"Cyberpunk Scene",
    "total_time":300,
    "close_blood_fx": true,
    "each_rate_value":10000,
    "killed_to_score":100,
    "survival_time_to_score":10,
    "level_events":"level_events",
    "prefab_player":"player-tps",
    "prefab_enemy":"enemy-tps",
    "prefab_drop_item":"drop_item",
    "enemies":["enemy_0", "enemy_1", "enemy_2", "boss_0"],
    "fx_dead":"fx_dead_white",
    "score_level":[...],
    "items":[...],
    "probability_drop_enemy":{...},
    "probability_drop_items":{...},
    "cards":["life", "attack", "defense", "special"],
    "probability_drop_card":{...}
}
We can see that the data configuration file of Level module contains:
- Kill scores
- Re-spawn time
- prefab information
- monster information
- dropped item information
- score level
- …
You can change the level data and gameplay by modifying these configurations.
action-level.json
{
    "start":{...},
    "warning":{ ... },
    "end":{...}
}
The Action configuration file for the level, is relatively simple, with only start , warning and end.
"start":{
    "start":[
        { "time": 0.2, "name": "on_msg_str", "data": { "key":"level_do", "value":"addPlayer" } },
        { "time": 0.5, "name": "on_inst", "data": "level_events_enemy" },
        { "time": 0.6, "name": "on_inst", "data": "level_events_items" },
        { "time": 0.7, "name": "on_inst", "data": "level_events_card" }
    ]
},
In the start command, we can see that the following actions will be executed when the level is loaded.
- on_msg_str:level_do, addPlayer
- on_inst:level_events_enemy
- on_inst:level_events_items
- on_inst:level_events_card
on_msg_str
From the UtilAction class in actions.ts, we can see that the method prototype for on_msg_str is:
  public static on_msg_str (data: key_type_string) {
      Msg.emit(data.key, data.value);
  }
It’s not hard to see that its function is to emit an event with a parameter.
Next, let’s see how these actions are executed in the script code.
{ "time": 0.2, "name": "on_msg_str", "data": { "key":"level_do", "value":"addPlayer" }
Here, it emits a level_do message with the parameter addPlayer.
Opening level.ts, we can see that the message is listened for in its init function:
Msg.on('level_do', this.do.bind(this));
The prototype of the do function in level.ts is as follows:
public do (fun: string) {
    this[fun]();
}
From this, we can see that the first action in action-level.json is actually calling the addPlayer function of Level.
on_inst
From the UtilAction class in action.ts, we can see that the method prototype for on_msg_str is:
    public static on_inst (key: string, actor: Actor) {
        var asset = ResCache.Instance.getPrefab(key);
        var obj = Res.inst(asset, Level.Instance._objectNode);
        if (actor && actor._viewRoot) {
            obj.parent = actor._viewRoot!;
            obj.setPosition(0, 0, 0);
        }
    }
From the prototype above, we can see that the on_inst method is used to instantiate a specified object.
The specified object parameter is the name of the prefab.
- level_events_enemy
- level_events_items
- level_events_cards
All of them are prefabs,and the corresponding files are located in the assets/resources/obj folder.
During the preloading phase, ResCache will load all the prefabs in the folder and store them by their prefab names. When using them, you can simply query by the name.
For more details, please refer to the loadPrefab, setPrefab and getPrefab in the ResCache class.
Actor Module
New let’s talk about the most concerned topics: Player Control, Monster Spawning, and Pickable Item Generation.
But before discussing these topics, let’s first take a look at the Actor module.
In the previous content, we mentioned that when you open action-player.json, action-enemy_1.json, and action-boss_0.json files, you will find that their content formats are quite similar. This is because the corresponding classes for player, monster, and BOSS are all Actor.
When you open the data-player.json or data-enemy_1.json files, you can see information such as action configuration file name, sound effects, maximum HP, and so on.
{
    "name":"actor-enemy_0",
    "action":"action-enemy_0",
    "sfx_walk_ground":"sfx_walk_ground",
    "sfx_walk_grass":"sfx_walk_grass",
    ...
    "strength": 100,
    "max_strength": 100,
    "max_hp":60,
    ...
}
When you open the corresponding action-xxx.json, you can see commands like play, jump, dead, pickup, etc.
And each command will execute the following commands:
- on_call:Call the specified function name of the current actor.
- on_set:Set the value of specified variable of the current actor.
- on_anig:Set the variable of the animation image of the current actor.
- on_sfx:Play sound effects.
You can view the specific function prototypes in the Action.ts file by yourself.
As you can see, the Actor handles all of the actions above.
Player Control
Initialize
The prefab used for the Player is located at the path resources/obj/player-tps.prefab, which is configured in data-player.json.
Let’s continue with the addPlayer in level.ts.
public addPlayer () {
    //get the prefab of player
    const prefab = ResCache.Instance.getPrefab(this._data.prefab_player);
    //create the instance of player by prefab
    const resPlayer = Res.inst(prefab, this._objectNode!, this._data.spawn_pos);
    // get Actor component
    this._player = resPlayer.getComponent(Actor)!;
    // mark this actor as the Player
    this._player.isPlayer = true;
    // initialize this actor using the data from data-player.json
    this._player.init('data-player');
}
The above are the key steps in the addPlayer function. Next, let’s continue to look at what the this._player.init code does.
The code first call the ActorBase.init to complete some basic initialize work, and then calls Actor.initView.
In the last step of Actor.initView, it calls the play Action to start the object.
In action-player.json, we can see the content of play as follows.
"play":{
    "start":[
        { "time": 1, "name": "on_call", "data": "onUpdate"},
        { "time": 1.5, "name": "on_inst_scene", "data": "actor_input"},
        { "time": 1.5, "name": "on_com", "data":"ActorStatistics"},
        { "time": 1.5, "name": "on_com", "data":"ActorSound"},
        { "time": 2, "name": "on_msg_str", "data": { "key":"msg_set_input_active", "value": true} }
    ]
},
It does the following things:
- Calls the onUpdate function
- Instantiates the actor_input object
- Adds ActorStatistics and ActorSound components to the player
- Sends the msg_set_input_active event to activate input module.
User Input Module
{ "time": 1.5, "name": "on_inst_scene", "data": "actor_input"},
The above statement will generate the instance of resources/obj/actor_input.prefab and add it to the scene code.
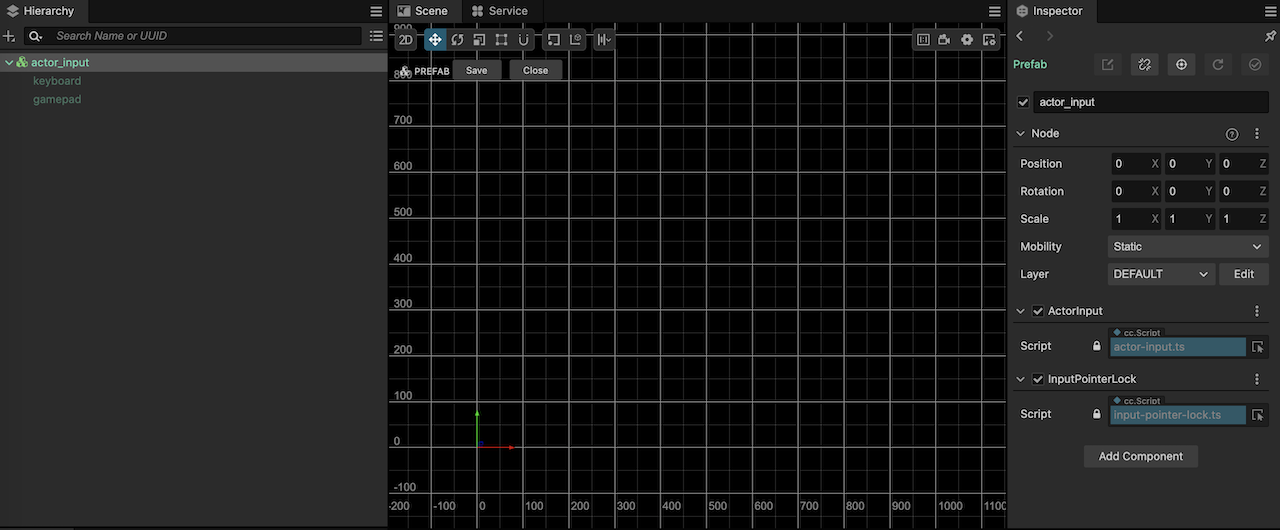
There is an ActorInput on the actor_input.prefab, which is responsible for handling user input.
Entering the actor-input.ts file, in the initInput of the ActorInput class, we can see that it performs platform detection. When the game is running on a mobile device, it will enable the joystick mode. Otherwise, it will use mouse and keyboard instead.
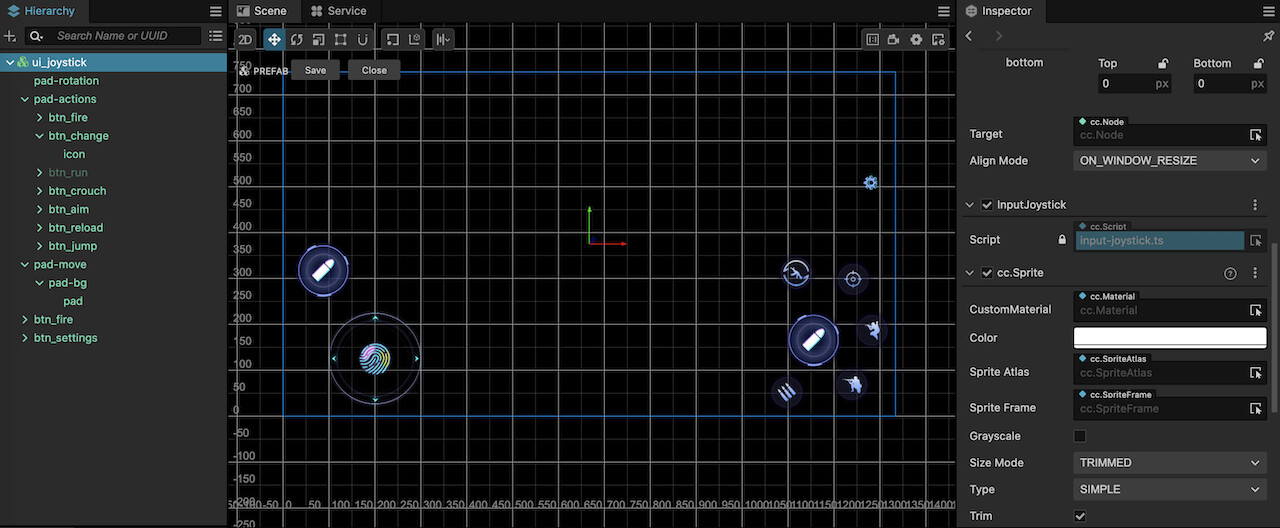
The input-joystick.ts and input-keyboard.ts don’t directly control the character, but instead pass all control commands to the ActorInput component for processing.
ActorInput implements all user actions, such as onMove, onJump, onRotation, onRun etc.
Player Camera
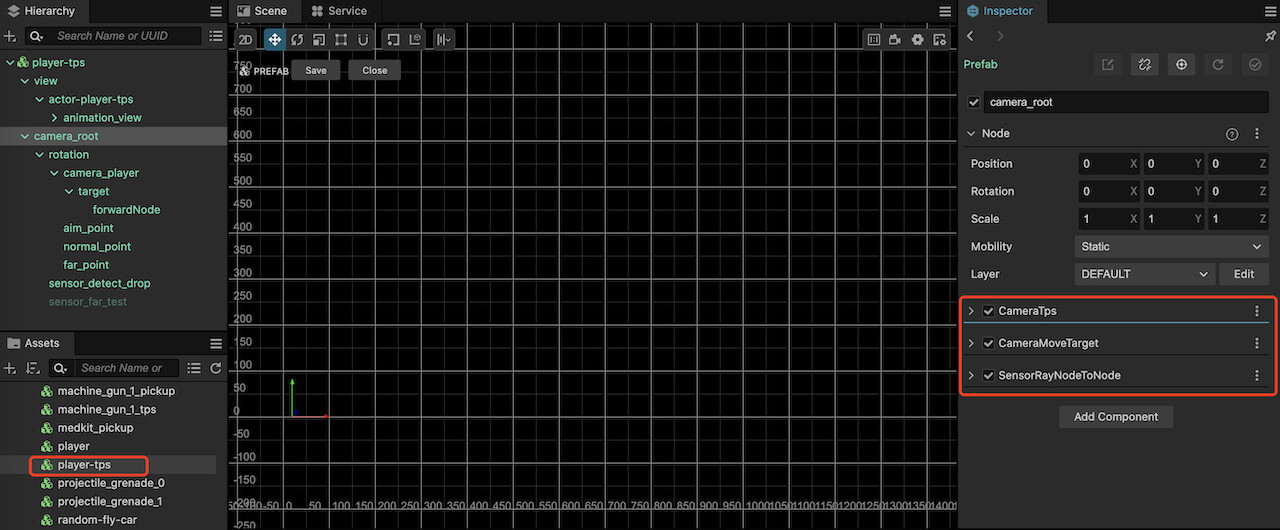
In player-tps.prefab, we can find the camera-root node, which has three components attached:
CameraTps:Used to control the camera’s pitch. Since the camera’s forward direction is always aligned with the main character, there is no need to control left and right.
CameraMoveTarget:Used to control the camera’s tween effect.
SensorRayNodeToNode:Used for collision detection between the camera and the scene.
Character Animation Mask & IK
In shooting games, there are two main features:
- Shooting while moving
- Changing gun posture based on the camera direction
The above features are also implemented in Cocos Cyberpunk.
Character Animation Mask
Cocos Creator provides the features of animation graph, layered animation and animation mask.
Layered Animation:In simple words, users can play multiple animation at the same time and blend them using weights.
Animation Mask:Used to indicate which bones should be used for skinning when the animation is played.
In Cocos Cyberpunk, the character(both Player and enemy)animation graph has two layers: base and fire.
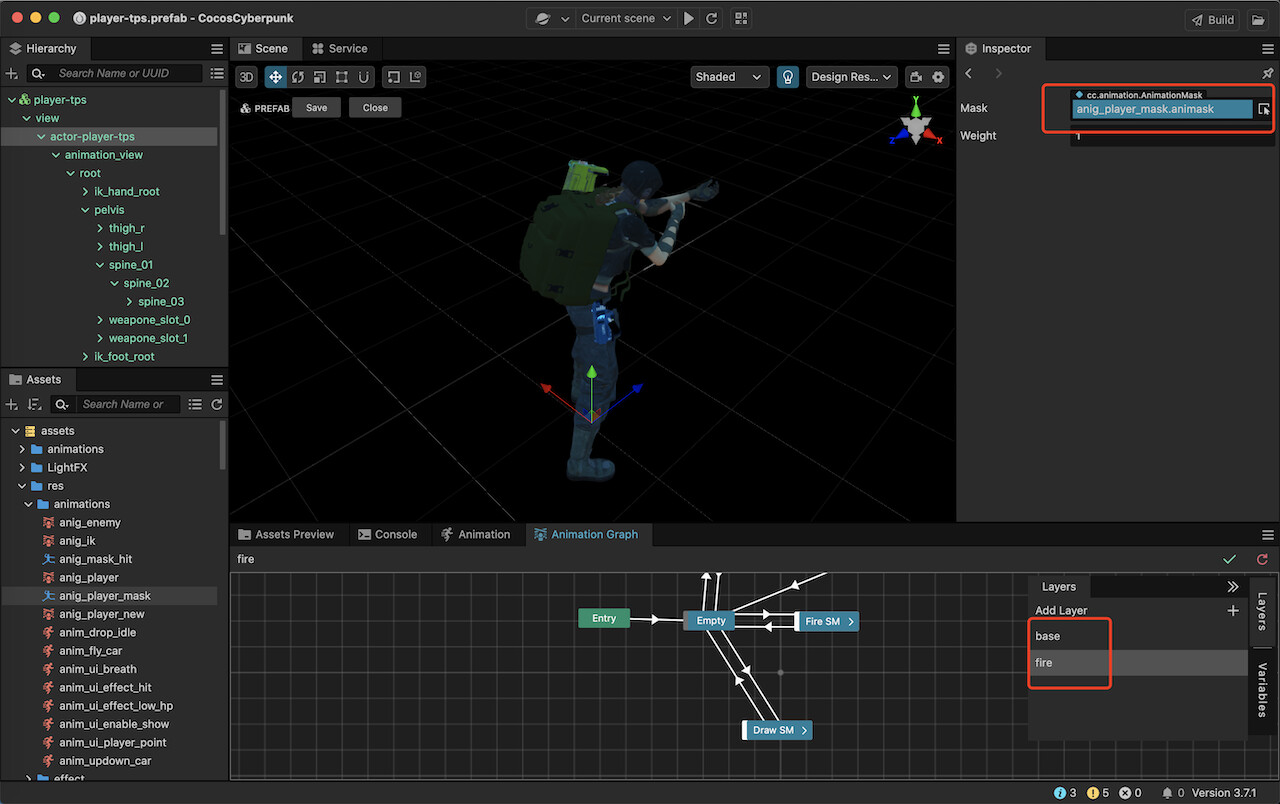
As you can see, the weight of fire is 1.0. Since the fire layer has a higher priority in the layer graph index, when base and fire are played at the same time, the fire layer will replace the animation.
If we want to implement the feature of shooting while moving, we hope that the base layer plays “move” and the fire layer plays “shoot”. In addition, the fire layer should only affect the upper body.
At this point, we need to use the Animation Mask.
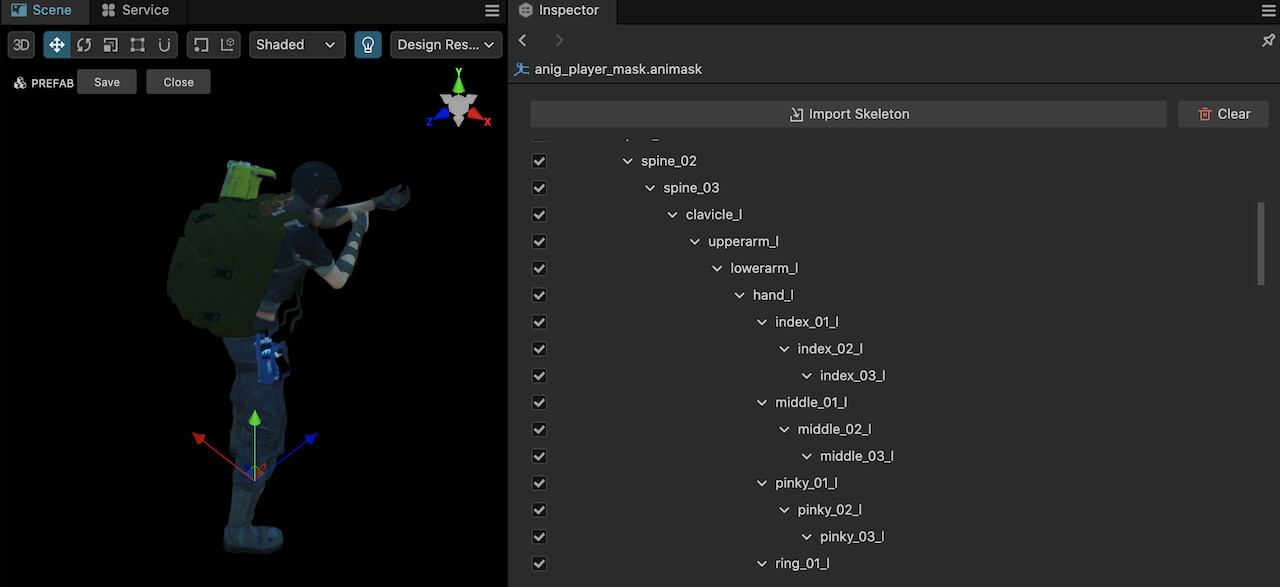
Double-click to open the anig_player_mask, and you can see that all upper body bones has been selected. In other words, when the fire action is being played, only the upper body will be affected.
Character IK
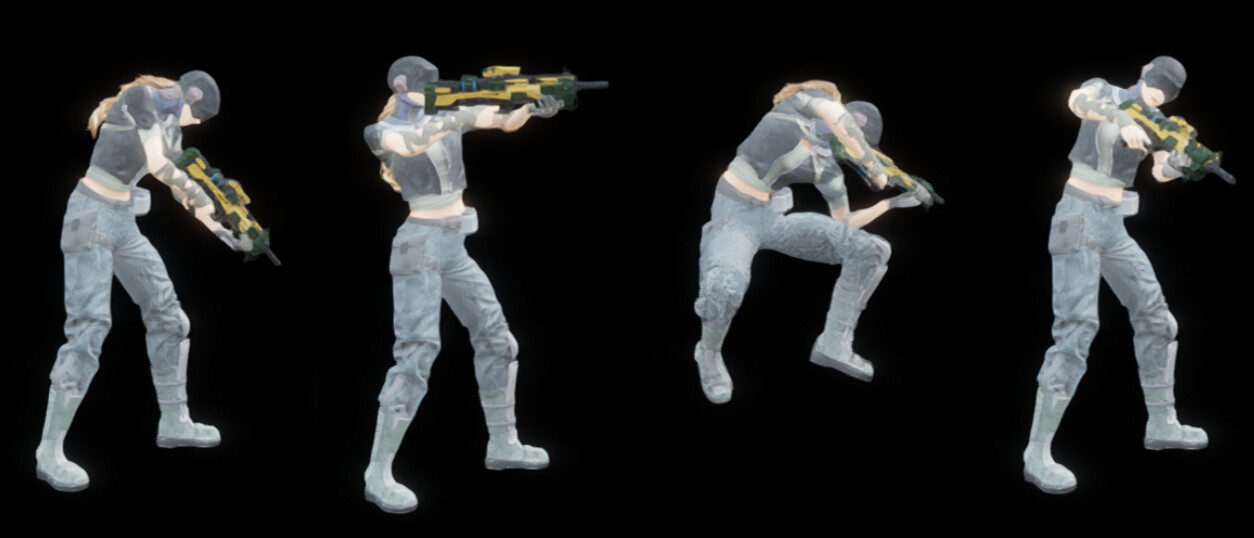
As shown above, we need to change th gun posture based on the direction of camera to ensure a good shooting experience in the game.
This is where the IK comes to play.
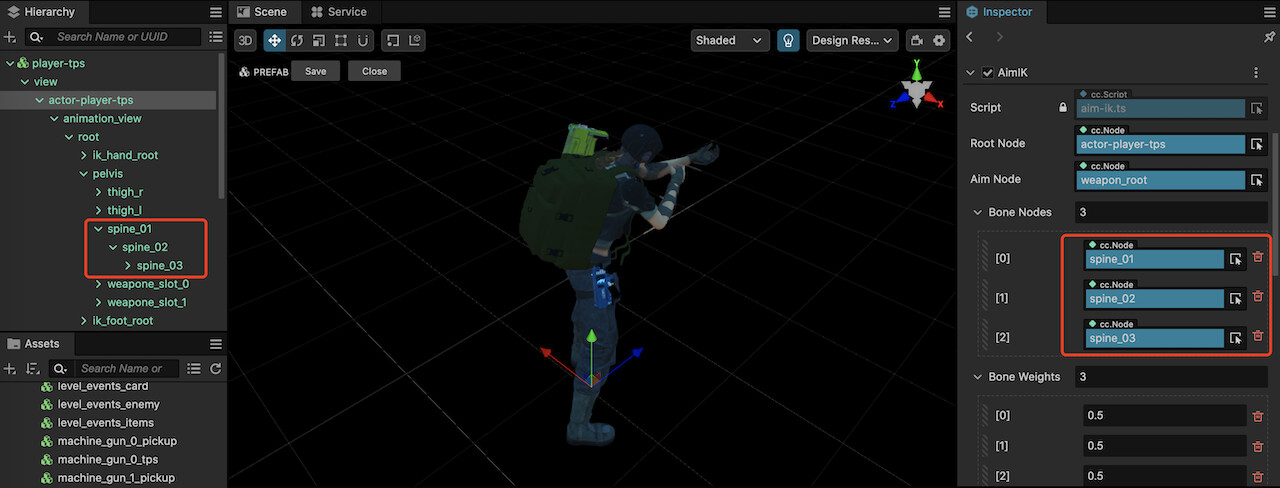
In player-tps.prefab, find the node named actor-player-tps, and you can see that it was tow components attached.
AimIK:Used for binding IK-related data. The aiming posture of the gun is mainly affected by the three joints on the spine: spine01, spine02 and spine03. The component references them.
AimControl:Used for implementing aiming control.
The IK related code can be found in the scripts/core/ik folder, Interested friends can study it in depth.
Enemy Spawn
Configuration
Let’s start with the start Action in action-level.json.
{ "time": 0.5, "name": "on_inst", "data": "level_events_enemy" },
When the Level starts, it will create an instance of level_events_enemy. There is only one in the level, and it is responsible for managing the spawning and destruction of enemies.
Resources related to it:
- resources/obj/level_events_enemy.prefab
- resources/obj/boss_0.prefab
- resources/obj/enemy_0.prefab
- resources/obj/enemy_1.prefab
- resources/obj/enemy_2.prefab
- level_events_enemy.ts
Open level_events_enemy.ts and you can see that in LevelEventsEnemy, the probability_drop_enemy from data-level.json is used as the data source. The content is as follows.
"probability_drop_enemy":{
    "interval":[2, 4],
    "interval_weight_max":1,
    "life_time":[30, 40],
    "max": 4,
    "init_count":[7, 10],
    "weights":[0.4, 0.7, 0.9, 1],
    "weights_max":[4, 4, 4, 1],
    "weights_group":[ 0, 1, 2, 3]
},
As you can see, it defines the spawn interval, maximum number of enemies, and so on.
Spawn
In LevelEventsEnemy class, the most important function is generateEvent, which checks if if is necessary to spawn enemies.
If the spawning conditions are met, it will randomly choose an appearance for the enemy from *data-level.json’s enemies property, which is shown as below.
"enemies":["enemy_0", "enemy_1", "enemy_2", "boss_0"],
After obtaining the appearance, it will randomly choose a behavior group, combine the data and then emit a msg_add_enemy event.
const currentIndex = this.probability.weights_group[occurGroupIndex];
const res = DataLevelInst._data.enemies[currentIndex];
// Send add add enemy.
Msg.emit('msg_add_enemy', { res: res, groupID: occurGroupIndex })
One thing to be note is that when the boss appears, it will emit a warning event. (hmmm, I think maybe it is better to be put into action-boss_0.json)
  if (res == 'boss_0'){
      Msg.emit('level_action', 'warning');
  }
Meanwhile, it will respond to msg_remove_enemy event, which is used to handle the case when enemies are removed.
Then, in AddEnemy, it will randomly select an available location from the navigation system and create a new enemy.
  // Get a random point from the navigation system
  const point = NavSystem.randomPoint();
  // Create enemy
  var enemy = ResPool.Instance.pop(data.res, point.position);
  const actor = enemy.getComponent(Actor);
  // Initialize the data.
  actor.init(`data-${data.res}`);
Enemy AI
Open boss_0.prefab or enemy_0.prefab, you can find two AI-related components.
ActorBrain:
This is the real Enemy AI driver, it will take the certain action based on the surrounding environment.
ActorInputBrain:
This is an adapter that makes the Enemy AI can easily be transferred to ActorInput.
Pickable Item Drop Mechanism
Configuration
Similar to the level_events_enemy, after the Level is successfully loaded, a manager for pickable items will be generated.
{ "time": 0.6, "name": "on_inst", "data": "level_events_items" },
Resources related to it.
- resources/obj/level_events_items.prefab
- resources/obj/drop_item.prefab
- level_events_items.ts
- drop-item.ts
In level_events_enemy.ts, it uses the probability_drop_items property in data-level.json as the configuration data.
    "probability_drop_items":{
        "interval":[5, 30],
        "life_time":[30, 40],
        "max": 4,
        "interval_weight_max": 1,
        "init_count":[7, 10],
        "weights":[0, 0.125,0.25, 0.375,0.75,1],
        "weights_max":[1, 1, 1, 1,2,2],
        "weights_group":[0, 1,2, 3,4,5]
    },
As you can see, it is similar to enemy spawning and also has some configuration parameters.
Drop
In level_events_items.ts, it does not handle the actual item drop. Instead, it listens to the msg_add_item event and adjusts its own data.
When it determines that a new item need to be generated, it emits the msg_add_item.
In level.ts , it listens for the event and call the addDrop method.
In the addDrop method, an instance of drop_item.prefab we be created.
Pick
On the sensor_detect_drop node in player-tps.prefab, it has SensorRays and ActorSensorDropItem two components.
SensorRays:Regularly checks the objects around the main character and stores them in the checkedNode.
ActorSensorDropItem:Performs some judgments, updates the state, and saves checkedNode as pickedNode.
There is a UIDisplayByState component on the grp_take_info node in ui_level.prefab, it detects this state and displays the prompt “Press E to pick up”.
When the item is picked up, the onPicked method of the Actor is called and the picked event is emitted.
The DropItem component on the drop_item.prefab responds to the picked event, destroys and recycles itself.
Auto Pick Up
A CheckAutoPick component is attached to the prefab of Player, the player-tps.prefab.
When on a mobile device, it will automatically call the Actor’s onPicked method.
Final Words
Due to the complexity of UI System and Navigation System, they weren’t covered in this post.
I hope this article can help the ones who want to learn 3D game development from the Cocos Cyberpunk’s source code.
The gameplay of Cocos Cyberpunk took the team several months to complete, which is obviously not can be fully understood in just two days, it’s even more impossible to fully explain it in just one article.
I hope more friends can learn from this project together, share their learning experiences and tutorials, and make the Cocos Cyberpunk open source project even better.
The next article will likely be about Custom Pipelines, so stay tuned.
Appendix 1:Class Names <—> File Names
In the Cocos Cyberpunk project, class names use the UpperCameCase naming convention, meaning the first letter of each word is capitalized.
The corresponding ts file uses lowercase-words-separated-by-hyphens. For example:
- UILoading → ui-loading.ts
- CameraController → camera-controller.ts
Knowing this naming convention will help you quickly locate the desired code.
Appendix 2:Two Types of Singleton Writing
Observant readers may notice that there are two types of singleton writing in the Cocos Cyberpunk project.
One type is the traditional Singleton pattern, which is suitable for all object-oriented languages.
It can be accessed by using ClassName.Instance, such as:
- UI.Instance
- ResCache.Instance
- Level.Instance
- GameSet.Instance
The advantage of this approach is that it can be called at any time and will be initialized on the first call.
However, the disadvantage is that all classes will be directly referenced by different files. When the class name is modified or the file is moved, all related files will be affected.
The other type is suitable for languages that support global variables such as TS,JS,and C++, please refer to data-core.ts, here are some examples.
import { DataEquip } from "../../logic/data/data-equip";
import { DataSound } from "../../logic/data/data-sound";
import { DataCamera } from "./data-camera";
...

export const DataEquipInst = new DataEquip();
export const DataSoundInst = new DataSound();
export const DataCameraInst = new DataCamera();
...

export function Init () {
    //Init data.
    DataEquipInst.init('data-equips');
    DataSoundInst.init('data-sound');
    DataCameraInst.init('data-camera');
}
This approach is quite flexible in use.
You can use it like this:
import * as dataCore from "./data-core";
dataCore.DataEquipInst.foo();
Or like this:
import { DataEquipInst } from '../data/data-core';
DataEquipInst.foo();
The advantage of this approach is: All referencing files only depend on a single container file, making the impact of refactoring very small.
However, there are some minor drawbacks: Multiple developers may maintain the same container file simultaneously, and need to all the initialization function in a certain place.
Comparatively, I like the second one, which makes the code more maintainable.
Tips: Actually, the second approach is not new, It is the same as holding various instance objects in static class. It is only due to the language features of TS, which can use global variables, that such a writing style is possible.