
Cocos Creator uses the cc.Graphics component of Cocos Creator to render, using the default shader of cc. But it can also use SDF for its graphics. We shared a story about SDF last year for a 3D game in China
This article briefly introduces the general method of custom rendering SDF for your game. All content in this article is based on Cocos Creator 2.4.2 and was built by GT, a cocos star writer at our Cocos Forums. We want to thank them for writing this article.
Look at the shader
cc.Graphics is the default shader. It’s usually in the following location (differs according to the engine installation location and version)
C:\CocosDashboard_1.0.12\resources.editors\Creator\2.4.2\resources\static\default-assets\resources\effects\builtin-2d-graphics.effect
The fragment shader code is as follows: (the author adds some comments to help you understand)
void main () {
    vec4 o = v_color;
    // alpha test, ignore here
    ALPHA_TEST(o);
    // Calculate AA (anti-aliasing) distance, if the platform supports fwidth will try to use, AA more accurate
#if CC_SUPPORT_standard_derivatives
    float aa = fwidth(v_dist);
#else
    float aa = 0.05;
#endif
    // AA processing around v_dist = 1 or -1
    float alpha = 1. - smoothstep(-aa, 0., abs(v_dist) - 1.0);
    o.rgb *= o.a;
    o *= alpha;
    gl_FragColor = o;
}
You can see that the shader does almost nothing but actions for aa, but what is v_dist for?
First with cc.Graphics, we are drawing a simple shape. Let’s look at the v_dist output:
// Draw a Bezier curve with cc.Graphics
graphics.strokeColor = cc.Color.WHITE;
graphics.lineWidth = 40;
graphics.moveTo(-212, -139);
graphics.bezierCurveTo(-213, 111, 38, 236, 246, 75);
graphics.stroke();
// Modify the graphics default shader code
void main () {
    // v_dist is output as a color value (take absolute value to avoid negative numbers not being displayed)
    gl_FragColor = vec4(abs(v_dist));
    return;
}
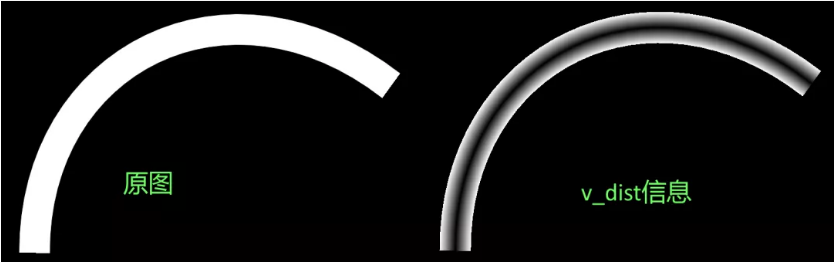
You can see from the figure that on the right, abs(v_dist) is black in the middle (value 0) and white on both sides (value 1), but the value of v_dist is actually in the range [-1, 1]. Outputting a negative number will be treated as 0 and not be visible, so abs is used to turn v_dist into a positive number.
v_dist here indicates the distance from the current slice to the graphics centerline, with 1 or -1 indicating the furthest edge and 0 indicating on the centerline.
Change shader
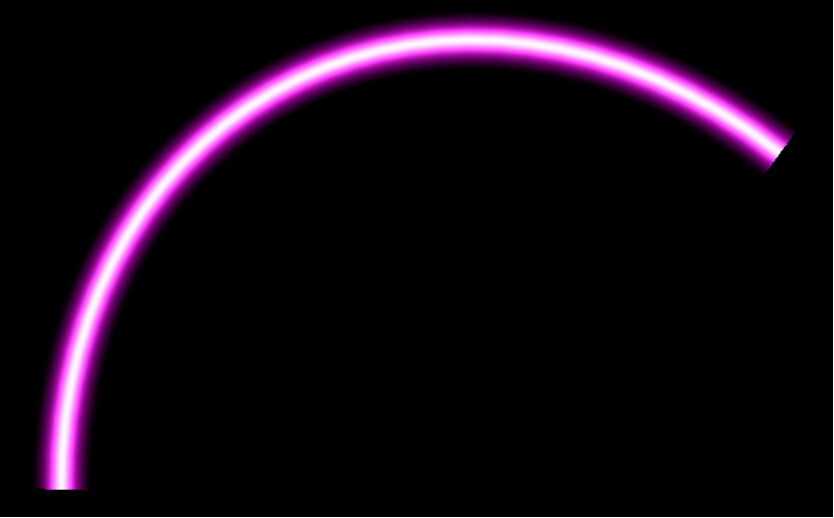
Sample from the texture file
Unlike the normal cc.Sprite, cc.Graphics does not assemble UV information to pass to the shader. v_dist can be mapped from [-1, 1] to the [0, 1] interval and then sampled directly on the texture.
The following code is mostly the same as the original shader, with added texture variables and the sampling process.
// Add texture uniform variable
uniform sampler2D texture;
void main () {
    vec4 o = v_color;
    ALPHA_TEST(o);
    #if CC_SUPPORT_standard_derivatives
      float aa = fwidth(v_dist);
    #else
      float aa = 0.05;
    #endif
    float alpha = smoothstep(aa, -aa, abs(v_dist) - 1.0);
    // Map v_dist values from the interval [-1, 1] to [0, 1]
    float D = v_dist * 0.5 + 0.5;
    // Sampling Textures
    o = texture2D(texture, vec2(D, 0.5));
    o.rgb *= alpha;
    gl_FragColor = o;
}
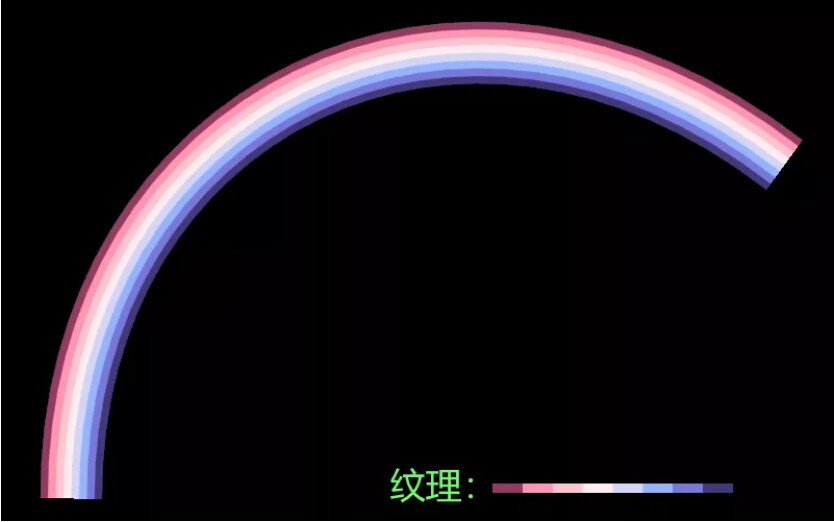
Sampling from procedural textures (swatches)
The same idea as for texture file sampling is to map v_dist to a certain color.
Here we provide a palette function to implement this mapping, and inside the function, you can implement any gradient color you want.
// A rainbow color palette with input t in the range [0, 1], outputting a color value
vec3 Pallete(float t) {
    // Scroll to move
    t += cc_time.x;
    vec3 dcOffset = vec3(0.5, 0.5, 0.5);
    vec3 amp = vec3(1., 1., 1.);
    vec3 freq = vec3(1., 1., 1.);
    vec3 phase = vec3(0., 0.3333, 0.6666);
    return dcOffset + amp * cos(2. * 3.14159 * (freq * t + phase));
}

void main () {
    // ... Everything else is the same.
    // The mapping is done with a Pallete function, behind which can be samples, or other static or dynamic textures
    o.rgb = Pallete(D);
    // ... Everything else is the same
}
By the way, I recommend an online gradient color matching website:
The color palette factor in the code above was obtained from this website.

Demo and source code
Code:
Forum discussion posts:
Demo experience address:

This demo there is more based cc.Graphics shader effects, including mesh visualization, outside light, a pseudo 3D. But we can share more about this in the future.