
Cocos Shader Series - Draw More Things
Series Chapters
- Basic Introduction
- Build A Triangle
- Draw More Things
- Add Some Texture
- Draw Shaders With Cocos Creator
- Change a shader with a texture map
- Use a Noise Map to Make a Disolve Texture
- Building With WebGL
- Alpha Testing and Blending
- Blend Testing
In the previous post, we successfully used WebGL to draw a triangle on the canvas. In this chapter, we continue to make some additions to the content of the previous chapter and draw some different things.
Mainly around the following knowledge points:
- Efficiently draw multiple triangles
- Draw triangles of different colors
Draw multiple triangles efficiently
When you saw this title, you might have thought, I can draw a triangle, but I can’t draw more.
// First, change the vertices and draw two triangles so that they form a rectangle
const positions = [
    0, 0,
    0, 0.5,
    0.7, 0,
    0, 0.5,
    0.7, 0.5,
    0.7, 0
];

// Secondly, when drawing, increase the number of vertices drawn
gl.drawArrays(gl.TRIANGLES, 0, 6);
In the end, it was drawn like this:

There’s actually no problem with drawing something like this, but be careful to find that two vertex data have been repeatedly submitted. Initially, four vertices can be used to draw a rectangle. Now this one takes six, which incurs 50% of the overhead! If the scene is gigantic, this problem will become more and more serious. Therefore, the solution that can be adopted is to provide the optimal vertices and only specify the order of drawing. We call the method of specifying the drawing order the vertex index. The vertices were drawn directly using the “gl.drawArrays” method in the previous vertex drawing. Next, we need to use the vertex index method “gl.drawElements” to draw. Modify the above content:
// Only four vertices are provided
const positions = [
    0, 0,
    0, 0.5,
    0.7, 0,
    0.7, 0.5,
];

// Provide an index array at the same time, take the vertex construction order from positions
// Index starts from 0 of the array
const indices = [
    0, 1, 2, // first triangle
    2, 1, 3 // second triangle
];

// Modify the vertex buffer and binding of "Step 2: Vertex Shader" here
// Upload vertex buffer

const vertexBuffer = gl.createBuffer();
gl.bindBuffer(gl.ARRAY_BUFFER, vertexBuffer);
gl.bufferData(gl.ARRAY_BUFFER, new Float32Array(positions), gl.STATIC_DRAW);

// Upload index buffer

const indexBuffer = gl.createBuffer();

// ELEMENT_ARRAY_BUFFER is specially used to bind index buffer

gl.bindBuffer(gl.ELEMENT_ARRAY_BUFFER, indexBuffer);

// Because the index will not have a decimal point, use an unsigned 16-bit integer and allocate memory reasonably

gl.bufferData(gl.ELEMENT_ARRAY_BUFFER, new Uint16Array(indices), gl.STATIC_DRAW);

// Finally, change the API used for drawing to use index buffer drawing
// gl.drawArrays(gl.TRIANGLES, 0, 6); Remove this part of the content and change it as follows:

gl.bindBuffer(gl.ELEMENT_ARRAY_BUFFER, indexBuffer);

// gl.drawElements(primitiveType, count, indexType, offset);
// Some parameters are consistent with gl.drawArrays. indexType: Specifies the type of the value in the element array buffer. There are gl.UNSIGNED_BYTE, gl.UNSIGNED_SHORT and extended types
// The maximum index value of gl.UNSIGNED_BYTE is 255, and the maximum index value of gl.UNSIGNED_SHORT is 65535

gl.drawElements(gl.TRIANGLES, 6, gl.UNSIGNED_SHORT, 0);
Let’s change the color of the vertices
In the previous example, we painted triangles or rectangles with a fixed color defined in the fragment as red. If we want to modify the color at runtime dynamically, this method cannot meet our needs. Therefore, we need to be able to set the input interface dynamically.
Uniform
Uniform is a way to send data from applications in the CPU like shaders in the GPU, but Uniform and vertex attributes are somewhat different. Uniform is global, which means that each Uniform variable is unique in each shader program object and can be accessed by any shader of the shader program at any stage. Also, Uniform will always maintain its own value unless it is reset or updated. Next, make a little modification:
const fragmentShaderSource = `
    precision mediump float;

    // Because uniforms are global variables, they can be defined in any shader without going through the vertex shader as an intermediary
    uniform vec4 u_color;

    // Shader entry function
    void main() {
        gl_FragColor = u_color;
    }`;

// ...

// gl.vertexAttribPointer(positionAttributeLocation, 2, gl.FLOAT, false, 0, 0);
const vertexColorLocation = gl.getUniformLocation(program,'u_color');

// Here color can be 4 floating-point colors or a floating-point array. For more information, please see the Uniform suffix issue below.
// Use 4 floats

gl.uniform4f(vertexColorLocation, Math.random(), Math.random(), Math.random(), 1.0);

// or a floating-point array
gl.uniform4fv(vertexColorLocation, [Math.random(), Math.random(), Math.random(), 1.0]);
After running, you can see on the screen that all the original vertex colors have become random colors. This setting method is relatively uniform. All vertices use the same color. If you want different vertices to use different colors, this method cannot be satisfied.
Uniform suffix problem
| Suffix | Meaning |
|---|---|
| f | function needs a float as its value |
| i | function needs an int as its value |
| ui | function needs an unsigned int as its value |
| 3f | function needs three floats as its value |
| fv | function needs a float vector/array as its value |
Extended vertex attributes
If you want each vertex to have its own color, this can be achieved through vertex attributes. The values of the three colors output in the vertex shader can be obtained in WebGL, and the difference is made according to these three values during rasterization. If the color of each vertex of the triangle is different, then WebGL will set the vertex a and Perform pixel difference between vertices b. So, next, we need to pass the vertex color value to the fragment shader and let it draw according to the value we give. The content of the transformation is as follows:
const vertexShaderSource = `

// Receive vertex position data
attribute vec2 a_position;

// Add vertex color data
attribute vec4 a_color;

// Output vertex color data to the fragment shader
varying vec4 v_color;

// Shader entry function
void main() {
    v_color = a_color;

    // gl_Position receives a vec4, so it needs to be converted
    gl_Position = vec4(a_position, 0.0, 1.0);
}`;

// First of all, because the vertex color value is defined, this part of the data can be written into the vertex buffer. As mentioned before, the vertex buffer can support multiple attributes
// Here directly assign different colors to the vertices

const positions = [
    0, 0, 1, 0, 0, 1,
    0, 0.5, 0, 1, 0, 1,
    0.7, 0, 0, 0, 1, 1,
    0.7, 0.5, 1, 0.5, 0, 1
];

const fragmentShaderSource = `
precision mediump float;

// Receive the color attributes from the vertex shader
varying vec4 v_color;

// Shader entry function
void main() {
    gl_FragColor = v_color;
}`;

// At this time, there is more color data, this data also needs to be transmitted to the vertex shader, so you need to declare the color input on the vertex shader a_color
// Next, after the vertex buffer data is transmitted to a_position, continue to transmit the data to a_color
// That is, make the following changes at "Step 6" and "Step 7"

const positionAttributeLocation = gl.getAttribLocation(program, "a_position");
gl.enableVertexAttribArray(positionAttributeLocation);
const colorAttributeLocation = gl.getAttribLocation(program, "a_color");
gl.enableVertexAttribArray(colorAttributeLocation);
gl.bindBuffer(gl.ARRAY_BUFFER, vertexBuffer);

// gl.vertexAttribPointer(positionAttributeLocation, size, type, normalize, stride, offset);
// At this time, since the position order in the vertex buffer is no longer continuous, you need to modify the value of stride. At this time, the step size of a vertex is 2x4 + 4x4 = 24

gl.vertexAttribPointer(positionAttributeLocation, 2, gl.FLOAT, false, 24, 0);

// At this time, since the color-related order in the vertex buffer does not start from 0, the offset value needs to be modified. At this time, its offset at a vertex is 2x4 = 8
gl.vertexAttribPointer(colorAttributeLocation, 4, gl.FLOAT, false, 24, 8);
The final effect is as follows:
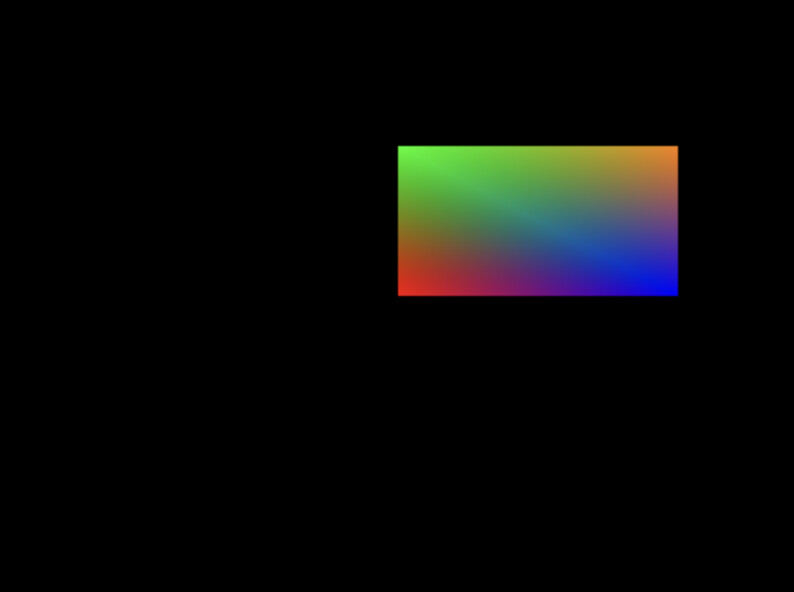
Did you not expect this picture? We only provide 3 colors, and now it helps us to transition automatically. This is the result of the fragment interpolation performed in the fragment shader. When rendering a triangle, the rasterization stage usually results in more fragments than the originally specified vertices. The raster will determine the position of each fragment based on the relative position of each fragment on the triangle shape. Then based on these positions, the input variables of all fragment shaders will be subtracted. For example: a line segment, the beginning and the end are blue and green respectively. If it runs to the 70% position of the line segment at this time, its color input attribute will be a linear combination of green and blue, more precisely, it is 70% blue + 30% green.
The attributes of each vertex of a triangle are distributed as follows:
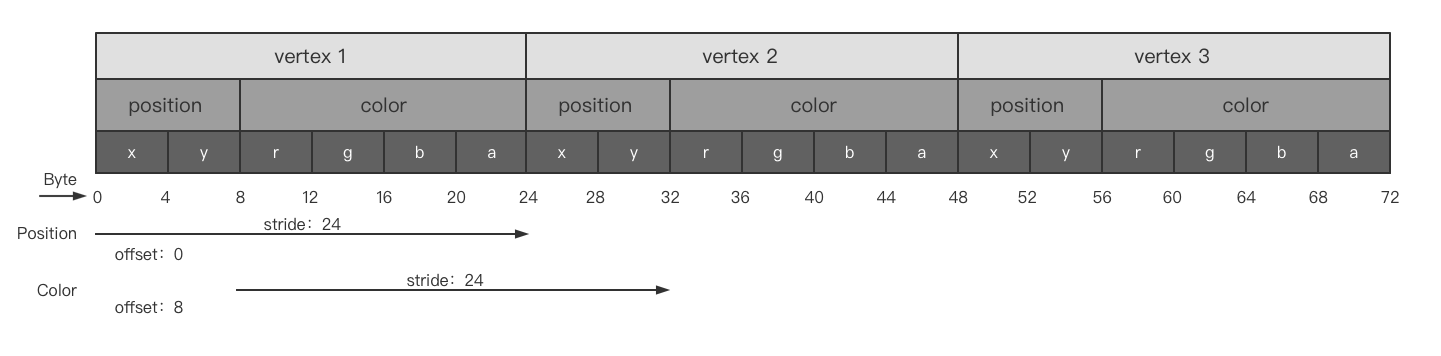
Of course, the main purpose of writing the color attributes above is to illustrate that the vertex buffer can support multiple attributes, but this is actually not a good method. Because vertices need float values to record, but color does not need. After all, the value range of color is from 0 to 255. One byte is enough. Using float to store it is a huge waste! Therefore, the following modifications are required:
const positions = [
    0, 0,
    0, 0.5,
    0.7, 0,
    0.7, 0.5,
];

const color = [
255, 0, 127, 255,
127, 255, 0, 255,
   0, 127, 255, 255,
    255, 127, 127, 255
];

// Idea one (recommended): Do not add memory, apply for a large memory at a time, position and color shared memory
const arrayBuffer = new ArrayBuffer(positions.length * Float32Array.BYTES_PER_ELEMENT + colors.length);
const positionBuffer = new Float32Array(arrayBuffer);
const colorBuffer = new Uint8Array(arrayBuffer);

// The current vertex attribute structure is pos + color
// Distribute according to float 32 pos(2) + color(1)
// Distribute by subsection pos (2x4) + color (4)

let offset = 0;
for (let i = 0; i <positions.length; i += 2) {

    // Fill in every floating point number at position
    positionBuffer[offset] = positions[i];
    positionBuffer[offset + 1] = positions[i + 1];
    offset += 3;
}

offset = 8;

for (let j = 0; j <colors.length; j += 4) {
    // Fill in each subsection when the color value is
    colorBuffer[offset] = colors[j];
    colorBuffer[offset + 1] = colors[j + 1];
    colorBuffer[offset + 2] = colors[j + 2];
    colorBuffer[offset + 3] = colors[j + 3];
    // A stride, 2 position floats, plus 4 unit8, 2x4 + 4 = 12
    offset += 12;
}

// Note that here vertexBuffer is bound to a large buffer that can accommodate float 32 positions and uint 8 colors
gl.bufferData(gl.ARRAY_BUFFER, arrayBuffer, gl.STATIC_DRAW);

const positionAttributeLocation = gl.getAttribLocation(program, "a_position");
gl.enableVertexAttribArray(positionAttributeLocation);

const colorAttributeLocation = gl.getAttribLocation(program, "a_color");
gl.enableVertexAttribArray(colorAttributeLocation);
gl.bindBuffer(gl.ARRAY_BUFFER, vertexBuffer);
gl.vertexAttribPointer(positionAttributeLocation, 2, gl.FLOAT, false, 12, 0);

// At this time, since the color-related order in the vertex buffer does not start from 0, the offset value needs to be modified. At this time, its offset at a vertex is 2x4 = 8.
// The color data is not normalized data, so normalization is enabled

gl.vertexAttribPointer(colorAttributeLocation, 4, gl.UNSIGNED_BYTE, true, 12, 8);

// Idea 2: Add a new cache, position and color do not share memory

const colorBuffer = gl.createBuffer();
gl.bindBuffer(gl.ARRAY_BUFFER, colorBuffer);
gl.bufferData(gl.ARRAY_BUFFER, new Uint8Array(color), gl.STATIC_DRAW);

const positionAttributeLocation = gl.getAttribLocation(program, "a_position");
gl.enableVertexAttribArray(positionAttributeLocation);
gl.bindBuffer(gl.ARRAY_BUFFER, vertexBuffer);
gl.vertexAttribPointer(positionAttributeLocation, 2, gl.FLOAT, false, 0, 0);

const colorAttributeLocation = gl.getAttribLocation(program, "a_color");
gl.enableVertexAttribArray(colorAttributeLocation);
gl.bindBuffer(gl.ARRAY_BUFFER, colorBuffer);

// Since the data used in WebGL is standardized data, since the color value at this time is 0-255, the data needs to be normalized to 0-1 at this time, and the normalize parameter is set to true
gl.vertexAttribPointer(colorAttributeLocation, 4, gl.UNSIGNED_BYTE, true, 0, 0);
Now we have a certain understanding of the basic working principle of WebGL. In the next chapter, we’ll try to change the texture of the triangle.