
Cocos Shader Series - Change a shader with a texture map
Series Chapters
- Basic Introduction
- Build A Triangle
- Draw More Things
- Add Some Texture
- Draw Shaders With Cocos Creator
- Change a shader with a texture map
- Use a Noise Map to Make a Disolve Texture
- Building With WebGL
- Alpha Testing and Blending
- Blend Testing
In the previous chapter, we learned about the rendering process of the basic drawing components in Cocos Creator. This chapter will continue in-depth, how to select a shader with a texture map for explanation and transformation. With textures, the picture we can present will be richer and more appealing.
Sprite Shader
The first shader we have to try to understand is the builtin-sprite shader used by 2D sprites , which adds texture processing to the basic drawing shader.
Create an independent Effect file foo.effect, copy all the content in builtin-sprite, let us try to understand this part. You don’t need to understand everything. After all, there are many places that involve more in-depth knowledge, and I will also mark “ignorable” content.
CCEffect% {
  Techniques:
  - passes:
    - Vert: the sprite was dropped-VS: Vert  # associated vertex shader and fragment shader
       sprite-fs:: frag frag
      depthStencilState:
        depthTest:  false
         depthWrite:  false
       blendState:
        targets:           -blend
        :  true
        blendSrc: src_alpha
          blendDst: one_minus_src_alpha
          blendDstAlpha: one_minus_src_alpha
      rasterizerState:
        cullMode: none
      properties:
        alphaThreshold: {value: 0.5}  # Define the property transparency threshold, when the transparency test is enabled At that time, fragments whose transparency is lower than the threshold value will be discarded
}%

// Vertex shader
CCProgram sprite-vs %{
    // Declare the
    precision highp  float of all vertex shader floating point numbers  ;
    // C++ include-like mechanism, you can see the description below.
    #include <cc-global>
    // Macro definition. The switch that controls the execution of the code. If USE_LOCAL is not enabled in the editor or code, the  #include <cc-local> code will not be executed. You can view the description below.
    #if USE_LOCAL
    #include <cc-local>
    #endif
    // RenderTexture image flipping problem can be ignored
    #if SAMPLE_FROM_RT
    #include <common>
    #endif
   // Vertex attribute data, position + texture coordinates + vertex color
    in  vec3 a_position;
    in  vec2 a_texCoord;
    in  vec4 a_color;

    out vec4 color;
    out vec2 uv0;

    vec4  vert  () {
        vec4 pos = vec4(a_position, 1);

        #if USE_LOCAL
        // If the vertex data is updated infrequently, only the matrix needs to be updated every frame. This type of data provides local coordinates and performs transformation calculations on the GPU to reduce CPU calculations pressure. Can be ignored for now.
        pos = cc_matWorld * pos;
        #endif

        // Whether to enable pixel alignment, can be ignored, this part is mainly to
        round the observation coordinates to avoid pixel jitter #if USE_PIXEL_ALIGNMENT
        pos = cc_matView * pos;
        pos.xyz = floor(pos.xyz );
        pos = cc_matProj * pos;
        #else
        // Because the UI has alignment features, the vertex data may change frequently due to alignment, and vertex data often needs to be recalculated every frame. Therefore, the default vertex data of Sprite uses the world Coordinate data.
        pos = cc_matViewProj * pos;
        #endif

        uv0 = a_texCoord;
        // Image flip
        #
        if SAMPLE_FROM_RT CC_HANDLE_RT_SAMPLE_FLIP(uv0);
        #endif
        color = a_color;

        return  pos;
    }
}%

// Fragment shader
CCProgram sprite-fs %{
    precision highp  float ;

    // These two include parts are about UI transparent pixel processing and image compression processing, and can also be ignored
    #include <embedded-alpha>
    #include < alpha-test>

    in  vec4 color;

    #if USE_TEXTURE
    in  vec2 uv0;
    // This part refers to the content of the extension below
    #pragma builtin(local)
     layout( set  = 2, binding = 10) uniform sampler2D cc_spriteTexture;
    #endif

    vec4  frag  ( ) {
    vec4 o = vec4(1, 1, 1, 1);

    #if USE_TEXTURE
       // The processing method when compressed texture is used, the default sampling is normal, please check the embedded-alpha file in the built-in chunks folder for details
      o *= CCSampleWithAlphaSeparated(cc_spriteTexture, uv0);
      // Image graying processing
      #if IS_GRAY
        float  gray = 0.2126 * or + 0.7152 * og + 0.0722 * ob;
        or = og = ob = gray;
      #endif
    #endif

     o *= color ;
    // Transparency test. When the transparency test is turned on, it compares with the transparency threshold property to discard some fragments. Ignorable.
    ALPHA_TEST(o);
    return  o;
    }
}%
Include a mechanism
Similar to the C/C++ header file, you need to include a mechanism. You can introduce other code snippets in any shader code (CCProgram block or independent header file):
// Built-in header file introduction
#include <cc-global>

// Custom header file introduction, using:
// 1. Relative to the project directory assets/chunks folder location (even if there is no chunks folder under assets, it will suppose there is a chunks folder, and it is searched relative to this folder)
// 2. Search relative to the current file path
// The former takes precedence.
// For more information about absolute paths or same file references, please check: https://docs.cocos.com/creator/3.2/manual/en/material-system/effect-syntax.html
#include- mechanism
#include ". ./headers/my-shading-algorithm.chunk"
All the built-in chunks of Cocos Creator are in the chunks folder under the “resource manager” internal. To reference the built-in chunks, just #include<chunk-name> directly, without the suffix.
Preprocessing macro definition
In any shader code (CCProgram block or independent header file), macros can be defined by capital letters and _. Each macro is a switch, which is closed by default. It can be turned on in the editor or at runtime, and it needs to be judged by the if statement. If it is not a GLSL built-in macro, please do not use ifdef or if defined to judge, otherwise it will always be true.
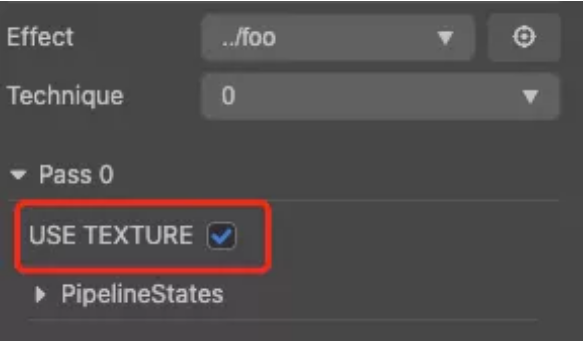
// USE_TEXTURE is a macro definition, and all macro definitions will eventually be serialized to the "Property Inspector" panel, which is convenient to enable/disable at any time.
// If the macro definition is disabled,  the code from #if to #endif will not be executed

#if USE_TEXTURE
    in  vec2 uv0;
    #pragma builtin(local)
    layout( set  = 2, binding = 10) uniform sampler2D cc_spriteTexture;
#endif

 // You can also enable/disable the macro through code
const meshRenderer = this.getComponent(MeshRenderer);
const mat = meshRenderer.material;
mat.recompileShaders({ USE_TEXTURE:  true  });
Finally, try to eliminate the parts that we don’t use temporarily and extract the parts extracted from the include.
CCEffect% {
    Techniques:
    - passes:
    - Vert: the sprite was dropped-VS: Vert
        the frag: the sprite was dropped FS-: the frag
        depthStencilState:
        depthTest:  to false
        depthWrite:  to false
        blendState:
        targets: -blend
        :true
    blendSrc: src_alpha
        blendDst: one_minus_src_alpha
        blendDstAlpha: one_minus_src_alpha
        rasterizerState:
        cullMode: none
}%

CCProgram sprite-vs %{
    precision highp  float ;
    #include <cc-global>
    in Vec3 a_position;
    in  vec2 a_texCoord;
    in  vec4 a_color;

    OUT vec4 Color;
    OUT vec2 UV0;

    vec4  Vert  () {
        vec4 POS = vec4 (a_position,. 1);
        POS = cc_matViewProj * POS;
        UV0 = a_texCoord;
        Color = a_color;

        return  POS ;
    }
}%

CCProgram sprite-fs %{
    precision highp  float ;

    in  vec4 color;

    #if USE_TEXTURE
    in  vec2 uv0;
    #pragma builtin(local)
    layout( set  = 2, binding = 10) uniform sampler2D cc_spriteTexture;

    // The cc_spriteTexture here has been used by the Sprite component, so the declaration of the layout part is reserved.
    // If there is a custom uniform in the follow-up, you don’t need to specify the layout
    #endif

    vec4  frag  () {
    vec4 o = vec4(1, 1, 1 , 1);

    #if USE_TEXTURE

     // Directly take out the part of CCSampleWithAlphaSeparated we need from embedded-alpha
    o *= texture(cc_spriteTexture, uv0);
    #endif

    o *= color;

    // ALPHA_TEST in alpha-test is a sum The behavior of judging by the threshold and then discarding the fragment is not needed here, so directly delete
    return  o;
  }
}%
In the previous chapter, we also mentioned that the shader written by Cocos Effect cannot be used alone and must be used in combination with materials. A material is a data set that interacts with light and is read by the renderer. It can provide the renderer with textures, lighting algorithms, etc., and can directly mount the material resources on the model object. A material can hold multiple techniques, but only one can be used at runtime. The configurable parameters included in the material are as follows:
- effectAsset or effectName: The effect resource reference which specifies which EffectAsset will be used for rendering. (Required)
- technique: Specify which technique in EffectAsset to use. The default is the 0th technique.
- defines: A list of macro definitions, which specify which macro definitions are turned on. All are turned off by default.
- states: The pipeline state overload list, which specifies the overloads of the rendering pipeline state (deep template transparent blending, etc.). The default is consistent with the effect statement.
The material can be initialized in the following ways:
const mat = new Material();
mat.initialize({
    effectName:  'pipeline/skybox' ,
    defines: {
        USE_RGBE_CUBEMAP:  true
    }
});
Note: this is not to say that the shader will definitely produce light and shadow effects, but if the shader does not handle these at all, there will be no light and shadow effects.
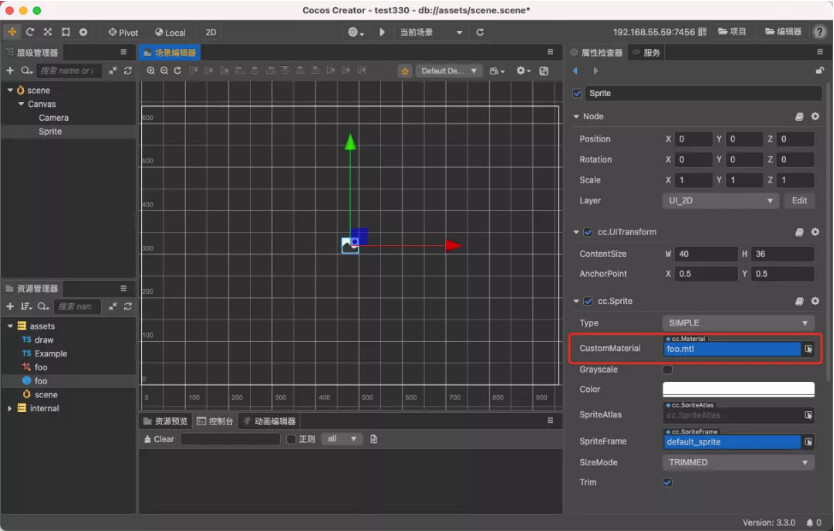
When you right-click in the “Level Manager” to create a material resource foo.mtl, the material’s effect is associated with the foo.effect we created before, and you can apply it. Then, create a Sprite node in the scene and drag the material onto the CustomMaterial property of the Sprite component mounted on the node. Observe the Sprite. At this point, you will find that the content rendered by Sprite directly becomes a white picture. That’s because the Sprite component will help upload textures, but because our custom material does not enable the USE_TEXTURE macro definition, that part of the code is not executed. Therefore, just enable the macro definition on the editor.
In this way, we successfully replaced the built-in material of the Sprite component with our custom material. In the next chapter, we try to do some special processing on the custom material to achieve the texture dissolving effect.
Expand knowledge
Layout Qualifier
This part of the content belongs to GLSL. Since it is used here, we should mention it briefly. I specifically explain here the need to modify the original built-in shader to understand what parts need to be retained and exist. In Cocos Creator 3.0, user-added uniforms or vertex attributes do not need to write this part of the content but are handled by the underlying rendering layer. For beginners, just understand this:
// In the previous WebGL content, we mentioned that when accessing the input attributes, we need to call gl.getAttribLocation to get the current vertex attribute position and then activate the attribute gl.enableVertexAttribArray
// This position is assigned by the shader by default. Of course, we can also specify by ourselves.
// You can use the gl command gl.bindAttribLocation to bind according to the specified location and then directly activate the attribute based on the location value. gl.enableVertexAttribArray
// Or you can specify it through the layout qualifier, and location represents the location where the attribute needs to be set. When the two are set at the same time, the layout priority is higher.
layout(location = 2)  in  vec3 position;

// Here is just a simple list of the memory allocation of the vertex attributes, and the uniform ones can also be specified memory allocation

// Cocos Creator built-in Two data memory structures. One is CCLocal, and the other is CCGlobal
//  #pragma builtin(local) means to apply for CCLocal memory
 // layout( set  = 2, binding = 10) means to bind to the specified location of CCLocal memory, similar to location, only But this is the way to use the higher version of GLSL, which is more flexible in designation than the lower version
#pragma builtin(local)
layout( set = 2, binding = 10) uniform sampler2D cc_spriteTexture;
Content reference
WebGL basics
WebGL API comparison table
OpenGL documents
Shader case