
Tutorial: Cocos Creator: Practical And Cost-effective Rendering - Character Hair
Does it really shine? Let your characters have realistic hair
-
Hair
-
Eyes (coming soon)
In the previous chapter, we mainly focused on skin rendering and subsurface scattering. In today’s chapter, let’s talk about hair.
Compared with skin, hair maybe even more of a challenge. We need to process a large number of polygons in units of hair bundles and pile them into various hairstyles. At the rendering level, we need to use the shader. The alpha channel removes unnecessary pixels on the polygon presenting a single slender, dense hair shape as a whole. Suppose you are also interested in learning about the description of these shapes and details on the hair models. In that case, you can refer to Adam Skutt’s role hair modeling industry benchmarking tutorial.
Adam Skutt hair modeling tutorial
Our Target
Our goal is to import a standard PBR character hair art resource into Cocos Creator for rendering. Art resources include inherent color maps (including alpha channel), normal maps, and AO maps. We will make a custom hair shader based on the standard PBR shader built-in Cocos Creator, just as we did with the skin article.
Note that we need to make a small requirement for art resources: the intrinsic color map (including the alpha channel) must be stored in the .tga format with a separate alpha channel. The shader we will write does not correctly render .png format images with pixel culling.
Laying out the theory
First of all, we still need to answer a question: what kind of effect can make the hair more realistic?
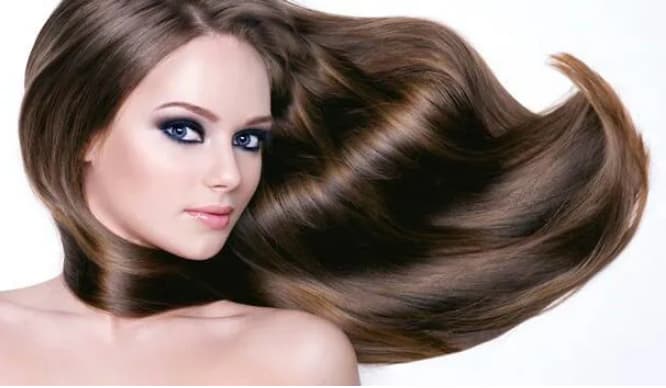
Observing the above picture, the first thing that catches people’s eyes is undoubtedly the long strips of highlights on her hair. Looking further, we can notice that there are two color changes in the long strips of highlights: One is the whiteish highlight color that we are familiar with. The intensity is slightly higher. The other is the highlight color that is slightly higher than the inherent lightness and saturation of the hair.
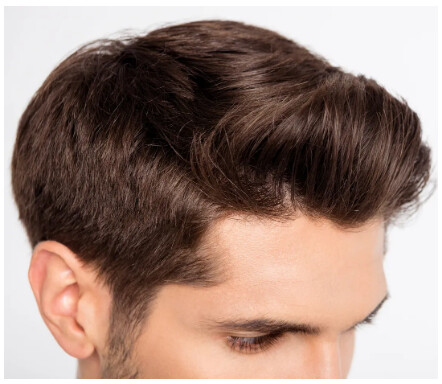
In the picture above, we can see two highlights that seem to intersect, which is determined by the way his hairstyle is combed. This tells us that the highlights of the hair basically follow the direction of each individual hair strand. In the same bundle of hair, all the hair strands are basically staying the same, so their highlights gather together to form a strip.
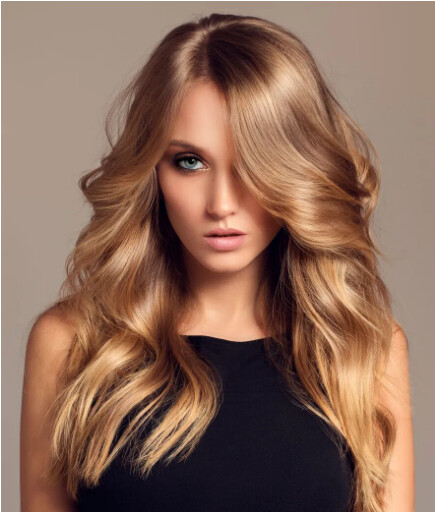
In this example, we can also see the highlights of two colors that follow the direction of the hair, and the position of the highlights seems to be concentrated on the curved position of the hairstyle.
Taken together, the laws we can observe are:
-
The highlights of the hair are band-shaped and follow the direction of the hairline;
-
Hair has two high gloss bands, a strong white highlight band, and a high gloss band biased toward the natural color of the hair;
-
The highlight bands of the hair usually appear in the curved part.
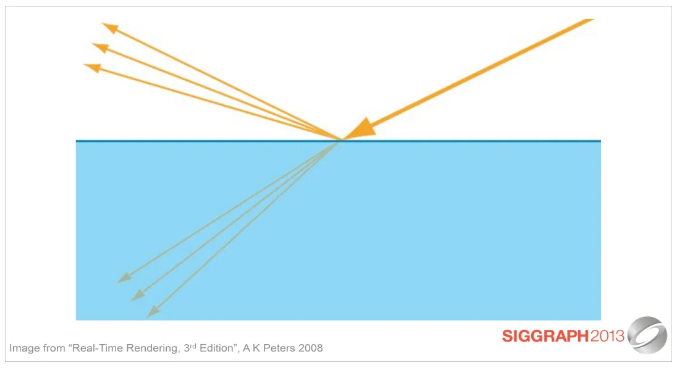
We know that Specular lighting expresses the reflected light of the material. Regardless of the surface roughness of the material, the direction of the Specular light propagation can be viewed as a cone from a macro perspective. The light propagation within this cone is average. That’s why the highlight we observe on the surface of the material is usually a circle. This characteristic of light propagation is physically called Isotropy, and its meaning is just like its literal meaning: “consistent in all directions.”
However, in the reference image, the highlights on the hair are not round. Highlights only appear on a single strand of hair, and from the lateral direction between the strands, there is no condition for highlighting. On the whole, hair is a material that only produces highlights in the vertical direction, no highlights in the horizontal direction, and the highlights in the vertical direction are densely arranged into a ribbon. This characteristic that is not uniform in all directions is called Anisotropy.
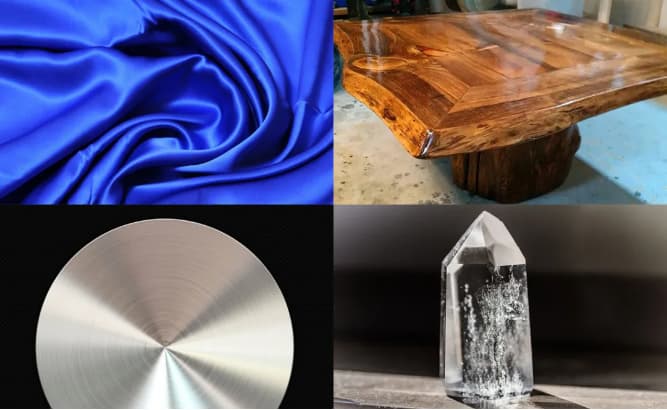
In addition to hair, any material that is physically densely combined with countless high-gloss filaments will exhibit anisotropic high-gloss characteristics, such as silk, most crystals, polished wood, brushed and polished metal, etc.
Achieve anisotropy
At present, most of the hair anisotropic rendering effects we see in the game are based on the Kajiya-Kay model published as early as 1989. So, what is the Kajiya-Kay model?
Since the anisotropic characteristics of the hair are reflected in the highlights, then we should start with Specular.
The “N·L” method that we have already talked about in the skin article, using the normal direction of the object and the direction of illumination, allows us to quickly get the value of the relationship between light, illumination, and darkness. Since the highlight is also related to the object’s surface characteristics and the light direction, can we use the same method to get Specular?
Of course, we cannot mechanically understand Specular as a Diffuse with extremely high strength and extremely small range. In addition to being affected by the direction of light, highlights are also related to the angle we observe. Therefore, we introduce a half vector H that is the sum of the illumination direction (L) and the observation direction (V), and apply the “N·L” method to obtain the dot product with the normal N. The intensity of the highlight is much higher than the intensity of Diffuse, so we output the intensity parameter as the index of the dot product. From this, we have a basic formula for calculating Specular:

However, this formula only applies to isotropic conditions and does not consider the anisotropic characteristics of hair.
As shown in the figure below, our Specular formula generally finds the dot product of the normal and the half vector. But we know through observation that the anisotropy of the hair is related to the direction of the hair and has little to do with the overall structure of the hair. Therefore, N loses its meaning to us. What we need is the vector T that expresses the direction of the hair.
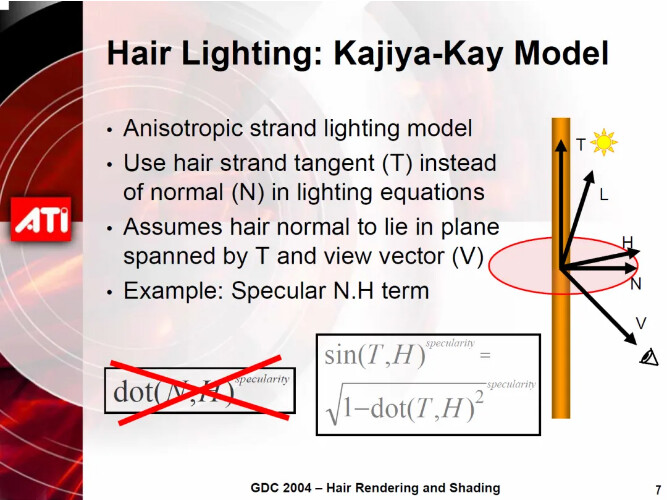
After obtaining the T vector, we continue to apply the “N·L” method as we have done, which requires obtaining the projection of T on the half vector. This projection is actually the sine of the angle between T and N, and the dot product can only get the cosine of the angle between the two. Fortunately, we can get the sine by conversion through the law of sine and cosines:
vec4 worldViewDir = cc_matView * vec4(0.0, 0.0, 1.0, 0.0) - vec4(v_position, 0.0);

vec4 worldHalfDir = normalize(normalize(cc_mainLitDir) + normalize(worldViewDir));

float THdot = dot(normalize(T), normalize(worldHalfDir.xyz));

float sinTH = sqrt(1.0 - pow(NHdot, 2.0));
In the above code, cc_matView and cc_mainLitDir have already appeared in the skin section, and they return the View Matrix and the direction of the light source, respectively.
These all seem relatively simple. Then the question is: how do we get the vector T?
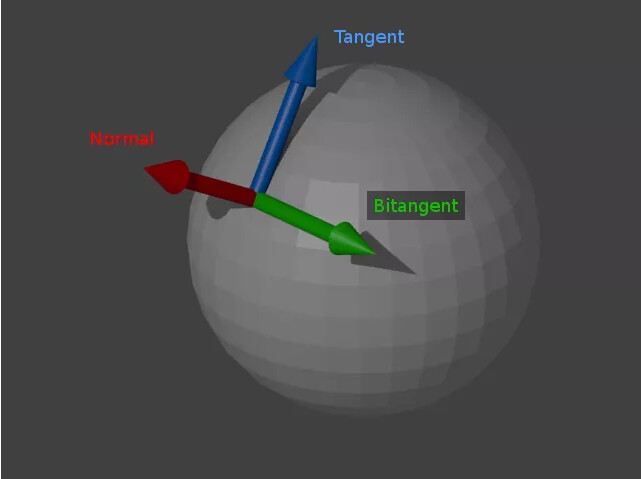
We know that the vertices of the object store tangent space data: take the vertex normal direction as one axis, the vertex tangent (perpendicular to the vertex normal and parallel to the surface) as the other axis, and the third perpendicular to the vertex normal and tangent. This vector is the third axis. Among them, the vertex normal and vertex tangent are already included in the vertex data of the mesh. The developers of the model have helped us deal with the smooth group or soft and hard edges (depending on whether they are using 3ds Max or Maya) and follow the requirements provides a normal map. The third vector, usually called Bi-tangent or Bi-normal, can be calculated by cross-product according to its characteristics perpendicular to the vertex normal and vertex tangent:
v_tangent = normalize((matWorld * vec4(In.tangent.xyz, 0.0)).xyz);

v_bitangent = cross(v_normal, v_tangent) * In.tangent.w;
In fact, in the PBR shader of Cocos Creator, the secondary tangent vector has been calculated for us, and we can use it through v_bitangent.
So far, we have established a connection between Specular and the direction of the hair, but our Specular is still the highlight of the model and does not look like hair. We need to use a grayscale image of the hair as a numerical weight to offset the direction of the secondary tangent vector so that our highlights are stretched in the direction of the hair, which is more like the shape of a hair.
The first thing we need to know is that the tangent space data is based on the tangent plane of the object’s surface, and the surface of the object is determined by the direction of the normal. Therefore, our offset to the secondary tangent vector must be offset in the direction of the normal.
Next, we need a grayscale image of the hair as the weight of the stretch. This grayscale image can be a texture using hair model UV or a continuous texture. If it is the latter, we have to write the corresponding UV Tiling function for it.
vec2 anisotropyUV = v_uv * anisotropyTile.xy + anisotropyTile.zw;

vec4 jitterMap = texture(jitterTex, anisotropyUV);
We declare a vec4 parameter anisotropyTile and use it to realize the UV control function. v_uv We have used it in the skin article, and what is returned is the UV data passed by the vertex shader.
We first multiply the normal data with the weighted grayscale image and disturb the normal direction. In addition, we also need to add a custom parameter of displacement weight. The meaning of this parameter will be reflected later. Then add it to the secondary tangent vector. This is the same as the way we obtain the H vector. After normalization, we get the half vector of the secondary tangent vector and the normal direction vector after the disturbance.
After obtaining our T vector, performing dot product calculation, converting it to a sine, and substituting it into our simple Specular formula, the anisotropic highlight will come out. We also use GLSL’s smoothstep function, similar to the mix function. It will project the input parameters into the defined minimum and maximum interval and generate a smooth transition curve between the two extreme values.
float anisotropyIndex( float offset, float factor, float amt ) {

vec3 jitterT = v_bitangent + (v_normal * (offset + factor));

float THdot = dot(normalize(jitterT), normalize(worldHalfDir.xyz));

float sinTH = sqrt(1.0 - pow(NHdot, 2.0));

float atten = smoothstep(-1.0, 0.0, NHdot);

return pow(sinNH, amt) * atten;

}
Now, Specular has basically followed the direction of the hair, but our highlights seem to be too strong. This is because we did not consider the issue of mutual shading by the hair itself. It is very easy to solve it, as long as the AO of the hair is superimposed on the highlight.
float aoFactor = mix(1.0, 0.0, pbr.x);
Finally, there is the link of linkage. Recalling the reference image we observed, we need to use the anisotropy function we wrote to generate two highlight bands. Remember the displacement parameters we wrote when we disturbed the secondary tangent vector? Bring different displacement parameter values (hairSpecMOffset, hairSpecAOffset) to the two highlight bands, respectively, and they will not overlap each other. You can move the highlight to a place where the model has a higher degree of curvature to obtain a more realistic effect. In addition, they have their own intensity parameters (hairSpecMAmt, hairSpecAAmt) and color parameters (hairSpecColor01, hairSpecColor02), and we can also give a total intensity for overall coordination (hairSpecIntensity).
vec4 hairSpec = clamp((anisotropyIndex(hairSpecMOffset, jitterMap, hairSpecMAmt) * hairSpecColor01 * hairSpecIntensity + anisotropyIndex(hairSpecAOffset, jitterMap, hairSpecAAmt) * hairSpecColor02 * s.albedo * hairSpecIntensity) * aoFactor), 0.0, 1.51);
In this step, our anisotropic highlight function is basically ready, but we have encountered a similar problem to the skin article: which channel do we output the highlights?
You may have thought that we can use our anisotropic highlight function to adjust the roughness channel to achieve the purpose of controlling the Specular output, but this result is not what we want. What our function returns is not a highlight mask, and we don’t want to see specular reflections in the highlights. What’s more, the highlights of the standard PBR still exist, and we don’t want to see isotropic and anisotropic highlights simultaneously. In this case, the easiest way is to set the roughness to a constant 1, eliminate all isotropic highlights, and then superimpose the output of the anisotropic highlights on the albedo channel.
The appearance of the hair
Our shader has been written, but our work is not yet complete. How to use this shader to show the best effect?
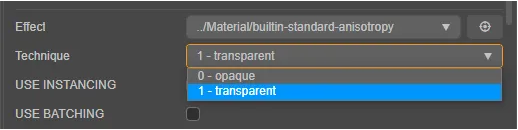
Create a new material and give our anisotropic shader—set technique to 1-transparent.
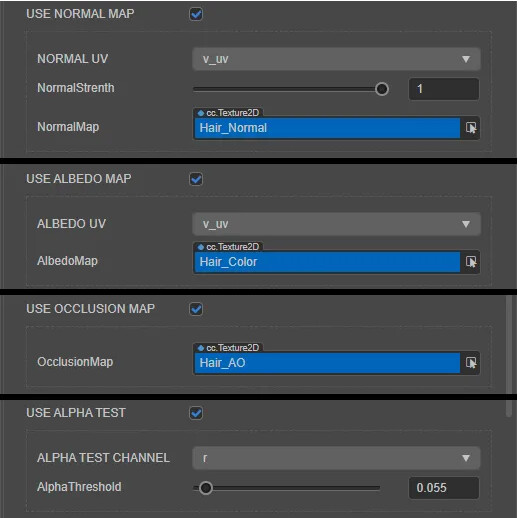
First, assign each texture to the corresponding channel. The normal map corresponds to the normal channel, the AO map corresponds to the Occlusion channel, and the intrinsic color map corresponds to the Albedo channel.
Turn on USE ALPHA TEST and use the alpha channel to eliminate unwanted pixels. Here you can use the red channel or alpha channel to adjust the culling threshold to make the “cutout” cleaner.
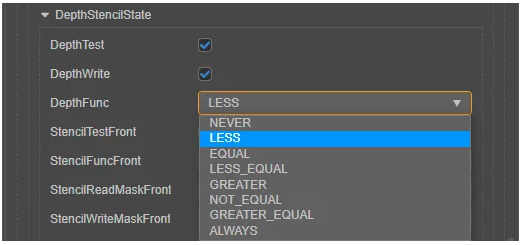
After this step, the hair should look like it should be. However, you will find that the relationship between hair seems a bit strange. You need to expand the PipelineStates tab at the bottom of the editor, turn on DepthWrite under the DepthStencilState tab, and make sure that DepthFunc is set to Less.
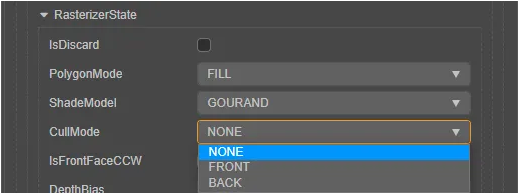
Of course, by default, the back of the model will not be rendered. If you need to achieve the effect of double-sided material, set CullMode under RasterizeState to None.
With this, the classic Kajiya-Kay model hair shader that we reproduced in Cocos Creator is basically completed.
In the next chapter, let’s give the characters a pair of eyes.