
Tutorial: Cocos Creator: Adding a texture to your lines
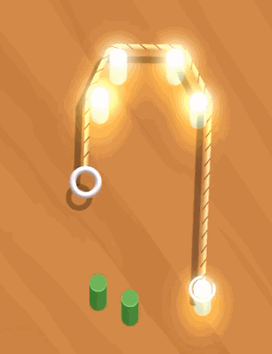
If you’ve ever played a game with a bridge, a rope, a snake, or another line with a texture, you may have wondered how you can do the same in your game. Our star writer, Baiyu Wubing, from the Chinese forums, shared this great tutorial on how to do the same for your game.
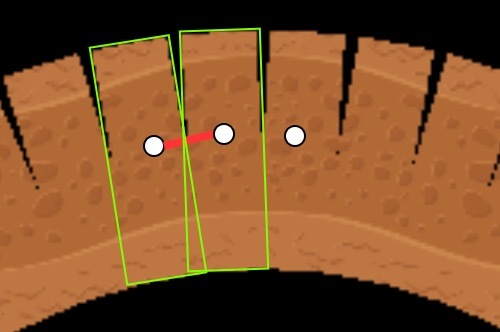
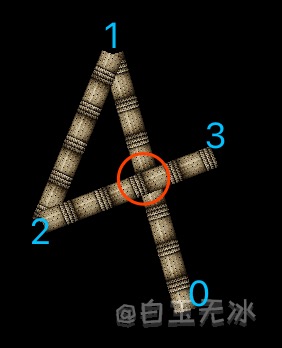
Let’s start with an example

How do we achieve this?
Start by creating the following:
- a
Scene - a
cc.Graphicsnode - add a child node to the
cc.Graphicsnode of typecc.Sprite, and change the rendering mode toMesh.

Note: Mesh coordinates are calculated from the top left corner, and the Graphics drawing is drawn from the center.
The cc.Sprite node, the Scale is adjusted to (1,-1), and the Anchor is adjusted to (0,1).
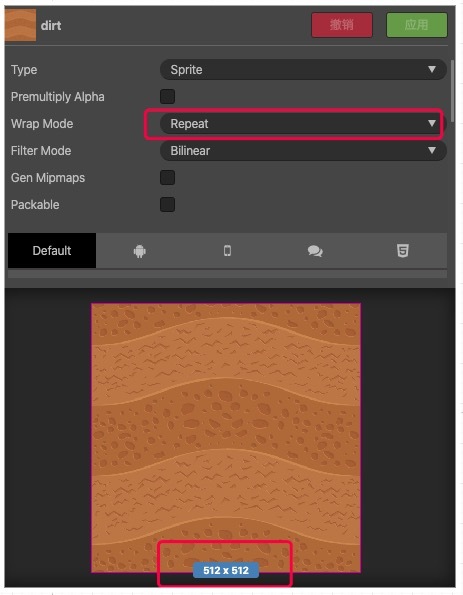
In order to make sure the texture is filled after repeating beyond the boundary, the obtained texture size has to be a perfect square and set to Repeat.
Drawing a texture definitely needs coordinate position information.
Let’s take a look at the WEBGL implementation of Graphics.
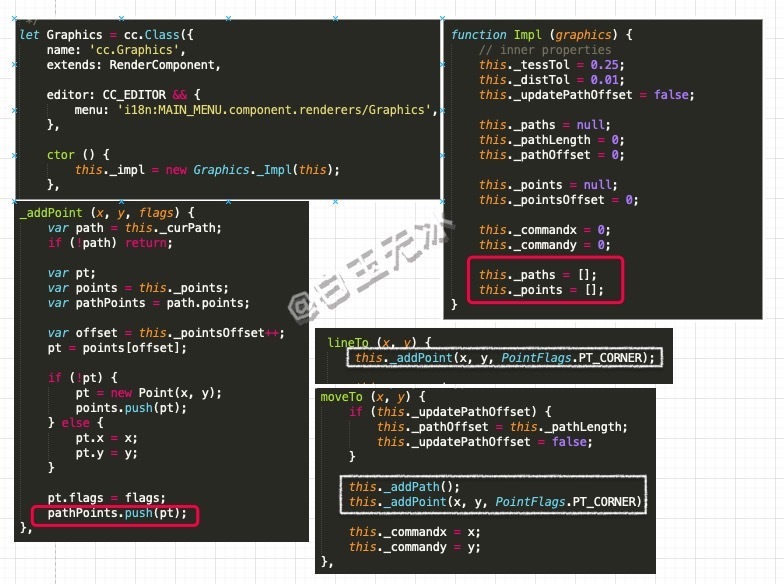
Graphics has an _impl variable. _impl also has a _paths variable, the points of all objects recorded paths, and a corresponding image line. lineTo and moveTo will go to _paths stuffing data points to draw the line.
For the circle and arc and rect, other interfaces eventually calls lineTo and moveTo.
With _paths the texture is drawn, you can traverse the first point out.
    for( let index = 0; index < _impl._paths.length; index++) {
        const path = _impl._paths[index];
        const pathPoints = path.points;
        if (pathPoints.length < 2) continue;
        for(let index2 = 1; index2 < pathPoints.length; index2++) {
            // current point
               const p = cc.v2(pathPoints[index2].x, pathPoints[index2].y);
           // previous point
               const p_pre = cc.v2(pathPoints[index2 - 1].x, pathPoints[index2 - 1].y);
               }
     }
How to paint with a texture?
First, consider two adjacent points. Then consider the line width of w for rectangle painting. The rectangle has four points, and the coordinates of these four points are needed.
Second, calculate the direction of these two points.
const dir = p.sub(p_pre); // direction
Third, find a vector in the vertical direction (calculated based on the inner vector product being 0) of the length is half the line width.
const cross_dir = (dir.y == 0 ? cc.v2(0, 1) : cc.v2(1, -dir.x / dir.y).normalize()).mulSelf(w / 2); // Vertical direction
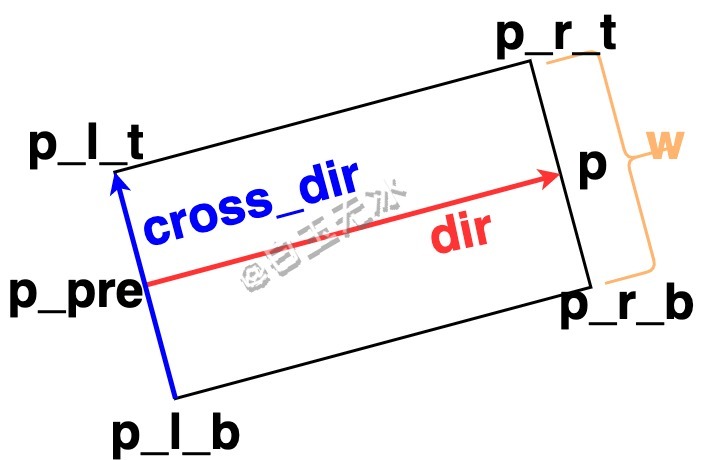
The four vertices of this rectangle can be obtained from the two points and the vertical direction.
const p_r_t = p.add(cross_dir); // upper right
const p_r_b = p.sub(cross_dir); // upper left
const p_l_t = p_pre.add(cross_dir); // bottom right
const p_l_b = p_pre.sub(cross_dir); // bottom left
The last four points padding sprite.spriteFrame data vertices, if you need further understanding, please reference the Preliminary grid sprite rendering mode article (Chinese only).
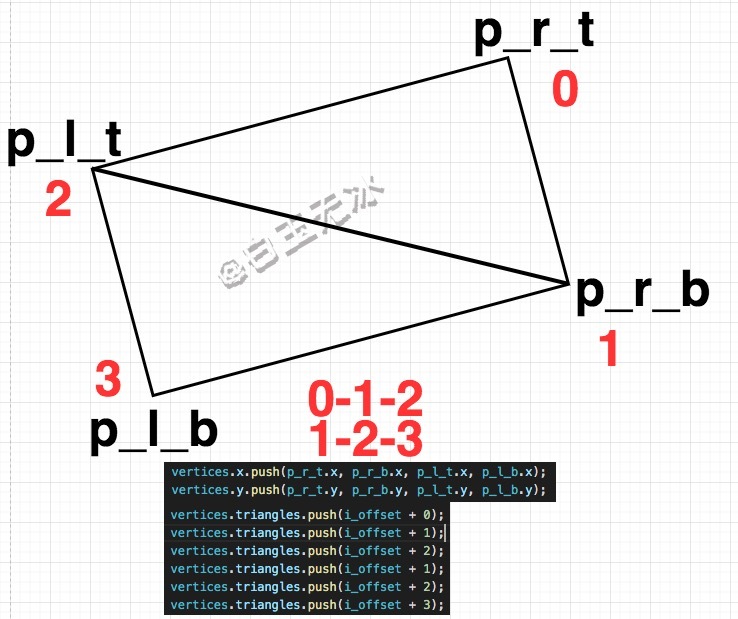
For uv texture coordinates, vertex coordinates used here directly a scaling factor. Example implementation:
    const uv_mul = 50;
    const i_offset = vertices.x.length;
    vertices.x.push(p_r_t.x, p_r_b.x, p_l_t.x, p_l_b.x);
    vertices.y.push(p_r_t.y, p_r_b.y, p_l_t.y, p_l_b.y);
    vertices.nu.push(p_r_t.x / uv_mul, p_r_b.x / uv_mul, p_l_t.x / uv_mul, p_l_b.x / uv_mul);
    vertices.nv.push(p_r_t.y / uv_mul, p_r_b.y / uv_mul, p_l_t.y / uv_mul, p_l_b.y / uv_mul);
    vertices.triangles.push(i_offset + 0);
    vertices.triangles.push(i_offset + 1);
    vertices.triangles.push(i_offset + 2);
    vertices.triangles.push(i_offset + 1);
    vertices.triangles.push(i_offset + 2);
    vertices.triangles.push(i_offset + 3);
This code works, but there is a problem with drawing rectangles in this way. For drawing arcs, if the separation is too large, or the line width is relatively large, separation will occur.
How to deal with this gap?
Just draw a circle at the connection point so that the gap can be removed.
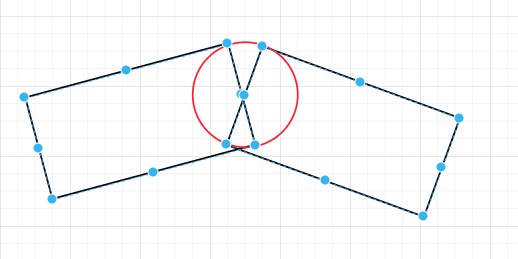
How to draw a circle?
A circle can be regarded as a regular polygon, and the position coordinates can be confirmed according to the relationship between the radius and the center of the circle. Please refer to the special loading effects of shader animation article to learn more (Chinese only).
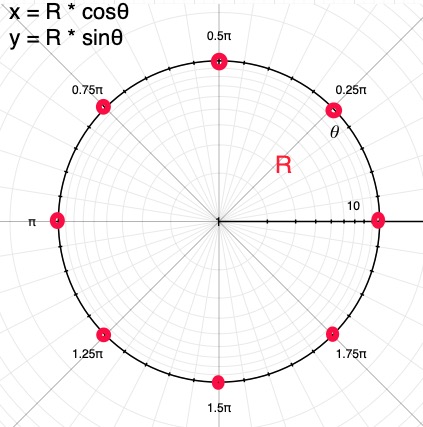
The radius is exactly half the width of the line. The coordinates on a circle are converted into the following code.
    //angle
    const r = 2 * Math.PI * index3 / count;
    // Calculate the direction vector first, and add the coordinates of the center of the circle to the point on the circle.
    const pos_circle = cc.v2(w / 2 * Math.cos(r), w / 2 * Math.sin(r)).addSelf(p);
How to determine the vertex index?
Follow the center of the circle and draw triangles one by one.
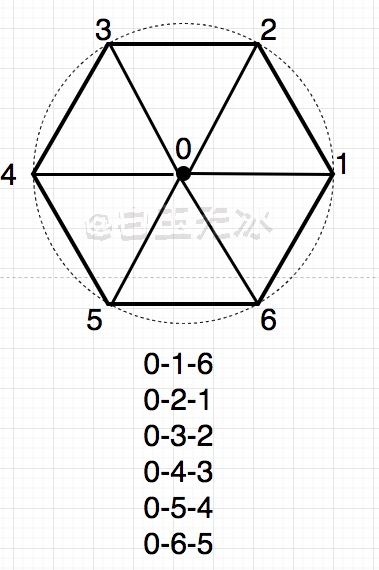
This is one of the indexing methods, converted into the code as follows. Example implementation:
    // Drawing a circle
    const count = 12;
    i_offset = vertices.x.length;
    vertices.x.push(p.x);
    vertices.y.push(p.y);
    vertices.nu.push(p.x / uv_mul);
    vertices.nv.push(p.y / uv_mul);
    for (let index3 = 0; index3 < count; index3++) {
          const r = 2 * Math.PI * index3 / count;
          const pos_circle = cc.v2(w / 2 * Math.cos(r), w / 2 * Math.sin(r)).addSelf(p);
          vertices.x.push(pos_circle.x);
          vertices.y.push(pos_circle.y);
          vertices.nu.push(pos_circle.x / uv_mul);
          vertices.nv.push(pos_circle.y / uv_mul);
          if (index3 === 0) {
                   // 0 - count -1
                   vertices.triangles.push(i_offset, i_offset + 1 + index3, i_offset + count);
                    } else {
                   // 0 - index3 - (index3-1)*
                   vertices.triangles.push(i_offset, i_offset + 1 + index3, i_offset + index3);
            }
    }
The above code is just to achieve the effect of a simple drawing texture. To achieve the effect of a rope, recalculate the texture coordinates, which are related to the position/direction/length.
Line drawing texture rope
Several front lines drawing texture has been achieved; the main goal is to calculate the correct uv coordinates.
Because this line has a direction and a length, it will affect the calculation of texture coordinates.
Note: one idea: pulling all the line segments into a straight line and place them in one direction.
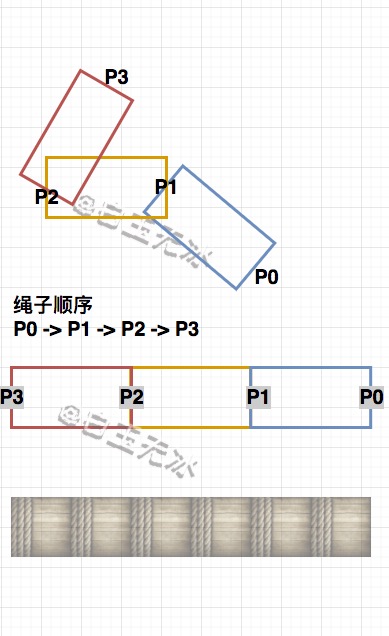
In-order to make this texture move from the head from the tail, after straightening, the last point is used as the starting point of the texture.
When traversing this point, start from the end and record the length of each section.
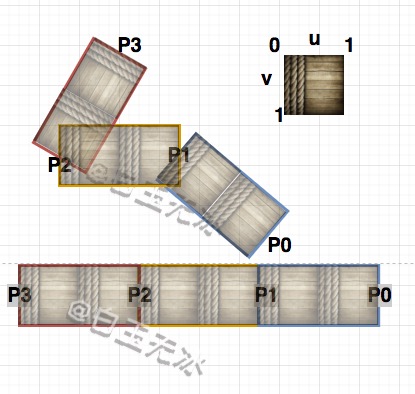
Texture coordinates v two points are 0 and 1. The texture coordinates u (horizontal direction) are calculated based on the length of the rope. Example:
    // Calculate from the last point
    for (let index2 = pathPoints.length - 1; index2 > 0; index2--) {
          // Omit part of the code
          vertices.x.push( **p_r_t** .x, p_r_b.x, **p_l_t** .x, p_l_b.x);
          vertices.y.push( **p_r_t** .y, p_r_b.y, **p_l_t** .y, p_l_b.y);
          // Calculate uv
          vertices.nu.push(offsetX.x * uv_mul, offsetX.x * uv_mul, (offsetX.x + dirLen) * uv_mul, (offsetX.x + dirLen) * uv_mul);
          vertices.nv.push(1, 0, 1, 0);
          // Omit part of the code
          offsetX.addSelf(cc.v2(dirLen, 0)); *//* *Record the length of the drawing*
    }
One problem with this backward traversal is that the head will cover the texture of the tail.
After calculating the vertex index of the rectangle, it needs to be reversed as a whole and drawn from the beginning. Example implementation:
    let trianglesCache: number[ ][ ] = [ ];
    for ( let index2 = pathPoints.length - 1; index2 > 0; index2--) {
          // Omit part of the code
          triangles.push(i_offset + 0);
          triangles.push(i_offset + 1);
          triangles.push(i_offset + 2);
          triangles.push(i_offset + 1);
          triangles.push(i_offset + 2);
          triangles.push(i_offset + 3);
          trianglesCache.push(triangles);
    }
    trianglesCache.reverse(); //Vertex index inversion
    trianglesCache.forEach(v => {
          //True vertex index order
          vertices.triangles.push(...v)
    }
After inversion, the texture of the rope is correct.
For drawing a circle (actually a polygon) at the connection, pay attention to the rotation of each point so that the texture direction of the circle is correct.

Example implementation:
    // Draw a circle
    const dir_angle = dir.signAngle(cc.v2(-1, 0)); //The included angle with the negative direction of the x-axis
    const count = 12;
    i_offset = vertices.x.length;
    // Here is the center of the circle
    vertices.x.push(p.x);
    vertices.y.push(p.y);
    vertices.nu.push(offsetX.x * uv_mul);
    vertices.nv.push(0.5);
    for (let index3 = 0; index3 < count; index3++) {
           const** r = 2 * Math.PI * index3 / count;
           //Vector from center to each side
           const pos_circle = cc.v2(w / 2 * Math.cos(r), w / 2 * Math.sin(r));
           vertices.x.push(pos_circle.add(p).x);
           vertices.y.push(pos_circle.add(p).y);
           // Need to rotate for round uv
           vertices.nu.push((pos_circle.rotate(dir_angle).x + offsetX.x) * uv_mul);
           vertices.nv.push(pos_circle.rotate(dir_angle).y / w + 0.5);
           if (index3 === 0) {
                  triangles.push(i_offset, i_offset + 1 + index3, i_offset + count);
                  } else {
                         triangles.push(i_offset, i_offset + 1 + index3, i_offset + index3);
                  }
    }
What should we have achieved?
Finally, here is an example of drawing a star:
Summary
The whole idea of the rope texture is to convert all the curved lines into straight, and then calculate the texture coordinates.