
What are the optimization methods for TiledMap maps? Cocos Creator gives you these four aspects to achieve deep optimization
Introduction
How to do TiledMap map optimization? Developer Bool Chen will share a set of effective TiledMap map optimization solutions, including rendering, parsing, and wayfinding.
When the maps in the project became larger and more complex, some performance problems began to appear gradually. This article will share the optimization and implementation of TiledMap from four aspects: clipping area sharing, Sprite color data removal, multi-atlas rendering batching, and frame-by-frame pathfinding.
Test case
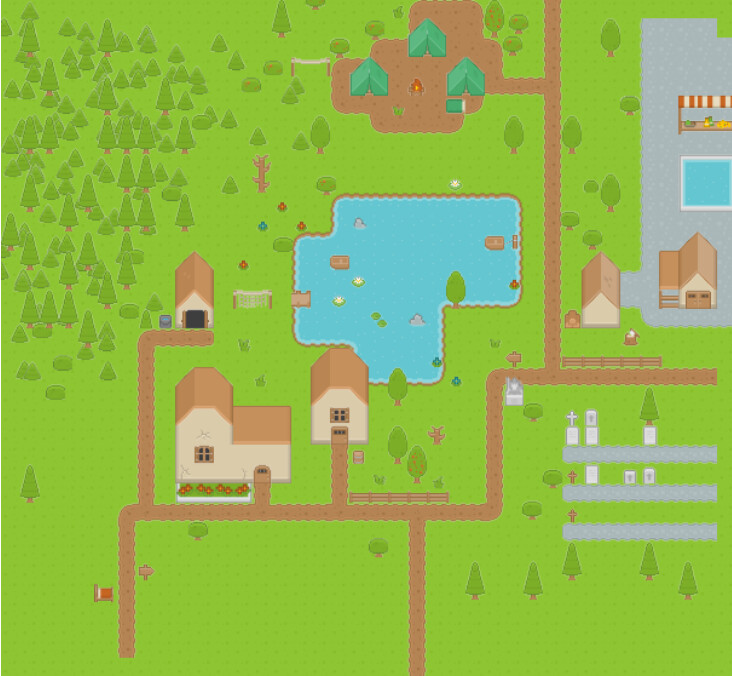
This test case is a map with 6 layers, including 4 tile layers and 2 object layers. The data source of the test is in the browser environment, using the console.time and timeEnd functions to print the corresponding logic time-consuming or to render time-consuming. It should be noted that the time-consuming of each run is not consistent, but after taking the average, it can be considered relatively reliable.

Before and after optimization (Note: the horizontal axis is the number of frames the game is running, and the vertical axis is the corresponding time-consuming under this number of frames, in milliseconds)
The above picture is the optimization effect after we finally use the clipping area sharing + Sprite color data removal + multi-atlas rendering in batches. The test shows that the rendering time is reduced by about 20% . In fact, this map is not complicated. The optimization effect will be more evident if the number of objects and layers increases.
The main optimization plan this time refers to "How to Redraw " by Xiaopang from Dacheng. This article introduces many performance optimization techniques and is strongly recommended for everyone to take a look. The project is based on Cocos Cocos Creator 2.4.3, but most of the optimization ideas are still applicable in version 3.x. Due to space limitations, this article only presents part of the core code, the complete code and the source code download of the test project are at the end of the article.
Crop area sharing
When the player controls the character’s movements on the map, the content displayed on the map also needs to change with the character’s position. At this point, to optimize performance, the engine will calculate the visible range of the screen, and only tiles within the visible range will be rendered.
After studying the rendering process of the TiledMap map in the engine, we found that, in fact, TiledMap itself is not the rendering component. The rendering of the map is done by TiledLayer, whose corresponding renderer is TmxAssembler. When rendering, the rendering stream will call the fillBuffers function of TmxAssembler one by one to fill in the rendering data, and the function _updateCulling of CCTiledLayer will be called to do the visible range, and only the visible range will be rendered when it changes.
However, when calculating, since each layer has a corresponding value Assembler, each layer will be calculated separately. In general, the range displayed by each layer is the same, so we hope that it is only calculated once.
Next, we will implement the sharing of clipping area (Share Culling) , which allows different TiledLayer to share the culling results of the visible area between them, thus saving performance.
Implementation process
First, we inherit TiledMap, rewrite the _buildLayerAndGroup function, and create custom ones called ShareCullingTiledLayer.
Because it is more convenient to record the first layer, we cache the first layer and pass TieldLayer to the subsequent layers so that the calculation results can be read later.
_buildLayerAndGroup() {
   for (let i = 0, len = layerInfos.length; i < len; i++) {
      if (layerInfo instanceof cc.TMXLayerInfo) {
         *//* Create a custom ShareCullingTiledLayer
         let layer = child.getComponent(ShareCullingTiledLayer);
         *//* Passing, recording the first TiledLayer
         layer._init(layerInfo, firstLayer);
         firstLayer = firstLayer || layer;
      }
   }
}
Then modify TiledLayer the cropping function by overriding it.
Here we make a judgment. If it is the first layer, we will let him perform the calculation and cache the result; if it is not the first layer, we will directly read the calculation result of the first layer.
Finally, rewrite the TiledLayer cropping function to build the cropped region.
_updateCulling() {
  // When this._firstLayer is empty, it means it is the first layer.
  let firstLayer = this._firstLayer;
  if (!firstLayer) {
    // Performing cropping area calculations
    this._updateViewPort();
    this._cacheCullingDirty = this._cullingDirty;
  } else {
    // Directly reusing the result of firstLayer
    this._cullingRect = firstLayer._cullingRect;
    this._cullingDirty = firstLayer._cacheCullingDirty;
    return;
  }
}
We very simply have completed this optimization. Share Culling is not troublesome to implement, but the effect is remarkable.
Optimization effect
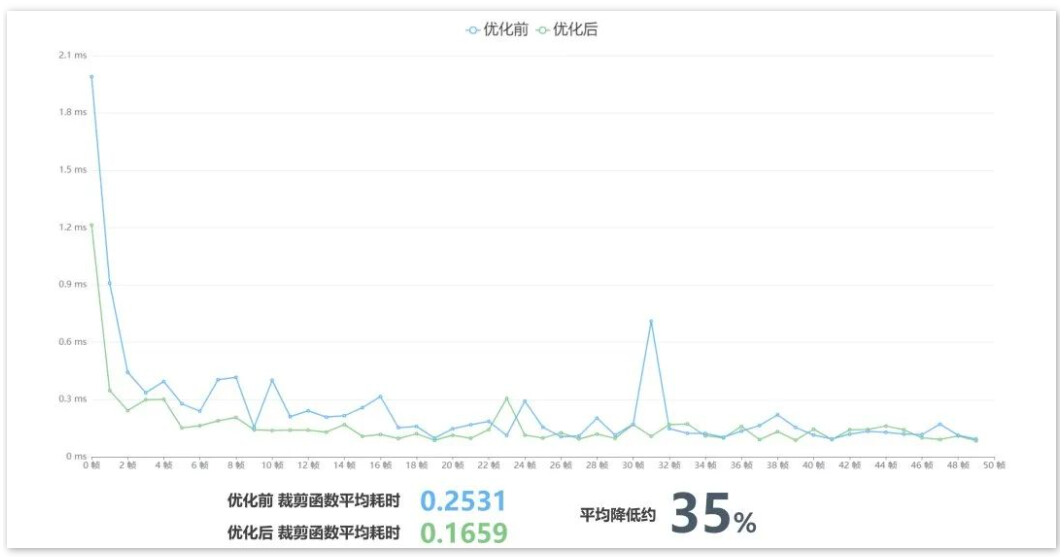
Before and after optimization
It can be seen that even in the case of only 6 layers, the average time-consuming of the clipping function is reduced by about 35%. When the number of layers increases, the optimization efficiency will be higher.
Speaking of cropping areas, here’s another optimization point. When initializing a block layer, the engine traverses the entire map of blocks, saving information about all of them for subsequent use. Here it could be changed to region loading, where only the blocks in the current screen are parsed at first. Then later, when moving, the blocks in the direction of action are dynamically parsed. Of course, this solution has the disadvantage of needing extra memory space to save whether the corresponding coordinates have been parsed.
Sprite color data removal
Next is object color removal. Here we use it for map objects, but this optimization applies to all Sprite components.
The default rendering vertex data of the Sprite contains color data, but in most cases, we directly put the materials given to us by the art team into the game and will not modify the color. At this time, the Color data seems to be an unnecessary item. Removing it can reduce the data transfer between the CPU and GPU and can also save the calculation of color in the shader.
Briefly talk about the Sprite rendering process. The Sprite component will get a default Assembler through resetAssembler, and the Assembler will populate RenderData with Sprite’s data through the updateRenderData function. Finally, the engine will help us pass the rendering data to the material and render.
Let’s take a look at how to achieve this optimization.
Implementation process
Let’s start with the low-level steps, starting with shaders. Create Effect and Material after the built-in Effect and Material. Because we no longer need color, we just need to remove the code for color input and output, calculation, etc., in the shader.
*//* Remove color-related input and output processing

CCProgram vs %{
  in vec3 a_position;
  // in vec4 a_color;
  // out vec4 v_color;
   void main () {
    // v_color = a_color;
    gl_Position = pos;
  }
}%

*//* Delete color-related inputs, calculations
CCProgram fs %{
  precision highp float;
  // in vec4 v_color;
   void main () {
    vec4 o = vec4(1, 1, 1, 1);
    CCTexture(texture, v_uv0, o);
    // o *= v_color;
    gl_FragColor = o;
  }
}%
Next, we need to provide rendering data without color—Inheirit cc.Assembler to implement a new Assembler. In the Assembler, we first create a vertex data format, removing the color property in the default vertex format. Next, create the corresponding vertex data container for our new format.
*//* *Customize the vertex format to remove the default color field*
let gfx = cc.gfx;
let vfmtNoColor = new gfx.VertexFormat([
    { name: gfx.ATTR_POSITION, type: gfx.ATTR_TYPE_FLOAT32, num: 2 },
    { name: gfx.ATTR_UV0, type: gfx.ATTR_TYPE_FLOAT32, num: 2 },
    // { name: gfx.ATTR_COLOR, …},
]);
/**
 *Initialize this._renderData to create a custom formatted renderData
 */
initData() {
  let data = this._renderData = new cc.RenderData();
  this._renderData.init(this);
   // Create renderData in our own format
  data.createFlexData(0, 4, 6, vfmtNoColor);
}
Finally, the function that renders the color is also removed. This completes one without color Assembler.
    /**
     * Update the colors and say bye, bye 😆
     */
    // updateColor () {

    // }
Then we need to use this Assembler. Override the Sprite’s resetAssembler function and change the default to the Assembler to the above Assembler.
/**
 * Modify the default Assembler
*/
_resetAssembler() {
  let assembler = this._assembler = new NoColorSpriteAssembler();
  assembler.init(this);
   this.setVertsDirty();
},
If you want to use it elsewhere, just replace the material in front of the sprite.
So how does this work with map objects? We implement a TiledObjectGroup by inheriting it and overriding the _init function. Inside, we change the default Sprite component to our custom component and assign the corresponding material to remove the color.
_init(groupInfo, mapInfo, texGrids, noColorMaterial) {
  let objects = groupInfo._objects;
  for (let i = 0, l = objects.length; i < l; i++) {
    imgNode = new cc.Node();
    let sp = imgNode.addComponent("NoColorSprite");
    sp.setMaterial(0, noColorMaterial);
  }
}
Optimization effect
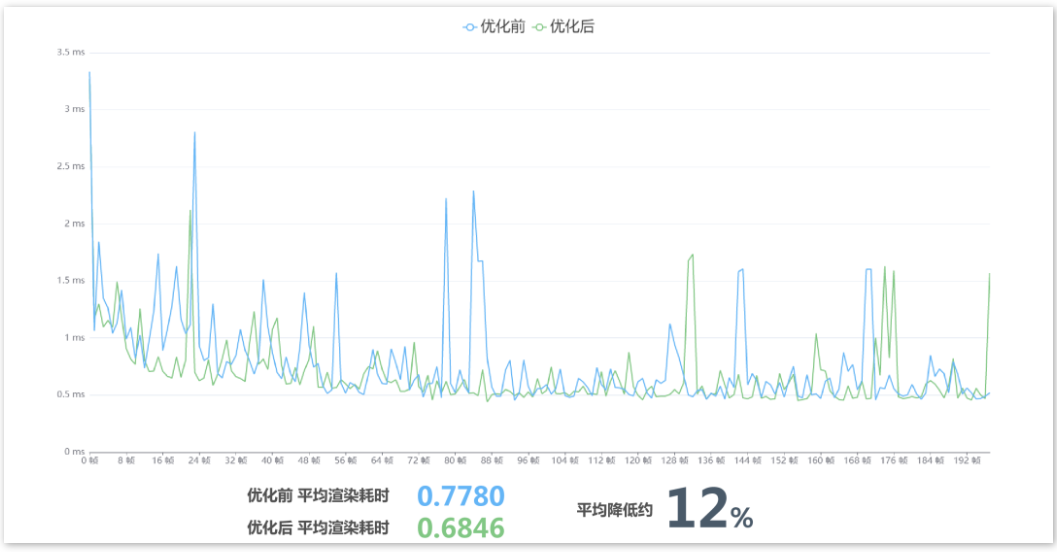
Before and after optimization
The final optimization effect reduces the rendering time by about 12% when there are more than 100 components. When I tested the optimization effect, I found that this data has a significant fluctuation, and the range is about 5 - 15%.
At the logical level, we have reduced the filling of color data, and the optimization effect itself is not very big. Second, data statistics cannot monitor the part of CPU and GPU data transmission, nor can it monitor the shader part of the optimization.
In addition, removing color data can also prepare us for our next batch of multi-atlas rendering of map objects.
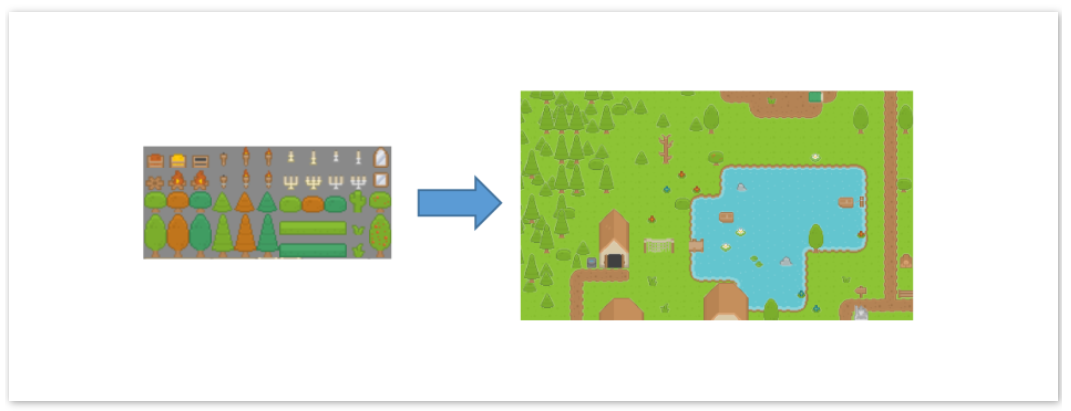
Multi-atlas rendering batch
Objects are often an indispensable part of the map. After the worldview is enriched, it is common for objects to come from different atlases. At this time, if the objects need to be sorted and the atlases are interleaved, generating a large amount of DC is very easy.
A common solution for optimizing DC is to pack sets, but this doesn’t work when the images are from different sets. Multi-atlas rendering combined batch is a similar scheme to packaged atlases, where we pass multiple atlases at once when rendering, converting the original determination of whether an image is from the same atlas to a determination of whether an image is from the same atlas.
Most mobile devices can support 8 atlases, so in theory, as long as the atlas used does not exceed 8, you only need 1 DC.
Implementation process
First of all, you need to modify the shader-related code. We also copy a built-in Effect and then add some texture parameters to the Effect declaration to receive multiple atlas data.
CCEffect %{
  techniques:
  - passes:
    - vert: vs
      properties:
        texture: { value: white }
        texture1: { value: white }
        texture2: { value: white }
        texture3: { value: white }
        // 4 5 6...
}%
Then, the texture_index is passed through the vertex data to indicate which atlas is currently used. In the shader code, it is enough to take values from different atlases according to the texture_index.
CCProgram fs %{
  precision highp float;
  in float texture_idx;
   void main () {
    vec4 o = vec4(1, 1, 1, 1);
     #if USE_TEXTURE
      if (texture_idx <= 1.0) {
        CCTexture(texture, v_uv0, o);
      } else if (texture_idx <= 2.0) {
        CCTexture(texture1, v_uv0, o);
      } else if (texture_idx <= 3.0) {
        CCTexture(texture2, v_uv0, o);
      }
      // else ...
    #endif
     gl_FragColor = o;
  }
}%
Now we have to figure out how to pass this data to the material.
Let’s start with texture_index. This part is similar to the previous component color removal, but this time it is to add data. We customize the new vertex data format, add an a_texture_index property to it, and then create a new vertex data container (Note the position of the texture_index declaration, we will use it later).
let gfx = cc.gfx;
var vfmtPosUvColorIndex = new gfx.VertexFormat([
  { name: gfx.ATTR_POSITION, type: gfx.ATTR_TYPE_FLOAT32, num: 2 },
  { name: gfx.ATTR_UV0, type: gfx.ATTR_TYPE_FLOAT32, num: 2 },
  { name: "a_texture_idx", type: gfx.ATTR_TYPE_FLOAT32, num: 1 },
  { name: gfx.ATTR_COLOR, type: gfx.ATTR_TYPE_UINT8, num: 4, normalize: true },
]);

initData() {
  let data = this._renderData = new cc.RenderData();
  this._renderData.init(this);
   data.createFlexData(0, 4, 6, vfmtPosUvColorIndex);
}
When done, we need to write values to this container and pass the data to the shader.
Create a new updateTextureIdx function to fill in the data. Fill in the texture_index property at the corresponding position of each vertex, according to the vertex format we defined.
Then find the updateRenderData function that fills the vertex data, and add a call to the updateTextureIdx function inside, thus completing the data filling.
*//* *Fill* *textureIndex data*
updateTextureIdx(sprite) {
  let textureIdx = sprite._textureIdx;
  let verts = this._renderData.vDatas[0];
   let verticesCount = this.verticesCount;
  let floatsPerVert = this.floatsPerVert;
   for (let i = 0; i < verticesCount; i++) {
    let index = i * floatsPerVert + 4;
    verts[index] = textureIdx;
  }
}

updateRenderData(sprite) {
  if (sprite._vertsDirty) {
    this.updateUVs(sprite);
    this.updateVerts(sprite);
    this.updateTextureIdx(sprite);
    sprite._vertsDirty = false;
  }
}
Next, we pass a texture variable to the objectGroup to hold the sets used by all object layers. After the objectGroup is created, the sets are then passed to the materials in order.
_buildLayerAndGroup: function () {
  let layerInfos = mapInfo.getAllChildren ();
  let textureSet = new Set();
  for (let i = 0, len = layerInfos.length; i < len; i++) {
    let layerInfo = layerInfos[i];
    let group = child.getComponent("MutilObjectGroup");
    group._init(this.objectMaterial, textureSet);
  }
  // Set the texture property of the material
  let objectTextures = Array.from(textureSet);
  for (let i = 0; i < objectTextures.length; i++) {
    let idx = i === 0 ? '' : i;
    this.objectMaterial.setProperty(`texture${idx}`, objectTextures[i], 0);
  }
}
Then take a look at the objectGroup section.
We implement a new TiledObjectGroup and rewrite the _init functions.
In addition textureSet, we also maintain one textureIndexMap, to record the location of the atlas set in the set. When creating a new Sprite component, dynamically update TextureSet and TextureIndexMap.
Then, we use a map to get the Sprite’s texture_index.
It should be noted that we need to write the hash value of the material to death. Otherwise, after updating the atlas, it will also be judged as not catchable.
_init(groupInfo, mapInfo, texGrids, material, textureSet) {
  // textureResource -> textureIndex
  let textureIndexMap = new Map();
  Array.from(textureSet).forEach((texture, idx) => textureIndexMap.set(texture, idx));
  for (let i = 0, l = objects.length; i < l; i++) {
    let sp = imgNode.getComponent("MutilSprite");
    let spf = sp.spriteFrame;
     // Collect all images
    let size = textureSet.size;
    textureSet.add(grid.tileset.sourceImage);
    // Update Map
    if (size !== textureSet.size) {
      textureIndexMap.set(grid.tileset.sourceImage, size)
    }
     sp.setMaterial(0, material);
    // Set textureIndex
    let index = textureIndexMap.get(sp.spriteFrame._texture);
    // Write dead hashes to make them batchable
    sp.getMaterial(0).updateHash(9999);
    sp.setTextureIdx(index + 1);
  }
}
Optimization effect

After optimization, Draw Calls were reduced from 16 to 6, reducing the rendering time by 13% on average. In a complex environment, no matter how many times the Draw Calls are generated by the object, the final Draw Calls will be 6 times, and the optimization effect will be improved.
Because of the default rendering method, we have added the texture_index data, which will have a little performance loss. However, if it is used in combination with the previous color removal, this loss can be offset, and a better optimization effect can be achieved.
In addition, there are operations similar to the record atlas in the tile layer.
During initialization, you need to get all the atlases used by the layer and create corresponding materials for them. Here you need to traverse the entire map. Here is an optimization point. First of all, we can ask each layer to use only one atlas when planning a puzzle map, which can also avoid the DC increase caused by multiple atlases. After that, we can modify the corresponding code. As long as we find an atlas, we can stop the traversal and avoid traversing the entire map multiple times.
Framing pathfinding
Pathfinding is an important part of the game. When the map area increases, the loss of the pathfinding algorithm will also become a part that cannot be underestimated. The idea of framing is also a common optimization method. We divide a complex job into several segments and do one segment per frame. It does not reduce the number of operations by itself, but it can help you flatten the CPU usage curve and avoid frame drops due to sudden computing occupancy.
Implementation process
Provide an interface in our pathfinding tool class to submit pathfinding tasks.
Because the execution of the code becomes asynchronous after frame-by-frame processing, we need to cache the data and the progress of the pathfinding task in order to continue processing correctly following the results of the previous frame.
After that, we call the corresponding pathfinding function every frame in the game to perform pathfinding calculations.
When calculating the path, before each access to the path point, we first determine the number of path points that have been visited. If the number exceeds the number, no more pathfinding will be performed, and the next frame will be called.
/**
 * Start a pathfinding task. This function is the entry point for external calls
 */
findRoad(start, target, wall, callback, config) {
  const { maxWalkPerFrame } = config;
  this._maxWalkPointAmount = maxWalkPerFrame || Number.MAX_VALUE;

// ... Store the data
// Perform a pathfinding immediately
  this._findPath();
}

/**
 * This function should be called every frame by the external referrer
 */
update() {
  this._findPath();
}
/**
 * Perform a pathfinding
 */
_findPath() {
  let walkPointAmount = 0;
   while (walkPointAmount++ < this._maxWalkPointAmount) {
    // Access path points...
    const point = this._waitQueue.poll();
  }
}
Optimization effect
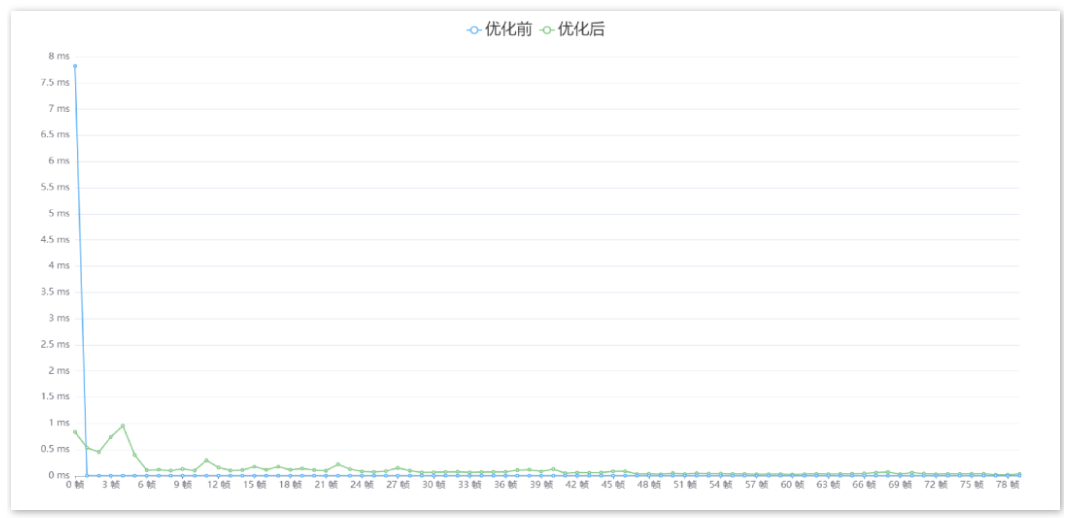
Before and after optimization
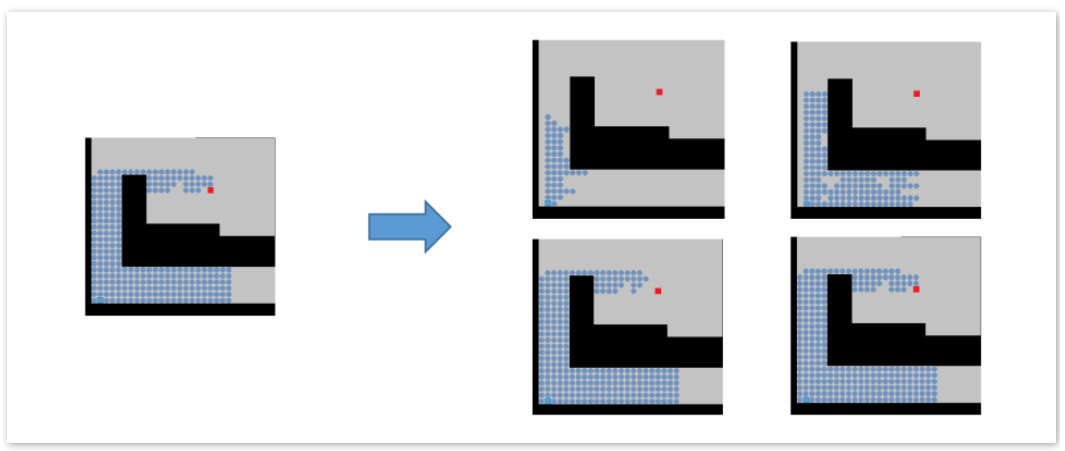
The test case is at the start of the game, submitting four pathfinding tasks. It can be seen that the time consumption before the optimization is close to 8ms, which is unacceptable for us. After optimization, the highest time-consuming is only 1ms. A relatively acceptable number.
In addition to framing processing, we can further optimize.
For example, when the game world has just started, all NPCs need to move randomly. At this time, a large number of NPCs need to perform pathfinding operations at the same time, which will still lead to high CPU usage. There are two solutions here, one is to let NPCs start moving at different timing points, and the other is to manage the pathfinding tasks in a unified way. The latter scheme is introduced here.
We can save submitted pathfinding tasks to a queue. We dequeue a new task from the queue when the pathfinding task is complete.
/**
* Add a pathfinding task. This function is an external call entry
* @param {FindRoadTask} task pathfinding task
 */
addFindRoadTask(task) {
  if (this._finding) {
    this._taskList.push(task);
  } else {
    this._startFindRoadTask(task);
  }
}
/**
*The end of pathfinding task callback. This function will be called regardless of whether the pathfinding succeeds or fails
*/
_onFindOver() {
  if (!!this._taskList.length) {
    this._startFindRoadTask(this._taskList.shift());
  } else {
    this._finding = false;
  }
}
This ensures that we will only perform one task per frame at a time, further flattening the curve. We tested with the same test case, and the results are as follows.
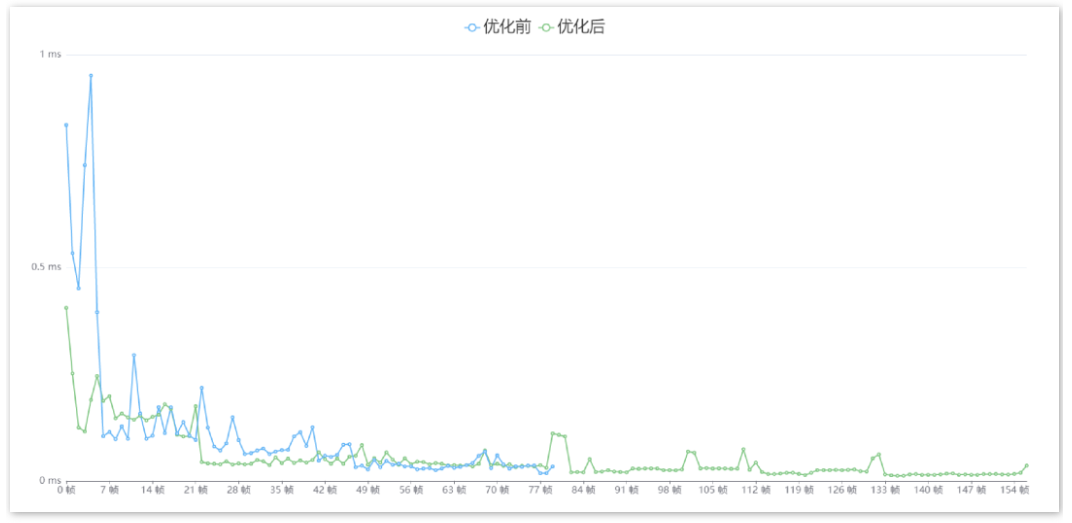
Before and after optimization
It should be noted that the blue line here is the green line is optimized. It can be seen that the green line is further smoother, and the maximum is not more than 0.5ms. We can no longer worry about the impact of pathfinding on the frame rate.
Summary and resource download
What is the effect of doing all the optimizations described in this article?
As mentioned at the beginning, we tested the cropping area sharing + color removal + multi-atlas rendering batch, and the rendering time was reduced by about 20% .
The complete code and test project are welcome to download and test. If you have any questions or other good optimization solutions, you can communicate in the forum together!
Forum post address
Crop area sharing (Share Culling):
性能优化2-TiledMap地图优化-裁剪区域共享(Share Culling) - Creator 2.x - Cocos中文社区
Sprite color data removal:
性能优化4-Sprite颜色数据去除 - Creator 2.x - Cocos中文社区
Multi-image rendering batch:
性能优化5-MutilTexture地图物件多图渲染合批 - Creator 2.x - Cocos中文社区
Frame-based pathfinding + unified management of pathfinding tasks: