
Implementing FSM in Cocos Creator to create silky-smooth character actions
Introduction: The author of this article, Huang Cong, is a college student. In the process of completing the design of working out a set of character motion control schemes. He shares his experience with us.
As a student in school, in the process of doing a graduate project some time ago, I also encountered the problem that many students will encounter: the action logic of the character is all written in Player.ts, so when a player script needs to execute multiple logics at the same time (movement control, animation playback, key management, etc.), without exception, such a situation occurred -
We first judged the key input, hoping to make our hero rotate, jump, flip and fly under WASD’s key drive. Then we changed the character’s action playback in the code block, set the moving speed, and kept setting his direction in an update…
Just thinking about all the work makes my head hurt! So I searched all kinds of information on making this easier for myself on the internet and finally figured out a set of solutions. The idea is based on the State Pattern in the game programming.
The following is the switching effect between the character movement, jumping, crouching, and jumping and slashing states that I implemented with the framework in Cocos Creator 2.4.x, and the behavior logic of the states I build in the script Player.ts.
Here is the final effect.
First test
Let’s start from scratch. In order to ensure a clear idea, we assume that we are now making a 2D horizontal version of the game, and we need to let the protagonist respond to our keyboard input and press the space bar to jump. This function looks easy to implement:
Player.ts
private  _jumpVelocity:  number  =  100 ;
onKeyDown(event:  any ) {
 if  (cc.macro.KEY.space == event.keyCode) {
        this .node.getComponent(Rigibody).setVerticalVelocity( this ._jumpVelocity);
    }
}
But there is a problem. There is nothing to stop an “air jump.” When the character presses the space crazily while in the air, the character will just float. A simple fix is to Player.ts add a _onGround field to it, and then:
private  _onGround: boolena =  false ;
private  _jumpVelocity:  number  =  100 ;
onKeyDown(event:  any ) {
 if  (cc.macro.KEY.space == event.keyCode) {
        if ( this ._onGround) {
            this ._onGround =  false ;
         // jump...
         }
    }
}
Understand it? At this point we haven’t implemented any other actions for the character. When the character is on the ground, I want the character to lie down when the ↓ arrow key is pressed, and stand up when released:
private  _onGround: boolena =  false ;
private  _jumpVelocity:  number  =  100 ;
onKeyDown(event:  any ) {
 if  (cc.macro.KEY.space == event.keyCode) {
        if ( this ._onGround) {
            this ._onGround =  false ;
         // if on the ground, jump up
         }
    }
    else  if  (cc.macro.KEY.down == event.keyCode) {
        if  ( this ._onGround){
            // if on the ground, lie down
         }
    }
}
onKeyUp(event :  any ) {
  if (cc.macro.KEY.down == event.keyCode) {
        // stand up
     }
}
New problems arise. Through this code, the character may jump up from the lying down state, and you can press the arrow keys to lie down in the air, which is not what we want, so we need to add a new field at this time…
private  _onGround: boolena =  false ;
private  _isDucking:  boolean  =  false ;
private  _jumpVelocity:  number  =  100 ;
onKeyDown(event:  any ) {
 if  (cc.macro.KEY.space == event.keyCode) {
        if ( this ._onGround && ! this ._isDucking) {
            this ._onGround =  false ;
         // if on the ground, not lying down, jump up
         }
    }
    else  if  (cc.macro.KEY.down == event.keyCode) {
        if  ( this._onGround){
            this ._isDucking =  true ;
            // if on the ground, lie down
         }
    }
}

onKeyUp(event:  any ) {
  if  (cc.macro.KEY.down == event.keyCode) {
        if  ( this ._isDucking ) {
            this ._isDucking =  false ;
            // stand up
         }
    }
}
But there are obvious problems with this approach. Every time we change the code, we break something that was written before. We need to add more moves - sliding attacks, jumping attacks, dodging backward, etc., but doing it this way creates a bunch of bug fixing before it’s done.
Finite State Machine (FSM)
After experiencing the above setbacks, I came to a painful conclusion: I left my laptop, got a pen and paper, and started to draw. I drew a box for each character’s actions: standing, jumping, lying down, jumping, and slashing… When the character responds to a keypress, draw an arrow that connects to the state it needs to toggle.
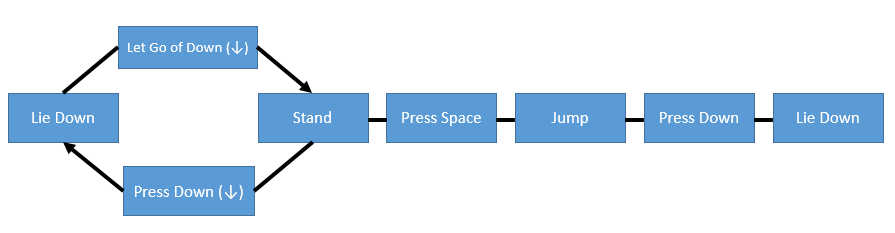
In this way, a finite state machine is established, and its characteristics are:
-
Has a collection of all possible states of the character. Here, the states are standing, lying down, jumping, and double jumping.
-
A state machine can only be in one state at a time. Characters cannot be standing and lying down simultaneously, which is one of the reasons for using FSM.
-
All key input will be sent to the state machine. Here is the pressing and popping of different keys.
-
Each state has a series of state transitions, transition conditions, and inputs related to another state. When in this state, the input satisfies the condition of another state and the state of the state machine switches to the state of the target.
This is the core thinking of a state machine: state, input, transition.
Enumeration and Branching
Coming back to my computer to analyze the problems with the previous code. First, it untimely bundles a whole bunch of bool variables: _onGround and _isDucking seems impossible for these variables to be both true and false at the same time, so what we need is an enum. Something like this:
enum  State {
 STATE_IDLE,
 STATE_JUMPING,
 STATE_DUCKING,
 STATE_DIVING
};
In this way, we don’t need a bunch of fields. We only need to make corresponding judgments according to the enumeration:
onKeyDown(event:  any ) {
    switch (_state) {
        case  State.STATE_IDLE:
            if (cc.macro.KEY.space == event.keyCode){
                _state = STATE_JUMPING;
                // jump...
             }
            else  if  (cc.macro .KEY.down == event.keyCode) {
                _state = STATE_DUCKING;
                // lying down...
             }
            break ;

        case  State.STATE_JUMPING:
            if  (cc.macro.KEY.down == event.keyCode) {
                _state = STATE_DIVING;
                // jump cut...
             }
            break ;

        case  State.STATE_DUCKING:
            //...
            break ;
    }
It seems to have changed slightly, but it’s a significant improvement over the previous code. We distinguish in conditional branches, which group the logic that runs in a state.
This is the simplest state machine implementation, but the real problem is not that simple. Our character also has a button charge, and when released, a special attack is performed. There is no way the current code is clearly qualified for such a job.
Remember the state machine flowchart I just drew? Each state box gave me some inspiration, so I started to try to design the state machine with object-oriented thinking.
State mode
Even though switch could accomplish these needs, it would still be rugged and cumbersome if not modified. So I decided to go with the idea from the game programming pattern that allows us to use simple interfaces to do complex logical work with the same goal as always: high cohesion and low coupling.
State interface
Encapsulate the state as a base class to control the behavior related to a state, and let the state remember the role information it is attached to.
The purpose of this is clear: To make each state have the same type and commonality to manage it centrally.
/**State base class, providing the logical interface of the state */
export  default  class  StateBase {
    protected  _role: Player |  null  =  null ;
    constructor ( player: Player ) {
        this ._role = player;
    }
    //start----- -------Virtual method-----------
    /**Called when entering this state */
     onEnter() { }

    /**A method that will be called every frame in this state */
     onUpdate (dt:  any ) { }

    /**Keyboard input events monitored by this state */
     onKeyDown(event:  any ) { }

    /**Keyboard up events monitored by this state */
     onKeyUp(event:  any ) { }

    /* * Called when leaving the state */
     onExit() { }
    //end-------------virtual method------------
 }
Write a class for each state
For each state, we define a class that implements the interface.
Its methods define the behavior of the character in this state. In other words, change switch, case and move them into the state class.
export  default  class  Player_Idle  extends  StateBase {
    onEnter():  void  { }
    onExit():  void  { }
    onUpdate(dt:  any ):  void  { }
    onKeyDown(event:  any ):  void  {
        switch  (event.keyCode) {
            case  cc. macro.KEY.space:
                // jump state
                break ;
            case  cc.macro.KEY.down:
                // lie down state
                break ;
        }
    }
    onKeyUp(event:  any ):  void  { }
}
Note that here the Idle state logic that was originally written in Player.ts has been removed and put into the player_Idle.ts class. This is very clear - only the logic we need to determine is present in this state.
State delegation
Next, rebuild the original logic in the role, abandon the huge switch, and store the currently executing state through a variable.
export  default  class  Player {
    protected  _state: StateBase |  null  =  null ;  //The current state of the role
 constructor () {
        onInit();
    }
 onInit() {
        this .schedule( this .onUpdate);
    }

 onKeyDown(event:  any ) {
        this ._state.onKeyDown(event);
    }
 onKeyUp(event:  any ) {
        this ._state.onKeyUp (event);
    }
 onUpdate(dt) {
        this ._state.onUpdate(dt);
    }
}
To “change the state,” we need to make _state point a different StateBase object, thus implementing the entirety of the state pattern.
Where will the state exist?
Another little detail: As mentioned above, to “change state,” we need _state point to be a new state object, but where does this object come from?
We know that a character has multiple states belonging to it, and these states cannot be stored in memory as free states. We must manage all the states of this character in some way. We may do this: find harmless people and animals position, add a static class that stores all the state of the player:
export  class  PlayerStates  {
    static  idle: IdleState;
    static  jumping: JumpingState;
    static  ducking: DuckingState;
    static  diving: DivingState;
    //...
 }
This way, the player can switch states:
export  default  class  Player_Idle  extends  StateBase  {
    onEnter():  void  { }
    onExit():  void  { }
    onUpdate(dt: any):  void  { }
    onKeyDown(event: any):  void  {
        switch  (event.keyCode) {
            case  cc. macro.KEY.space:
                // Jumping state
                this ._role._state = PlayerStates.JumpingState;
                break ;
            case  cc.macro.KEY.down:
                // Lying down state
                this ._role._state = PlayerStates.DuckingState;
                break ;
        }
    }
    onKeyUp(event: any):  void  { }
}
Is there a problem? No problem. But now that the optimization has reached this point, I am unwilling to do more because it’s still a highly coupled implementation. Such an implementation means that each character needs a separate class to hold the state ensemble, which is cumbersome when multiple characters and multiple actions are in a game.
So is there a breakthrough? Of course, in a container! It solves the coupling problem and retains all the flexibility of the previous method. It only needs to register a state in the container.
protected _mapStates: Map<string, StateBase> = new Map(); // Role status collection
Modularize existing code
Now to sort out what we have implemented:
-
Multiple states inherit from a state base class and implement the same interface.
-
The variable of the current state of the role is defined in the role class
_state. -
Use a container
_mapStatesto store a collection of states for a character.
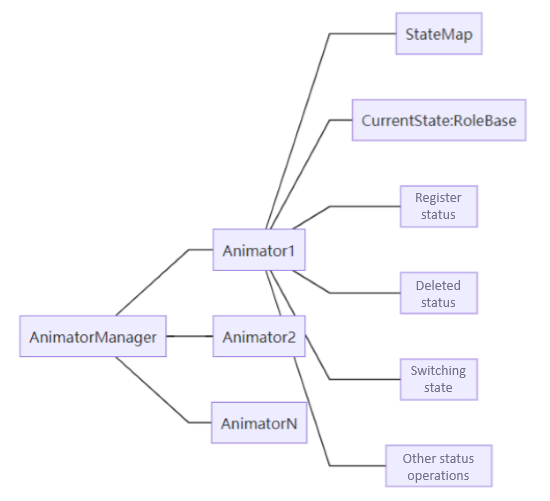
I think the function is almost perfect. It aggregates the variables related to the processing state into one class, completely empties the role class, and at the same time, like a general manager, implements additions, deletions, and changes to the state class, and draws a frame diagram for easy understanding. .
animator.ts
/**Animator class, used to manage the state of a single character */
export  default  class  Animator  {
    protected _mapStates:  Map <string, StateBase> =  new  Map ();    //Character state collection
     protected _state: StateBase |  null  =  null ;                   //Character current state
    /**
     * Registration state
     * @param key state name
     * @param state state object
     * @returns
     */
     regState(key: string,  state : StateBase):  void  {
        if  ( ''  === key) {
            cc.error( 'The key of state is empty');
            return ;
        }
        if  ( null  == state) {
            cc.error( 'Target state is null' );
            return ;
        }
        if  ( this ._mapStates.has(key))
            return ;
        this ._mapStates.set(key, state );
    }
    /**
     * delete state
     *  @param  key state name
     *  @returns
     */
     delState(key: string):  void  {
        if  ( ''  === key) {
            cc.error( 'The key of state is empty ');
            return ;
        }
        this ._mapStates.delete(key);
    }
    /**
     * switch state
     *  @param  key state name
     *  @returns
     */
     switchState(key: string) {
        if  ( ''  === key) {
            cc .error( 'The key of state is empty.' );
            return ;
        }
        if  ( this ._state) {
            if  ( this ._state ==  this ._mapStates.get(key))
                return ;
            this ._state.onExit();
        }
        this ._state =  this ._mapStates.get(key);
        if  ( this ._state)
            this ._state.onEnter();
        else
             cc.warn( `Animator error: state ' ${key} ' not found.` );
    }
    /**Get all states in the state machine*/
     getStates():  Map <string, StateBase> {
        return  this ._mapStates;
    }
    /**Get the current state */
     getCurrentState(): StateBase {
        return  this ._state;
    }
    /**Current state update function*/
     onUpdate(dt: any) {
        if  (! this ._state) {
            return;
        }
        if  (! this ._state.onUpdate) {
            cc.warn( 'Animator onUpdate: state has not update function.' );
            return ;
        }
        this ._state.onUpdate(dt);
    }
}
Next, we only need to define an Animator class, and register the state we need to it, and then continue to execute the previous logic code:
Player.ts
export  default  class  Player  {
 private _animator: Animator|  null  =  null ;

    onInit() {
        // state machine registration
        this ._animator =  new  Animator();
        if  ( this ._animator) {
            this ._animator.regState( 'Idle' ,  new  IdleState( this ));
            this ._animator.regState( 'Jumping' ,  new  JumpingState( this ));
            this ._animator.regState( 'Ducking' ,  new  DuckingState(this ));
            this ._animator.regState( 'Diving' ,  new  DivingState( this ));
        }
        // key response event binding
         cc.systemEvent.on(cc.SystemEvent.EventType.KEY_DOWN,  this .onKeyDown,  this );
        cc.systemEvent.on(cc.SystemEvent.EventType.KEY_UP,  this .onKeyUp,  this );

        this .schedule( this .onUpdate);
    }
    onEnter(params?: any) { }
    onUpdate(dt: any) {
        this ._animator .onUpdate(dt);
    }
    onKeyDown(event: any) {
        let  state = this ._animator.getCurrentState();
        if  (state) {
            state.onKeyDown(event);
        }
    }
    onKeyUp(event: any) {
        let  state =  this ._animator.getCurrentState();
        if  (state) {
            state.onKeyUp(event );
        }
    }
}
Of course, you can choose to do some extended work so that the state machine is also managed:
AnimatorManager.ts
/**AnimatorManager */
export  default  class  AnimatorManager  {
    //Single example
     private  static  _instance: AnimatorManager |  null  =  null ;
    public  static  instance(): AnimatorManager {
        if  (! this ._instance) {
            this ._instance =  new  AnimatorManager ();
        }
        return  this ._instance;
    }
    private _mapAnimators:  Map <string, Animator> =  new  Map <string, Animator>();

    /**
     * Get the animation machine, if it does not exist, create a new one and return
     * @param key Animator name
     * @returns Animator
     */
     getAnimator(key: string): Animator |  null  {
        if  ( ""  == key) {
            cc.error( "AnimatorManager error: The key of Animator is empty" ) ;
        }
        let  anim: Animator |  null  =  null ;
        if  (! this ._mapAnimators.has(key)) {
            anim =  new  Animator();
            this ._mapAnimators.set(key, anim);
        }
        else  {
            anim =  this ._mapAnimators .get(key);
        }
        return  anim;
    }

    /**
     * delete animator
     *  @param  key animator name
     */
     delAnimator(key: string) {
        this ._mapAnimators.delete(key);
    }

    /** clear animator */
     clearAnimator() {
        this ._mapAnimators.clear();
    }

    /**Animator state update */
     onUpdate(dt: any) {
        this ._mapAnimators.forEach( ( value: Animator, key: string ) =>  {
            value.onUpdate(dt);
        });
    }
}
In this way, the new operations of the role class are centralized in the management class, and there is no need for new in Player.ts:
// state machine registration
this ._animator = AnimatorManager.instance().getAnimator( "player" );
if  ( this ._animator) {
    this ._animator.regState( 'Idle' ,  new  IdleState( this ));
    this ._animator. regState( 'Jumping' ,  new  JumpingState( this ));
    this ._animator.regState( 'Ducking' ,  new  DuckingState( this ));
    this ._animator.regState( 'Diving' ,  new  DivingState( this ));
}
Finished product
The final character state switching effect is achieved by the following code, which is clean and tidy:
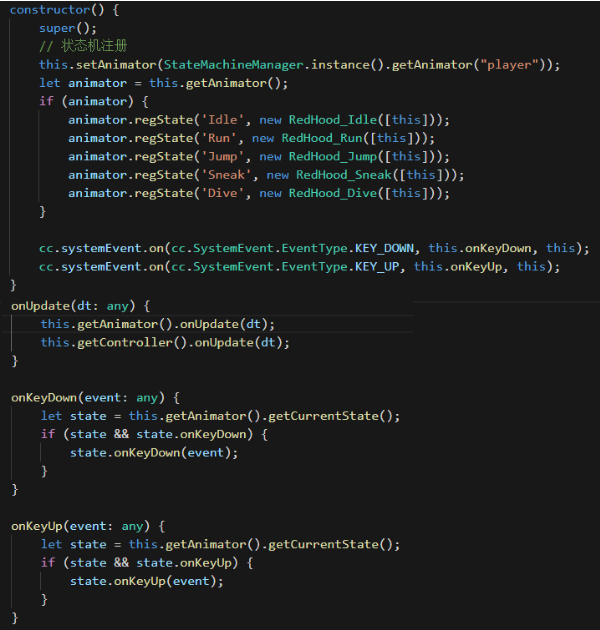
Note: this.getController() is the module that controls the movement and has nothing to do with the system
Even though state machines have these common extensions, they suffer from some limitations.
This is just a record of my solution, which means you can critique it all you want. You are welcome to go to the Chinese forum to communicate on any better solutions you have!