
Creating Hyper-realistic Car Paint In Real-time In Cocos Creator
This article comes from our star developer Captain Jiang!
Today, many of the techniques once used in game development are appearing more frequently in other industries and commerce. Real-time rendering technology is rapidly being popularized in many industries, whether in high-tech industries such as construction, medical care, industrial manufacturing, or fields closely related to the general public, such as retail, travel, and human-computer interaction.
The automotive industry is undoubtedly one of the pioneers in the commercialization of game technology, ranging from AAA game masterpieces that simulate real driving experience to HTML5 displays modeling cars to buy on a mobile phone. Instant rendering can always bring a variety of ways to look at a car. So, in the “everything is possible in the metaverse” world we are in today, how do we make a beautiful 3D car rendering in Cocos Creator?
Whether used for games, industrial or commercial purposes, the art resources required for car rendering are not fundamentally different from other objects. We need to:
- Use hard surface modeling technology to store the structural form of various vehicles;
- Use the PBR rendering workflow to express the material effects of automobiles such as metal, leather, and glass;
- Use normal maps to restore fine structure and material details to models with smaller polygon counts, allowing more audiences to get the same experience without losing visual presentation.
However, to achieve a satisfactory car rendering, the first and foremost is the performance and quality of the car paint. This tutorial will analyze the structure and types of car paint and learn the realistic style of car paint performance in Cocos Creator 3.4 (To try this tutorial,
please click here or at the end of the article to download).
Structure of car paint
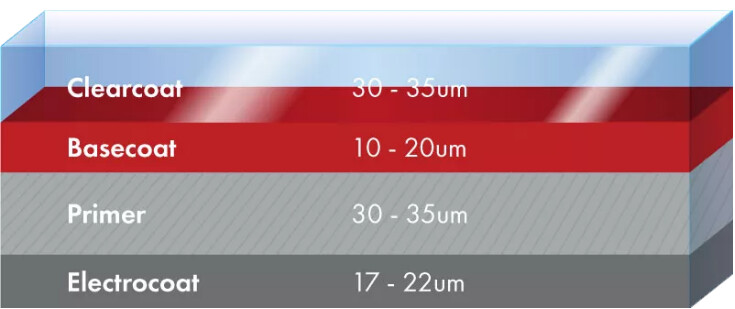
Traditional car paint is generally divided into four layers: Electrocoat, Primer, Basecoat, and Clearcoat.
-
The role of electrophoresis and middle coating is mainly to protect the body from external chemical and ultraviolet erosion. They are located in the lower layer of the paint and are completely covered by the paint, so we do not need to consider their effect in rendering.
-
The primer coat is the part that mainly expresses the color and texture of the car’s final painted look. A basecoat is a final layer that will be visible to your eye.
-
The clearcoat is colorless and transparent. It is placed on top of the pigmented paint and covers the pigmented paint. This allows for some protection from minor scratches, bumps, and the sun’s UV rays.
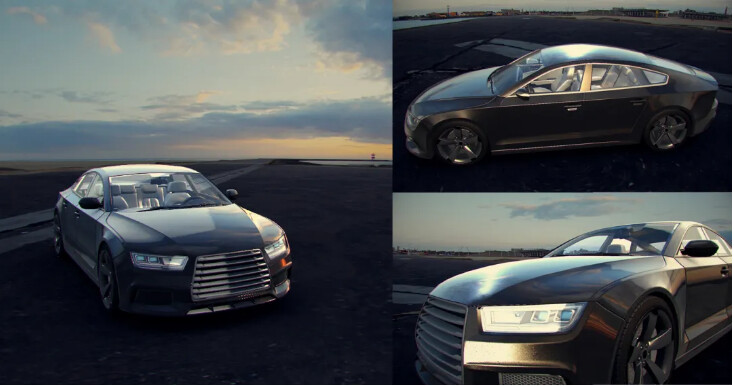
Paints are divided into different materials and types, with different colors and highlights. We can see that without spraying clearcoat, the paint color is exposed, the performance of the car paint is completely determined by how many layers of paint are on the car. We only need to use the PBR process to express the color, add highlights, and get the metallicity of the color paint. This is no different from how other common materials behave.
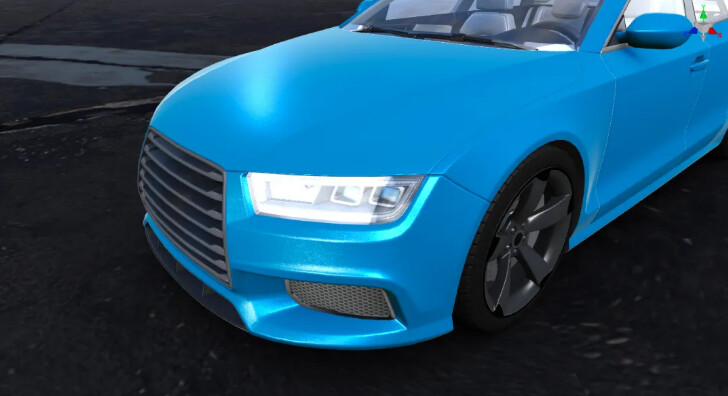
When a clear coat is applied, the overall appearance of the car paint is different: the clear coat is colorless and transparent, and the surface is polished to a very smooth surface so that strong reflections appear on the body while maintaining the color of the color coat.
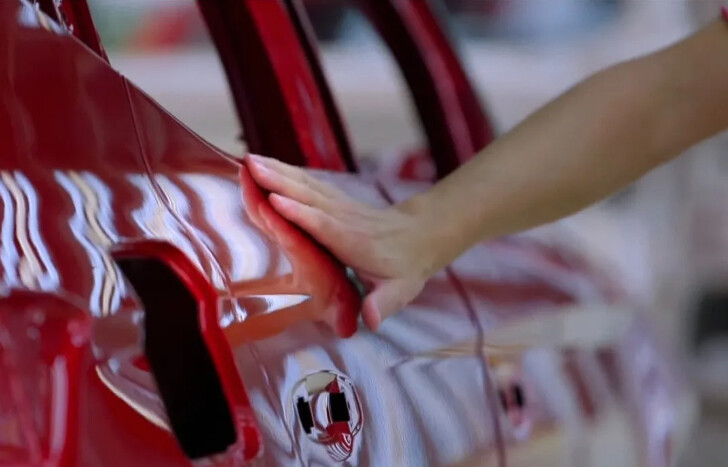
Not only that, but when we looked closer, we noticed subtle bumpy ripples on the body. This natural phenomenon occurs when the paint dries from a sprayer, called orange peel. The orange peel pattern will appear in the varnish layer because the thicker the primer coat layer, the more likely you will have unevenness in the paint layers. The basecoat paint layer is the thinnest layer in the car paint structure and usually does not appear to have an orange peel unless highlighted by the polished thin clear coat.
After understanding the structure of the car paint, we already have a general idea: we need to make a layer of material with a strong reflection effect and fine stripe structure on top of a standard PBR material layer. This varnish material is independent of the underlying paint material and will always be there regardless of how the underlying paint material behaves. (unless the car is damaged)
Since the main effect of the car paint is determined by the color paint layer, how do we express the color paint layer?
Classification of paint
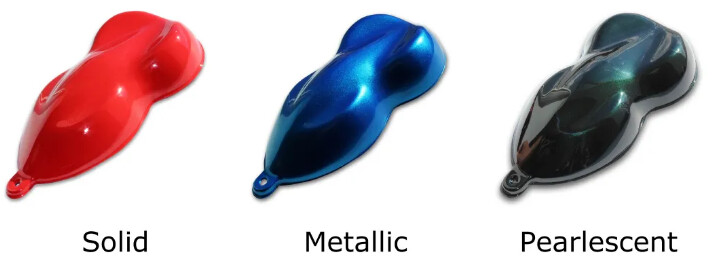
There are three types of standard color paints with cars: ordinary paint (Solid, also known as plain paint, non-metallic paint), metallic paint (Metallic), and pearlescent paint (Pearlescent, also known as mica paint).
- The effect of ordinary paint is basically the same as that of non-metallic materials we are familiar with: the color of the highlights is the same, and the inherent color is bright.
- Metallic paint is similar to the familiar metal materials, with darker inherent colors and overflowing colors in highlights. Not only that, because the metal paint is mixed with fine metal particles during the production process, when we look closely, we can see dense metal spots on the metal paint, especially in the high-gloss area.
- The most prominent feature of pearlescent paint is the color change caused by subsurface scattering, and its highlights are also softer. Similar to metallic paint, it also has dense metal spots.
Whether it is ordinary paint, metallic paint, or pearlescent paint, we can see a relatively strong reflection in the reference picture, which is, of course, caused by the clearcoat layer above the paint layer. In addition, in the PBR process, the brightness of the inherent color will be reduced when the metallicity is high, and the metallic paint has the same characteristics, which cannot express very bright colors. Therefore, the most common colors to sell cars are black, white, yellow, and red paint.
Then, we also have the idea of making color paint: the standard PBR process can basically meet the requirements of making color paint. On this basis, we need to superimpose a layer of normal effect, which will help us express the metallic graininess of metallic paint.
In addition to these three most common types, the paints include Candy which is round like pearl paint but has more vivid colors and highlights; Chameleon, which is very rich in color variation; Matte paint (Matte) with very weak highlights, and others. These effects can be achieved by adjusting the PBR parameters or some simple techniques (such as using N • V to adjust the UV, using a gradient map as an albedo, etc.), so I won’t go into details.
Shader preparation
First, we need to process the vertex data we need in the vertex shader:
out vec3 v_normal;
out vec3 v_tangent;
out vec3 v_bitangent;
out vec4 viewWorld;
out vec4 p_position;

v_normal = normalize((matWorldIT * vec4(In.normal, 0.0)).xyz);
v_tangent = normalize((matWorld * vec4(In.tangent.xyz, 0.0)).xyz);
v_bitangent = cross(v_normal, v_tangent) * In.tangent.w;
viewWorld = normalize(cc_cameraPos - (matWorld * In.position));
The data we need to pass from the vertex shader includes vertex normals, vertex tangents, vertex bitangents, and the view vector in world space. The vertex normal and vertex tangent can be obtained directly from the input model, the vertex double tangent can be calculated by the cross product of the vertex normal and vertex tangent, and the observation vector in world space can use the built-in parameters that return the camera world space position cc_cameraPos and world The vertex positions in space are calculated.
In addition, since we need to implement the normal function, we also need to create a 3×3 matrix:
out mat3 matTBN;
matTBN = mat3(normalize(v_tangent), normalize(v_bitangent), normalize(v_normal));

We have already talked about the concept of tangent space in "Real Character Rendering: Hair." The direction of the normal vertex is regarded as the positive direction of the Z-axis. The coordinate system space thus established is the tangent space, which can express the different spatial positions of the object's surface in the vertical direction. The two vectors (tangent and bitangent) perpendicular to the normal vertex are already obtained, so we can use them directly to create a new matrix. This tangent space transformation matrix is also called the TBN matrix.
Now we can start implementing the effect in the fragment shader.
The creation of the paint layer
Since reflection is a key effect we make, we can start with a Fresnel reflection effect:
in vec3 v_normal;
in vec3 v_tangent;
in vec3 v_bitangent;
in vec4 viewWorld;
in vec4 p_position;
in mat3 matTBN;

float NdotV = dot(normalize(v_normal), normalize(viewWorld.xyz));
float baseMask = mix(0.0, 1.0, 1.0 - fresnelScale * pow(clamp(1.0 - NdotV, 0.0, 1.0), fresnelHard));
vec4 baseBlend = mix(secondPaintColor, s.albedo, baseMask);
s.albedo = baseBlend;
Of course, Fresnel is not without N • V, which we are already very familiar with. We use custom parameters to multiply (fresnelScale) and exponential power (fresnelHard) calculations based on N • V, respectively. The parameters adjust the strength and range hardness of Fresnel, which is the same as the implementation logic of Specular we talked about in “Hair.” Then, we declare a custom color parameter and use the result of the Fresnel calculation to mix with the natural color, which will help us achieve the color change effect of the pearlescent paint.
Next we will use a normal to achieve the metallic particle effect of the paint layer:
vec2 flakeUV = v_uv * flakeTiling.xy + flakeTiling.zw;
vec4 flakeMask = texture(flakeMask, flakeUV);
vec4 flakeNormal = texture(flakeNormal, flakeUV);
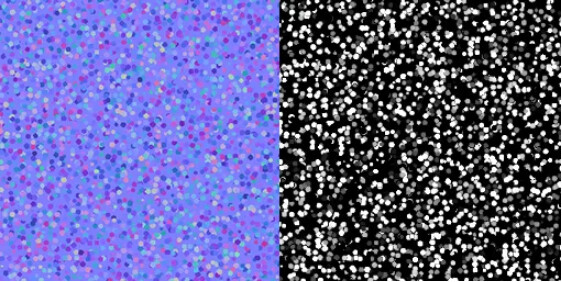
The first is the basic operation of textures. We declare a vec4 (flakeTiling) to use its four floats to achieve UV scaling and deflection and then use this set of UVs to project two textures. We now have two maps: the standard map of the metal particles and the corresponding grayscale map. The primary function of the grayscale map is to provide us with a depth mask to create the effect of particle depth.
Now we can blend the normals:
flakeNormal = flakeNormal * 2.0 - 1.0;
vec3 fn = vec3( flakeNormal.x * flakeMask.r * flakeNormalScale,
                flakeNormal.y * flakeMask.r * flakeNormalScale,
                flakeNormal.z );
vec3 flake = matTBN * normalize(fn);
s.normal = normalize(vec3(s.normal.rg + flake.rg, s.normal.b * flake.b));
Of course, pictures cannot store negative values, and normals need to express negative values, so our first step is to normalize the values of the pixels in the picture: from the interval [0, 1], to [-1, 1] range. We need to use custom parameters to control the expression of the normal, so we can break up the data of the normal map according to the dimension, multiply it by the depth mask expressed by the grayscale map and our custom intensity parameter (flakeNormalScale), and then reassemble into a new vector. Using our prepared TBN matrix, the tangent space data in the normal map can be converted to world space data. Finally, overlay the converted metal particle data onto the normal channel of a standard PBR material.
Displaying the clearcoat layer
Now we can work on the clearcoat layer. First, follow the same steps and use a normal map to create the orange peel effect of the varnished layer:
vec2 coatUV = v_uv * coatTiling.xy + coatTiling.zw;
vec3 coatNormal = texture(coatNormal, coatUV).xyz;
coatNormal = coatNormal * 2.0 - 1.0;
vec3 cn = vec3( coatNormal.x * coatNormalScale,
                coatNormal.y * coatNormalScale,
                coatNormal.z );
vec3 coat = matTBN * normalize(cn);
s.normal = normalize(vec3(s.normal.rg + coat.rg, s.normal.b * coat.b));
The most important thing for the clear coat layer is the strong reflection effect. It should be noted that our goal is not to make a reflection effect that faithfully reproduces all changes on the outside. Because in real-time rendering, most of the implementations of reflection except ray tracing require that the scene in reflection be constructed in some form according to the general rendering process. For example, in a room with a mirror reflected floor, to achieve the reflection of the room in the floor, all objects in the room that can be seen in the reflection need to be rendered separately, which will undoubtedly cause the rendering pressure to increase exponentially. Moreover, the reflection in the paint is a visual effect. We do not need it to perform faithful recreation that looks like a mirror finish on a car. Therefore, we only need to use a panoramic HDR map of the environment and superimpose it on the fragment output to reflect the environment on the material.
The projection method of panorama maps is not the same as general maps, so the question is, what kind of UV do we need to provide for panorama maps?
uniform samplerCube reflEnvMap;
vec3 worldRefl = reflect(normalize(-viewWorld.xyz), normalize(v_normal));
vec3 reflUV = normalize(worldRefl);
vec4 reflMap = texture(reflEnvMap, reflUV, s.roughness);
First, we declare a samplerCube category of uniform, which is sampler2D not essentially different from the one we use every day, except that it uses a panorama map sampler.
We can use the OpenGL reflect function to get the vector of reflected rays. The reflect function requires two arguments: the vector of the incident ray and the normal vector. We intend to see the mirror image of the reflection, so the incoming ray is the negative of the viewing vector.
With the reflection vector, we can draw the panorama map. In Cocos Creator, the texture function interface corresponds to the texture2D and textureCube two functions in OpenGL. Therefore, when drawing a general texture, call the texture function and input sampler2D two parameters, and UV. When drawing a panorama texture, call the texture function, input samplerCube, UV, and a float parameter.
This float parameter controls a simple blur effect designed by OpenGL for the panorama texture, so we directly assign the roughness value in the PBR pipeline to it. The last thing to note is that the UVs needed to draw the panorama map are not vec2, but vec3, so we can directly use the obtained reflection vector.
However, our reflections are not very good. The reflected image doesn’t seem to have the correct color. This is because the panorama map is stored in RGBE in a linear color space. When using it in the engine, we need to convert it to color data in RGB format first. We can refer to the built-in unpackRGBE function and use the following algorithm to convert:
vec4 reflMap = texture(reflEnvMap, reflUV, s.roughness);
vec4 reflRGB = (reflMap * pow(1.1, reflMap.a * 255.0 - 128.0) * 5.0; //See unpack.chunk
Now our reflections environment map looks normal however the reflections on the paint are not only from the color of the environment. The color of the paint itself will also have an effect. We can create a custom parameter (reflEnvMapScale) that expresses the weight of the car paint between its own natural color and white (equivalent to a value of 1.0) and then multiply the weighted result by the color of the reflected environment map.
When the weight is high, the weighted result is close to 1.0, which is equivalent to 100% outputting the color of the environment map; correspondingly, when the weight is low, the output is the color of the environment map multiplied by the intrinsic color:
vec3 reflShift = mix(s.albedo, vec3(1.0, 1.0, 1.0), reflEnvMapScale);
vec4 reflColor = reflRGB * vec4(reflShift, 0.0);
Finally, use the N • V we obtained before to calculate the range of Fresnel reflection, and then mix the natural color and reflection color according to the range of Fresnel, and the high reflection effect of the car body comes out:
float reflMask = mix(0.0, 1.0, (reflScale * pow((1.0 - NdotV), reflHard));
vec4 coatRef = mix(s.albedo, reflColor, reflMask);
s.albedo = coatRef;
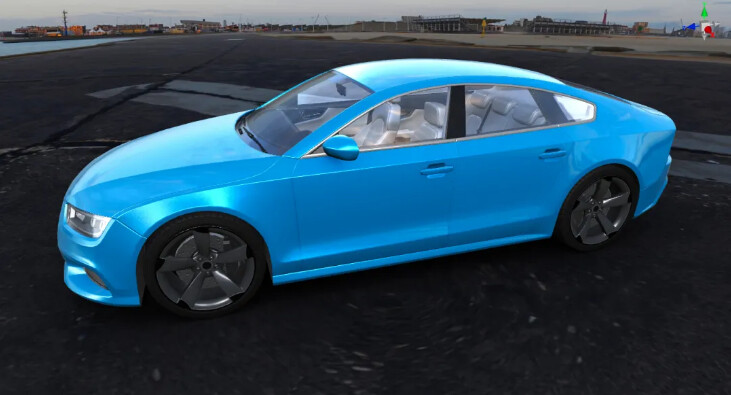
By doing this, we have basically completed the restoration of the car paint effect in reality. However, from the perspective of project execution, we still have a problem that needs a little attention.
Some thoughts on art
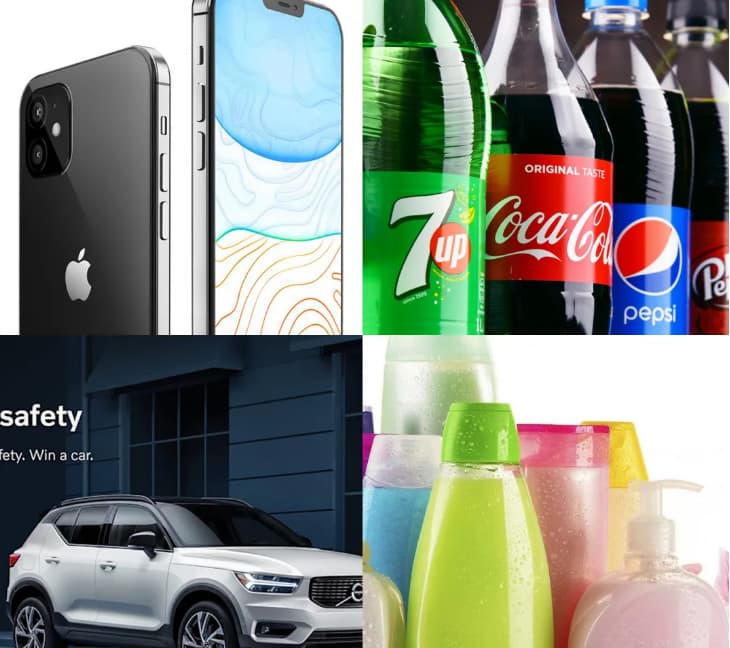
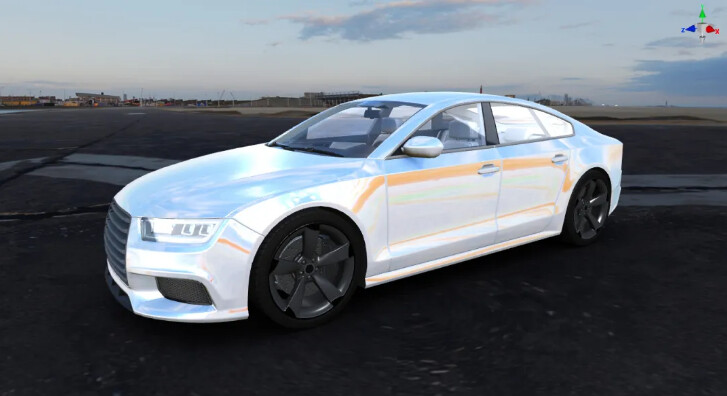
We often see commercial advertisements for various products in our daily life. In photos or renderings of these products, we can often observe sharp-edged, wide-ranging white highlights, whether it is consumer electronics, automobiles, or toys. This effect can be seen in all kinds of plastic packaging of fast-moving consumer goods, even if the source of these highlights cannot be found from the environment in the rendering of these advertisements.
Where do these highlights come from? Photos in commercial lighting are usually taken in professional photography studios. During the shooting process, multiple lightboxes and reflective umbrellas need to be used to control the lighting on the photos accurately, and the reflection mirrors of the light boxes and reflective umbrellas are precisely the same. Sharp-edged white geometry, so on materials with high reflective intensity, these white highlights appear frequently.

In commercial computer rendering, the same effect is pushed onto objects. At present, various mainstream DCCs and plug-ins have introduced the effect of simulating lightboxes and reflective umbrellas in real studios. The position, range, and overall shape of white highlights can be precisely controlled by generating and outputting HDR maps, such as Blender’s HDRI Maker, HDRI Pro Studio for Cinema 4D, and more.
In instant rendering, we don’t show the model fixed at a camera angle, so we usually don’t precisely control how these white highlights appear in the frame. But in the process of writing the shader, we have already implemented the function of making reflection effects with HDR maps. In the same way, we can use these DCCs, which specialize in producing HDR maps, to generate an HDR map that simulates the lighting effects of a photography studio and use it on our instant rendering model.
This workflow allows us to achieve the desired effects of commercial rendering in a real-time rendering environment. Alternatively, we can borrow this approach and add color to our game - even if we don’t make lightboxes and umbrellas in the environment at all.
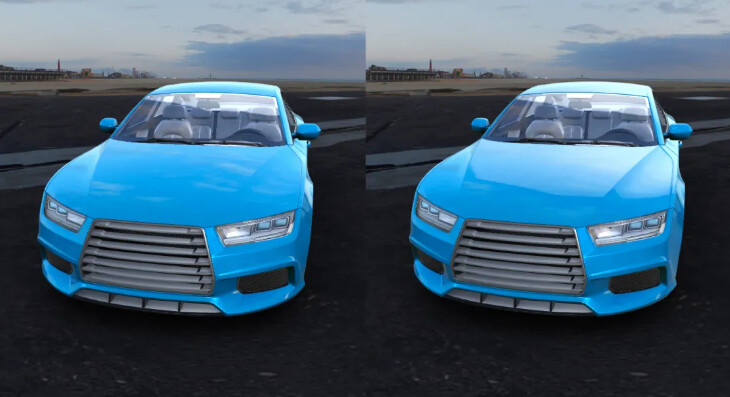
Does the car look more “advanced” after adding white highlights?
If you would like to try out this fun shader, It’s now available in our Cocos Store!