
How does Cocos achieve smooth projectile projectiles? Starting from the derivation of the formula, the practice and application of projectile motion are explained in detail
Introduction
There are often projectile motion effects similar to projectile launching and shooting in games. “Cocos Star Writer” Chen Pippi will deduce the formula of projectile motion in this article and apply it to achieve various interesting game effects.
Let me show you what we want to achieve:
Fixed angle and speed
Fixed angle

Fixed speed

Unfixed angle and speed
online preview:
The main task (core theme) of this article is " Projectile Motion. "
Projectile motion often occurs in our daily life, such as the movement of a basketball in the air after a basketball player shoots. Projectile movement can also be seen in various video games, such as the movement of shells in the air after a tank shoots in World of Tanks.
As you can see, the title of this article is “The Practice of Projectile Movement in Game Development,” We will work together to derive various formulas for projectile movement and apply these formulas in the game to achieve various interesting functions.
In addition to the main quest, this article also includes some side quests:
- Object Interaction and Raycasting in 3D Games
- Dot and Cross Product of Vectors in 3D Space (Linear Algebra)
- Calculation of projection of a vector on a plane in three-dimensional space
- Directional Angle Calculation of Vectors in 3D space
- Real-time pre-drawn projectile trajectory
Example project
The example project “Projectile” accompanying this article is an open-source project.
To avoid the article from being tedious and lengthy, some features in the project are not introduced in the article. At the same time, I will integrate the project code and insert it into the article so that the actual project structure will be slightly different from the code and the article.
Download the source code:
Gitee repository: Cocos 示例 - 炮弹抛射: 一个使用 Cocos Creator 3.4 开发的炮弹抛射示例项目。项目核心主题为抛射体运动(Projectile Motion)在游戏开发中的实践。
GitHub repository: GitHub - ifaswind/cocos-case-projectile: 一个使用 Cocos Creator 3.4 开发的炮弹抛射示例项目。项目核心主题为抛射体运动(Projectile Motion)在游戏开发中的实践。
Cocos Store: 炮弹抛射 | Cocos Store
The game engine used in this project is Cocos Creator 3.4.2.
Scene construction
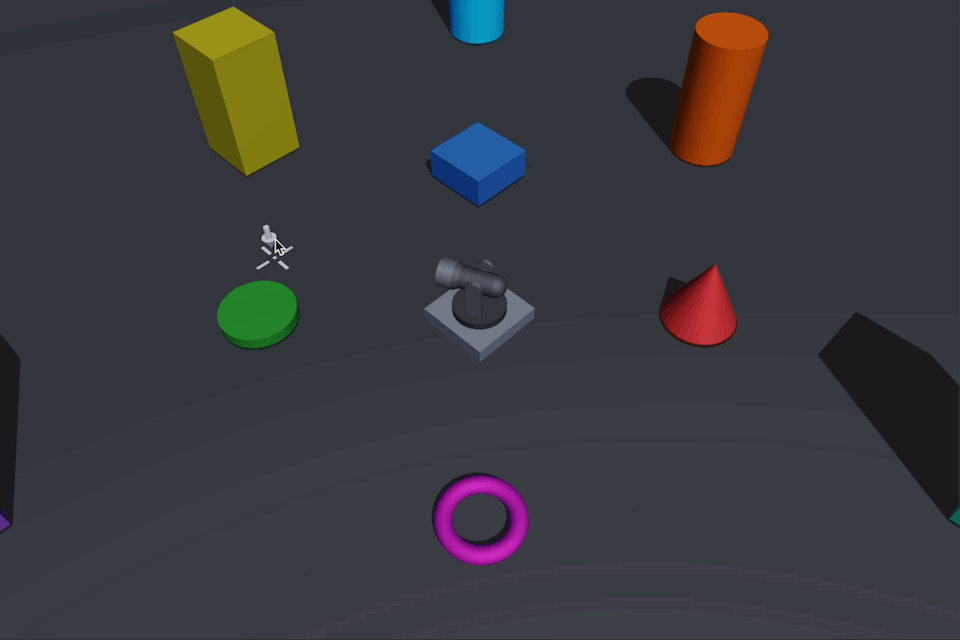
Let’s have a relaxing and pleasant experience of building blocks.
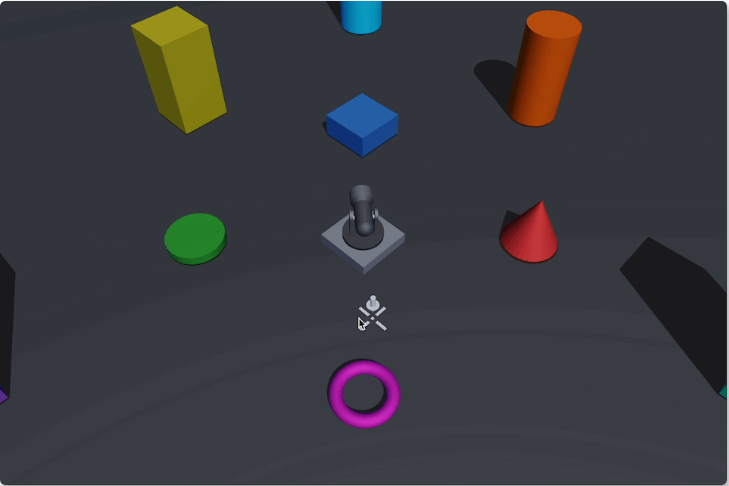
Surroundings
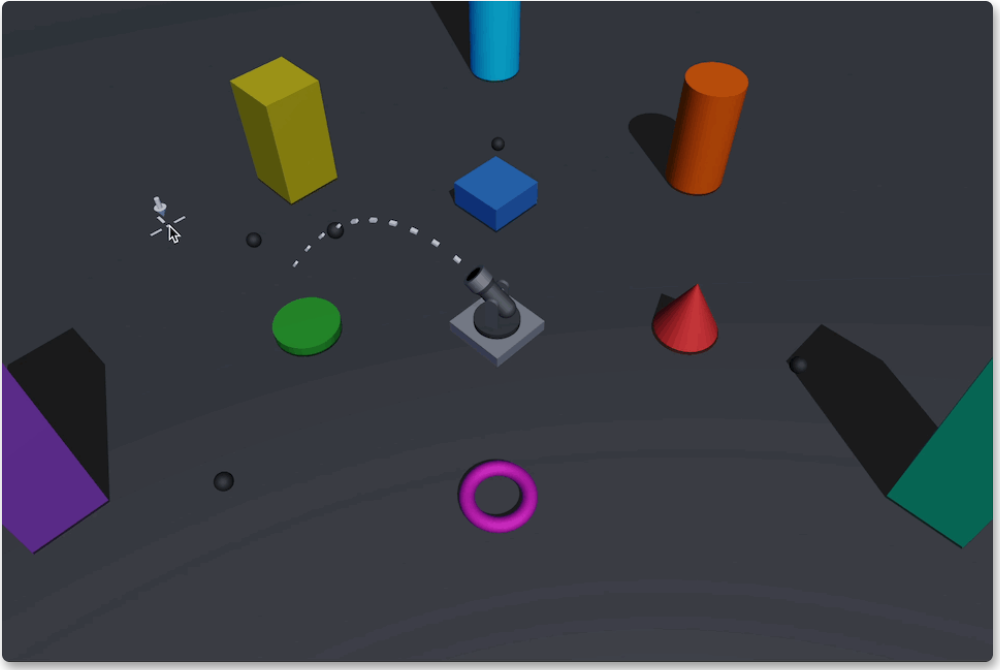
Quickly build a simple scene and place some colorful obstacles (or platforms) of varying heights.
Remember to add proper Colliders to these things so we can interact with them via rays.

Children’s Paradise
![]() Actually, it took most of the day to adjust the size and color of various shapes…
Actually, it took most of the day to adjust the size and color of various shapes…
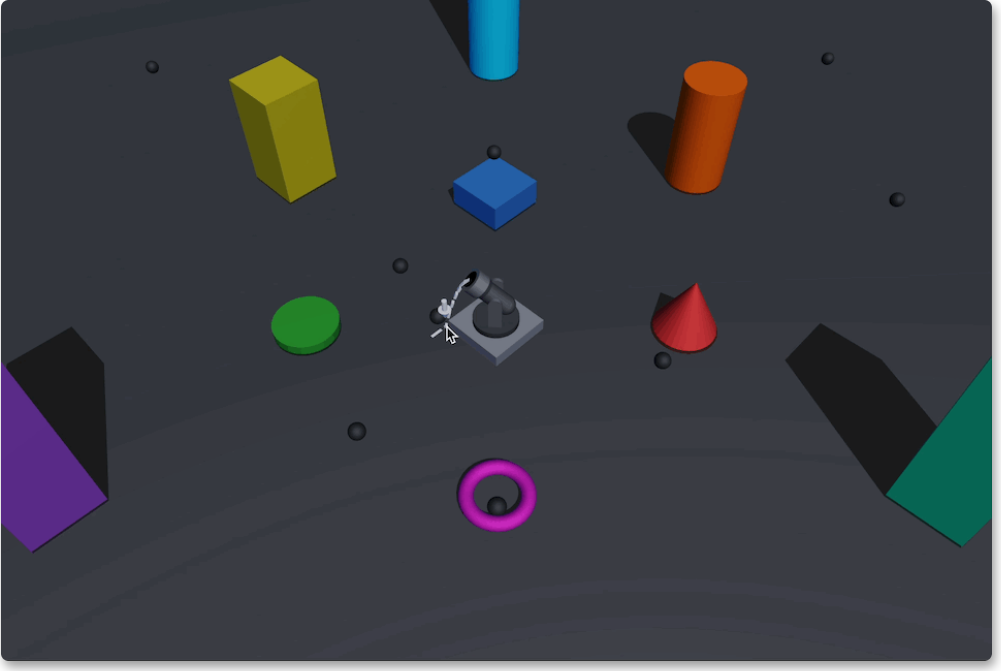
Cannon
Assembled a cannon (Cannon) using a few basic shapes built-in; even though it looks like a flashlight (![]() ), I’d rather call it a cannon!
), I’d rather call it a cannon!
Cannon

Large flashlight
![]() I really tried my best, it took me a long time, but it’s actually quite pleasing to the eye after watching it for a long time…
I really tried my best, it took me a long time, but it’s actually quite pleasing to the eye after watching it for a long time…
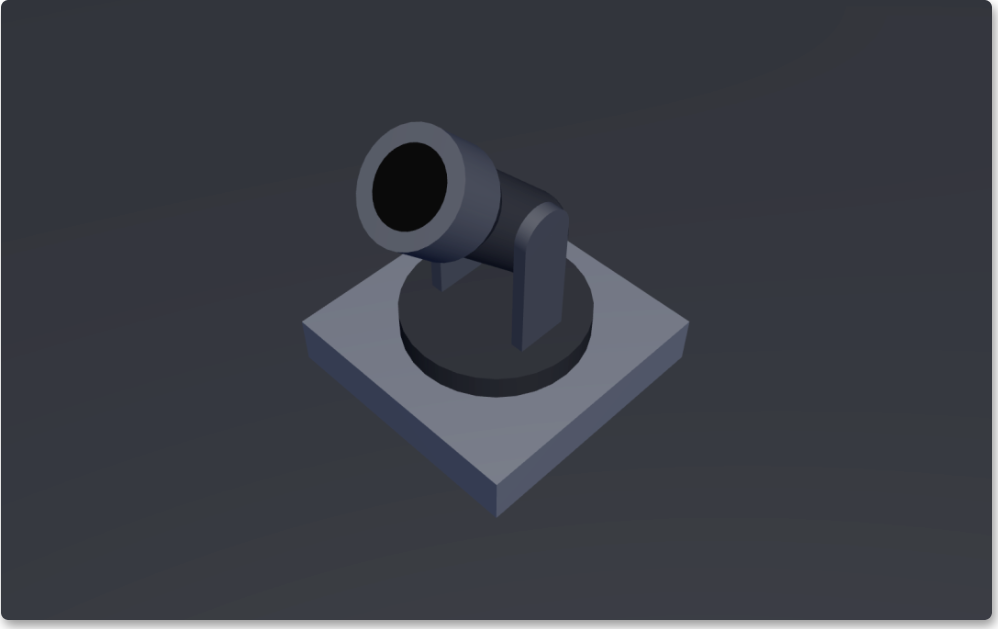
Briefly introduce several key components of this cannon:
The yaw axis allows the gun body to rotate left and right (Yaw Axis)

Cannon’s yaw axis
Pitch Axis that allows the barrel to be adjusted up and down
Cannon’s Elevation Axis
Fire Point that determines the position and direction of the projectile’s firing
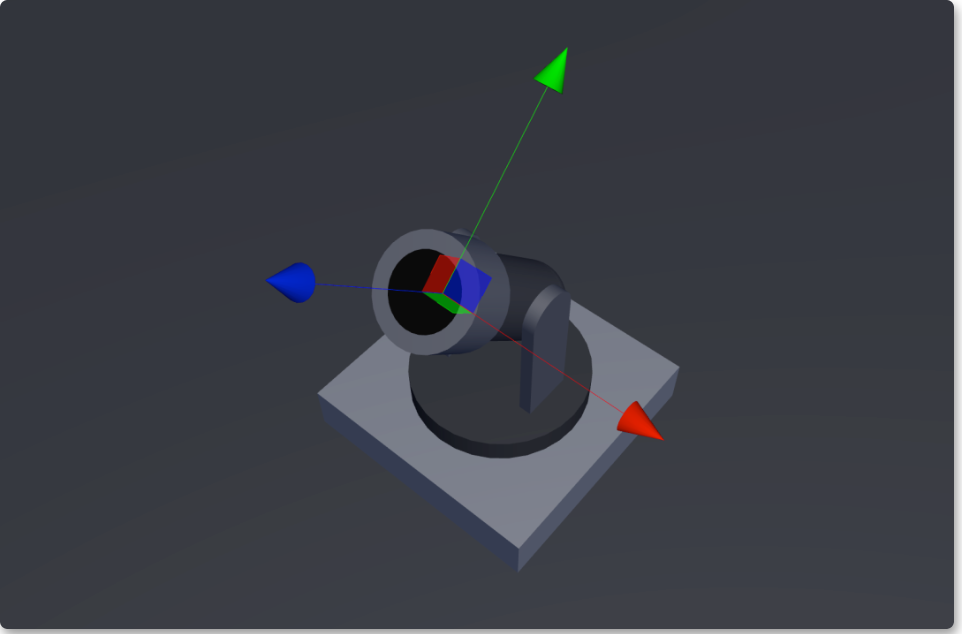
Cannonball firing point
Cannonball
Make a simple cannonball (Bullet) using the built-in sphere and save it as a separate prefab.
And add a Sphere Collider and RigidBody components to the projectile so that the projectile can have physics.
Another thing to note is that the default value of the Linear Damping item of the rigid body component is 0.1. We need to set it to 0; otherwise, the shell will automatically slow down when flying.
Cannonball
Basic function
Implement some basic functions with code.
Aim and shoot
- Cannon
Create a Cannon to implement the various functions of the cannon.
Let’s first implement the functions of “Aim” and “Shoot”:

Basic functions of the cannon
Currently, only the pitch angle update is implemented in the aiming function of the cannon.
- GameController
Create GameController a to implement the game’s control logic.
Implement the logic of “click the mouse to fire a shell”:
Game Controller
![]() Running effect:
Running effect:

Click the mouse to fire cannonballs
Left and right
At present, this cannon can only shoot in a fixed direction. It’s stupid. Let’s control the left and right orientation of the cannon according to the clicked position.
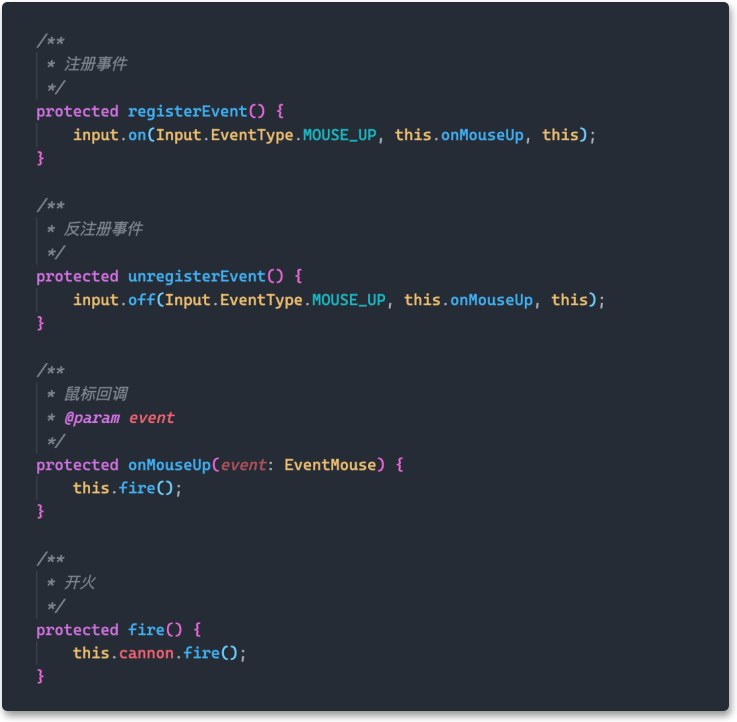
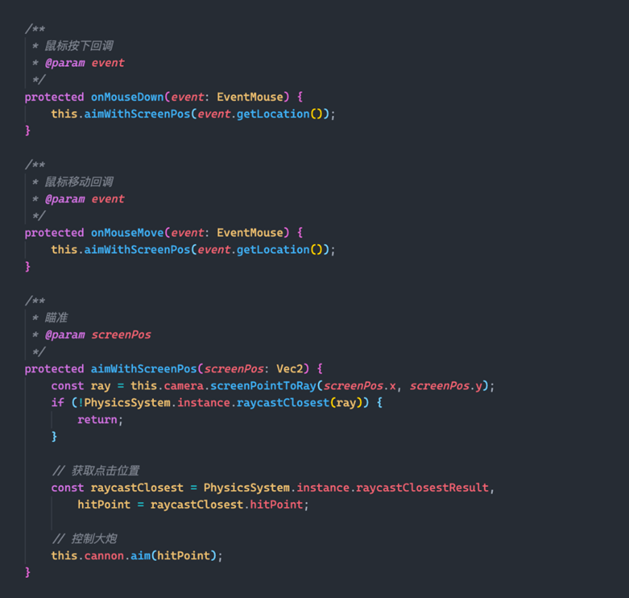
- Click Interaction and Raycasting
Let’s first briefly understand how to specify the target position of the cannon by tapping the screen.
Generally, in 2D games, if you want to interact with objects in the two-dimensional world through a mouse or a touch screen, you only need to use two-dimensional coordinates on a screen to determine whether to “hit” the object.
In 3D games, if you want to interact with objects in the three-dimensional world, you need to use “Raycast” to achieve it.
Simply put, it is to emit a ray (Ray) from the Near Plane of the camera (Camera). The ray length is equal to the distance from the near clipping plane to the far clipping plane (Far Plane). This ray is related to the object in the scene. Do an intersect operation; if it intersects, it counts as hitting the object.
ray casting
Most game engines provide the ability to “create rays from 2D coordinates in screen space” on the camera. For example, the Camera component of Cocos Creator provides screenPointToRay functions.
The specific click function is straightforward to implement:
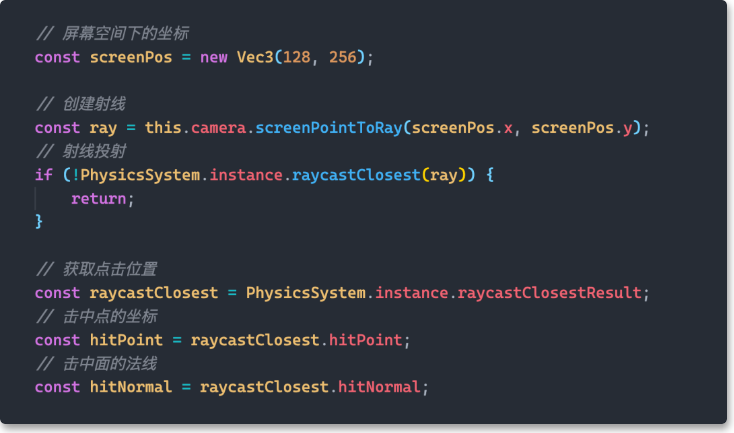
Code for ray casting
It should be noted that objects in the scene must have any type of Collider to participate in ray detection.
look directly at the target
Now we can get a target position, but in most cases, our target position is not on the same level as the gun body. If we let the node of the gun body look directly at the target position, we will get an abnormal performance.
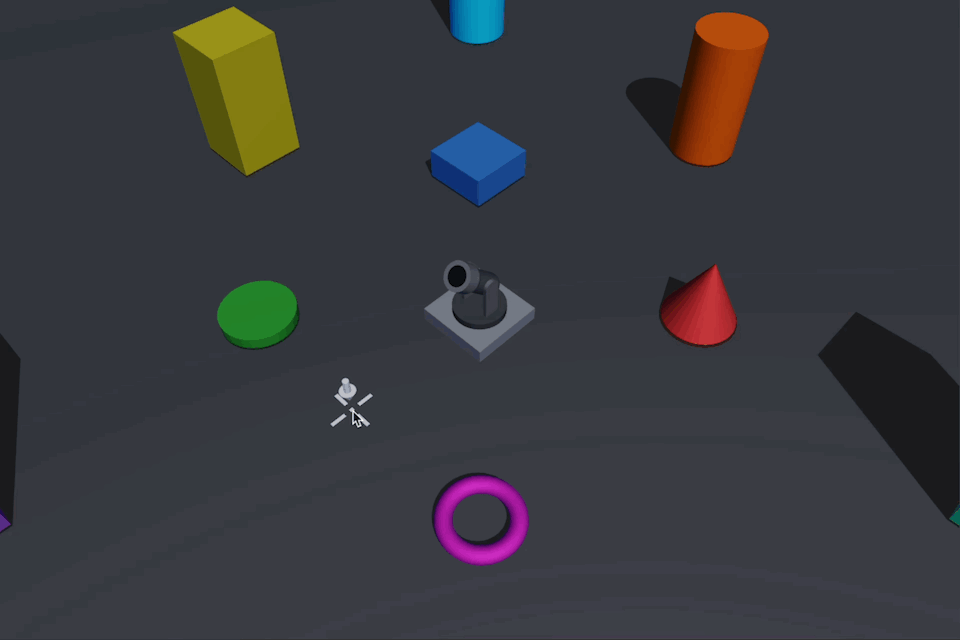
Also, I sneakily made a simple cursor (white arrow and crosshair) to highlight the current target location.
The cannon looks directly at the target location
Note: In Cocos Creator 3.4.2, the front of the node points in the z-direction, so now the cannon’s butt is looking at the target node.
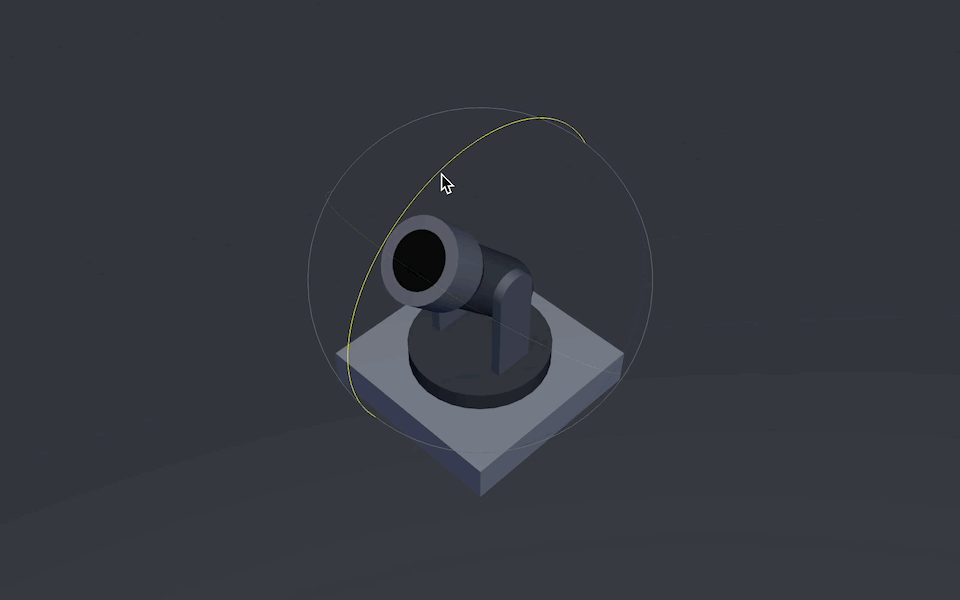
yaw angle
In fact, we only want to change the left and right orientation of the gun body. The “left and right orientation” mentioned here has a more professional term called “Yaw.”
Yaw
Yaw describes the movement of an object based on its yaw axis (usually the y-axis in the object’s coordinate system in game development), changing the direction it is pointing to the left or right of its direction of motion.
Yaw (Wikipedia)
Note: In rotation, in addition to “Yaw,” “Pitch” and “Roll” are usually accompanied by “Pitch” and “Roll,” which respectively describe the motion based on the other two main axes.
To make the cannon face the specified position, all we need to change is the yaw angle of the gun body. The correct way is:
-
Create a direction vector pointing from the yaw axis node position of the gun body to the target position
-
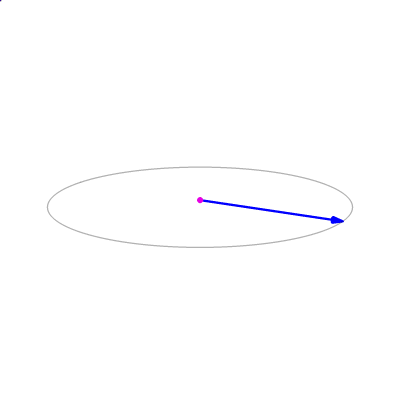
Project this direction vector onto the horizontal plane where the yaw axis node is located
-
Calculate the angle between the direction vector and the forward vector of the cannon by " Vector Dot Product."
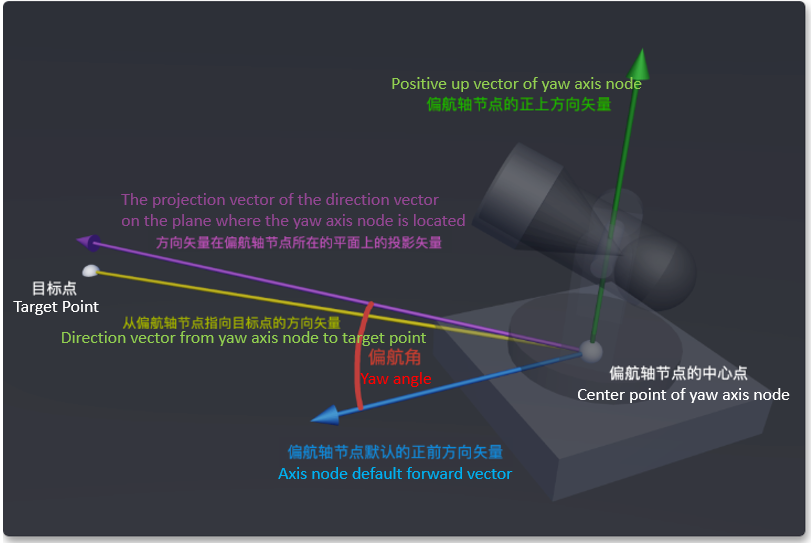
Yaw angle
Note: “Yaw axis node” is the child node of the cannon, and it carries all the nodes of the gun body. Changing the yaw angle of the yaw axis node can change the direction of the gun body.
“lost direction”
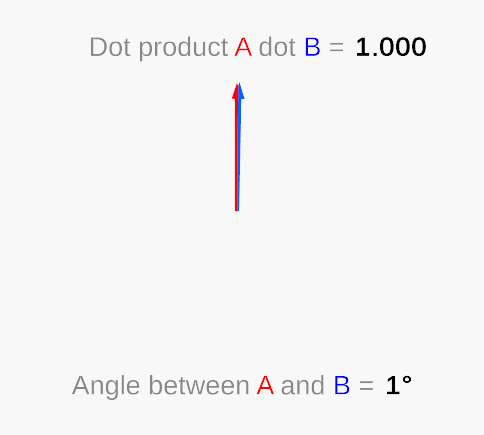
Hold on, the value obtained by calculating the included angle through the vector dot product is always between 0 and 180 degrees, which means that the dot product can tell you the minimum angle between two vectors but cannot tell you that one vector is in another vector—left or right, because “45 degrees left” and “45 degrees right” are both “45 degrees” for dot product.
Vector dot product (Wikipedia)
For example, the angle between the two purple vectors and the blue vector in the following figure is 45 degrees, but they are on both sides of the blue vector:

Angles of the same degree but in different directions
Directed angle
But in the game engine, the valid range of rotation of an object is 0~360, or -180~180 degrees (we all know “90 degrees left” and “-90 degrees right”, and “270 degrees right” means the same).
In the final analysis, we just need an included angle with a positive and negative sign, " Directed Angle . "
When we mention “direction,” developers who are good at linear algebra can quickly think that we can use " vector cross product " to determine whether a vector is on the left or right of another vector.
Vector cross product (Wikipedia)
In addition, the calculation of the directed angle of the vector in the three-dimensional space requires a reference plane to make sense.
Specific calculation steps:
- Project two vectors onto the same reference plane
- Find the normal vector of two vectors by the cross product
- The direction is obtained by the projection length of the normal vector on the reference plane normal vector
- Calculate the angle between two vectors using a dot product
- Apply direction to included angle (symbol)

function to calculate the directed angle
For the function “projecting a vector onto a plane”:
function to project a vector onto a plane
Note: In the 3D world, using a direction vector as a plane normal can represent a class of planes facing the same because “plane normal” means that the direction vector must be perpendicular to the plane it represents.
Code Practice
Having solved the problem of yaw angle, the cannon is now given the code “towards the target position”:
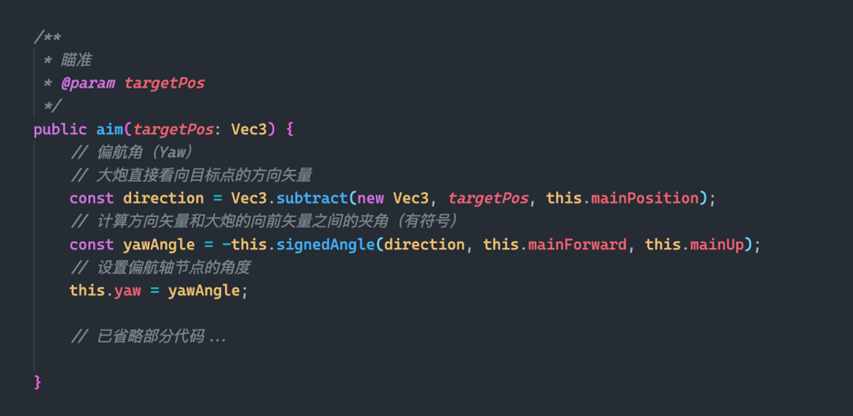
Aiming function of the cannon
Note: The rotation of nodes in Cocos Creator 3.4.2 conforms to the right-hand rule. That is, the counterclockwise direction is the positive direction.
Then implement the logic GameController of “move the mouse to control the cannon aiming” in :
Game Controller
![]() Phased achievements:
Phased achievements:
The orientation of the cannon
Shooting mode
Now our cannon can follow the mouse to rotate 360 degrees and fire projectiles, but the pitch angle and speed of projectile firing are fixed, which doesn’t seem to achieve all we need.
And our expectation is: that given a target position, the cannon can calculate the firing angle and velocity by itself.
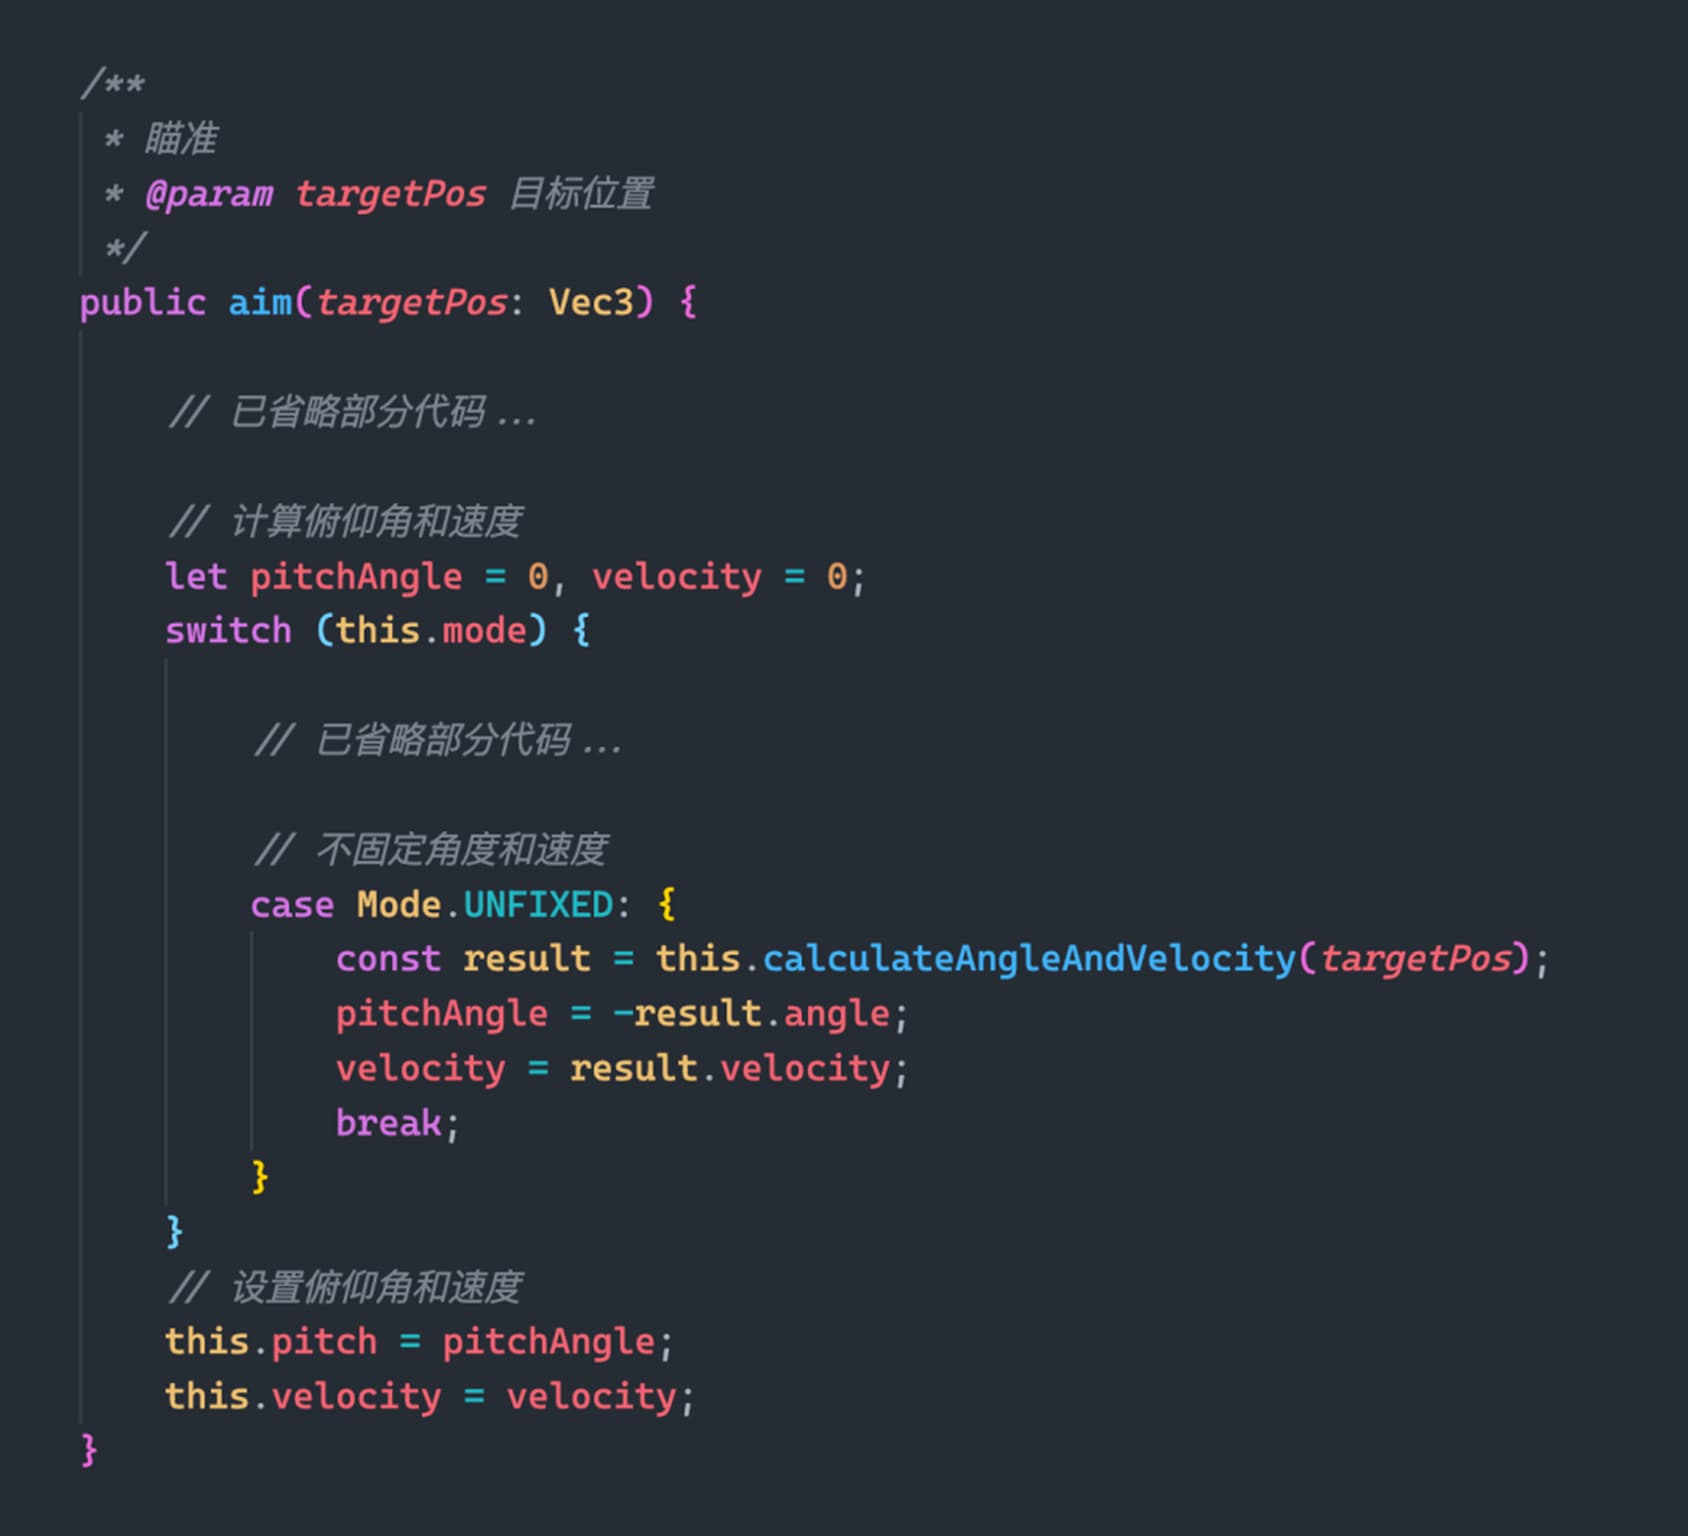
For this goal, we can design three different modes:
- Fixed launch angle dynamically calculates the initial velocity of the shell
- Set the initial speed of the shell and dynamically calculate the launch angle
- Dynamic calculation of firing angle and initial velocity of shells
In addition to the current mode of “fixing the launch angle and the initial velocity of the shell,” we have a total of 4 methods.
Next, we will implement them one by one.
Fixed angle and speed
Due to the new concept of patterns, to make the subsequent coding more convenient and elegant, we slightly adjusted the current code structure.
Calculate the firing angle and velocity of the projectile based on the mode in the Cannon component’s function: aim
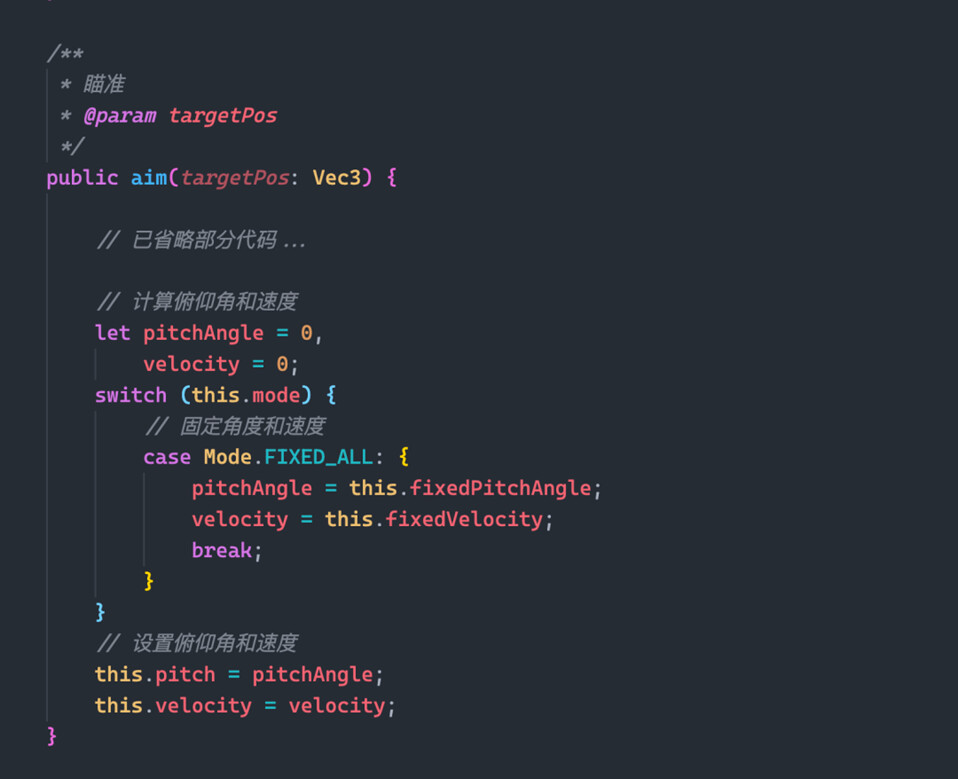
Aiming function of the cannon
Projectile movement
Although there have been so many lot already said, it seems to have nothing to do with projectile movement.
basic introduction
Let’s start with what is projectile motion?
Projectile motion is the motion of an object thrown at an initial velocity under the action of the earth’s gravity.
Projectile motion can be divided into horizontal motion and oblique motion:
- Horizontal Projectile Motion: The angle between the outgoing direction of the object and the horizontal plane is 0, so the object only has an initial velocity in the horizontal direction (it can also be regarded as an initial velocity of 0 in the vertical direction).
flat throw
- Oblique Projectile Motion: The exit direction of the object has a certain angle with the horizontal plane, so the object not only has an initial velocity in the horizontal direction but also has an initial velocity in the vertical direction.
oblique throwing movement
Under normal circumstances, when we refer to projectile motion, we refer to oblique motion because oblique motion is “compatible” with flat motion~
In addition, projectile motion is often referred to as “parabolic motion,” which I think is a more convenient name.
basic formula
![]() Welcome to the main pre-quest!
Welcome to the main pre-quest!
Before diving in, let’s learn (review) some simple prerequisites.
First, let’s get to know the members that will appear in the various formulas:
- s - Displacement
- x - Horizontal Displacement
- y - Vertical Displacement
- h - Max Height
- θ - Initial Angle
- v - Initial Velocity
- t - Time (Time)
- g- Gravitational Acceleration
Note: We default to the initial speed as directional, corresponding to the initial angle θ.
Note Standard gravitational acceleration is 9.80665, but in-game engines usually default to 9.8 or 10. The default value of gravitational acceleration in Cocos Creator 3.4.2 is 10.
Note: The projectile motions discussed in this article are “ideal projectile motions.”
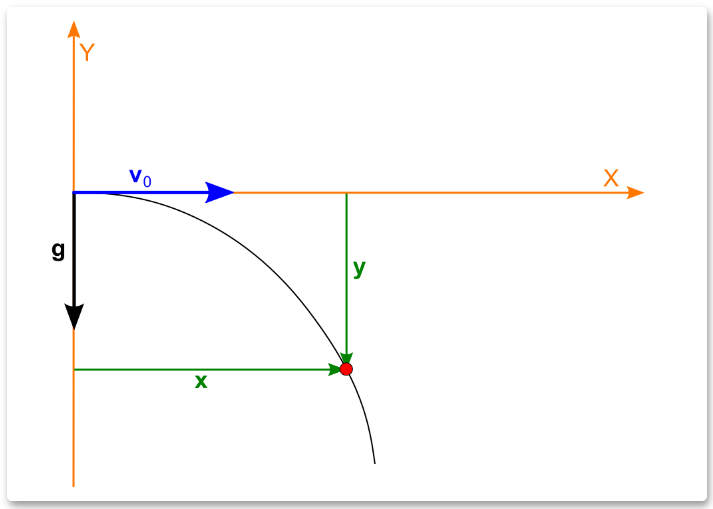
free fall displacement formula
Calculating the displacement is when the object is only affected by gravity.
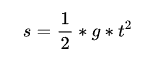
free fall displacement formula
Horizontal displacement formula
In projectile motion, the object is only affected by its initial velocity in the horizontal direction.
That is to say, the horizontal velocity of the object is always equal to the horizontal component of the initial velocity, i.e., .θ
![]()
Horizontal displacement formula
Note: In calculating horizontal displacement, we take “right” as the positive direction.
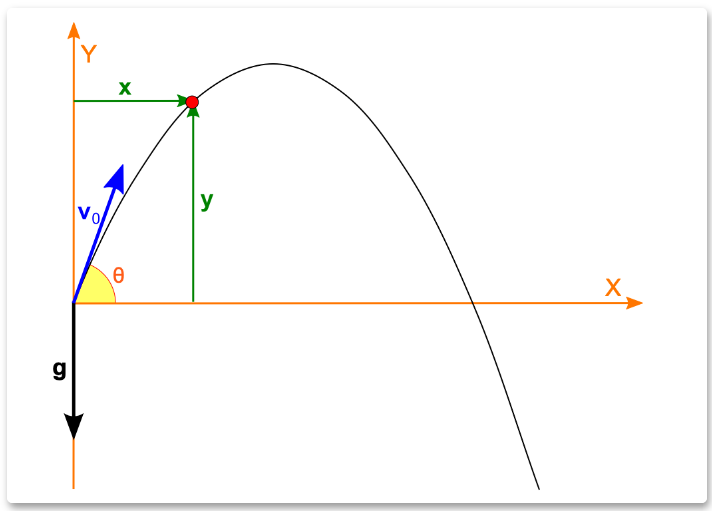
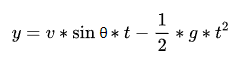
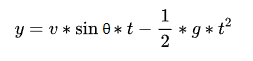
Vertical displacement formula
In projectile motion, the object is affected by initial velocity and gravitational acceleration in the vertical direction.
That is to say; the object has two vertical displacements at the same time:
Displacement is affected by the vertical component of the initial velocity
Free Fall Displacement Affected by Gravity
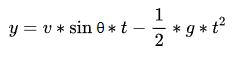
Verticle displacement formula
Note: We take “up” as the positive direction in the calculation of the vertical displacement, so the free fall displacement is a negative value.
Advanced Mode
![]() Welcome to the main quest!
Welcome to the main quest!
Fixed angle
Now let’s implement the second mode: fix a firing angle and dynamically calculate the initial velocity of the shell based on the target position.
In this mode, the firing angle of the cannon is fixed and given a target point in three-dimensional space. We need to calculate the initial velocity of the projectile firing.
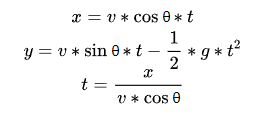
Calculate the horizontal and vertical displacement
With the position of the target point, and we already know the position of the launch point, we can calculate the horizontal and vertical displacement from the launch point to the target point.
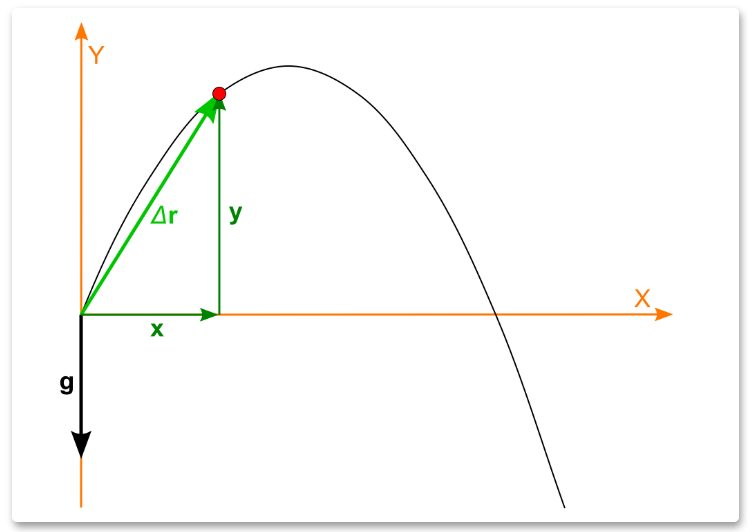
Displacement of projectile motion
After projecting both points on the same horizontal plane, the distance between the two points is the horizontal distance; and the difference between the y-values between the emission point and the target point is their vertical distance.
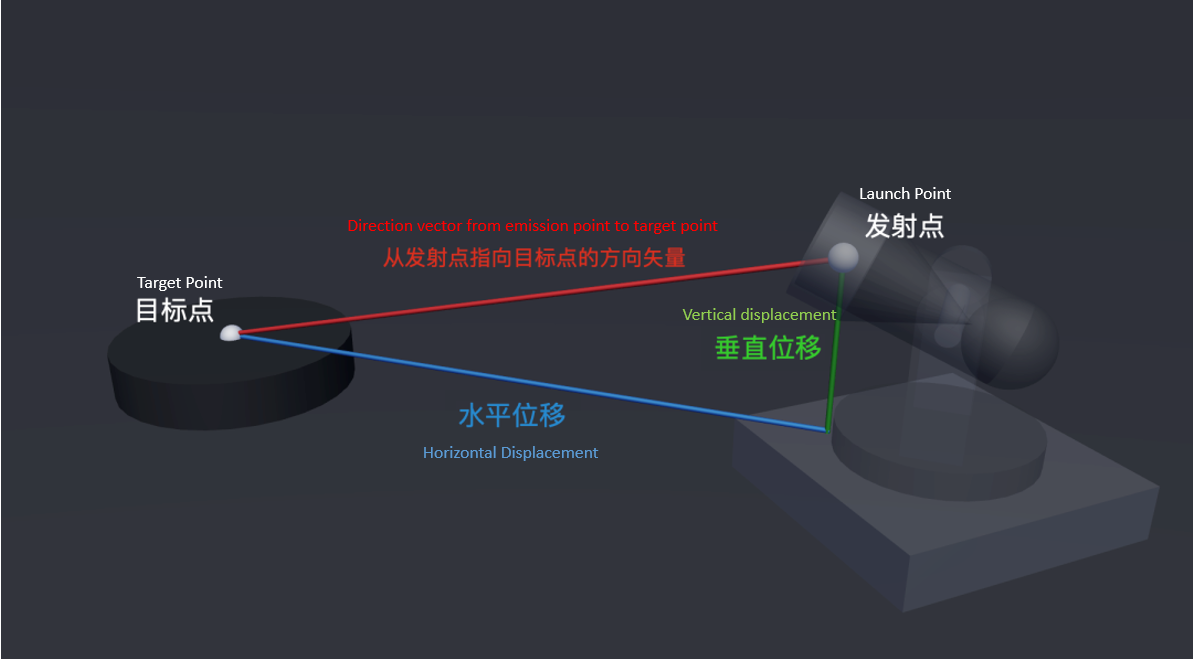
displacement
The actual calculation process is as follows:
- Use vector subtraction to get the direction vector from the launch point to the target point
- The y value of the direction vector is the vertical distance
- After projecting the direction vector onto the horizontal plane, its length is the horizontal distance

function to calculate displacement
Note: In game development, the easiest way to represent a horizontal plane is to use a direction vector with a vertically upward direction as the plane normal, such as a direction vector with a value of { x: 0, y: 1, z: 0 } .
Note: In Cocos Creator 3.4.2 Vec3.UP = new Vec3(0, 1, 0) .
initial velocity formula
Ahem, back to the topic.
Take a look at the information we have now:
- Horizontal displacement (x)
- Vertical displacement (y)
- initial angle (θ)
And what we want to ask for is:
- Initial speed (v)
Taking another look at the “horizontal displacement formula” and “vertical displacement formula” above, we seem to be missing a key piece of information:
- time (t)
No problem! We can try to eliminate this time term ( ).
First, we can easily get the “horizontal displacement time formula” from the “horizontal displacement formula”:
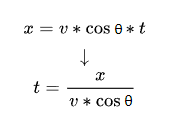
Then substitute this “horizontal displacement time formula” into the “vertical displacement formula”:
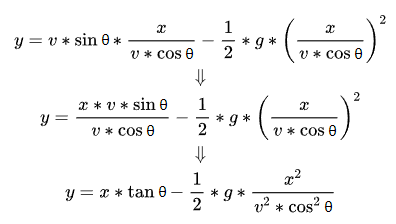
Good, the time (t) has been successfully eliminated, and a new vertical displacement formula has been obtained. In order to distinguish it, we will name it “Vertical Displacement Formula 2”.
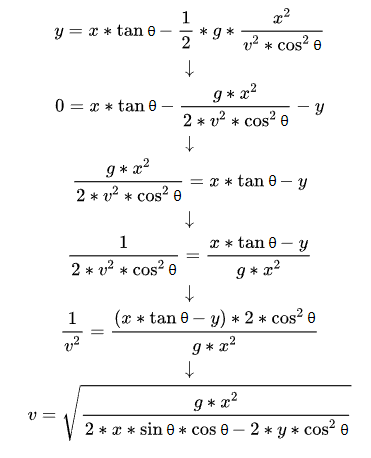
Finally, we try the initial velocity term (v) again in the “isolated” formula:
![]() Boom!
Boom!
That’s right! This is the initial velocity formula we want!
Code Practice
Now, let’s turn the formula into code:
function to calculate the initial velocity
Note: For some cases that cannot be calculated, the validity judgment is added to the code.
The cannon calculates the initial velocity based on the target position when aiming:
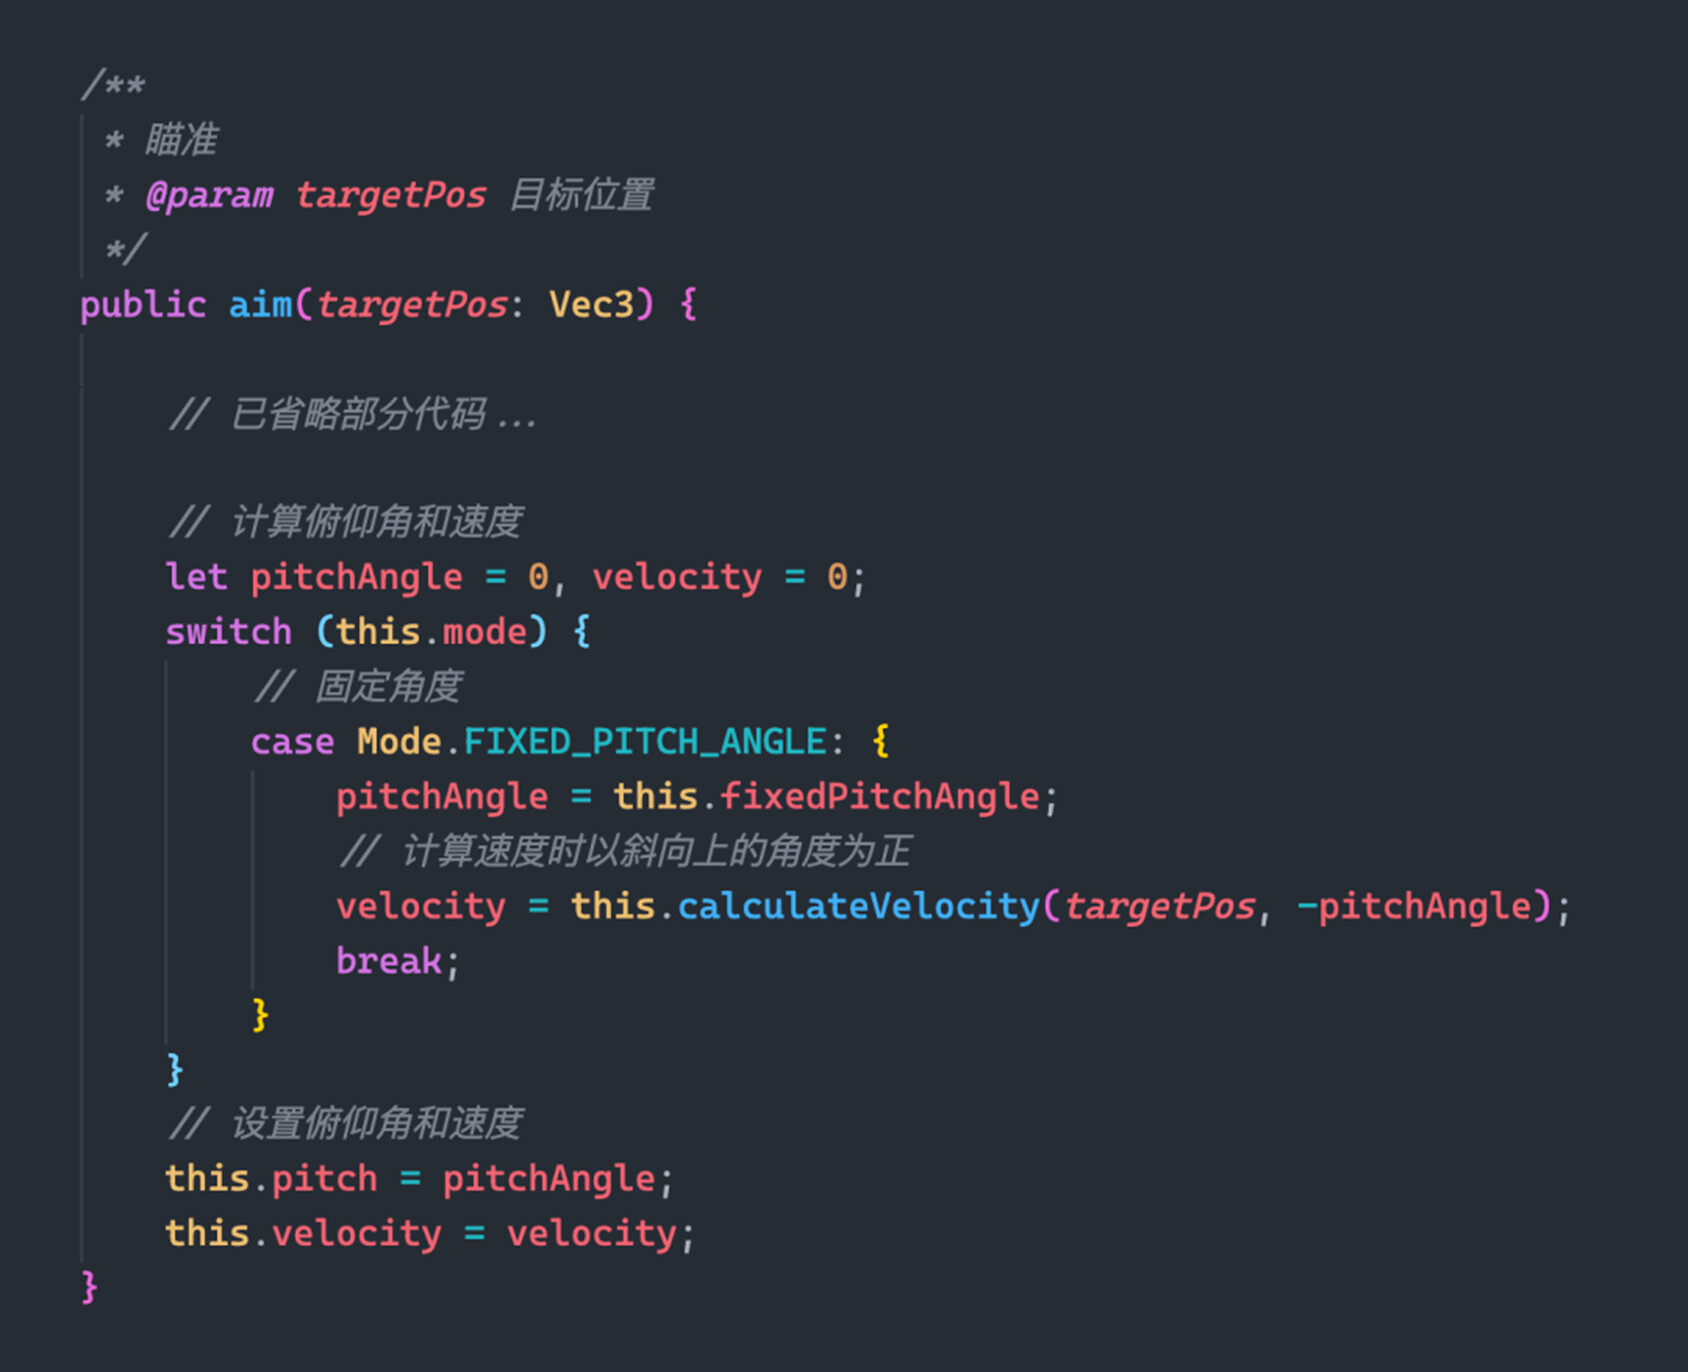
Aiming function of the cannon
![]() Phased achievements:
Phased achievements:
Fixed angle mode for cannons
fixed speed
In the third section: the initial velocity of the shell is fixed, and the firing angle is dynamically calculated according to the target position.
In this mode, the initial velocity of the projectile fired by the cannon is fixed. Given a target point in three-dimensional space, we need to calculate the firing angle.
initial velocity formula
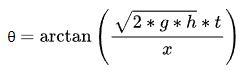
In the derivation of the “speed formula,” we got a “vertical displacement formula 2” without a time term (t). Here, we can use this formula to derive the angle formula directly.
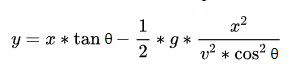
Vertical displacement formula
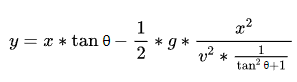
Hold on, now we’re asking for the initial angle ( θ), and in “Vertical Displacement Equation 2” both tan θ and are cos θ^2 here. That’s not good.
But the good news is that we can directly set cos θ^2 by replacing it with
![]() (since they are equal), which should help us reduce some of the difficulties.
(since they are equal), which should help us reduce some of the difficulties.
The new formula seems to be more complicated. Let’s try it out:
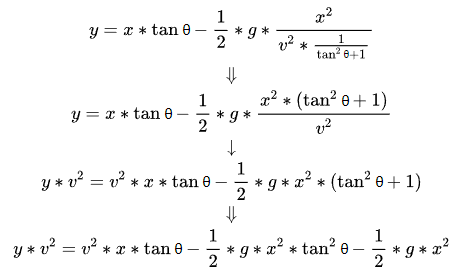
Here you can move the item to the left of the equals sign to the right:
![]()
Hey, the formula seems to conform to the characteristics of " Quadratic Equation , "so let’s sort it out a little:
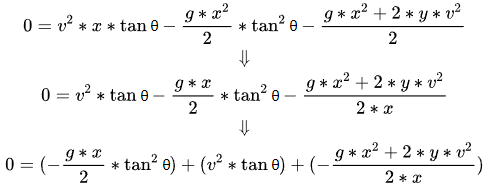
Hey, isn’t this just a quadratic equation in one variable!
![]()
We can map several parts of the formula one by one:
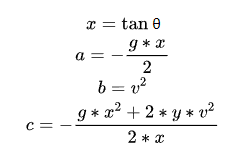
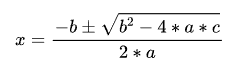
This is easy to handle. We can directly use the " formula method " to solve the quadratic equation in one variable.
This is the " root formula " of a quadratic equation in one variable :
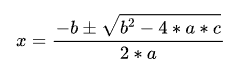
Substitute the unknown term, quadratic term coefficient, linear term coefficient, and constant term into the root-finding formula:
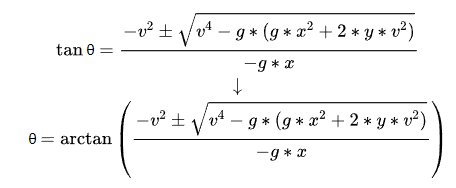
![]() Bingo!
Bingo!
I finally got the “initial angle formula”!
However, it is important to note that this formula has at most two solutions.
Quadratic Equation
An integer equation that contains only one unknown (unary) and the highest degree of the unknown term is 2 (quadratic) is called a quadratic equation in one variable.
Quadratic equations in one variable can be sorted into general forms. Among them is called the quadratic term, which is the coefficient of the quadratic term; the first-order term, the coefficient of the first-order term; and the constant term.
Code Practice
Turn the formula into code:
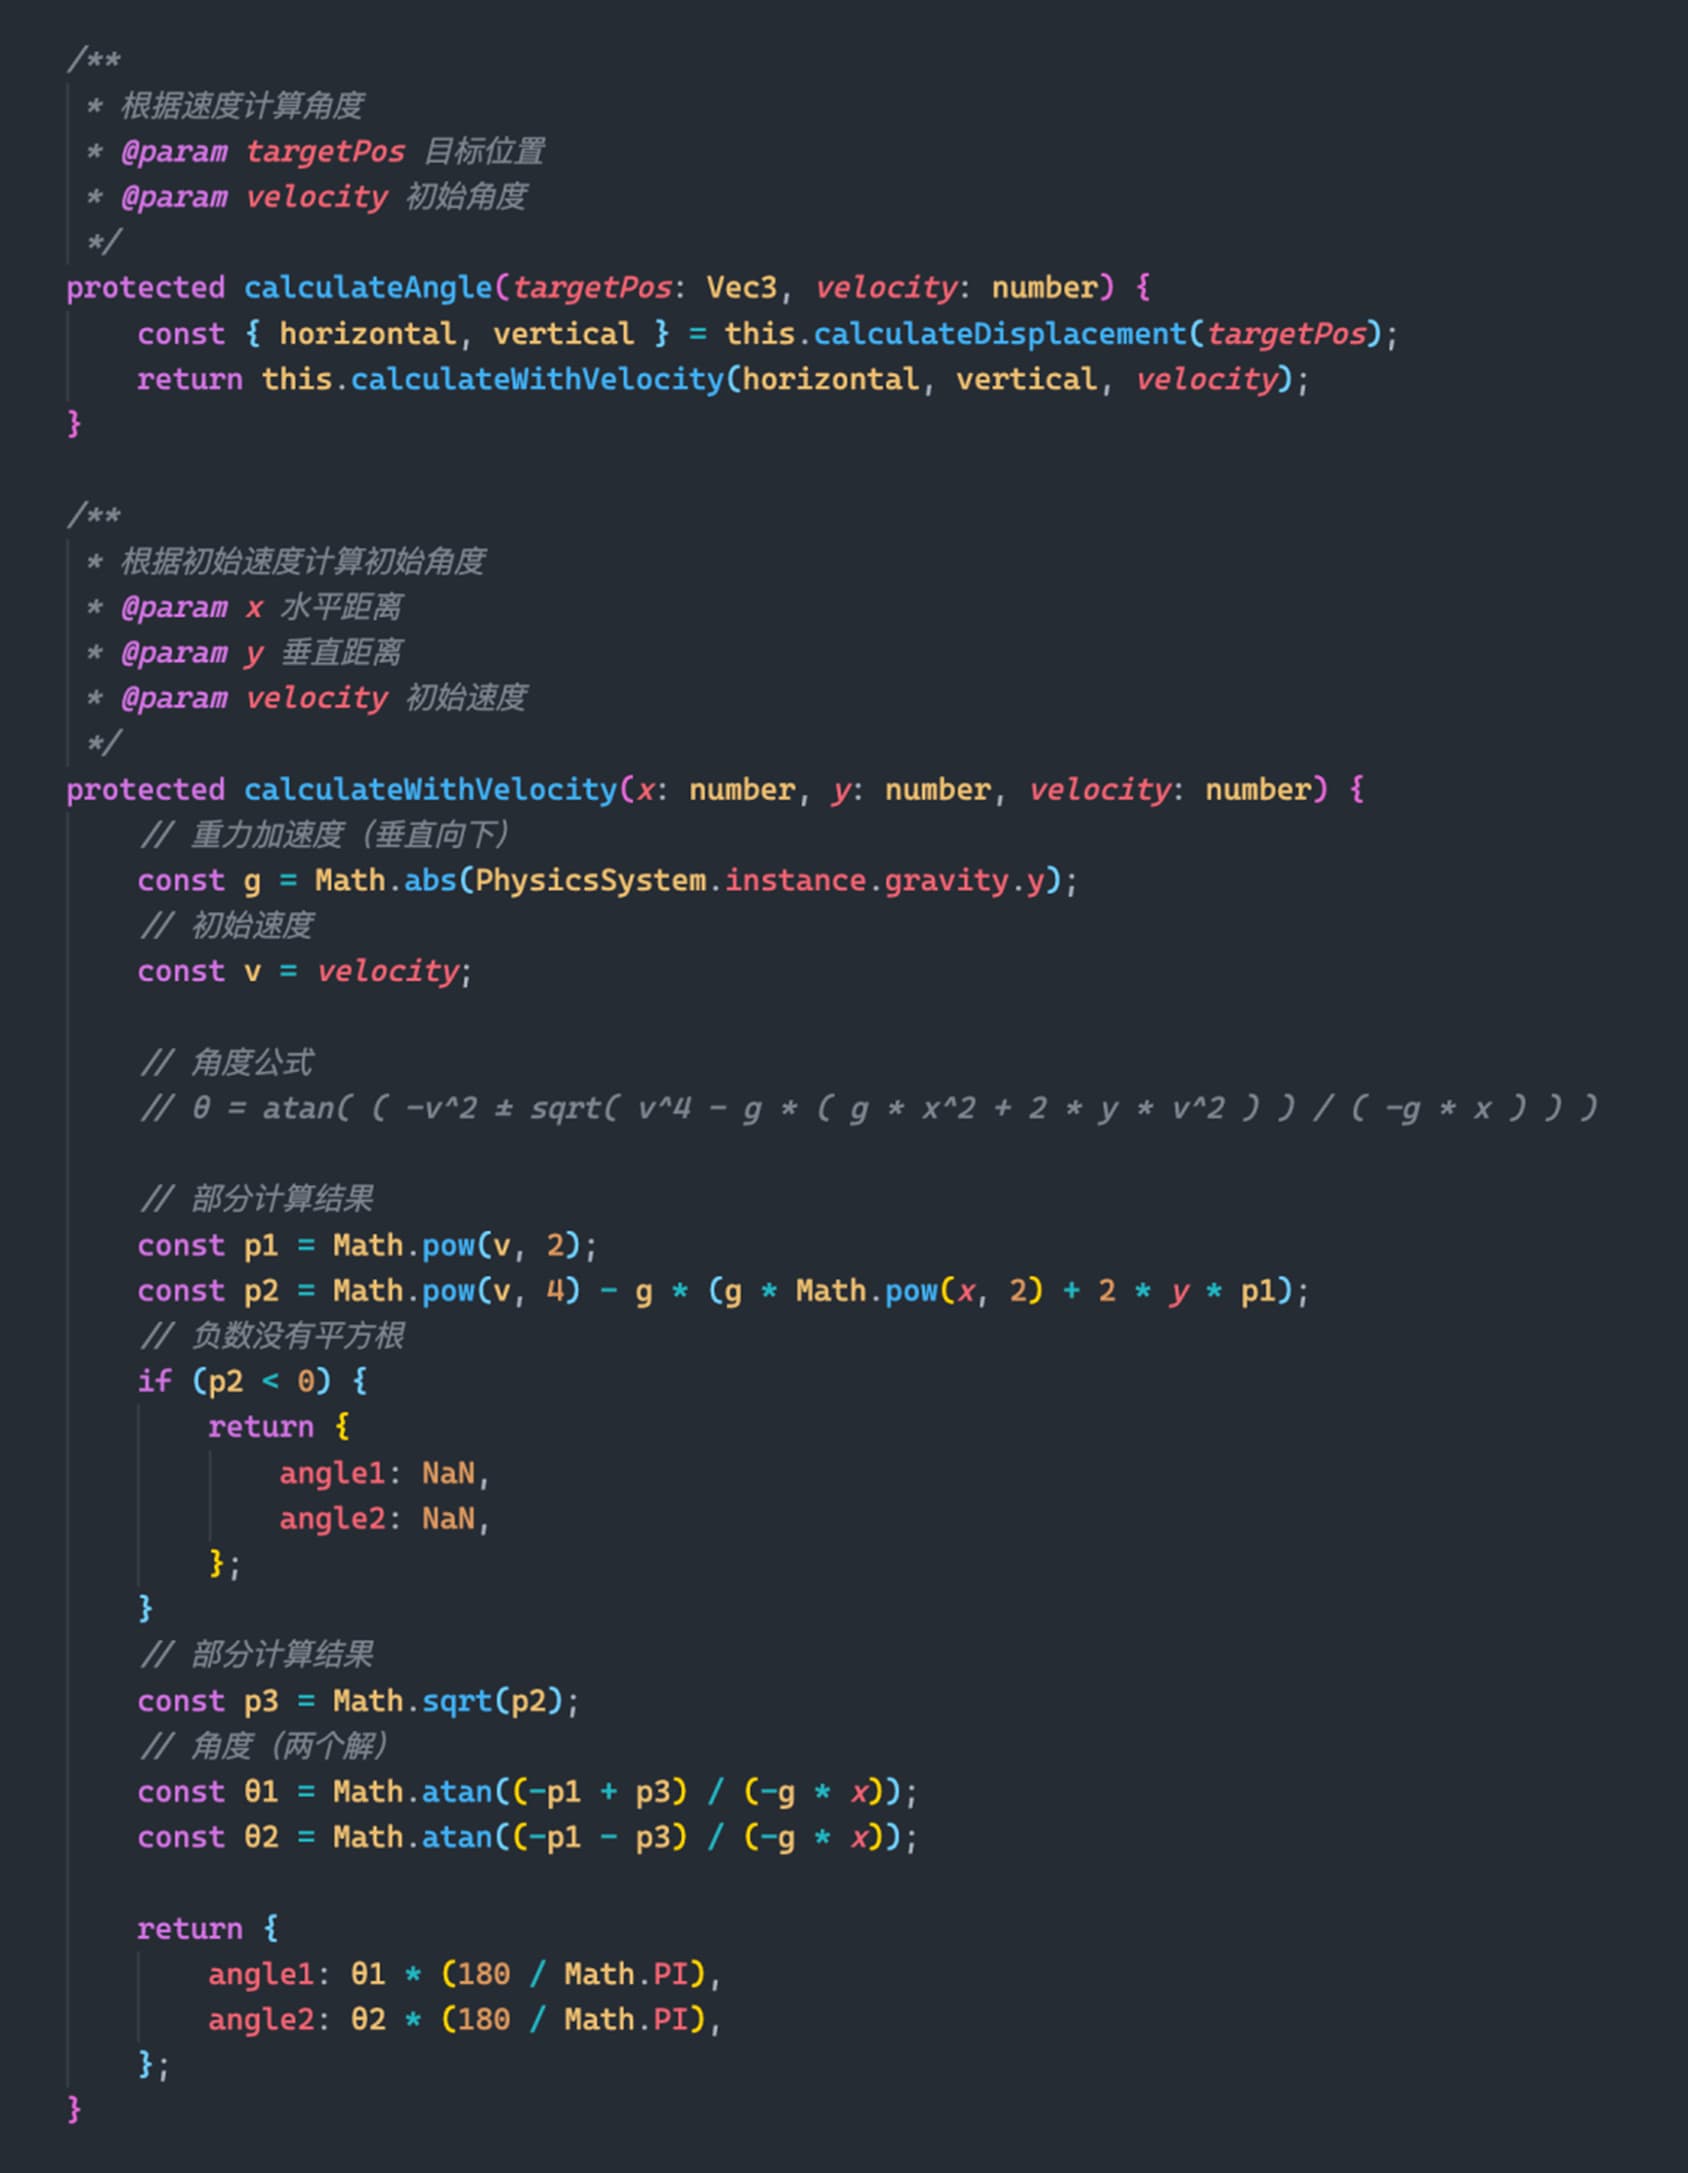
function to calculate the initial angle
Note: For some cases that cannot be calculated, the validity judgment is added to the code.
The cannon calculates the initial angle based on the target position when aiming.
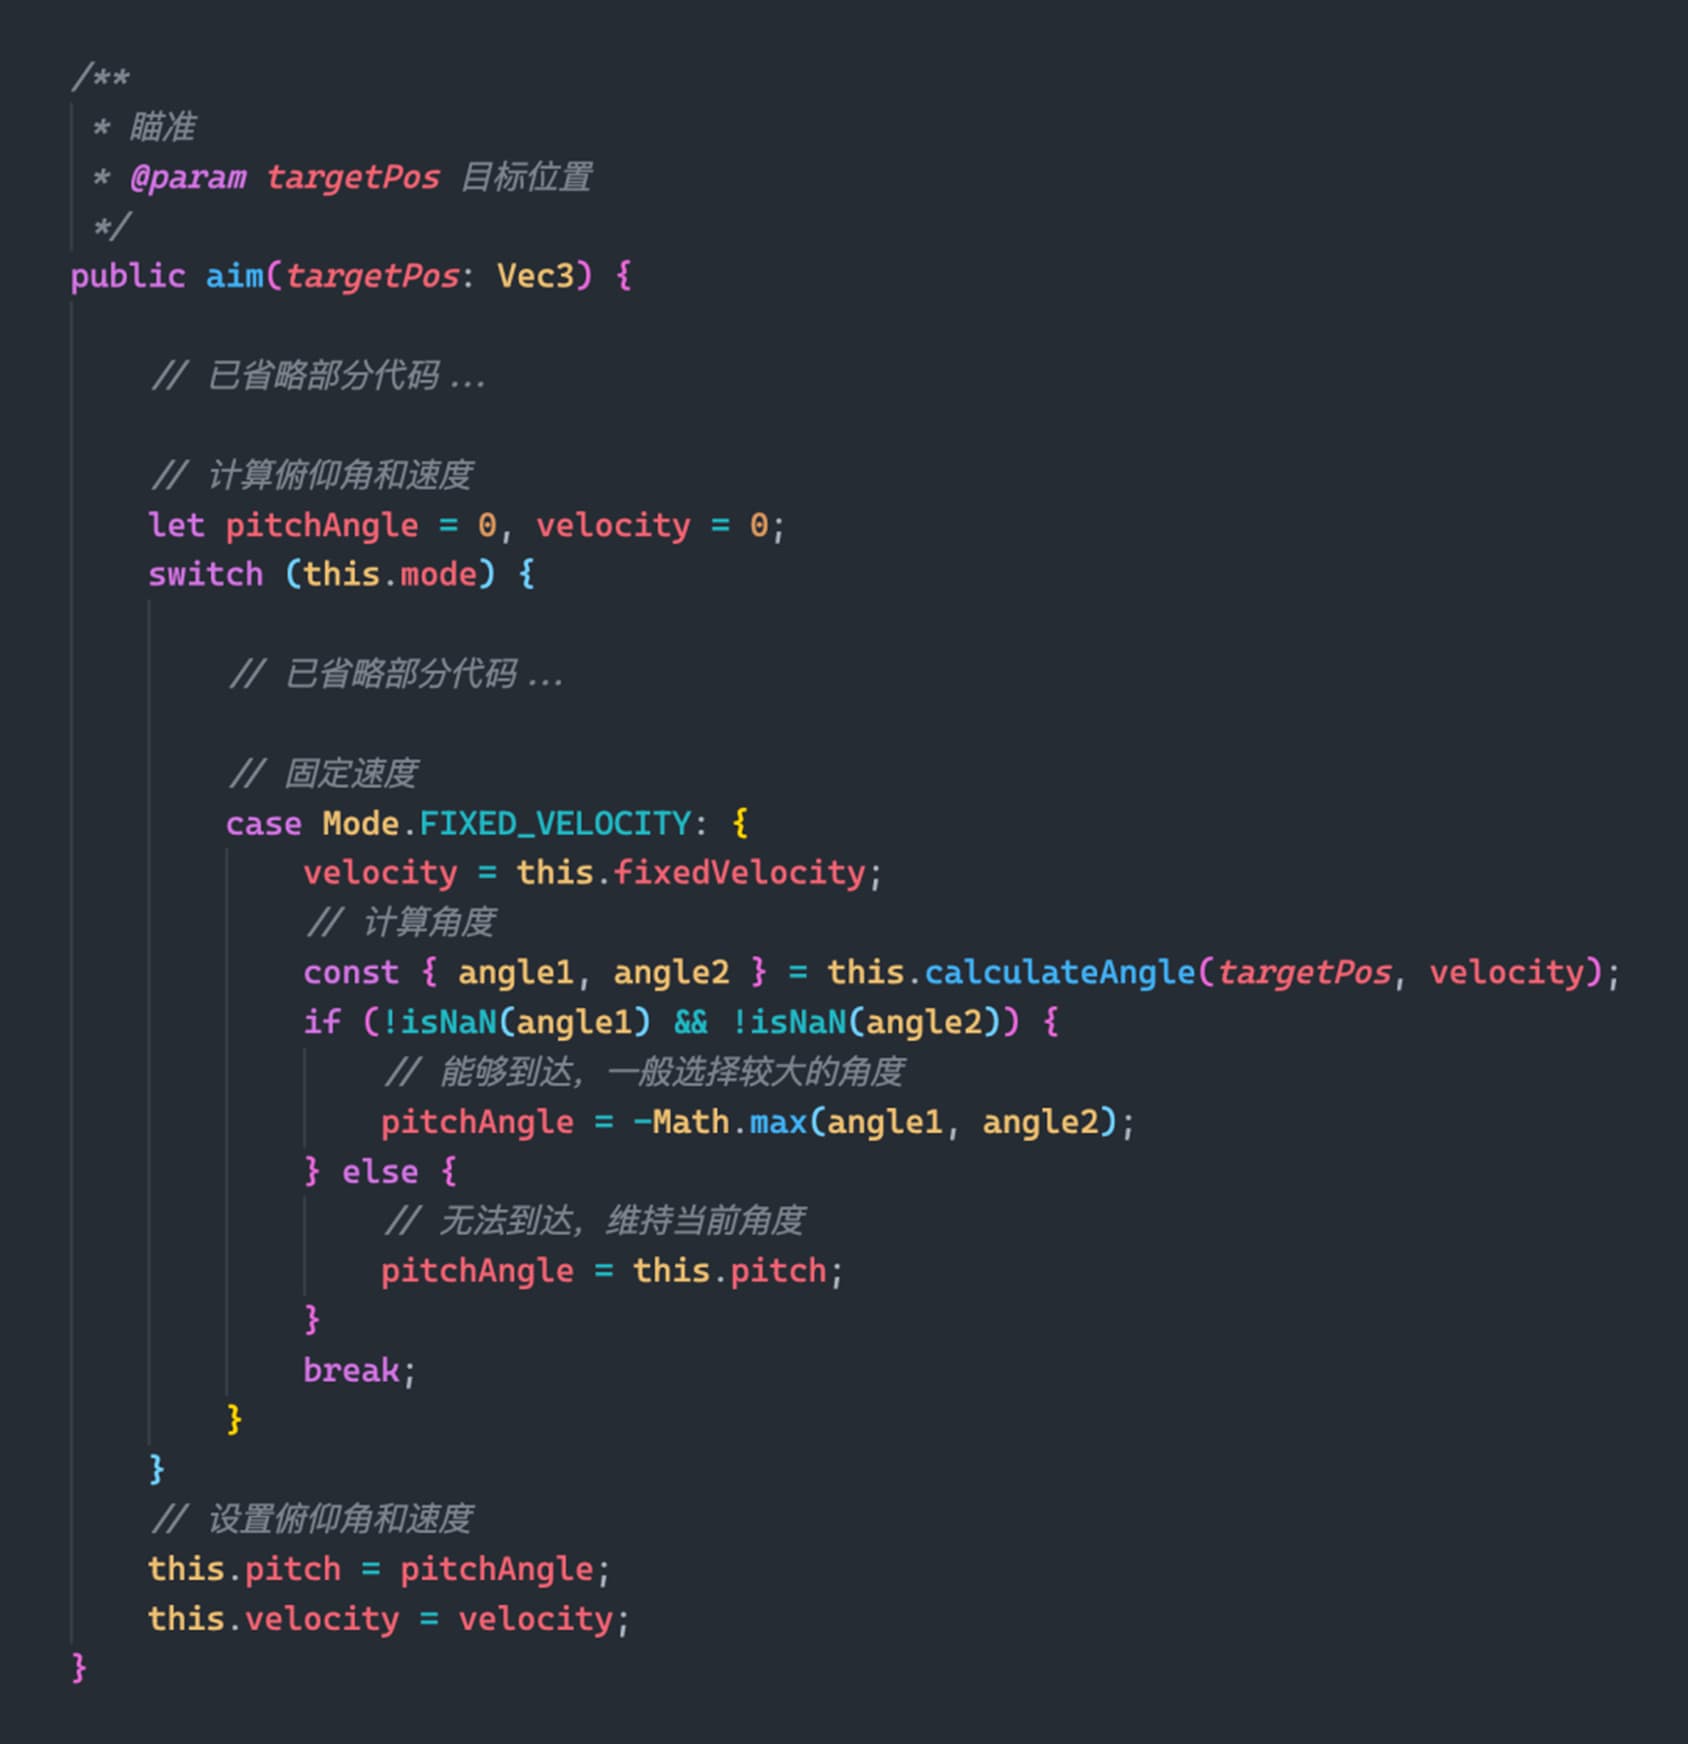
Aiming function of the cannon
For the case of obtaining two results, we can directly choose the larger angle. You can also choose different angles according to the specific situation.
If no valid results can be obtained, it means that no matter what angle is used to launch the cannonball, the cannonball cannot reach the target position. In this case, we can choose to maintain the current angle.
![]() Phased achievements:
Phased achievements:

Fixed Speed Mode for Cannons
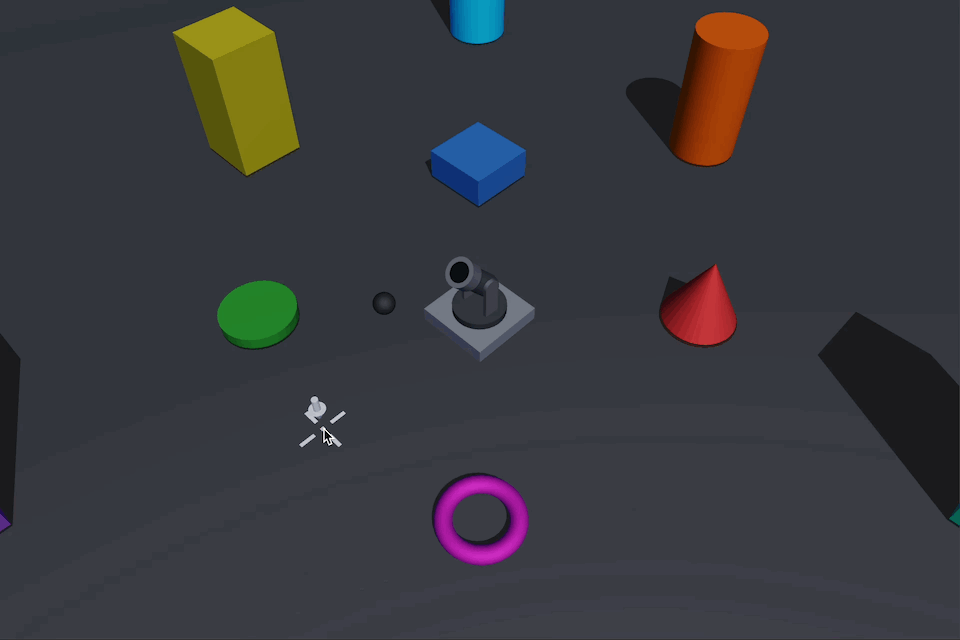
Unfixed angle and speed
Previously, we implemented the solutions of fixed angle and fixed speed, respectively, which are all very good, but they don’t feel very flexible.
How is it flexible? I don’t want the cannon fixed at a certain angle or speed. I want freedom, and I don’t care about anything else!
Then we will implement the fourth mode: specify a target position and dynamically calculate the launch angle and the shell’s initial speed.
Situation Analysis
Information we have:
- Horizontal displacement (x)
- Vertical displacement (y)
What we require is:
- Initial angle ( θ)
- Initial speed (v)
Remember the “Vertical Displacement Formula” from the beginning? The one with the time term (t).
There are a total of 5 items in a formula, 3 of which are unknown. This isn’t good…
It seems that another way has to be found.
maximum height formula
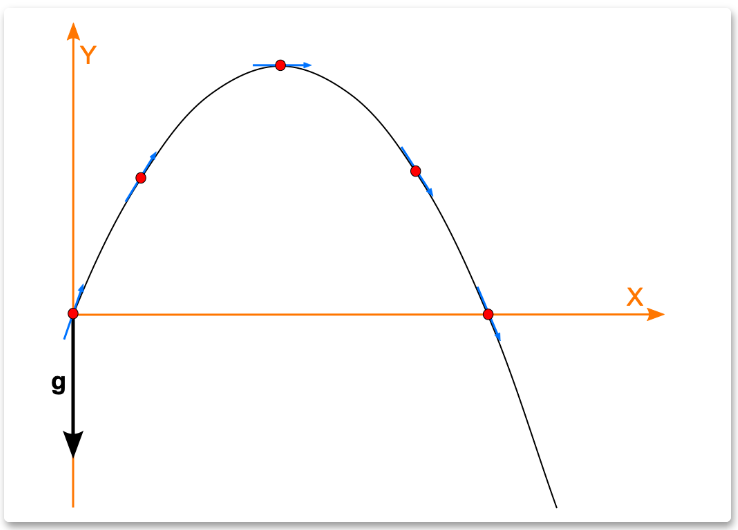
We all know that the throwing motion can be mainly divided into two stages. The first is the ascending stage, after reaching a maximum height, then the descending stage.
If we can determine the maximum height, is there a certain room for manipulation?
![]() When does the object reach its maximum height?
When does the object reach its maximum height?
![]() The answer is when the object no longer continues to rise (the end of the ascent phase and before the start of the descent phase). That is, the vertical velocity of the object is 0 at this moment.
The answer is when the object no longer continues to rise (the end of the ascent phase and before the start of the descent phase). That is, the vertical velocity of the object is 0 at this moment.
Maximum height of projectile motion
As we mentioned earlier, in the oblique throwing motion, the vertical displacement is affected by two velocities:
- The vertical component of initial velocity (vertically up)
- Velocity is given by gravity (vertical downwards)
When the vertical velocity of an object is 0, it means that the “vertical component of the initial velocity” is equal to the “gravity imparted velocity”:
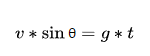
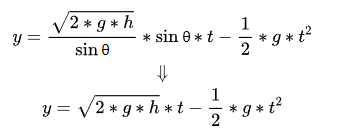
From the above formula, we can get the time formula when the object reaches the maximum height , we call it the “maximum height time formula”:
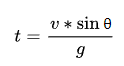
We substitute the “maximum altitude time formula” into the “vertical displacement formula” and eliminate the time term (t) again:
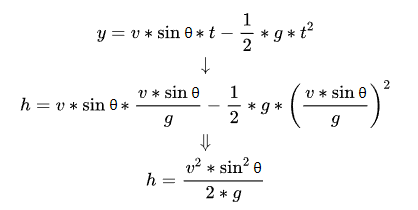
So we get the “maximum height formula.”
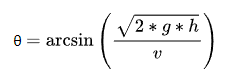
Initial angle formula 2
According to the “maximum height formula,” we can get the “initial angle formula 2” with the maximum height term (h) and the initial velocity term (v):
>Initial Velocity Formula 2
And “Initial Velocity Formula 2” with maximum height term (h) and initial angle term (θ):
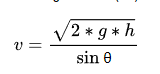
Woohoo, buy one get two free, very cost-effective!
Don’t be too happy. Our problem is still not solved…
Judging from the existing formulas, the initial angle and initial speed must be calculated first before the other can be calculated, which is embarrassing.
Time formula
When we were at a loss, our old friend “Vertical Displacement Formula” suddenly visited:
![]() It says: In this case, we can try to eliminate the items and minimize the unknown things in the formula, just like playing the game.
It says: In this case, we can try to eliminate the items and minimize the unknown things in the formula, just like playing the game.
![]() I said: Good! Who doesn’t like to play matchmaking!
I said: Good! Who doesn’t like to play matchmaking!
This substitutes the “Initial Velocity Formula 2” just obtained into the “Vertical Displacement Formula”:
At this time, we found that this formula also seems to satisfy the characteristics of a “one-dimensional quadratic equation”:
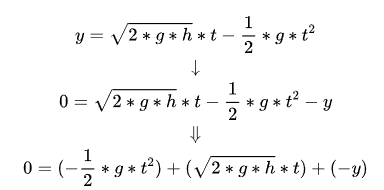
Remember the general form of a quadratic equation in one variable:
![]()
Match several parts of the formula one by one:
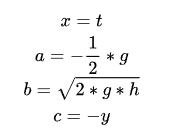
Or the formula for finding the root of a quadratic equation in one variable:
Substitute the unknown term, quadratic term coefficient, linear term coefficient, and constant term into the root-finding formula:
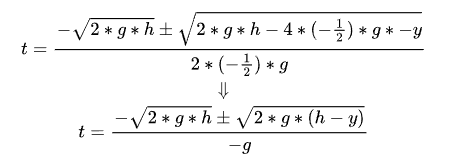
![]() Great!
Great!
Now we can find the total time (t) for the object to travel from the starting point to the destination point.
Initial angle formula 3
Things have changed, so let’s sort out the information we have now:
- Horizontal displacement (x)
- Vertical displacement (y)
- Maximum height (h)
- Time (t)
What we require is still:
initial angle ( θ)
Initial speed (v)
Repeat the old tricks. Eliminate the problem!
This time we invite the “horizontal displacement formula”:
![]()
Substitute “Initial Velocity Formula 2” into it and try:
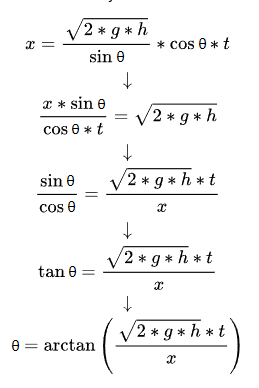
![]() Excellent!
Excellent!
Now we can use the maximum height (h) and time (t) to find the initial angle (θ)!
Key formula
Huh, so many formulas are really overwhelming. Let’s take out the useful ones first.
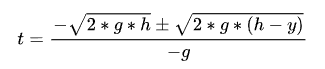
Use the “time formula” to calculate the time (t):
Use “Initial Angle Formula 3” to calculate the initial angle (θ):
Use “Initial Velocity Formula 2” to calculate the initial velocity (v):

Code Practice
![]() Mathematics is really “fascinating.”
Mathematics is really “fascinating.”
Finally can write code.
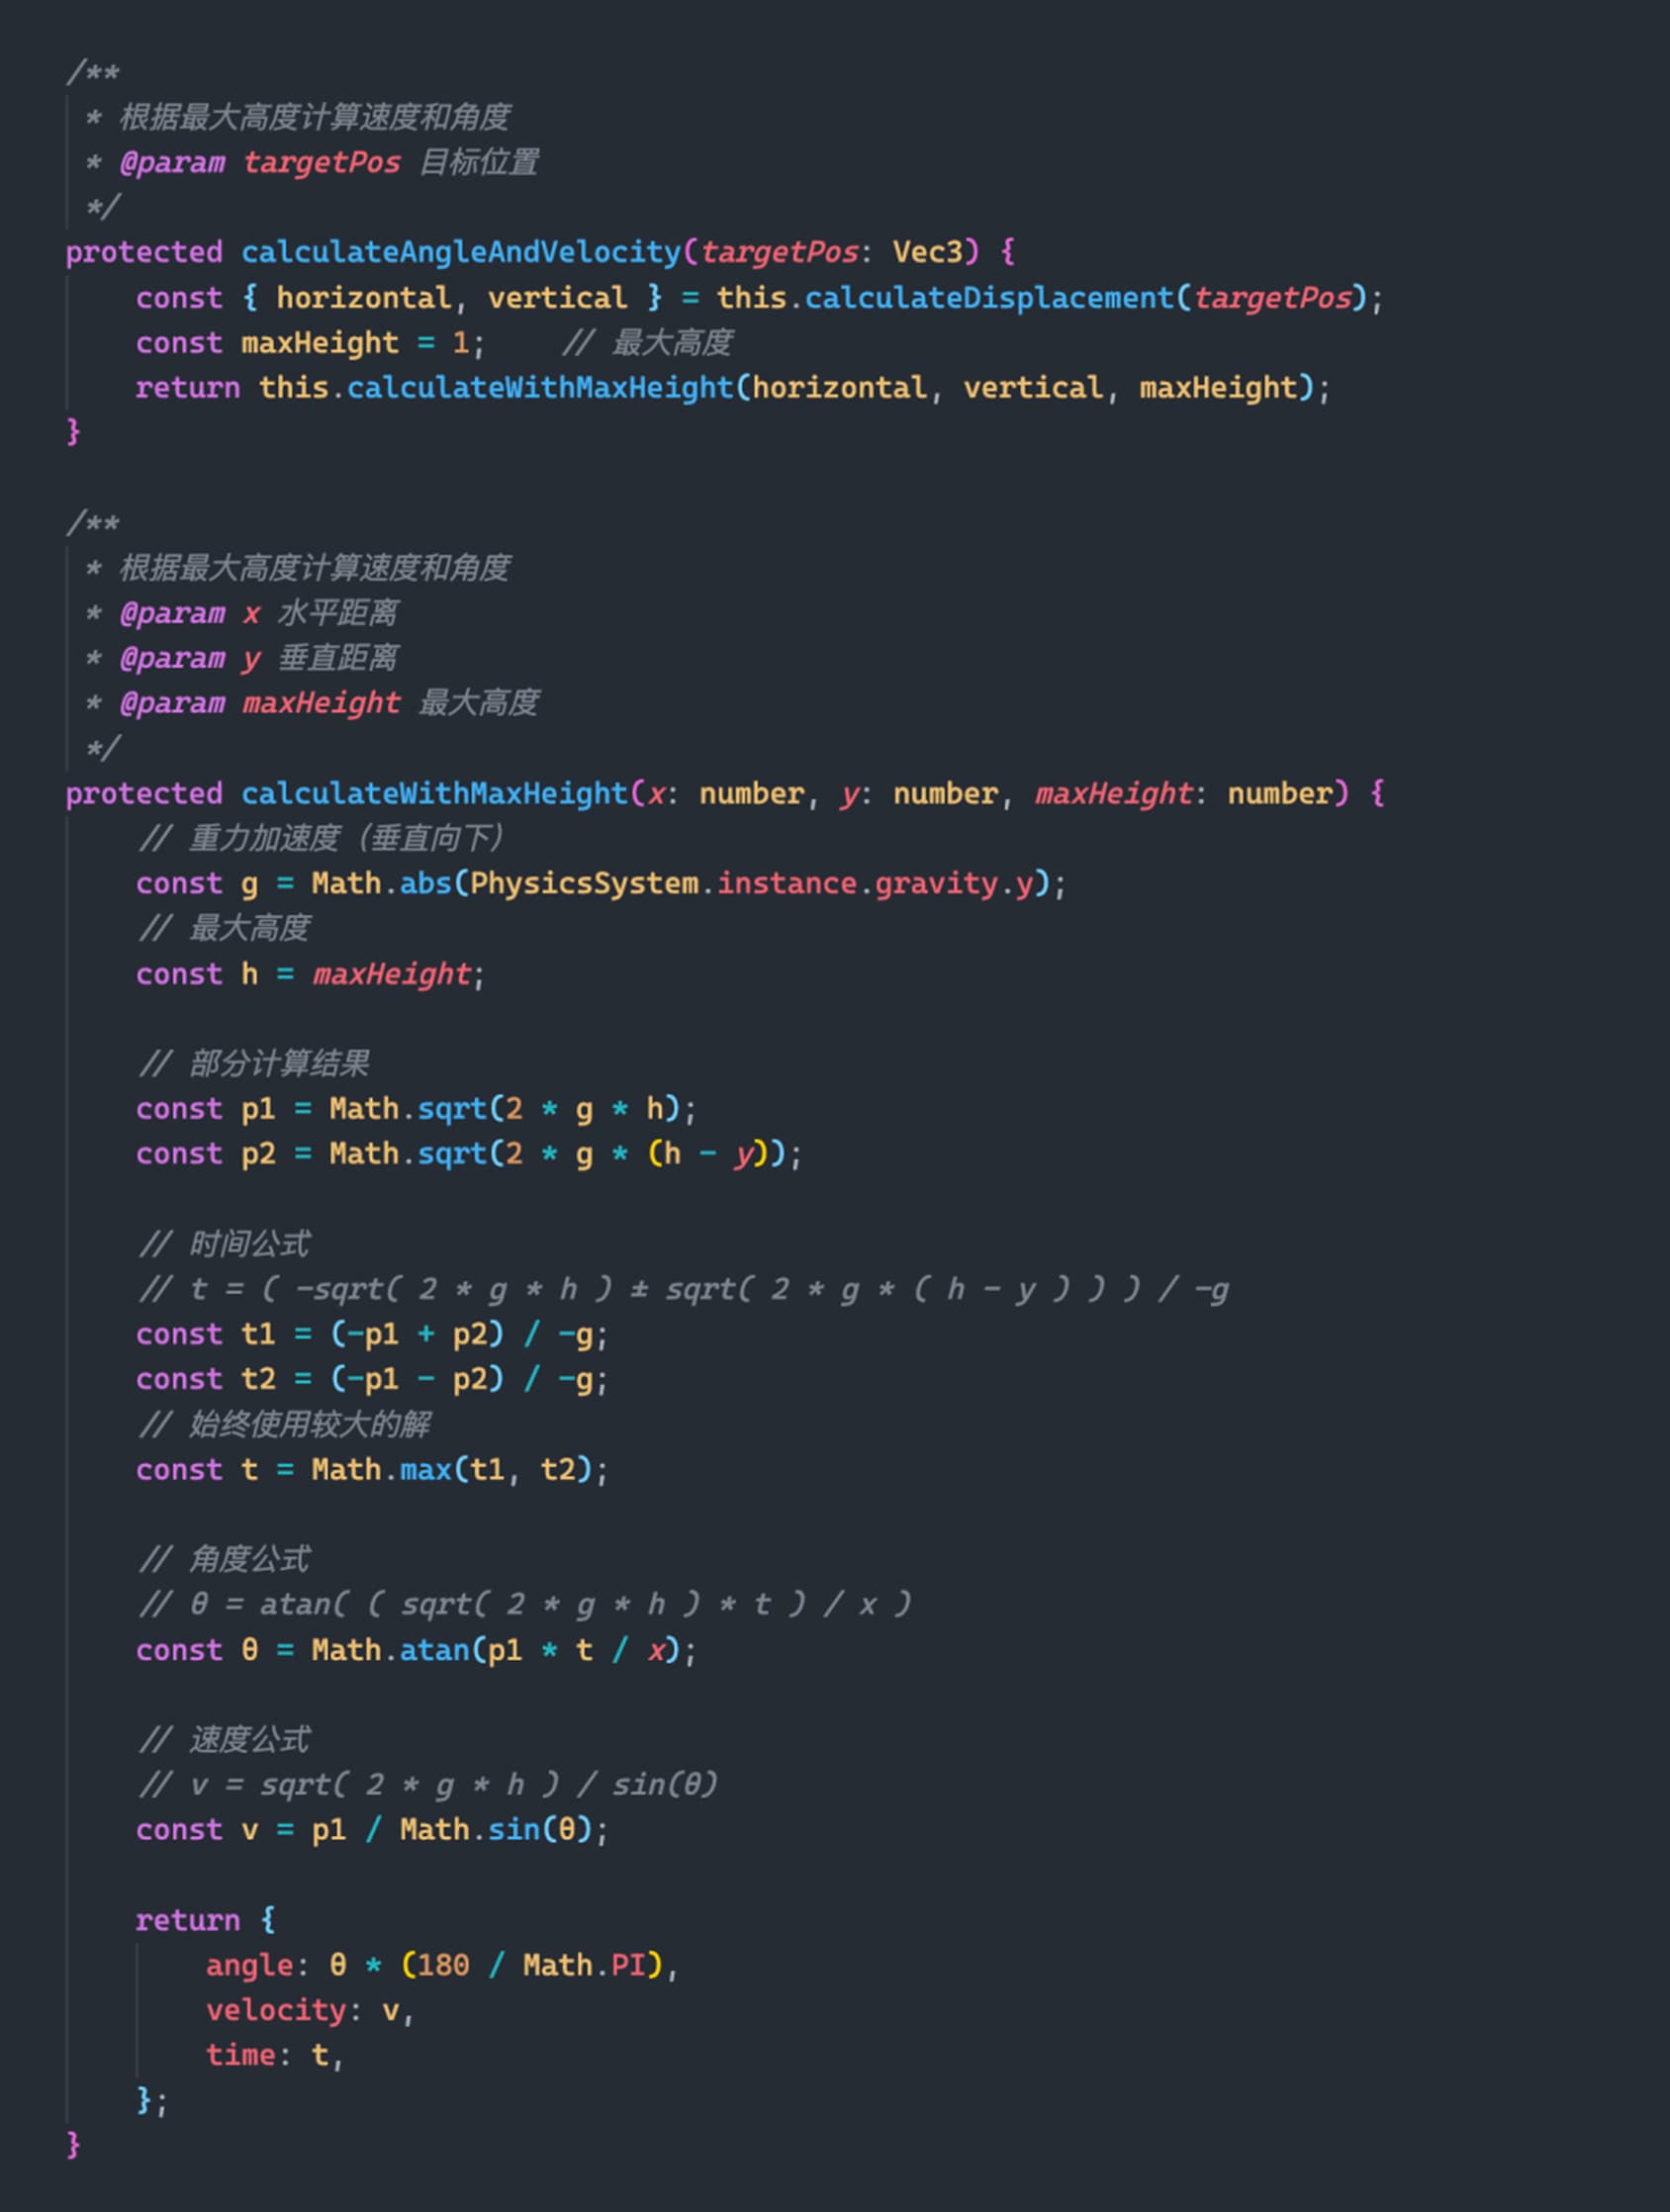
Functions for calculating angle and velocity
The cannon calculates the initial angle and initial velocity based on the target position when aiming.
Aiming function of the cannon
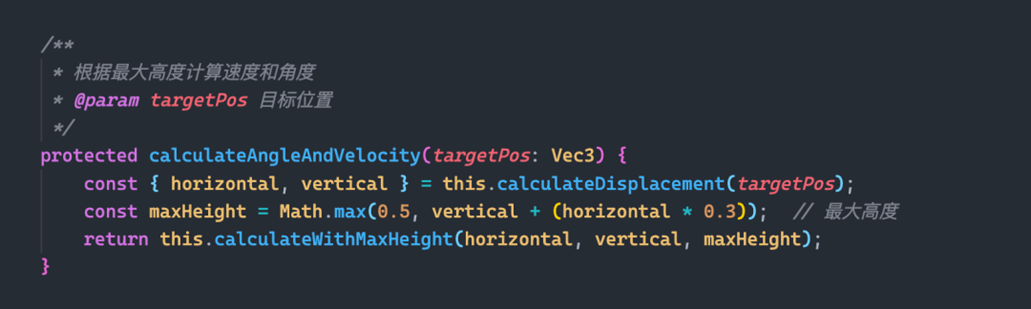
In the calculateAngleAndVelocity function, we set the maximum height as 1 .
![]() Let’s take a look at the actual effect first:
Let’s take a look at the actual effect first:
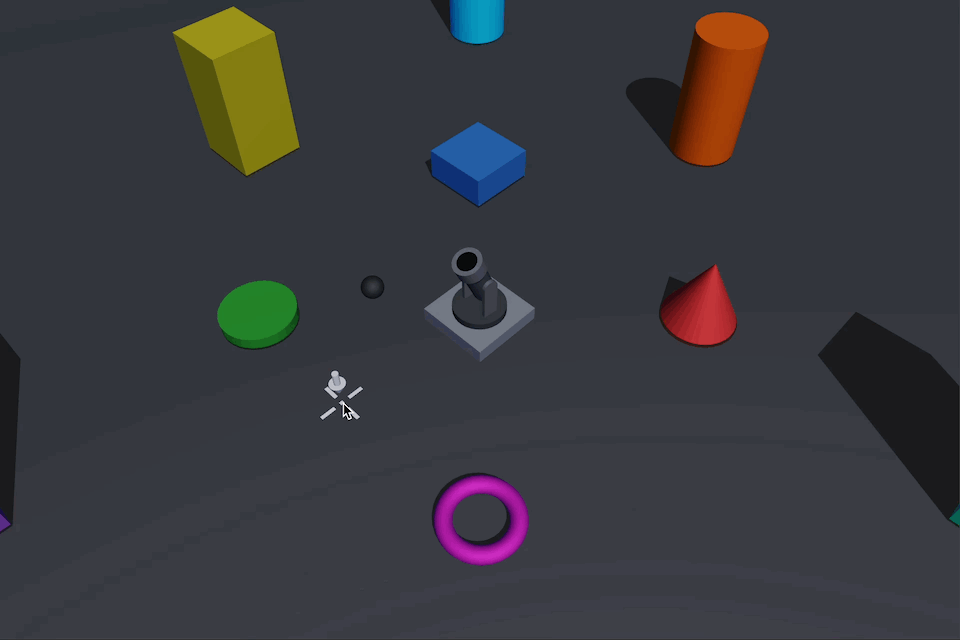
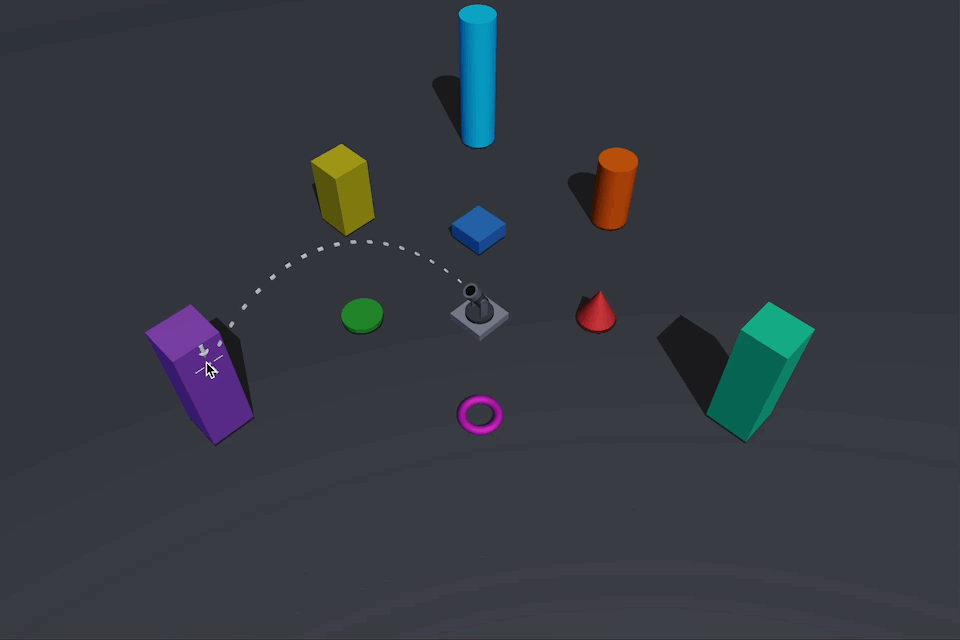
Cannon Free Mode 1
![]() There still seems to be a bit of a problem though, when we position the target above the orange column, which means the vertical distance between the target point and the firing point is greater than the maximum height we’re given, the cannon shoot onto it.
There still seems to be a bit of a problem though, when we position the target above the orange column, which means the vertical distance between the target point and the firing point is greater than the maximum height we’re given, the cannon shoot onto it.
We can fix this. The maximum height we define is based on the launch point. When the maximum height is less than the vertical distance between the target point and the launch point, the shell will definitely not reach the target point.
In addition, the maximum height must not be less than 0. Because the height of the launch point is 0, how can the maximum height be smaller than the height of the launch point?
Therefore, it is best not to fix the maximum height. Since we can directly find the vertical distance and horizontal distance of the target point of the launch point, why not calculate a suitable maximum height based on these two data?
Dynamic calculation of maximum height
![]() Try it again:
Try it again:
Cannon Freemode 2
![]() Perfect!
Perfect!
So far, we have successfully realized various shooting functions of the cannon!
Shell trajectory
![]() It’s not over yet!
It’s not over yet!
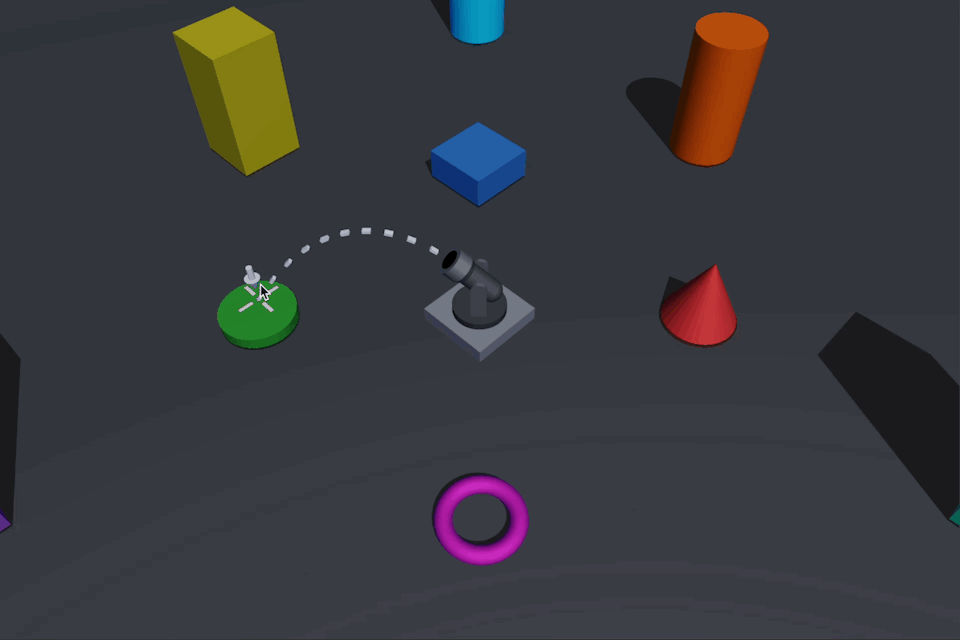
When we know the projectile’s launch point, target point, initial angle, and initial velocity, we can also draw the projectile’s trajectory.
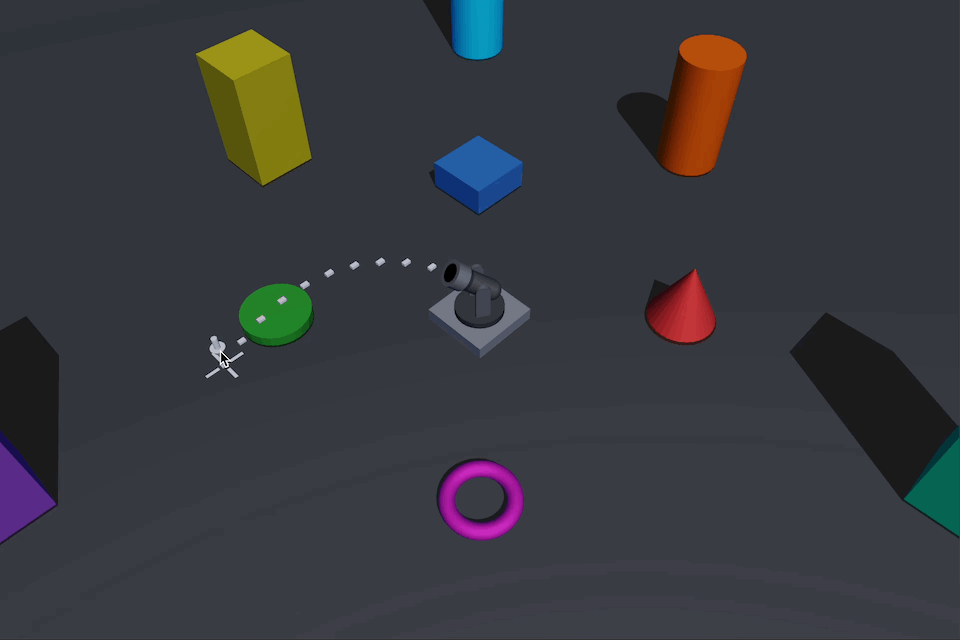
like this:
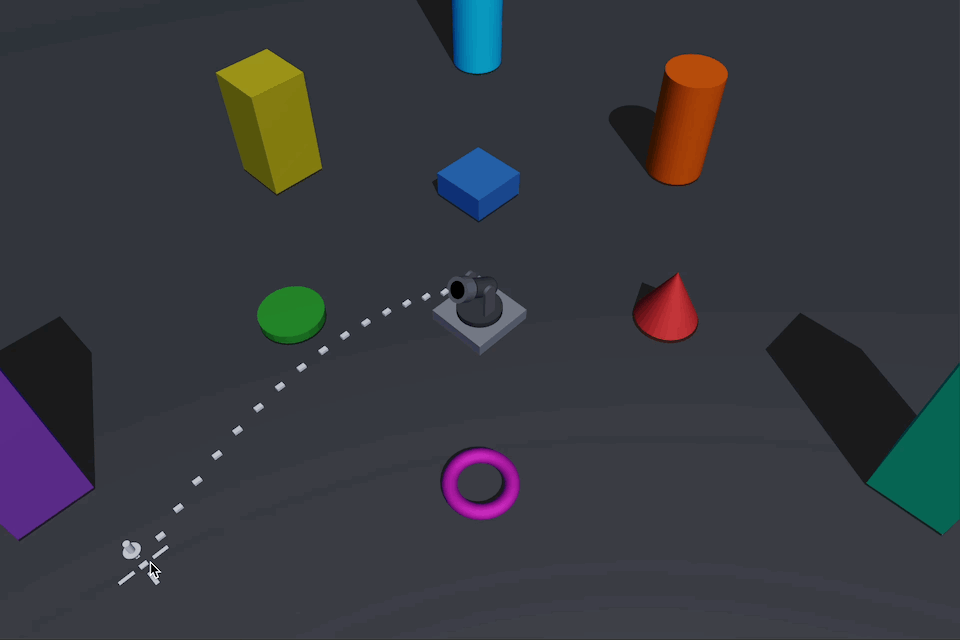
draw ballistics
Isn’t it great!
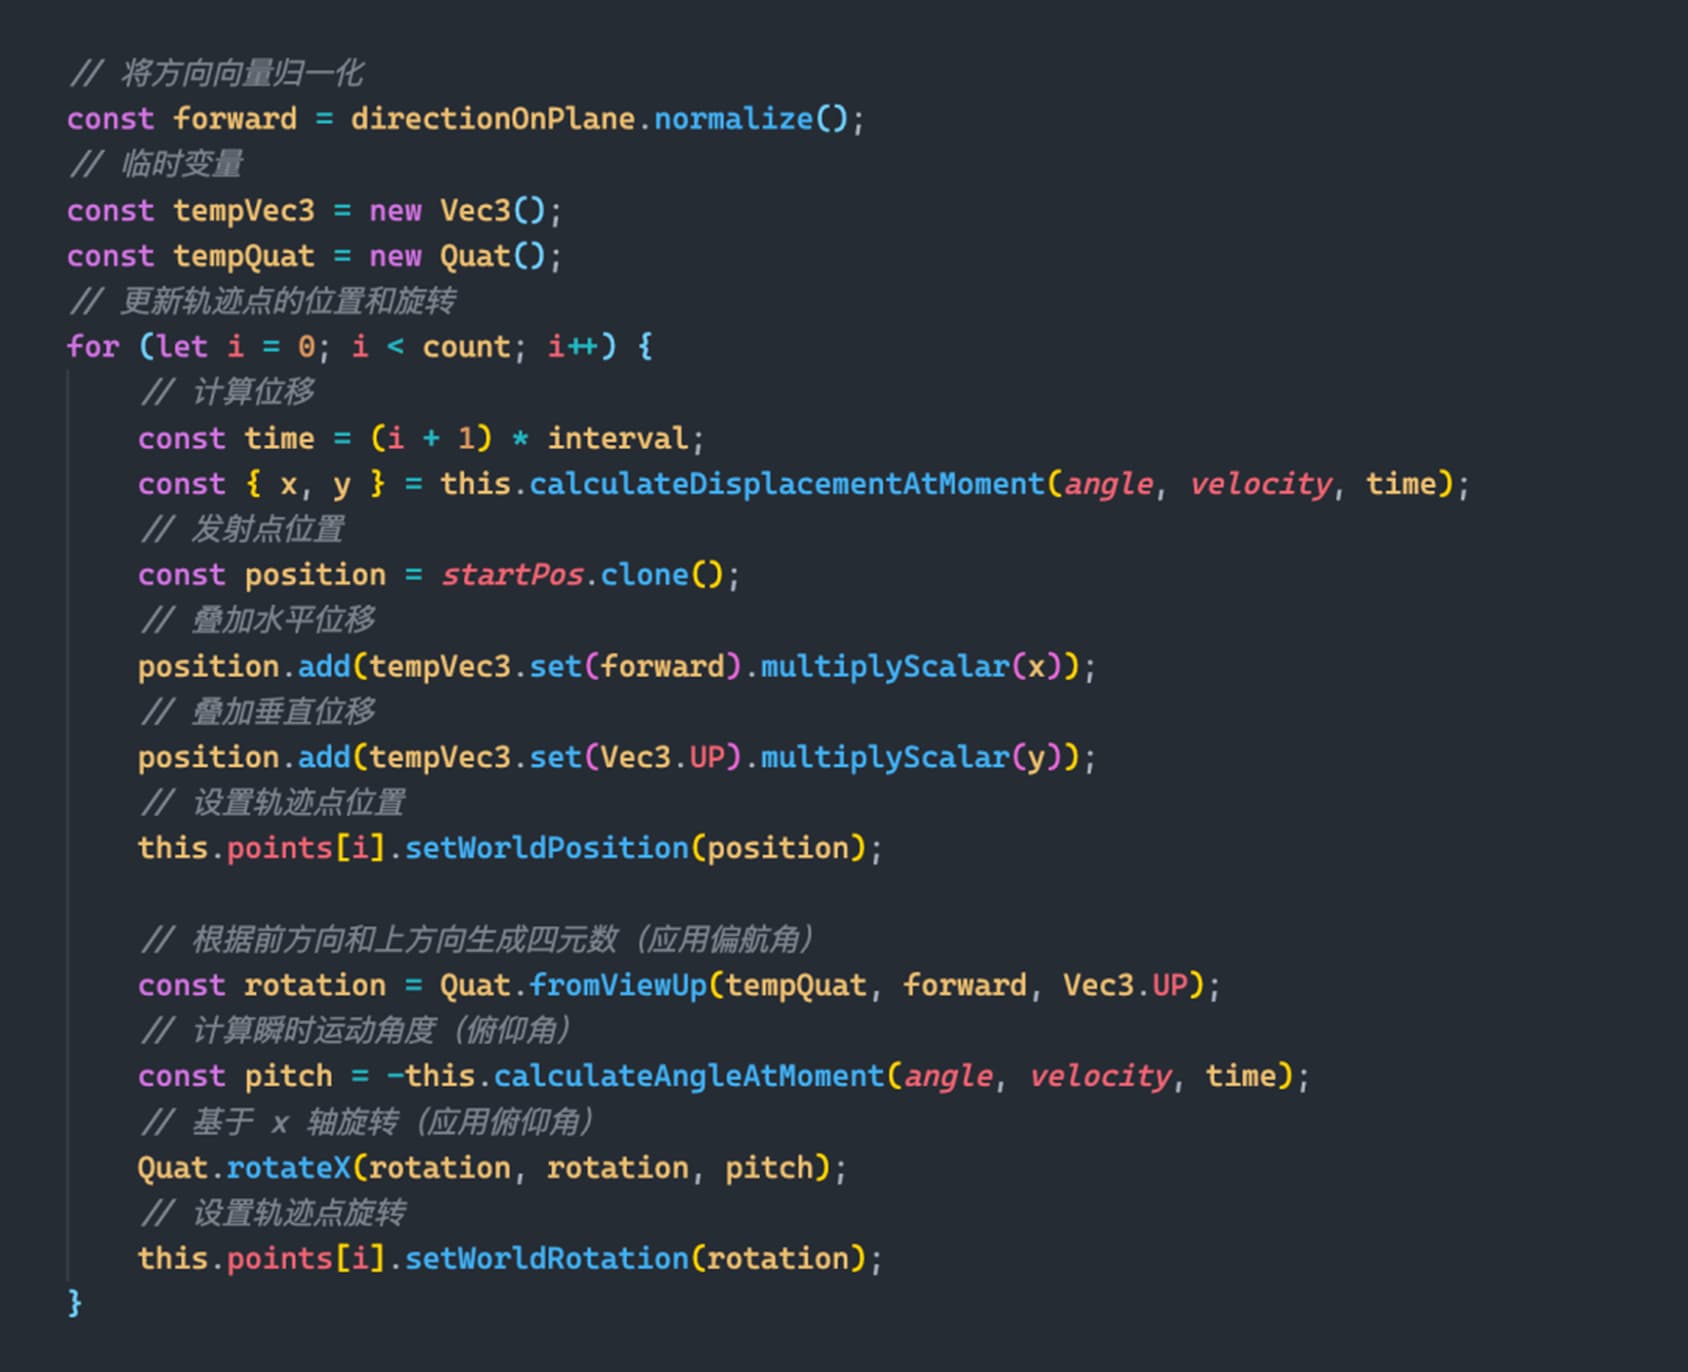
track point generation
Compared with the previous content, this implementation is straightforward, directly on the formula:
Yep, still them.
According to the “horizontal displacement formula” and “vertical displacement formula,” we can calculate the horizontal and vertical displacements at any time during the projectile’s movement.
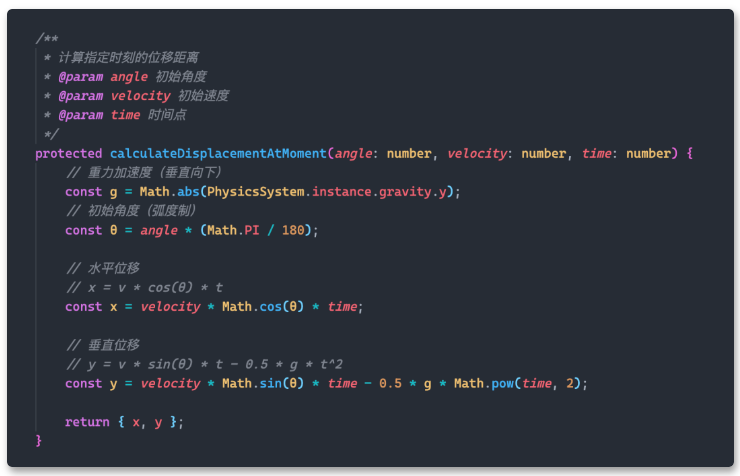
A function to calculate the displacement at a specified time
According to the “horizontal displacement time formula,” we can calculate the total time of the projectile from the launch point to the target point.

Function to calculate the total time
We generate several trajectory points, calculate the time interval between trajectory points according to the total time of movement, traverse all trajectory points, calculate the displacement at the corresponding moment of each trajectory point, and finally set the position of the trajectory point.
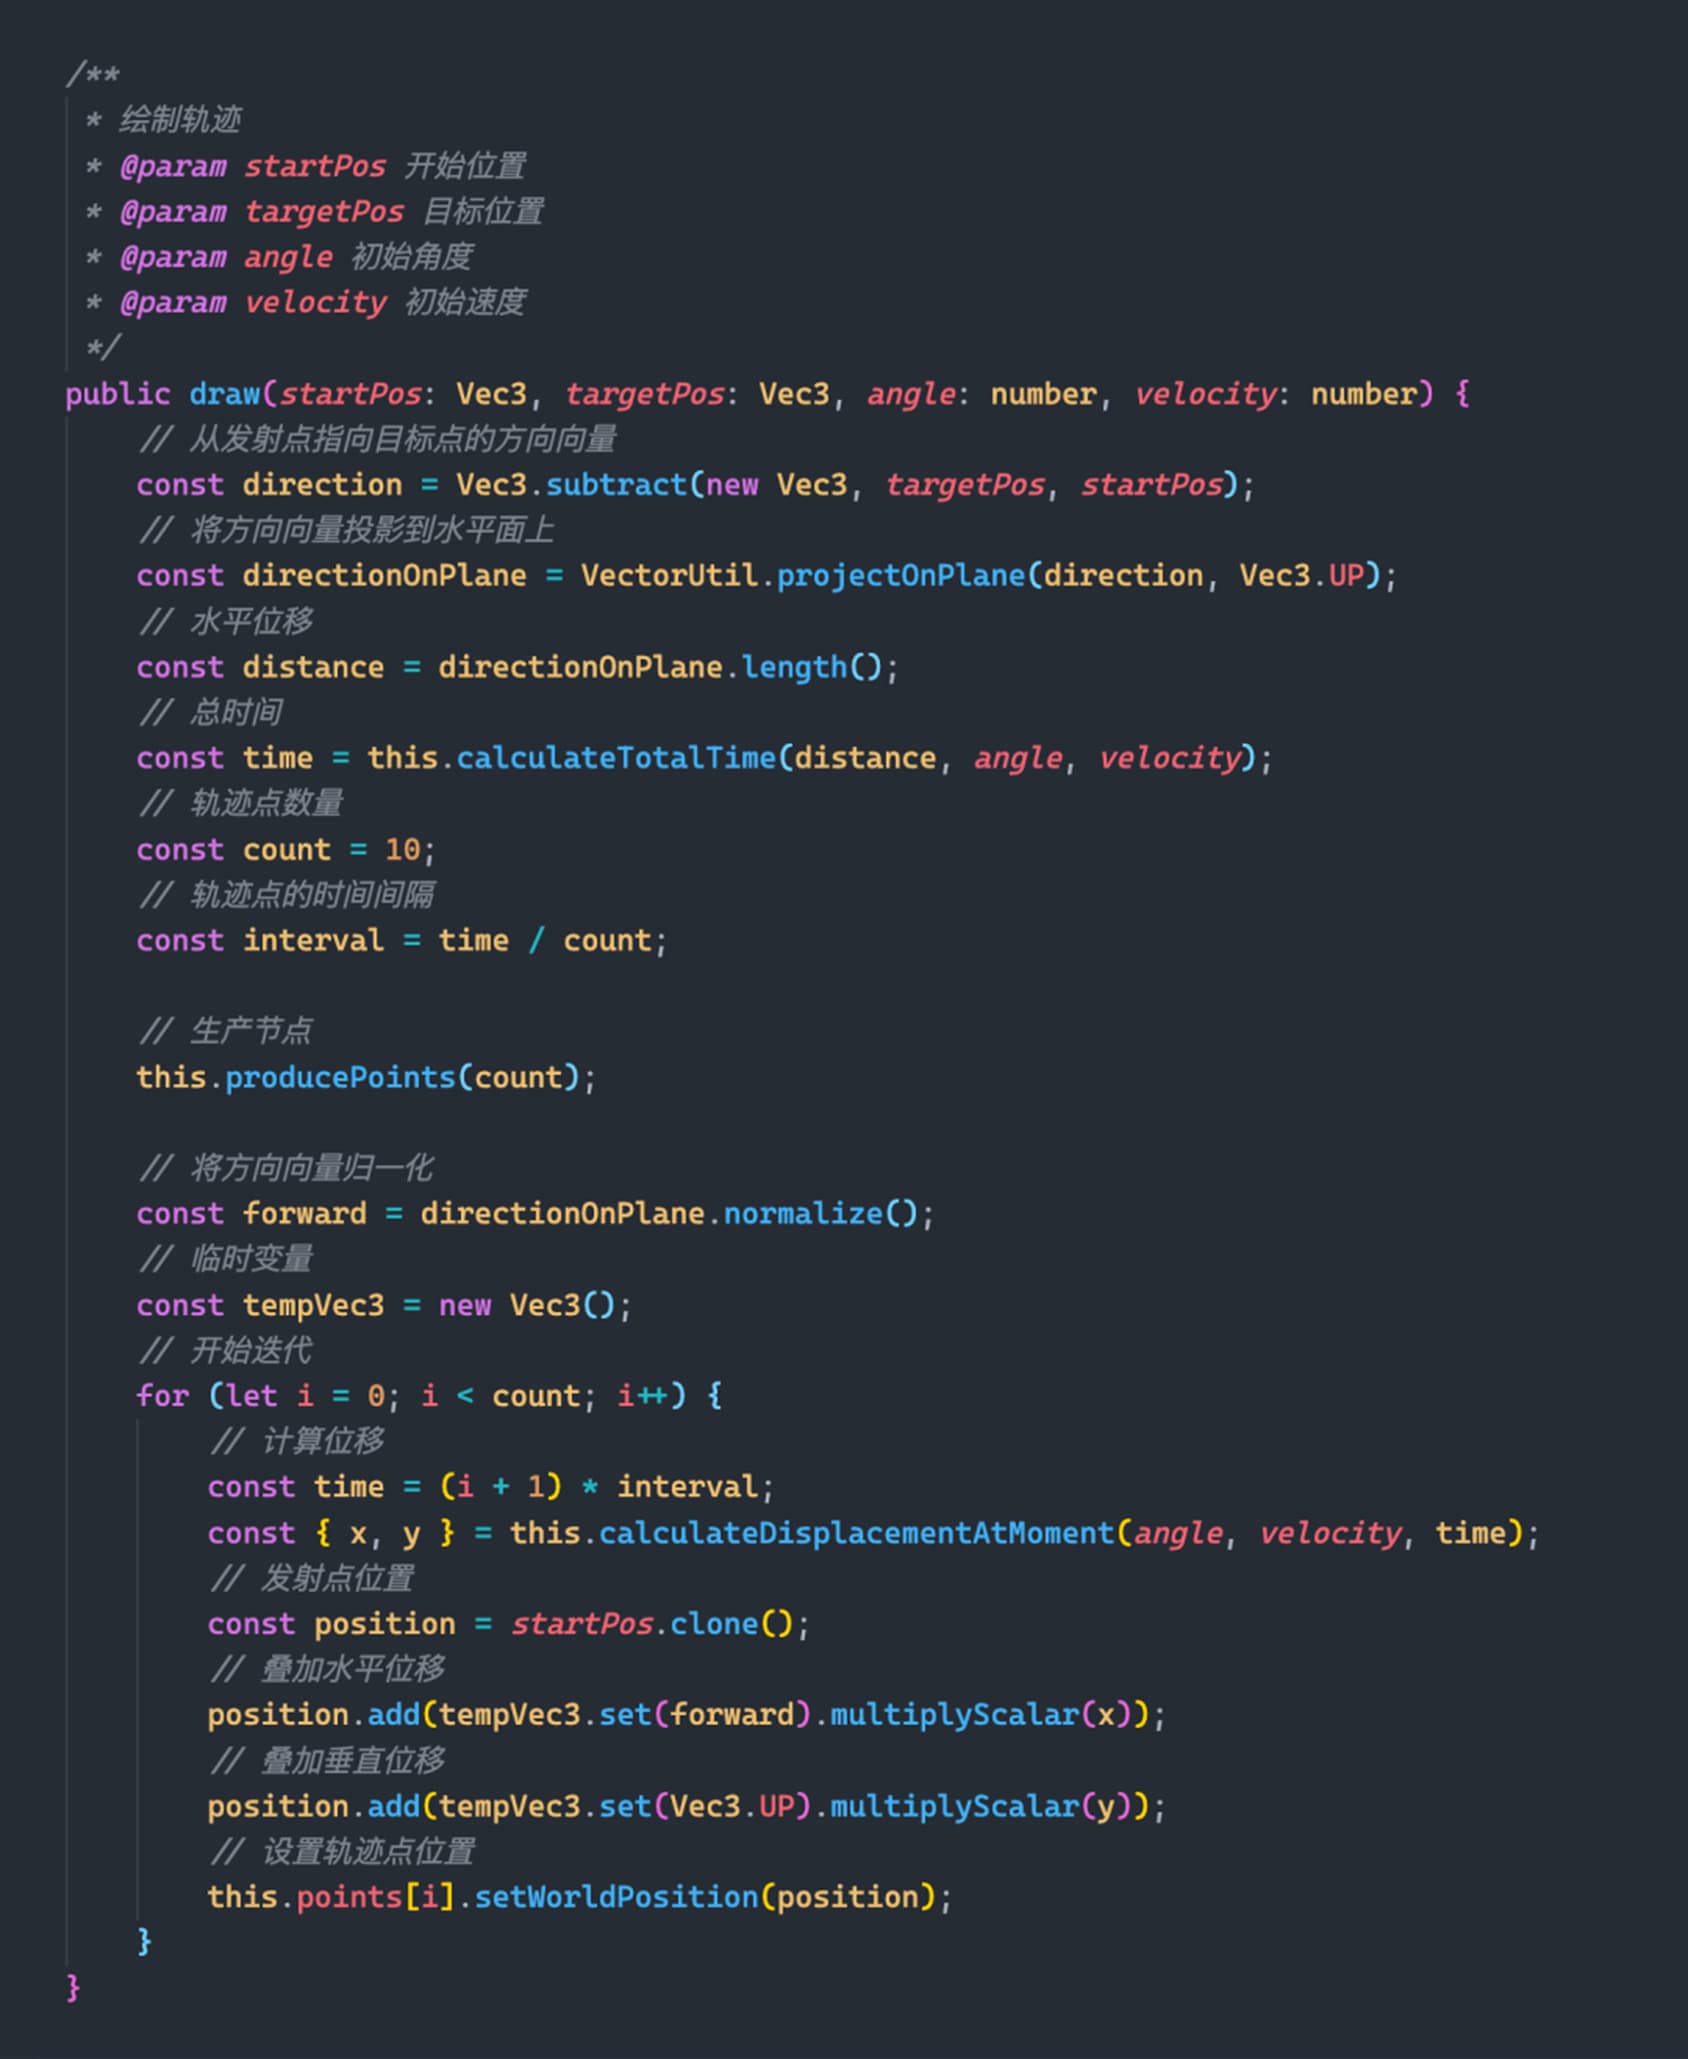
Function to draw ballistics 1
I used a small white cuboid as the track point here. After batch processing is enabled, only one Drawcall is needed to draw the entire track, and there is no need to worry about performance issues.
![]() Check out the effect:
Check out the effect:
Draw ballistic 1
It can be seen that the generated trajectory is basically correct, but there are still two problems to be solved.
Number of track points
The first problem is that the number of trajectory points is fixed, and the farther the target point is from the launch point, the more distant the interval between the trajectory points is, which is very sparse and not very beautiful.
For this problem, we can decide the number of trajectory points according to the horizontal distance between the target and launch points.
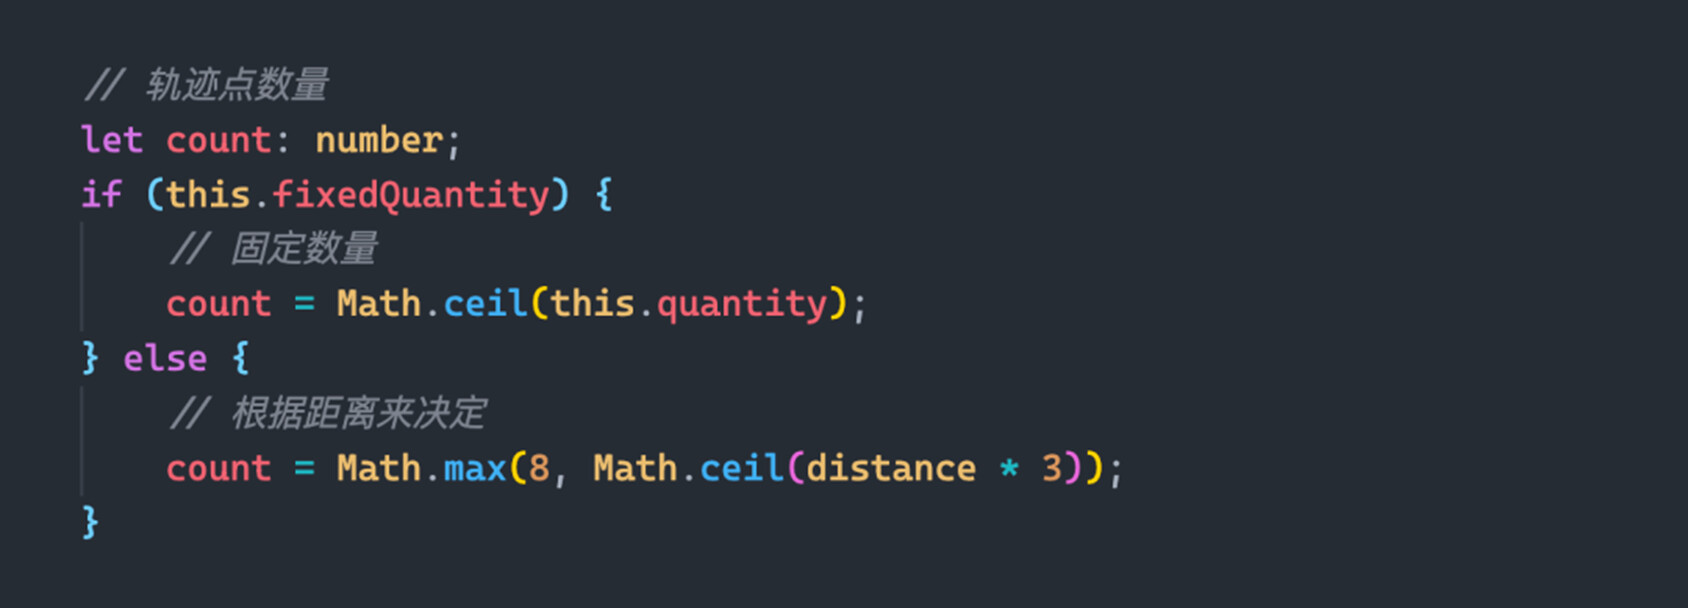
Function to draw ballistics 2
![]() Effects:
Effects:
Draw Ballistics 2
For the situation where the number of trajectory points is not fixed and changes frequently, it is recommended to use a Node Pool to optimize runtime performance and avoid creating and destroying a large number of nodes frequently.
Track point rotation
Another problem is that although the position of each track point is correct, their rotation does not change, which looks weird.
In fact, at every moment in the projectile’s motion, the object’s direction of motion changes. So we hope that the orientation of each trajectory point should also correspond to the direction of movement at its corresponding moment.
Instantaneous motion angle of projectile motion
We mentioned at the beginning that the horizontal velocity of the object in the motion of the projectile is always equal to the horizontal component of the initial velocity, and the formula can be obtained:
![]()
The vertical velocity of the object is equal to the vertical component of the initial velocity (vertically upward) minus the velocity given by gravity (vertically downward), and the formula can be obtained:
![]()
With the velocity components in the horizontal and vertical directions, the direction of the actual velocity can be found:
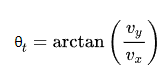
Turn the formula into code:
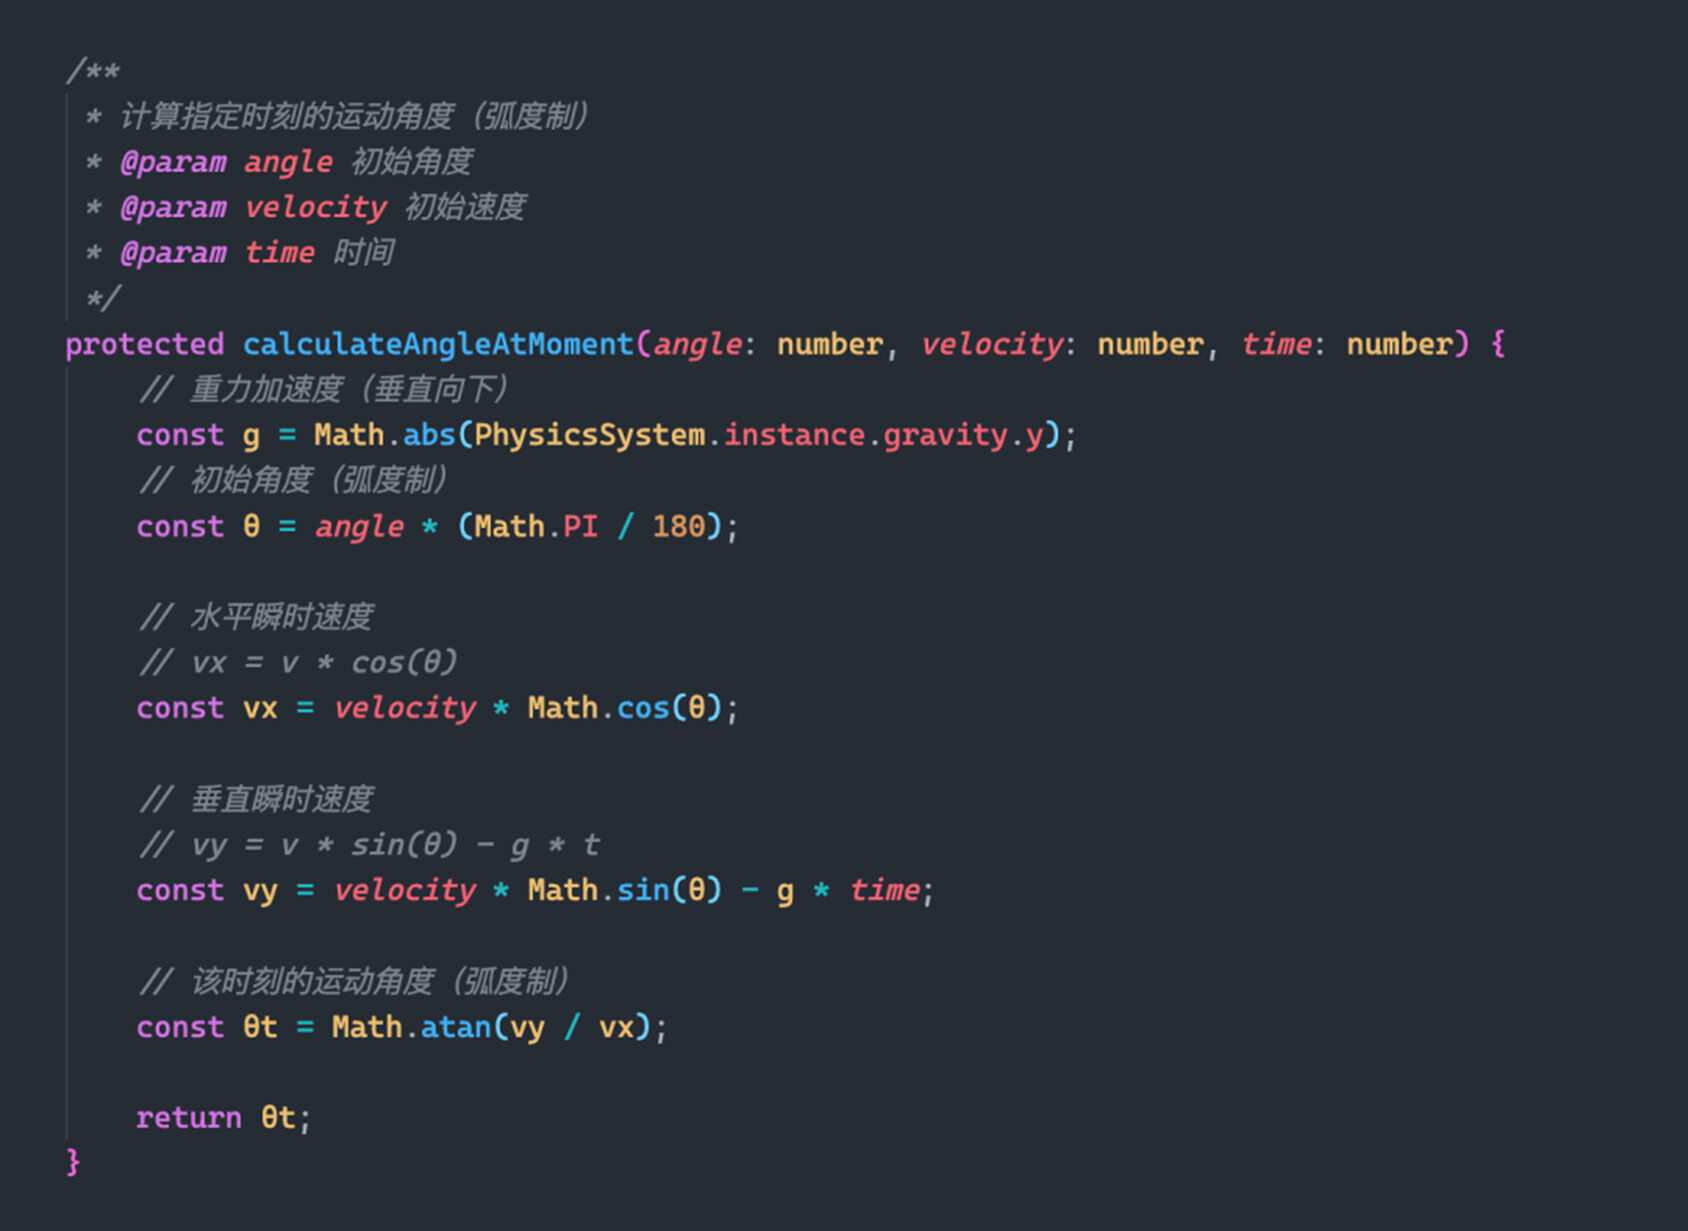
A function to calculate the instantaneous angle of motion
Good, now we can calculate the angle of motion at any time, so how do we apply this angle to objects in three-dimensional space?
In three-dimensional space, the order is very important for rotations between different axes, and different orders will give very different results.
In our case, we need to orient the trajectory point “towards” the target (yaw angle) before applying the instantaneous velocity direction (pitch angle).
In-game development, we can use quaternions to achieve multiple rotations:
- Generate quaternions based on forwarding and up vectors
- Apply pitch angle based on x-axis rotation
Actual code:
Function to draw ballistics 3
![]() Final effect:
Final effect:
draw ballistics 3
![]() Wonderful!
Wonderful!
Aim cursor
Finally, we append a minor feature to the cursor.
Add a requirement
This article briefly introduces how to obtain the three-dimensional world coordinates of screen clicks through ray casting in the “Click Interaction and Ray Casting” section.
In addition to the coordinates of the hit point, the result returned by ray casting also includes the normal of the hit surface .
We can use this normal as the direct up direction of the cursor so that the cursor is always perpendicular to the surface where the hit point is.

The cursor is perpendicular to the surface of the object
Adapt to the target surface
But only a normal can’t determine the rotation of an object!
A three-dimensional Cartesian coordinate system has three mutually perpendicular axis vectors, and at least two mutually perpendicular vectors are required to construct a three-dimensional Cartesian coordinate system (the third axis can be obtained by vector cross product).
![]() So, we also need to find a vector that is perpendicular to the normal of the target surface. In theory, a vector has an infinite number of vectors that are perpendicular to it. How can this be adjusted?
So, we also need to find a vector that is perpendicular to the normal of the target surface. In theory, a vector has an infinite number of vectors that are perpendicular to it. How can this be adjusted?
Just when I was burying my head in work, I came up with a very tricky plan on a whim:
- Generate a direction vector using the target position and the cannon position
- Projects the direction vector onto the plane represented by the target face normal
- After normalization, a unit vector perpendicular to the normal of the target surface is obtained
- The object’s rotation can be determined by the unit vector and the normal of the target surface.
Quickly implement it with code:
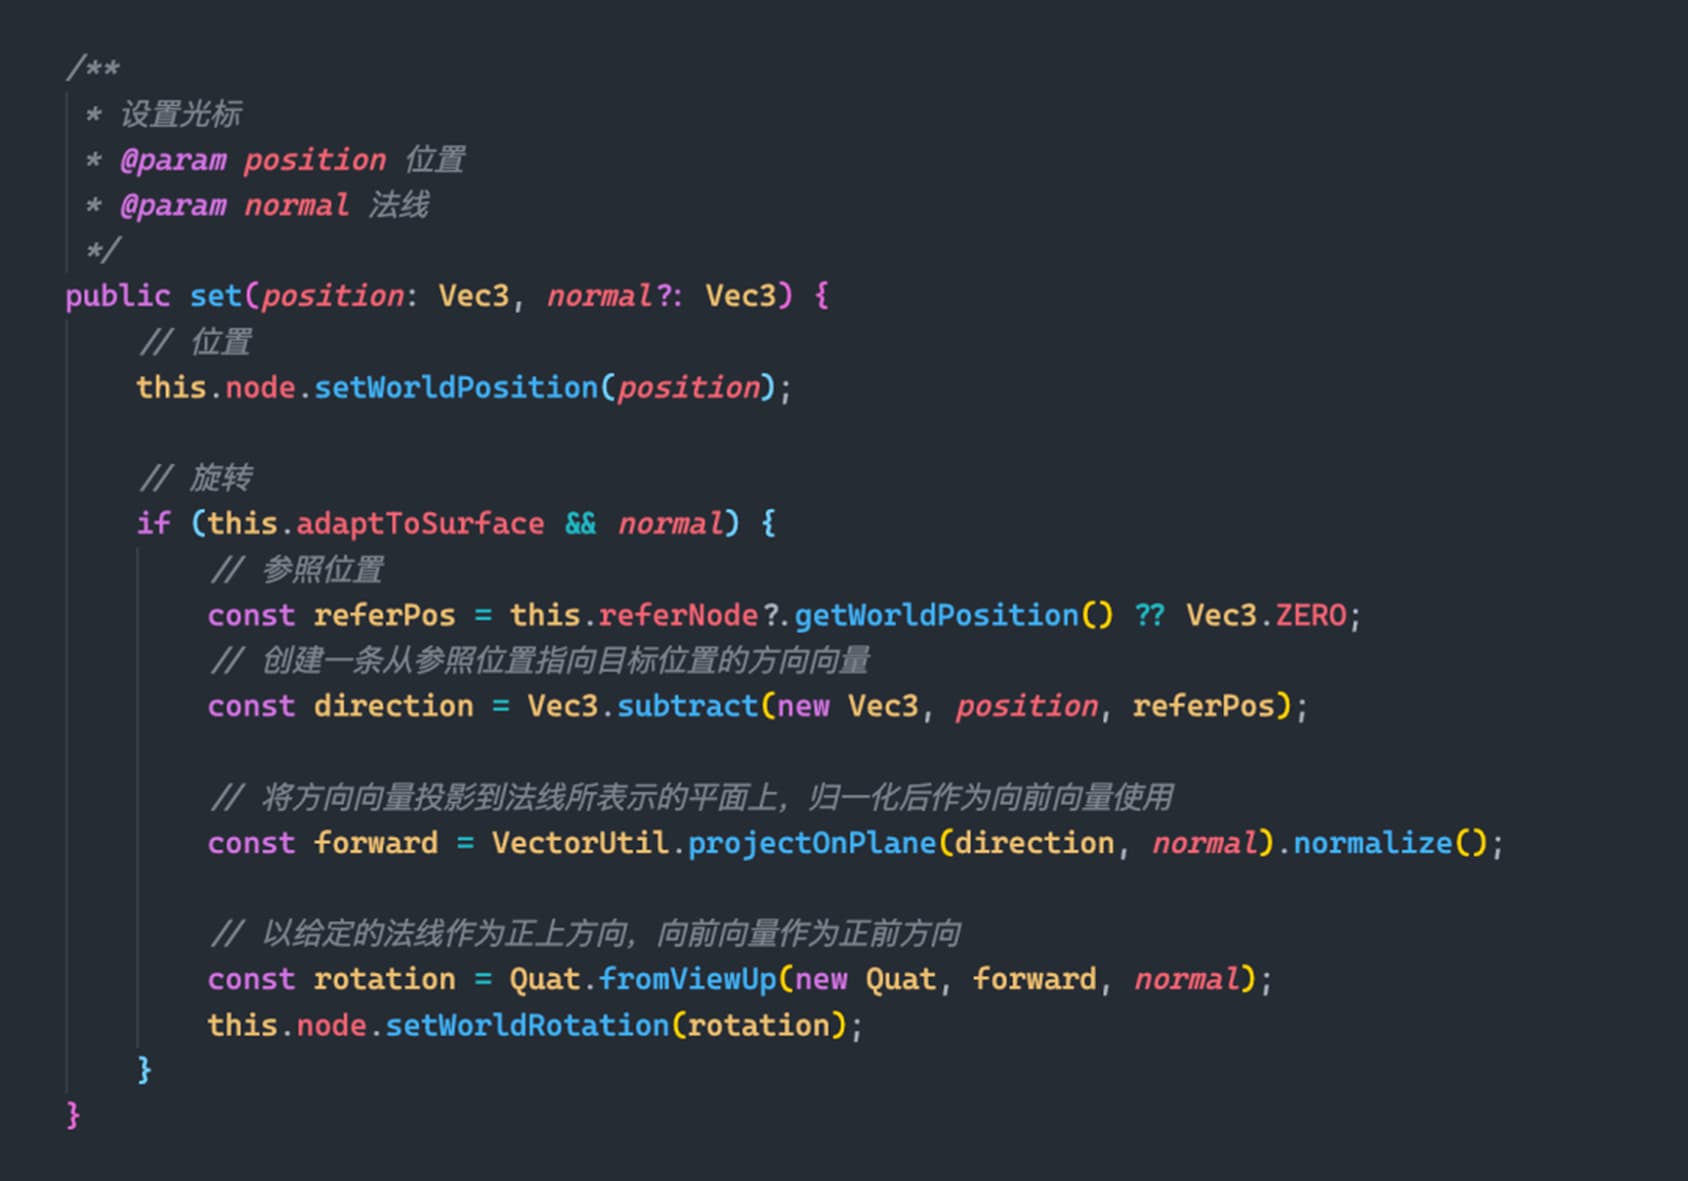
Function to set the cursor
![]() Check out the effect:
Check out the effect:
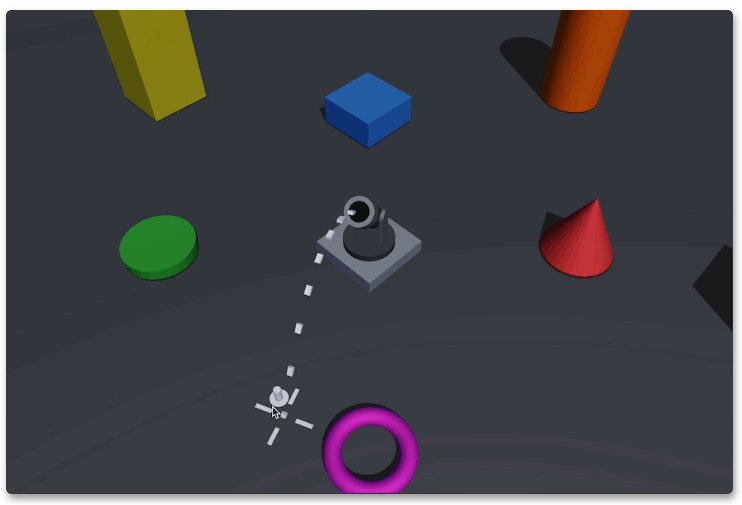
Cursor’s fit to surface mode (cross)
Our cursor will always be perpendicular to the object’s surface, and the front of the cursor will be as far in front of the cannon as possible.
![]() After replacing the crosshair with a circle, there is no sense of issue on surfaces:
After replacing the crosshair with a circle, there is no sense of issue on surfaces:
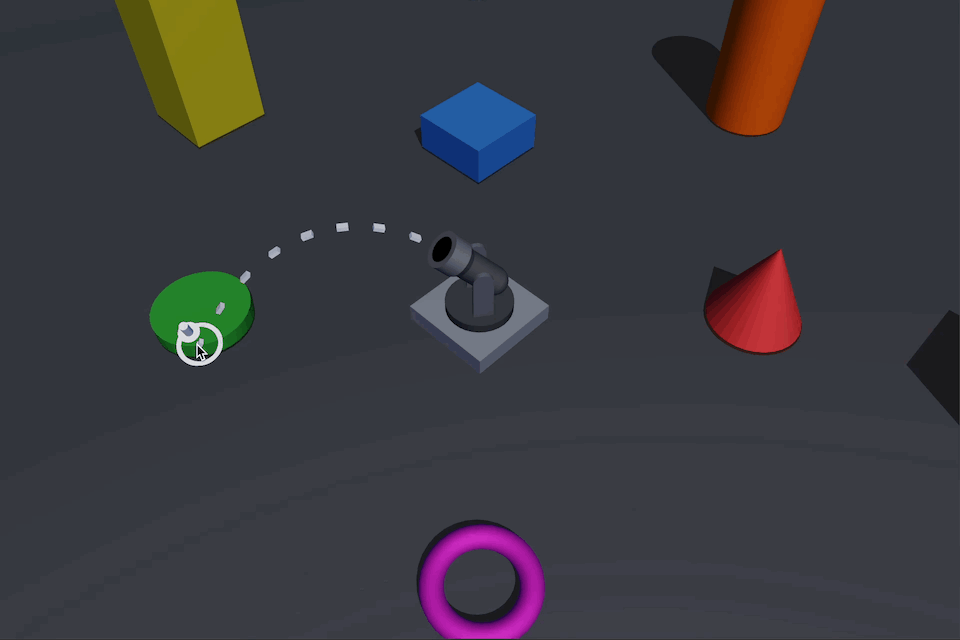
Cursor’s adaptive surface mode (circle)
![]() Tsk tsk tsk, I’m such a clever little dev~
Tsk tsk tsk, I’m such a clever little dev~
The text is here. I don’t know how to summarize it. If you don’t understand it, just read it again~ ![]()
References
Projectile motion
Quadratic equation