
Analysis of Cocos Creator’s web/native multi-platform Spine replacement scheme, with Demo source code
Introduction
Spine is a common implementation scheme in game development. This time, Mr. Feather, a Cocos expert who shares on our Chinese forums, will introduce his exploration and selection of overall dressing and partial dressing implementation schemes.
Operating environment
Cocos Creator 3.5.2 web/native
Need
In 2D/3D games, animating clothing is a common requirement. In 2D games, Spine is a powerful and widely used skeletal animation tool, so Spine skins is a topic that many developers cannot avoid. According to Feather’s understanding, according to the needs and implementation methods, the clothing can be divided into:
- Overall dress up
- Partial dress up
There are different implementation schemes for overall replacement and partial replacement, among which partial replacement can be divided into:
- Spine Clothing Accessory Replacement Skinning
- External Texture Skinning
- Socket hanging point skinning
The specific choice of which scheme is more appropriate needs to be comprehensively considered from the aspects of the programmer and art maintenance convenience, performance bottlenecks, project requirements, etc.
First, based on Cocos Creator 3.5.2, Feather will introduce their pros and cons, selection, implementation methods, and pitfall avoidance process of various schemes in this article.
Secondly, in the implementation process, it is also necessary to consider the differences between the web and native platforms for adaptation. Feather will also share with you the difficulties and solutions encountered during the adaptation process on different platforms (web, mini-games, native).
Principles
Basic Concepts of Spine
Spine is an implementation of 2D skeletal animation, similar to DragonBone. Spine allows you to design bone motion, keyframe motion, and skinning information at runtime. Spine will automatically calculate the data between keyframes from the bone drive slot and slot drive attachment (and important attachment information is mapped) to move, rotate, display, deform, etc.
Compared with frame animation, skeletal animation can perform animation interpolation based on data objects at runtime. Generally speaking, it has the advantages of smaller size, fewer art resource requirements, better animation flow effects, animation blending, and programmable control of bones.
Swapping is essentially swapping the attachment map on the slot. The texture source can be the texture in the Spine export file or the texture in Cocos Creator. The overall clothing and skin attachment dressing in this article use self-contained textures for dressing. As the name suggests, the external texture uses the texture in Cocos Creator for skinning.
As for the hanging point, it is understood that a bone is chosen as hanging point A, and hanging point A is the parent of node B in Cocos, which will change as A moves, rotates, etc. (these properties are known, for now, more properties are uncertain, check the documentation, read the engine source code and test to verify if the documentation does not specify). Hang points are often used for weapon changes or local changes that can be done using hang points when external mapping is not readily available.
Simple schematic diagram of Spine
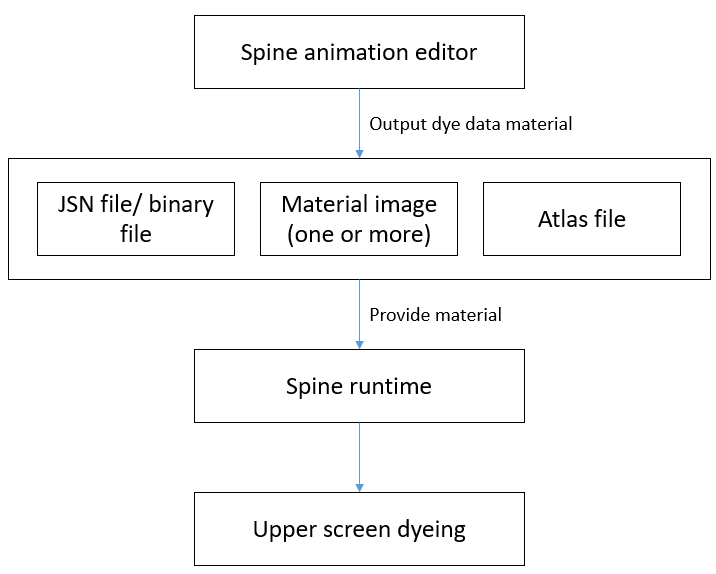
(Source: Author: Zeng Peisen)
Spine rendering flowchart
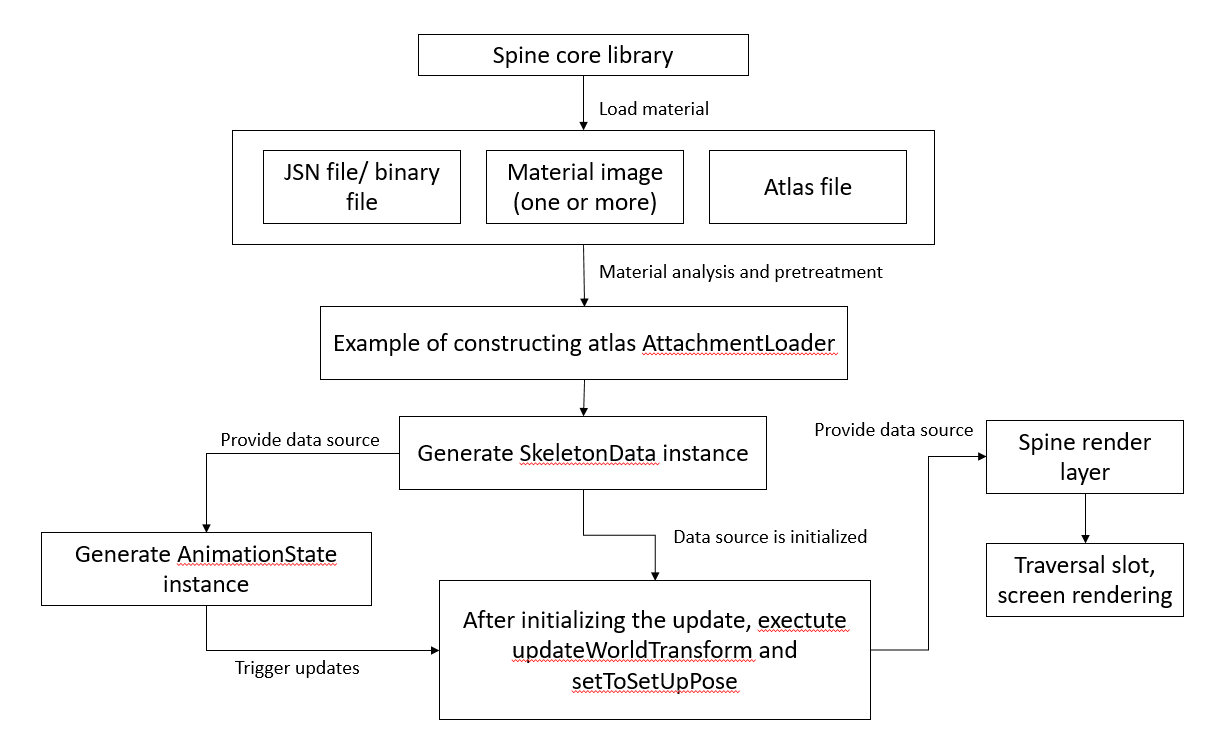
(Source: Author: Zeng Peisen)
Analysis and Implementation
Overall dress up

Overall dress up
- Advantage
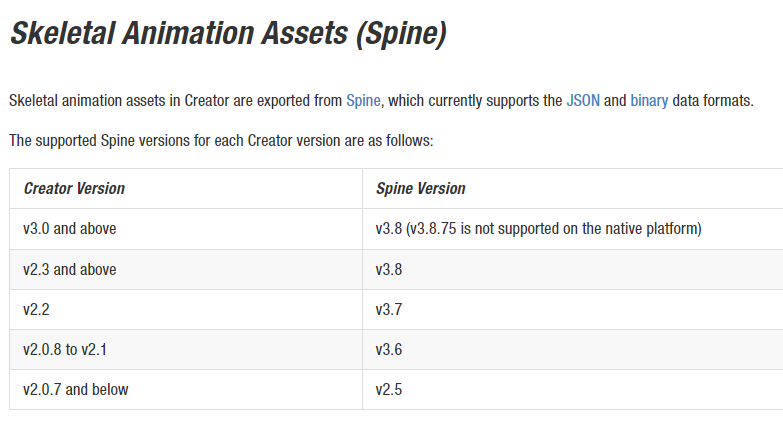
The implementation is relatively simple—there is no need to modify the engine, and the three ends are unified. After setting up the skin in the Spine editing software, you can call the API based on the runtime library at runtime. The integration of the runtime library Cocos Creator has also been completed for us. The supported versions are as follows. Developers who need to upgrade it for themselves can also download and replace it from the official Spine repository.
- Shortcomings
Unable to meet the needs of local skin changing, if there are m parts that need partial skin changing, and each piece has n types of skin, and the skin is switched by naming combination to achieve partial skin changing, complete skins of mxn are required to complete coverage. For all skins, when m and n are a little large, the maintenance for all combinations will be very troublesome, and the cost will be high. At the same time, with the increase of m and n, the size of the atlas will be uncontrolled, which will consume memory and slow down loading speeds.
Therefore, the overall skin reskinning is more suitable for situations where only the entire skin needs to be changed or only two or three skins combined in two or three parts.
Creation:
- Create skins in Spine animation editing software and choose to take effect
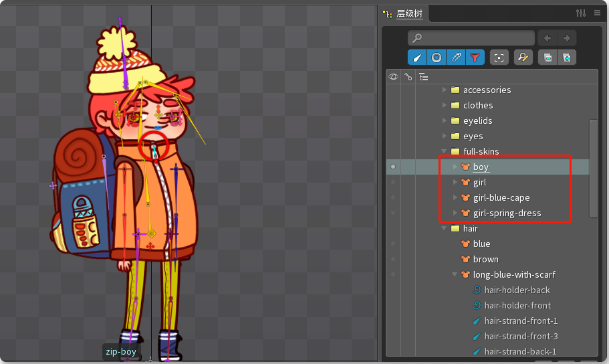
- And set a skin placeholder on the part that needs dynamic skinning, and put the texture that needs to be displayed for the effective skin under the placeholder. This part of the content should be for developers of animation production and needs more attention. But the coding development also needs a general understanding of the mechanism. For more information on action engineering content production, please refer to Spine’s official instructions: Spine User Guide - Skin
- Run-time program control, just call it setSkin(skin_name:string)
    @property({
        type: sp.Skeleton
    })
    role: sp.Skeleton;

    cur_skin_name = "full-skins/girl-spring-dress"
    start() {
        this.role.setSkin(this.cur_skin_name);
    }
    onSetFullSkin(event: TouchEvent, data: string) {
        if (data != "") {
            this.role.setSkin(data);
            this.cur_skin_name = data;
        }
    }
At the same time, the overall implementation of the dressing can also refer to the official introduction documentation, also written in great detail via the Spine Skeleton component reference.
Local dress up
Partial replacement - accessories replacement
Spine attachment replacement refers to creating a skin (referred to as SkinPart) for a certain part of Slot A in the Spine project and recording the skin placeholder. At runtime, by querying the attachment in SkinPart (referred to as attachmentPart), use the partial attachment (attachmentPart) at the corresponding position of the skin and replaces the attachment (attachmentFull) under SlotA in the whole body skin.
- Advantage:
- Skin combinations can be achieved as well as partial dressing combinations.
- When you change a part of Spine, you can see it in the project, and the art handles the visual effect making it more controllable.
- Compared with the local replacement method of external textures, the atlas of the components can participate in the map set of Spine, reducing DrawCall.
- There is no need to modify the engine, the native and web performances are unified, and the split engine function will not be unavailable on the mini game side because of the modification of the engine, which will increase the time cost of the game loading.
The reasons for the limitations of the existing DrawCall for external texture replacement will be introduced in the follow-up content.
- Shortcoming
- Skin maps that are not currently in use cause unnecessary memory waste, especially when the number of spines increases.
- The skin’s texture cannot be shared with the node sprite in the Cocos Creator scene, which causes a memory waste in the scene that needs to be shared. At the same time, the instantiation speed will also be slower.
- As the number of parts and skins increased, the Spine project gradually became bloated, difficult to manage, and not conducive to multi-person collaboration.
- Accomplishment
- Create a whole body skin in the Spine project, create n partial skin SkinParts for each part that needs to be skinned, and export the Spine.

- Query the attachments in the SkinPart of a partial skin (referred to as attachmentPart) at runtime, and replace the attachments (attachmentFull) under SlotA in the whole body skin.
  /**
    * @param skinName Name of the skin of the part being replaced
    * @param slotName The name of the slot of the part to be replaced
    * @param targetAttaName  The name of the skin placeholder in the Spine
     */
    changeSlot(skinName: string, slotName: string, targetAttaName: string) {
        //Find  skin item
        let skeletonData = this.role.skeletonData.getRuntimeData();
        let targetSkin: sp.spine.Skin = skeletonData.findSkin(skinName);

        // Find localized under-skin slots and attachments
        let targetSkinSlotIndex = skeletonData.findSlotIndex(slotName);
        let atta = targetSkin.getAttachment(targetSkinSlotIndex, targetAttaName);

        //Find the slots
        let curSlot = this.role.findSlot(slotName);

        //Replace the attachment
        curSlot && curSlot.setAttachment(atta);
    }
Partial Dressup - External Textures
Partial skinning - External textures, as the name implies, do not use Spine to export the textures in the atlas but use Cocos Creator’s texture resources for partial skinning. The image used in the current part and the image to be replaced have no skin deformation, or the two images can use the same skin, and the external image can be directly used for dressing.
- Advantage
- Spine project management is convenient, and there will be no need for a large number of textures to be bound in the Spine animation editing software, which can significantly reduce the workload, improve work efficiency, and save a few hairs!
- More flexible, you can use any texture in Cocos Creator to replace it with program logic
- Save memory and don’t repeatedly load a lot of texture resources that don’t need to be displayed. In the scenario where texture and Spine need to be displayed alternately on the same screen, it is not necessary to load a memory for each Spine and texture.
- Shortcoming
- It is not what you see is what you get, but this shortcoming can be perfectly circumvented by specifying stricter art specifications.
- The currently used solution’s textures for partial refurbishment cannot be batched together. Otherwise, an abnormality will be displayed. In the scenario with many spine instances, the DrawCall will increase rapidly, reaching a somewhat surprising value. However, if developers research on their own, they should be able to solve this problem by customizing the engine and spine ts runtime library.
- The engine must be modified, and the native side must also be maintained.
Even with the above shortcomings, in scenarios that do require a lot of smaller dressings, the partial dressing scheme using external textures is still worth considering.
- Accomplish
The official technical team of Cocos provides a partial skinning scheme for external textures based on Cocos Creator 3.4.2. The git address is as follows: 3.4.0 Spine partial skinning. The project satisfies the adaptation for the web (including mini games) and the native side and can be downloaded and used.
Due to the change in the initialization process, the binding method provided by the official demo cannot operate normally. The adaptation used by feathers of v3.5.1 and v3.5.2 has been completed. At the same time, considering the convenience of daily project development, the TypeScript layer interface has been encapsulated to complete the demo. A link will also be released at the end of the article, everyone is welcome to download it, and if possible, it will also be on the Cocos Store.
static updatePartialSkin(ani: sp.Skeleton, tex2d: Texture2D, slotChange: sp.spine.Slot, slotsName: string = "") {
        let slot!: sp. Spine.Slot;
        if (slotChange) {
            slot = slotChange;
        }
        else {
            slot = ani.findSlot(slotsName) as sp.spine.Slot;
        }
        if (!slot) {
            error('updatePartialSkin:', slotsName)
            return;
        }
        slot.color.a = 1;
        const attachment: sp.spine.RegionAttachment = slot.getAttachment() as sp.spine.RegionAttachment;
        if (tex2d == null) {
            error('tex2d null:', slotsName)
            return;
        }
        if (!attachment) {
            error('updatePartialSkin attachment null:', slotsName)
            return;
        }
        if (JSB) {
            // @ts-ignore
            let skeleton = cc.internal.SpineSkeleton.prototype;

            // @ts-ignore
            let spineSkeletonData = cc.internal.SpineSkeletonData.prototype;

            // Partial dressing
            skeleton.updateRegion = function (attachment: any, tex2d: any) {
                // @ts-ignore
                var jsbTex2d = new middleware.Texture2D();
                jsbTex2d.setRealTextureIndex(spineSkeletonData.recordTexture(tex2d));
                jsbTex2d.setPixelsWide(tex2d.width);
                jsbTex2d.setPixelsHigh(tex2d.height);
                // @ts-ignore
                sp.spine.updateRegion(attachment, jsbTex2d);
            };
            (<any>ani).updateRegion(attachment, tex2d);
        }
        else {
            const skeTexture = new sp.SkeletonTexture({ width: tex2d.width, height: tex2d.height } as ImageBitmap);
            if (tex2d) {
                skeTexture.setRealTexture(tex2d);
            }

            const region = new sp.spine.TextureAtlasRegion();
            if (tex2d) {
                region.width = tex2d.width;
                region.height = tex2d.height;
                region.originalWidth = tex2d.width;
                region.originalHeight = tex2d.height;
            }
            region.rotate = false;
            region.u = 0;
            region.v = 0;
            region.u2 = 1;
            region.v2 = 1;
            region.texture = skeTexture;
            region.renderObject = region;

            attachment.region = region;
            if (tex2d) {
                attachment.width = tex2d.width;
                attachment.height = tex2d.height;
            }

            if (attachment instanceof sp.spine.MeshAttachment) {
                attachment.updateUVs();
            } else {
                attachment.setRegion(region);
                attachment.updateOffset();
            }
        }
    }
- Problems with the program:
When multiple instances of the same Spine resource exist in the scene, after one instance is replaced, the other instances will also change simultaneously, which is not expected.
- Solution:
For each Spine instance, copy SkeletonData. The code is as follows:
copySkeletonData(spine: sp.Skeleton, data: sp.SkeletonData, is_set: boolean = true) {

        let date = new Date();

        // Record the currently playing animation
        const animation = Spine.animation
        const spdata = data;
        let copy = new sp.SkeletonData();
        js.mixin(copy, spdata);

       // @ts-ignore
        copy._uuid = spdata._uuid + "_" + date.getTime() + "_copy";
        let old = copy.name;
        let newName = copy.name + "_copy";
        copy.name = newName;
        copy.atlasText = copy.atlasText.replace(old, newName);

        // @ts-ignore
        copy.textureNames[0] = newName + ".png";

        // @ts-ignore
        copy.init && copy.init();

        if (is_set) {
            spine.skeletonData = copy;
            // Continue playing the animation, or it will stop
            spine.setAnimation(0, animation, true);
        }
    }
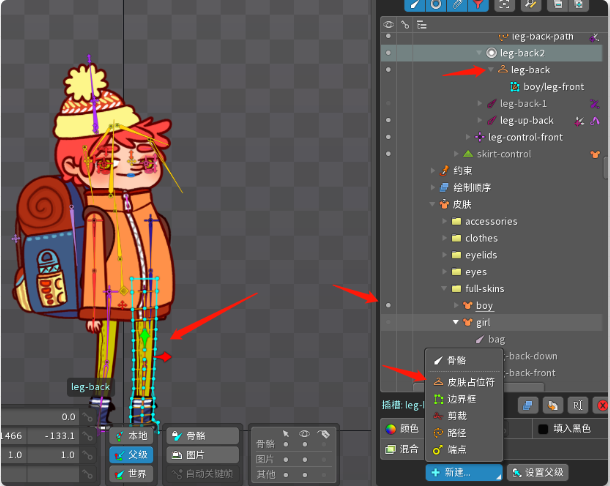
Partial skinning - hanging point
When using skeletal animation, it is often necessary to mount a node on a specific part of the skeletal animation to achieve the effect of linkage between the node and the skeletal animation. The linkage here is basically summarized as following the movement, rotation, and other attributes of the mount point to synchronize (temporarily known to have these attributes, more attributes are uncertain, the documents can be queried, and the documents can be tested and verified) to change.
The design of the hanging point is generally used for following items such as weapons. Still, from another point of view, if the project requirements do not care about some problems caused by the hanging point, it can also be used to solve some dress-up problems, so Feather thinks the hanging point is also one of the schemes for a partial replacement.
The implementation of the hanging point, this part of the official document, is also introduced in more detail. You can observe it. Here is a simple summary, taking the logo node that needs to be mounted as an example:
- After the editor selects the spine skeleton component, selects the bone to follow, and drags the parent node Target of the mounted logo node, which is relatively easy.
Official reminder: Do not directly set the logo node to Target, which will invalidate the UITransform of the logo node itself. Please create a new empty node as the Target, and use the logo of the node to be mounted as a child node of the Target node.
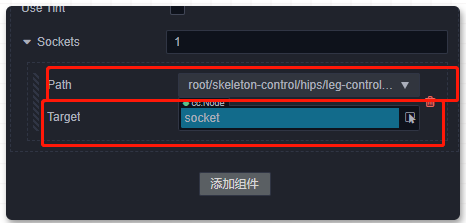
- The code implementation is suitable for the needs of dynamically changing the mount skeleton point at runtime.
Code:
- Determine the bone path that needs to be mounted
- set mount node
paths: Map<string, string> = new Map();

onChangeSocket(e: EventTouch, boneName: string) {
      this.paths["hand-front"] = 'root/skeleton-control/hips/body-down/body-up/arm-front-control/arm-front-up/arm-front-down/hand-front';
      this.paths["leg-front-4"] = 'root/skeleton-control/hips/leg-control-front/leg-front-1/leg-front-2/leg-front-3/leg-front-4';

      let sockets = this.role.sockets;
      let socket = sockets.find((value, index) => {
          return (value.target == this.socketTestNode)

      });
      if (!socket) {
          let newSocket: sp.SpineSocket = new sp.SpineSocket(this.paths[boneName]);
          this.role.sockets.push(newSocket);
      }
      else {
          socket.path = this.paths[boneName];
      }
      this.role.sockets = this.role.sockets;
  }
Be careful! Points to note:
Since a mounted node can only be a child of a Spine, the rendering order of the mounted node can only be at the top of the Spine node. However, if you don’t care too much about the order of a frame, here’s a cheeky way to make the rendering order of the mounted node logo below the Spine node. Instead of having the logo point as a child of the target, we can place it at the lower level of the Spine and then get the position and rotation properties of the target node in the update to refresh it.
Note that if there are multiple nodes to be mounted, the order of the nodes to be mounted can be adjusted at will.
However, this still does not solve the problem that the logo node cannot be rendered in mixed order with other attachments in Spine. I’m too busy to look into how to fix this for now. If any developers have a better solution to this problem, please feel free to discuss it.
Summary
- For simple needs, if the overall replacement can meet the requirements, use it directly.
- For partial replacement, if fewer parts are to be replaced, you can use accessories for replacement or hanging point replacement, depending on the project.
- For the more complex accessories, and parts of the dressing, in general, the external texture dressing is the most suitable, and developers capable of DC problems can take some time to deal with them theoretically.
- Combined with the content of the project, considering the maintenance cost, performance consumption, etc., the above schemes can be combined and used in combination to solve the project needs.
No matter which plan is adopted, Spine assets plans must be fully communicated with art developers, aligned with the information, and then determined. Feather understands Spine engineering because he owns the Spine professional version and has done some simple Spine animations before, which will significantly help Spine’s subsequent development and communication.
Demo download
Demo has been upgraded to v3.5.2, download address:
Reference link
[1] spine user guide - skin
[2] Spine Skeleton Component Reference
https://docs.cocos.com/creator/manual/en/editor/components/spine.html
[3] 3.4.0 Spine partial peeling