
3D automatic pathfinding comes easy with the NavMesh navigation mesh plug-in.
Pathfinding is one of the functions that developers cannot ignore in game development. NavMesh navigation mesh pathfinding is widely used to achieve automatic pathfinding of dynamic objects in complex 3D game worlds. The developer iwae created the plug-in Easy NavMesh, which implements a complete 3D automatic pathfinding function in Cocos Creator 3.x.
Navigation Mesh (NavMesh for short) can store the mesh information of the walkable area to realize functions such as navigation and pathfinding in complex 3D space.
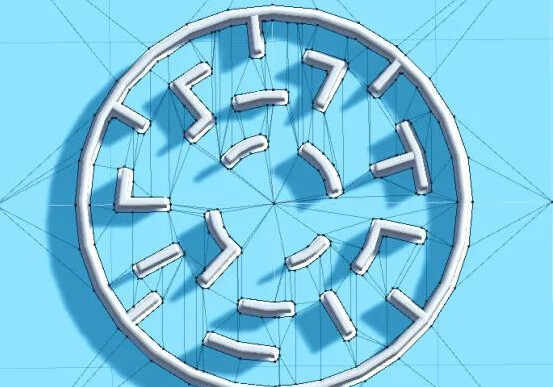
The navigation mesh comprises multiple polygon meshes (Polygon Mesh, from now on, referred to as poly), which is the light blue color block with black stroke in the above image. The pathfinding in the navigation grid is based on poly. Two points in the same poly can be reached in a straight line, ignoring the terrain height; if the two points are located in different Polys, the pathfinding algorithm will be used. (such as A* algorithm) Calculate the poly that needs to be passed, and then calculate the specific path.
NavMesh and waypoints
Why choose to use NavMesh instead of waypoints for pathfinding?
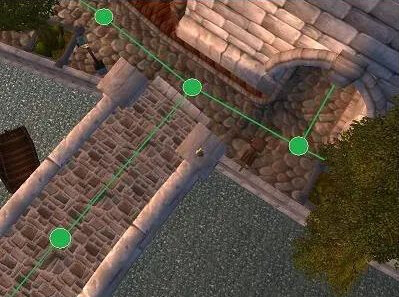
In early 3D games, waypoints were a common way to find ways, but waypoints are not only cumbersome to generate and configure but also have a more severe disadvantage. Take the corner of Stormwind City in World of Warcraft below as an example. The AI’s behavior is limited when using waypoints and can only move on the lines between the waypoints.
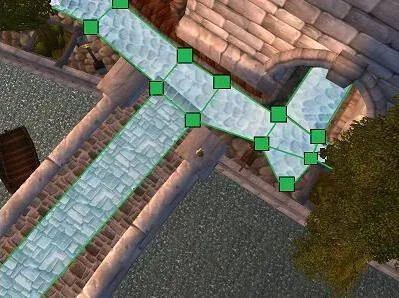
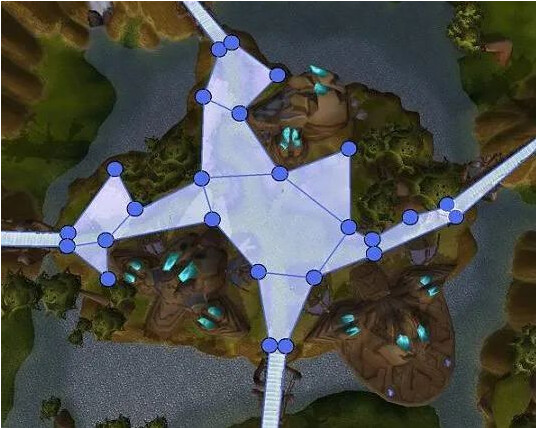
And Navmesh can bake out NavMesh information by calculating the character’s information (volume, walking height, uphill angle, etc.). The light blue poly in the figure below represents the walkable area on the map.
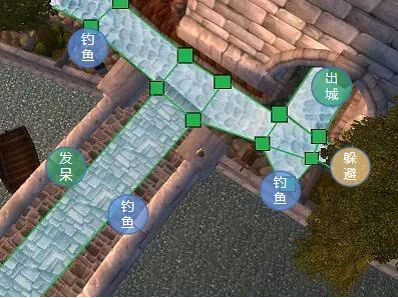
With Navmesh, the movement area of the characters will be more flexible, enabling more complex AI behaviors. As shown in the picture below, characters can fish anywhere along the river, hide in the woods, or go out of the city.
To give another more convincing example, on Harlan Island in Nagrand in the vanilla server of World of Warcraft, the use of NavMesh can cover the entire area. The behavior and performance of AI will also be more intelligent than waypoints, which can basically cover all corners of Orchid Island (of course, there are some special cases, such as jumping, etc., we can still achieve it through waypoints).
At the same time, NavMesh can also realize the slope movement of the character through height parameters and angle parameters and perform behaviors such as upper and lower bridges. Take Shattrath City in “Warcraft” as an example. Refer to the Poly part of the figure below.

Once these Poly grids are available, the pathfinding function can be implemented with the help of the A* algorithm. The open-source library of A* by bgrins is used here, and the mathematical library is translated, modified, and converted to the TS version.
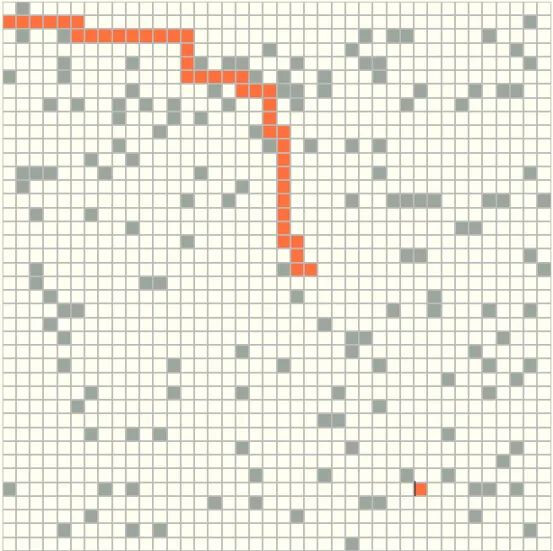
The traditional A* route search is based on a grid and a grid of obstacle points in the grid for the pathfinding algorithm, as shown in the figure below.
The traditional A* route search method is based on the grid and the grid of obstacle points in the grid, and the pathfinding algorithm is performed, as shown in the following figure.
In the Poly block generated by NavMesh, the data has been meshed based on the map. We need to consider how to find the optimal landing point instead of letting the characters move along the yellow line of the poly in the figure below or directly From start to finish?

Easy NavMesh
Easy NavMesh is a lightweight mesh navigation library for Cocos Creator 3.x. It adopts the A*+ funnel algorithm. The entire library is less than 40KB, which can meet the requirements of the H5/mini game platform for package size and performance consumption requirements. At the same time, the pre-baked NavMesh mesh information is saved in JSON format to ensure loading and running efficiency.
Funnel Algorithm+A*
Easy NavMesh adopts the lightweight TS library based on PatrolJS, using the combination of recast.js+wasm, and controls the size of the library below 40KB. PatrolJs combines a relatively simple funnel algorithm (Simple Stupid Funnel Method) + A*, and the funnel algorithm can solve the Poly movement problem we encountered in the previous section.
The funnel algorithm abandons finding the midpoint of the edge of the poly (although this method can make the path smoother). However, through a circular algorithm, constantly reducing the scope of the triangle funnel (which can be interpreted as the angle of the triangle), this method is more frequently calculated but more straightforward and more effective.
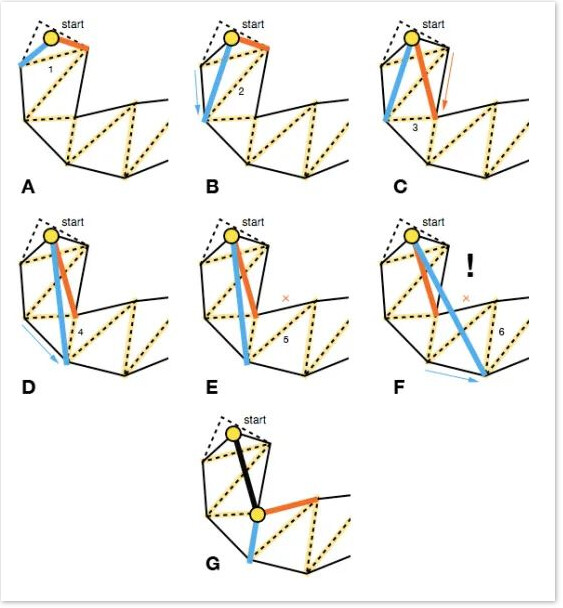
Next, we will demonstrate the process of locating the waypoint by calculating the small funnel angle through the funnel algorithm through several example diagrams.
-
Check whether the two points on the left and right of the first Poly in Figure A are within the range of the triangular funnel formed by the red and blue lines, and then go to the 3 Polys in Figure B and D in turn. We can see that the angle of the triangular funnel keeps getting smaller. The scope of the funnel also becomes smaller and smaller.
-
Then we traverse the two new Poly of E and F diagrams. We find that the endpoints on the right side of the E diagram (the side marked x. For the sake of understanding, the positions here are the actual positions on the picture, not the positions of Poly vertices) are outside the triangle funnel generated by the previous D diagram. The red line of the D diagram can reach the 5th poly of the E diagram, and here the funnel stops updating and does not reduce the angle.
-
If the E diagram is not updated, then the new blue line of the F diagram is outside the funnel, and the red line of the D diagram cannot reach the 6th poly. At this time, we end the funnel algorithm, take the red line generated directly from A to D as the first path, start from the G diagram, regenerate a new triangle funnel, and start a new funnel algorithm.
With the funnel algorithm, we can use A* with the funnel to get the correct route.
static findPath(startPosition:Vec3, targetPosition:Vec3, zoneID:string, groupID:number) {
const allNodes = this.zone[zoneID].groups[groupID];
const vertices = this.zone[zoneID].vertices;
let closestNode = null;
let distance = Infinity;
let measuredDistance
for (let i = 0, len = allNodes.length; i < len; i++) {
const node = allNodes[i];
measuredDistance = Vec3.squaredDistance(node.centroid, startPosition);
if (measuredDistance < distance) {
closestNode = node;
distance = measuredDistance;
}
}
let farthestNode = null;
distance = Infinity;
for (let i = 0, len = allNodes.length; i < len; i++) {
const node = allNodes[i];
measuredDistance = Vec3.squaredDistance(node.centroid, targetPosition);
if (measuredDistance < distance &&
nUtils.isVectorInPolygon(targetPosition, node, vertices)) {
farthestNode = node;
distance = measuredDistance;
}
}
// If we can't find any node, just go straight to the target
if (!closestNode || !farthestNode) {
return null;
}
//A* pathfinding algorithm
const paths = Astar.search(allNodes, closestNode, farthestNode);
const getPortalFromTo = function (a, b) {
for (let i = 0; i < a.neighbours.length; i++) {
if (a.neighbours[i] === b.id) {
return a.portals[i];
}
}
};
// Use the funnel algorithm to settle on the best route
// Got the corridor,pull the rope
const channel = new Channel();
channel.push(startPosition);
for (let i = 0; i < paths.length; i++) {
const polygon = paths[i];
const nextPolygon = paths[i + 1];
if (nextPolygon) {
const portals = getPortalFromTo(polygon, nextPolygon);
channel.push(vertices[portals[0]], vertices[portals[1]]);
}
}
channel.push(targetPosition);
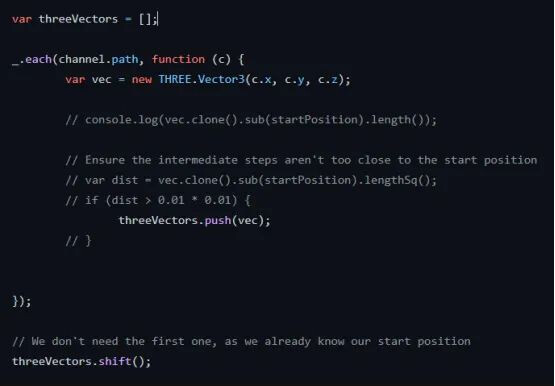
channel.stringPull();
// Return the path, omitting first position (which is already known).
return channel.path;
}
Pre-baking program
Easy NavMesh uses a pre-baking solution to export Navmesh data in JSON format in advance to reduce data overhead, which is convenient for cross-platform support.
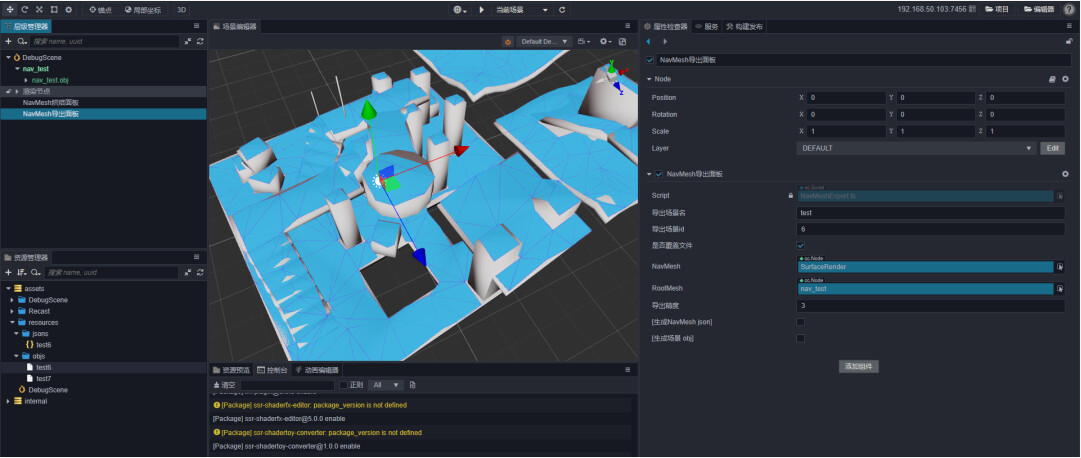
Easy NavMesh provides various export tools and supports recast.js to export JSON data dynamically, Blender Navmesh to export OBJ, etc. Developers can choose according to their needs:
- Support recast.js to export JSON data. You can use the NavMesh export panel provided by Cocos Creator to export NavMesh information to Mesh JSON format. You can also export the entire scene as OBJ through the panel and use tools such as Blender to process NavMesh information.
- Support Blender Navmesh to export OBJ format, and then use Python script to convert (the script is modified based on OBJ to three.js Json Mesh, and the useless normal, UV, and other information are removed. Thanks to the original author: AlteredQualia).
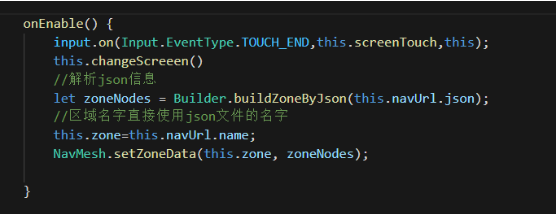
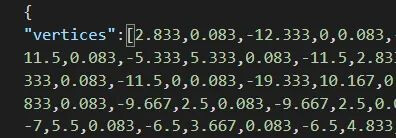
After the engine parses these JSONs, we can use the fixed-point information and surface information in the JSONs to construct the navigation mesh data. This grid information can also be stored on the server or by creating new objects through scripts for flexible adaptation.
ClampSteped
ClampSteped-based movement is supported. With ClampSteped, you can use the mesh information baked by NavMesh without using the Cannon or Ammo physics engine that comes with Cocos, and the characters do not need to add rigid bodies. It is based on the mathematical method of ThreeJs’ Plane and Triangle libraries (Easy NavMesh transplanted ThreeJS The Plane and Triangle classes, recompiled using Cocos’ Vec3 Mat4 math library).
ClampSteped is still an immature solution at present. Now only the basic demo is provided. Subsequent optimization needs to rely on the big guys. When using ClampSteped to replace objects, you need to pay attention to setting the object’s radius.
Other optimizations
Easy NavMesh removes the third-party Vector3 math library and uses Cocos’ Vec3 instead, avoiding the two conversions between Cocos’ Vec3 class and other V3 coordinate classes.
The original library uses the OBJ format or the JSON model of Three.js. Here, the JSON information can be exported directly through Cocos. The information has been reserved with decimal precision in advance, which reduces the size of the JSON and the amount of computation required to process the OBJ information. Size Does Matter ~
FAQ QA
Q1: Why sometimes is the path not the closest visually?
A: In NavMesh, the A* algorithm uses poly as the grid. In complex grid terrain, the number of Poly groups to the nearest distance point may be more significant.
Q2: Why is ClampStep easy to pass through walls?
A: At present, the math libraries are all translated from Three.js. This ClampStep is rarely used in Three’s projects. There are not many Demos for reference. It needs to be further adapted to Cocos, and subsequent versions will continue to be tuned.
Q3: Is there a follow-up optimization plan?
A: Easy NavMesh will continue to be updated and maintained. First, I plan to add more NavMesh-based game demos, such as hide and seek, optimizing ClampSteped, and implementing ClampSteped-based FPS NavMesh Demo (next time!).
Easy NavMesh has now been released. Click at the end of the article to get it in the Cocos Store. Thanks for your support. See the Chinese forum for more detailed instructions, and welcome everyone to exchange feedback in the post!
Easy NavMesh Download-Store
https://store.cocos.com/app/en/detail/3641
Forum post