Save time and space using prebuilt libraries for c++ builds. With a step by step manual workout to setup a helloworld starting project on ios, mac, android adt and android studio. I’ve never tried the others.
Howto tested with cocos2d-x 3.13.1, android-19, ndk r12b, xcode8 on mac os x el capitan. Just for writing things down before one forgets.
Note: you can avoid all this by simply using cocos creator. But if you, like me, have legacy c++ code…
----- engine setup - one time only after installation
----- cocos2d-x engine setup
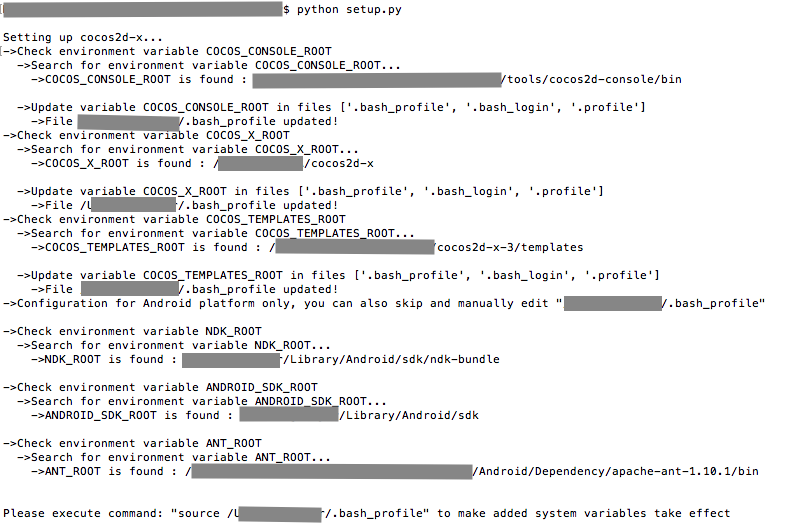
Supposedly you have downloaded the latest cocos2d-x release, and unzipped it into a directory of your choice. That’s your cocos engine base install dir, which we’ll simply call {CCENGINE} from now on. Then you set everything up as described into the engine setup documentation, run setup.py etc. etc., exactly as described in https://github.com/cocos2d/cocos2d-x readme.
----- Android prebuilt libraries setup fix
Let’s start with Android. First of all we need to fix a file into the engine install dir to avoid an error when using prebuilt libraries. Go to:
- cd {CCENGINE}/cocos/prebuilt-mk/
- vi Android.mk (or edit the file with your favorite editor)
- change: $(call import-module, android/cpufeatures/prebuilt-mk)
to: $(call import-module, android/cpufeatures)
Anyway library building works even deleting this row. Who knows why…
----- android libraries generation
Create android engine prebuilt libraries with:
4. cocos gen-libs -p android -m debug
This is going to create default android prebuilt libraries in {CCENGINE}/prebuilt dir. Feel free to use --app-abi flag with possible values: armeabi:armeabi-v7a:arm64-v8a:x86, just for building different types of android devices abi library support. But you’ll be probably comfortable with armeabi alone and at most x86 in for emulators. That accounts for: cocos gen-libs -p android -m debug --app-abi armeabi:x86
----- ios libraries generation
5. cocos gen-libs -p ios --app-abi armeabi:x86_64 -m debug
You could spare yourself using --app-abi flag, but you probably want to add x86_64 for bulding against the ios simulator. To include it in the library, you need to go to the engine installation dir and change a flag in ios cocos library build file when building for debug, as follows:
6. (optional) cd {CCENGINE}/build. double-click on cocos2d_libs.xcodeproj. Xcode opens.
7. (optional) “Build active architecture only” is set to yes for debug. So select cocos2d_libs project then in the search bar up right type “active”. Choose debug and set all targets to no.
At the end of bulding, test the obtained library with:
8. (optional) lipo -info {CCENGINE}\prebuilt\ios\libcocos2d iOS.a to get the message: “Architectures in the fat file: libcocos2d iOS.a are: i386 armv7 x86_64 arm64”, showing arm(ios devices) and x86_64(ios emulator) support in one fat binary.
----- mac libraries setup
Generate mac libraries with:
9. cocos gen-libs -p mac -m debug
----- cocos binary templates creation
You need to create binary templates for using them with cocos create and prebuilt libs. So:
10. cocos gen-templates
This is written apart in the docs. Found by trial and error. And this is going to add the much desired binary templates in {CCENGINE}\templates. And you now can do:
----- create binary project with prebuilt libraries
Here we go:
11. cocos new -l cpp {CCGAMENAME} -t binary
Sadly, this creates no template for android studio, and the ios/mac template doesn’t seem to work. Apparently, it has no schemes. And the include dirs in the build project setup are pointing to /Application/Cocos… while my {CCENGINE} installation is in /usr/local…
Oh, and you get a couple nice directories with cocostudio things and conf files here and there. Clearly it needs some updating…
But the proj.android adt setup works. Try:
12. cd proj.android
13. cocos compile -p android
Try deploy on a device. Hello World!
Followin’ fixes for what’s missing.
----- project setup - to do on every project you create
----- create your project
We’ll behave as if templates are not working at all. So here’s are all the manual steps.
Let’s start with creating a new cocos project. Open a command prompt and move to your favorite work dir and:
14. cocos new -l cpp {CCGAMENAME}
We get a directory with a new cocos project which we’ll call {CCPRJ}, our game directory.
15. cd {CCPRJ}
Into this dir there’s a {CCPRJ}/cocos2d installation. This is the local copy of the engine, created every time you do cocos new.
We can delete the cocos engine local dir so we are sure it won’t get in the way. Of course this is not created if you used binary flags on cocos create.
16. rm -fR cocos2d
----- android glue library setup - one time for both non-binary created android adt and/or android-studio (skip this if you use android adt binary template)
We need to setup the cocos platform java to cpp bridge library. This part of the engine connects java and c++ code. It’s located in {CCENGINE}/cocos/platform/android.
17. cp {CCENGINE}/cocos/platform/android {CCPRJ}/{CCBRIDGE}
If you created proj.android with binary template, you don’t need to do this step, nor the following android adt setup.
----- android adt setup (skip this if you use android adt binary template)
files to change:
- Android.mk
- build-cfg.json (optional)
- project.properties
----- ndk-build setup
Change to android adt project, proj.android. We’ll call this simply {ANDROID} from now on.
18. cd {CCPRJ}/{ANDROID}/jni>
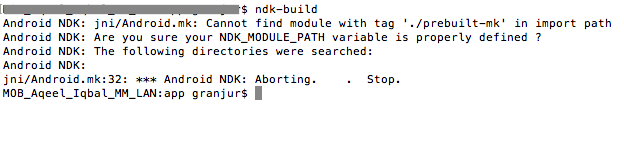
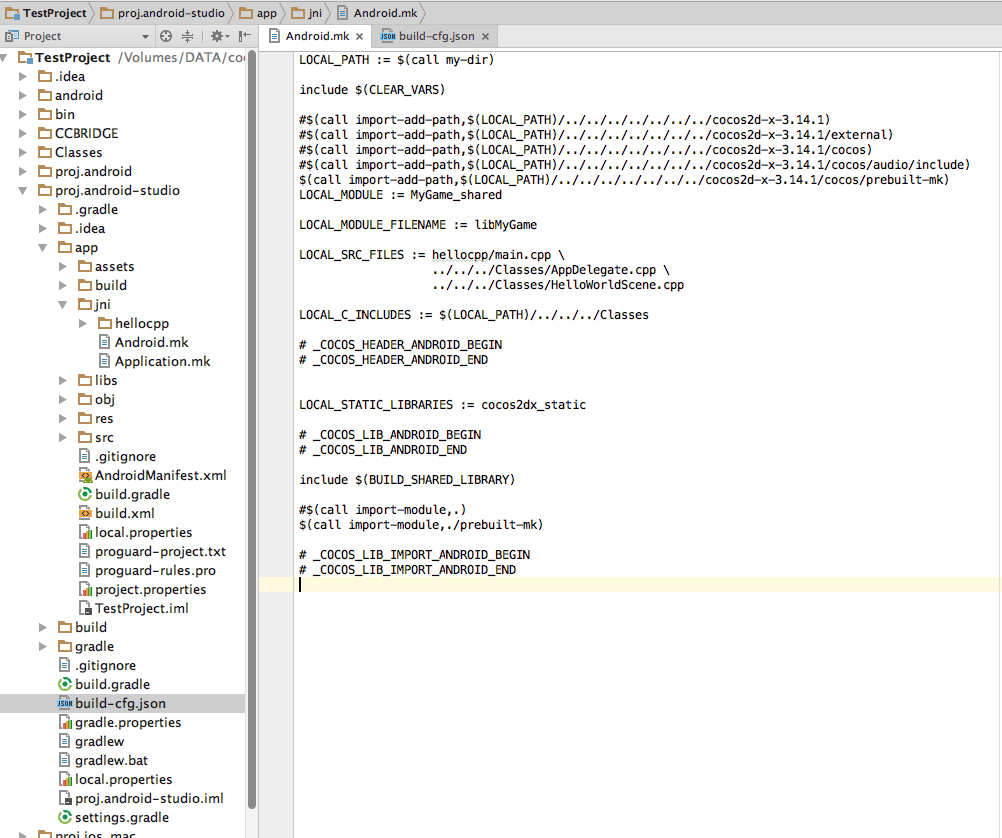
19. vi Android.mk (or open with a text editor).
change: $(call import-module,.) to: $(call import-module,./prebuilt-mk)
This makes us use the prebuilt system. Now we need to link from project to engine dir.
20. change:
$(call import-add-path,$(LOCAL_PATH)/…/…/cocos2d)
$(call import-add-path,$(LOCAL_PATH)/…/…/cocos2d/external)
$(call import-add-path,$(LOCAL_PATH)/…/…/cocos2d/cocos)
$(call import-add-path,$(LOCAL_PATH)/…/…/cocos2d/cocos/audio/include)
to:
$(call import-add-path,{CCENGINE})
$(call import-add-path,{CCENGINE}/external)
$(call import-add-path,{CCENGINE}/cocos)
$(call import-add-path,{CCENGINE}/cocos/audio/include)
(you can use bash variables in the form: ${CCENGINE}, but they probably need further configuration to use in an ide)
Test it with:
21. cd {CCPRJ}/{ANDROID}
22. ndk-build
you should get:
[armeabi] Compile++ thumb: MyGame_shared <= main.cpp
[armeabi] Compile++ thumb: MyGame_shared <= AppDelegate.cpp
[armeabi] Compile++ thumb: MyGame_shared <= HelloWorldScene.cpp
[armeabi] Compile thumb : cpufeatures <= cpu-features.c
[armeabi] StaticLibrary : libcpufeatures.a
[armeabi] SharedLibrary : libMyGame.so
[armeabi] Install : libMyGame.so => libs/armeabi/libMyGame.so
now your code (AppDelegate, HelloWorld and so on) has been built into shared library libMyGame.so, the one called from java when activity is started.
now run:
23. cocos compile -p android
you should get errors and warnings:
Android NDK: WARNING: Ignoring unknown import directory: /Users/max/Developer/Stage/Workspace/Cocos/MyCppGame/proj.android/…/cocos2d
Android NDK: WARNING: Ignoring unknown import directory: /Users/max/Developer/Stage/Workspace/Cocos/MyCppGame/proj.android/…/cocos2d/cocos
Android NDK: WARNING: Ignoring unknown import directory: /Users/max/Developer/Stage/Workspace/Cocos/MyCppGame/proj.android/…/c
BUILD FAILED
/usr/local/android/tools/ant/build.xml:459: …/cocos2d/cocos/platform/android/java resolve to a path with no project.properties file for project /Users/max/Developer/Stage/Workspace/Cocos/MyCppGame/proj.android
to get rid of warnings (optional):
24. vi build-cfg.json
change:
“…/cocos2d”,
“…/cocos2d/cocos”,
“…/cocos2d/external”
to:
“{CCENGINE}”,
“{CCENGINE}/cocos”,
“{CCENGINE}/external”
----- java/cpp bridge library setup
25. vi {CCPRJ}/{ANDROID}/project.properties
change:
android.library.reference.1=…/cocos2d/cocos/platform/android/java
to:
android.library.reference.1={CCBRIDGE}/java
Try again with:
26. ant clean
27. ant debug
Everything’d be ok now, and you’d get an apk.
----- deploy & run
Now with cocos utils:
28. cocos compile -p android should yield BUILD SUCCESSFUL!
On with the testing, connect a device or fire up an emulator, then
29. adb devices, and when it shows something is connected, then
cocos deploy -p android. Hello World!
Or to avoid boring unneeded recompilation, use adb install (adb install {CCPRJ}/bin/debug/android/{CCGAMENAME}-debug.apk (revert with adb uninstall org.cocos2dx.{CCGAMENAME})
----- android studio
Now we set up to work on proj.android-studio/app, which now becomes our {ANDROID} installation.
files to change:
- Android.mk
- build-cfg.json (optional)
- settings.gradle
----- ndk-build step
30. Do as in steps 18-24 of android adt
----- java/cpp bridge library setup
31. cd …/…
32. vi settings.gradle
change: project(’:libcocos2dx’).projectDir = new File(settingsDir, ‘…/cocos2d/cocos/platform/android/libcocos2dx’)
to: project(’:libcocos2dx’).projectDir = new File(settingsDir, ‘{CCBRIDGE}/libcocos2dx’)
Try with:
33. gradlew --info assembleDebug
and you’ll get an apk, then
34. cocos compile -p android --android-studio
----- ios/mac
files to change:
- MyCppGame.xcodeproj
----- ios/mac setup
On updating the project setup file. Change to {CCPRJ} proj.ios_mac (called here {IOSMAC})
(for a visual guide you can follow @nite post here How to speed up cocos2d-x build with prebuilt lib. Apple part is the same.)
35. cd {CCPRJ}/{IOSMAC}
36. double-click on {CCGAMENAME}.xcodeproj, xcode fires up
37. find cocos2d_libs.xcodeproj (on the left project file explorer) and delete it.
Go to prebuilt dir:
38. cd {CCENGINE}/prebuilt/ios
39. drag and drop “libcocos2d iOS.a” into XCode. In the add file to project popup, select the following options: assign it to MyCppGame-mobile target, uncheck copy item, check create groups.
40. cd {CCENGINE}/prebuilt/mac
41. drag and drop “libcocos2d Mac.a” into XCode. In the add file to project popup, select the following options: assign it to MyCppGame-desktop target, uncheck copy item, check create groups.
Last one, change project include directories still pointing to the old setup.
42. Select MyCppGame project, then in the search bar up right type “header”. double-click on “Header search path”, change:
$(SRCROOT)/…/cocos2d
$(SRCROOT)/…/cocos2d/cocos
$(SRCROOT)/…/cocos2d/cocos/audio/include
$(SRCROOT)/…/cocos2d/extensions
$(SRCROOT)/…/cocos2d/external
$(SRCROOT)/…/cocos2d/external/chipmunk/include/chipmunk
with:
{CCENGINE}
{CCENGINE}/cocos
{CCENGINE}/cocos/audio/include
{CCENGINE}/extensions
{CCENGINE}/external
{CCENGINE}/external/chipmunk/include/chipmunk
Lastly, mac setup is missing an entry for building.
43. Select MyCppGame-desktop project, then in the search bar up right type “header”. double-click on “Header search path”.
44. add: {CCENGINE}/external/glfw3/include/mac
Now you can compile and run on ios and mac. CMD-R… Hello World!
----- Cleaning and final considerations
45. You may want to remove {CCENGINE}/build/build/cocos2d_libs.build. It contains all ios and mac intermediate, and on my machine is at a swoop 5.4 gb, debug only. Same for:
{CCENGINE}/cocos/scripting/lua-bindings/proj.ios_mac/build/cocos2d_lua_bindings.build (hate lua)
{CCENGINE}/cocos/scripting/js-bindings/proj.ios_mac/build/cocos2d_js_bindings.build
{CCENGINE}/tools/simulator/frameworks/runtime-src/proj.android/obj/local
Hope it helps.