
Infinite Parallax Node
Introduction
Parallax in its general meaning is a changing of object position relative to the background that depends on observer position. Since it is characteristic of three dimensional world it is widely used in two dimensional games in order to create effect of depth. In cocos2d-x there is a ParallaxNode that provides scrolling of its children faster or slower according to the parallax ratio.
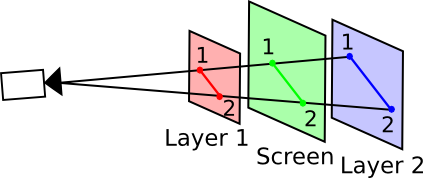
On the picture you can see that distance between point 1 and 2 differ for each layers. That is a simple demonstration of parallax.
The only problem we have with the standard parallax node in cocos2d-x is that when objects cross left side of the screen they disappear. Parallax node does not manage its children replacement to the right immediately after their left visible area of the screen. So we need to it do by ourselves.
For that we are going to extend standard “ParallaxNode” functionality and create our own class “InfiniteParallaxNode”.
Implementation
For our purposes we are going to create “InfiniteParallaxNode.h” and “InfiniteParallaxNode.cpp” files
Class definition in the header file looks as follows:
class InfiniteParallaxNode : public ParallaxNode
{
public:
    static InfiniteParallaxNode* create();
    void updatePosition();
};
“updatePosition” is the method that will manage elements replacement.
Now open InfiniteParallaxNode.cpp file.
“create” method looks almost as it is defined in “CREATE_FUNC” macro:
InfiniteParallaxNode* InfiniteParallaxNode::create()
{
    // Create an instance of InfiniteParallaxNode
    InfiniteParallaxNode* node = new InfiniteParallaxNode();
    if(node) {
        // Add it to autorelease pool
        node->autorelease();
    } else {
        // Otherwise delete
        delete node;
        node = 0;
    }
    return node;
}
And now an implementation of “updatePosition”:
void InfiniteParallaxNode::updatePosition()
{
    int safeOffset = -10;
    // Get visible size
    Size visibleSize = Director::getInstance()->getVisibleSize();
    // 1. For each child of an parallax node
    for(int i = 0; i < _children.size(); i++)
    {
        auto node = _children.at(i);
        // 2. We check whether it is out of the left side of the visible area
        if(convertToWorldSpace(node->getPosition()).x + node->getContentSize().width < safeOffset)
            // 3. Find PointObject that corresponds to current node
            for(int i = 0; i < _parallaxArray->num; i++)
            {
                auto po = (PointObject*)_parallaxArray->arr[i];
                // If yes increase its current offset on the value of visible width
                if(po->getChild() == node)
                    po->setOffset(po->getOffset() +
                                  Point(visibleSize.width + node->getContentSize().width,0));
            }
    }
}
At the beginning of the source file you need to add the next declaration of the “PointObject” class:
class PointObject : public Ref
{
public:
    inline void setRation(Point ratio) {_ratio = ratio;}
    inline void setOffset(Point offset) {_offset = offset;}
    inline void setChild(Node *var) {_child = var;}
    inline Point getOffset() const {return _offset;}
    inline Node* getChild() const {return _child;}
private:
    Point _ratio;
    Point _offset;
    Node* _child;
};
In this way we have an opportunity to use “PointObject” class.
Explanation
To understand the actions we do in “updatePosition” method take a glance at the structure of “ParallaxNode”.
It has two arrays of children. The first is just a standard vector of Node*. It stores references to children. Also there is another array of “PointObjects”. Each “PointObject” contains a week reference to corresponding node from the first array. Important fact for us here is that “PointObject” contains offset value and ration. During rendering process coordinates for each node are calculated as follows:
pos.x = -pos.x + pos.x * ratio.x + offset.x;
pos.y = -pos.y + pos.y * ratio.y + offset.y;
Where initially “pos” is a coordinates of parent (parallax node).
Now what about our case. At the line 1 we visit take child node from the first array (it has the name “_children”).
At the second line we check whether the node cross left screen border or not.
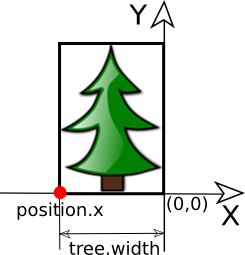
The condition for that is position.x + tree.width < 0 according to the picture above. Position.x corresponds to convertToWorldSpace(node->getPosition()).x, whereas
node->getContentSize().width corresponds to tree.width.
Then in the line 3 we find the “PointObject” that is corresponds to current node (the node that has left visible screen area).
Finally at the line 4 we increment offset so that the node moves to the right border of the screen.
Primitive Shadows Node
In this section we are going to create simple shadows simulation for objects from our parallax scrolling node.
Implementation
For shadows simulation we are going to create “ShadowLayer” class. Its definition on the header file looks as follows:
class ShadowLayer : public Layer
{
    static unsigned int SHADOW_TAG;

    Point _lightPosition;
    float _worldScale;

    Node* getShadowForNode(Node* node);
    float toDegrees(float radians);
    bool findIndex(int index, vector<int> v);

protected:
    virtual float calculateSkew(Node* node);

public:
    static ShadowLayer* create(Node* parent, Point lightPosition, float worldScale, vector<int> disableIndices);
    bool initWith(Node* parent, Point lightPosition, float worldScale, vector<int> disableIndices);

    void update(Node* parent);
};
Here “SHADOW_TAG” is a unique identifier for shadow node; “_lightPosition” defines position on a light source on the screen; “_worldScale” is a parameter that impact shadow length. update method updates shadow appearance, should be used each time any shadowed node have changed its position; “disableIndices” is a vector of tags for nodes that should not drop a shadow.
In “init” function we actually creates shadows. In our case shadow is a sprite - modified copy of the target node. Target node hereinafter is a sprite child of parent node that drops a shadow.
bool ShadowLayer::initWith(Node *parent, Point lightPosition, float worldScale, vector<int> disableIndices)
{
    if(!Layer::init())
        return false;

    _lightPosition = lightPosition;
    _worldScale = worldScale;

    // For each child of parent node we generate a shadow
    // and attach it to the node itself
    for(auto node : parent->getChildren())
    {
        auto shadow = getShadowForNode(node);
        node->addChild(shadow);

        if(disableIndices.size() > 0)
            // If nodes tag is within disable indices
            if(findIndex(node->getTag(), disableIndices))
                // Make its shadow invisible
                node->getChildByTag(SHADOW_TAG)->setVisible(false);
    }

    return true;
}
Shadow creation process consists of next steps:
- Create sprite and init it with sprite frame of target node
- Center shadow sprite according to the target node
- Copy target node transformations (scale, rotation)
- Modify y scale of shadow node according to the world scale parameter
- Flip the shadow sprite
- Make shadow sprite of a right form (real-shadow like)
- Make shadow sprite half-transparent and gray
- Assign unique shadow tag to shadow sprite
Node* ShadowLayer::getShadowForNode(Node *node)
{
    // Step 1
    auto shadow = Sprite::create();

    auto object = (Sprite*)node;
    shadow->setSpriteFrame(object->getSpriteFrame());

    // Step 2
    shadow->setAnchorPoint(Point(0.5,1.0)); // position it to the center of the target node
    shadow->setPosition(Point(shadow->getContentSize().width / 2, 0));

    // Step 3
    shadow->setRotation(object->getRotation());
    shadow->setScale(object->getScale());

    // Step 4
    shadow->setScaleY(_lightPosition.y / _worldScale);

    // Step 5
    shadow->runAction(FlipY::create(true));

    // Step 6
    shadow->setSkewX(calculateSkew(node));

    // Step 6
    shadow->setColor(Color3B(0, 0, 0));
    shadow->setOpacity(150);

    // Step 7
    shadow->setTag(SHADOW_TAG);

    return shadow;
}
Skew calculation function looks as follows:
float ShadowLayer::calculateSkew(Node *node)
{
    Node* parent = node->getParent();
    float ED = _lightPosition.y - parent->getPosition().y;
    float EL = _lightPosition.x - (node->getParent()->getPosition().x + node->getPosition().x);
    float DLE = atan(ED / EL);
    float DB = node->getContentSize().height * node->getScaleY() +
            parnet->getContentSize().height * parent->getScaleY();
    float CB = tan(PI / 2 - DLE) * DB;
    float AB = node->getContentSize().height * node->getScaleY();
    float skew = 90.0 - toDegrees(atan(AB / CB));
    return skew;
}
And finally the update function:
void ShadowLayer::update(Node* parent)
{
    int safeOffset = -10;
    // 1. For each target node
    for(auto node : parent->getChildren())
    {
        // 2. Get the shadow sprite
        auto shadow = node->getChildByTag(SHADOW_TAG);
        // 3. If the target node has left the screen visible area
        if(node->getParent()->getPosition().x + node->getPosition().x
                               + node->getContentSize().width < safeOffset)
            // Reset shadow skew
            shadow->setSkewX(0);
        else
            // Else recalculate skew
            shadow->setSkewX(calculateSkew(node));
    }
}
Explanation
The main trick here is in skew transformation. It give shadow sprite realistic shadow form.
Look at the picture above.
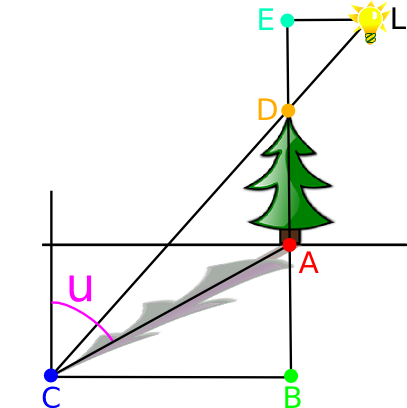
Skew transformation is defined by u angle in degrees. So our purpose is to find out right value for u angle.
- u we can find from the next equation:

- Angle ACB we calculate from:

- CB we can find from the next equation:

- DB is a sum of shadow and target heights and angle DCB is equal to DLE angle. DLE angle we can find from:

Combine everything together
Create an infinite parallax node:
vector<int> disableShadowTags;

_backgroundElements = InfiniteParallaxNode::create();

unsigned int rocksQuantity = 7;
for(unsigned int i = 0; i < rocksQuantity; i++)
{
    // Create a sprite with rock texture
    auto rock = Sprite::create("rock.png");
    rock->setAnchorPoint(Point::ZERO);
    // Set scale factor as a random value from [0.8, 1.2] interval
    rock->setScale(randomValueBetween(0.6, 0.75));
    rock->setTag(1000 + i);
    disableShadowTags.push_back(rock->getTag());
    _backgroundElements->addChild(rock,
                // Set random z-index from [-10,-6]
                randomValueBetween(-10, -6),
                // Set ration (rocks moves slow)
                Point(0.5, 1),
                // Set position with random component
                Point((visibleSize.width / 5) * (i + 1) + randomValueBetween(0, 100),
                ground->getContentSize().height - 5));
}

unsigned int treesQuantity = 35;
for(unsigned int i = 0; i < treesQuantity; i++)
{
    auto tree = Sprite::create("tree.png");
    tree->setAnchorPoint(Point::ZERO);
    // Parameters for trees varies
    tree->setScale(randomValueBetween(0.5, 0.75));
    _backgroundElements->addChild(
                tree,
                randomValueBetween(-5, -1),
                Point(0.75, 1),
                Point(visibleSize.width / (treesQuantity - 5) * (i + 1) + randomValueBetween(25,50),
                          ground->getContentSize().height - 8));
}
addChild(_backgroundElements, 2);
Now create shadow layer:
_shadows = ShadowLayer::create(
                _backgroundElements, sun->getPosition(), 425, disableShadowTags);
_shadows->retain();
And the “update” function that moves parallax scrolling node and updates shadows:
void HelloWorld::update(float delta)
{
    Point scrollDecrement = Point(5, 0);
    _backgroundElements->setPosition(_backgroundElements->getPosition() - scrollDecrement);
    _backgroundElements->updatePosition();
    _shadows->update(_backgroundElements);
}
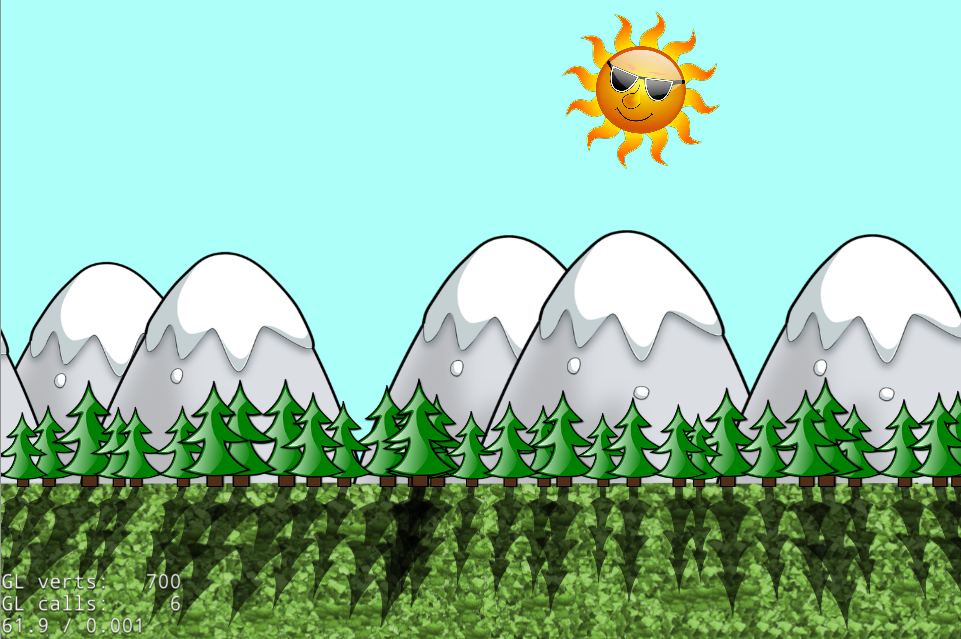
Results
Conclusion
Shadows simulation mentioned above is very simplified and adapted to that special case, however it can make appearance a bit more attractive. You can find lots of flaws using it in more complicated way, so just consider this as a quick replacement of a real shadow-visualization technique or an starting point for your own implementation.
See also
- To make shadows more realistic you can apply blur to them.
Blur tutorial
Source code in the attachments.
IPSWS.zip (2412.5 KB)
IPSWS.zip (2464.4 KB)


