First I tried to build but it told me I need to retarget the Windows SKD due to it trying to get some 8.1 or 6.1, so I put it to 10.0.17134.0.
Then it complained about “msvcr110.dll” missing, which is part of in my system32 though. Okay, so put a copy in my build-folder. I also have Visual Studio 2015 Redistributable installed.
And now, on both “Debug” and “Release” I hit following error when executing:
The application was unable to start correctly (0x000007b). Click OK to close the application.
Which seems to be related to missing DLL, so I assume that “msvcr110.dll” is incorrect or something?
I would be grateful if someone could help me : ) Thanks for your time!
Hello, thanks for your replies but this actually confusing me a bit more.
I have “Visual C++ Redistributable for Visual Studio 2015” installed, it even complains about being already installed and yet still says “msvcr110.dll” is missing. I’m not sure… is it supposed to be automatically included?
Retargeting the SDK to Windows 10 does not fix this. I actually have no other SDK installed but 10.0.17134.0.
The other post said:
Retargeting does not solve anything for me sadly, as said related to that missing DLL.
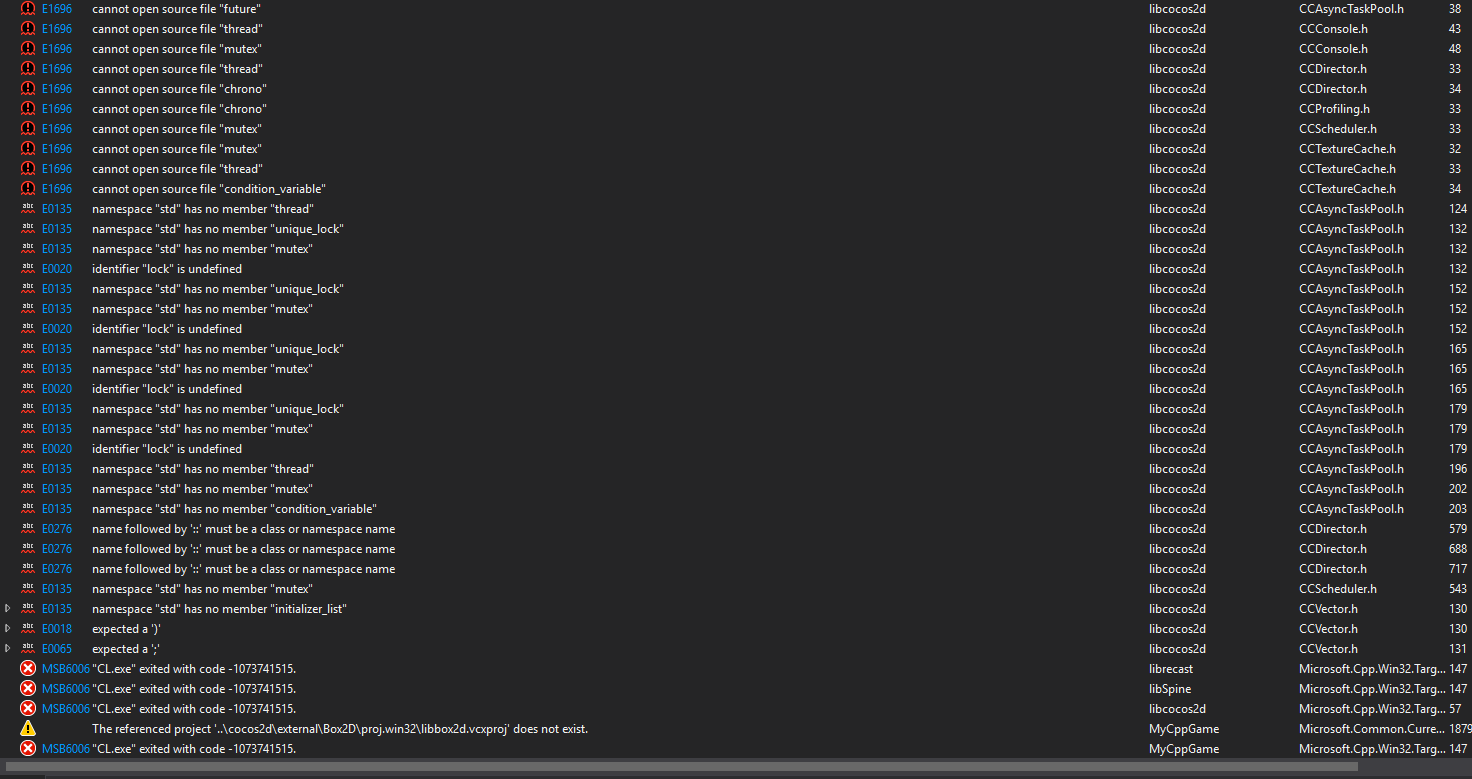
When I pick v140_xp as toolset only, it complains about not being able to open a lot of header-files: stddef.h, stdlib.h, errno.h, …
Do you have the Windows SDK v7.1 installed? I vaguely recall having a similar issue, and had to install the Windows SDK v7.1. Getting it installed properly on Windows 10 was another issue, but in the end I did get it to work, but can’t quite recall what I had to do. There should be plenty of info on the net about it.
Thanks, it required me to do some registry-editing but I was able to install SDK v7.1.
Picked it in the toolset for every solution and then encountered some errors:
That is really odd. I just tested creating a project from scratch, and it’s all compiling and running fine. Here are the steps to how I created it:
I created a folder called “Test” on C: drive:
cd c:\test
Now you are in C:\test cocos new -l cpp -p com.gamefromscratch.demo -d . demo cd demo
Now you are in C:\test\demo
mkdir win32-build && cd win32-build
Now you are in C:\test\demo\win32-build
cmake .. -G"Visual Studio 15 2017" -Tv141
Now the solution and project files have been created in C:\test\demo\win32-build
You can open up the “TemplateCpp.sln” that is located in that folder in Visual Studio (should be demo.sln, but not sure why it is still TemplateCpp.sln, but that’s not important).
Right click the TemplateCpp project in that solution, and click “Set as StartUp Project”.
That’s good. I’m not sure how you were creating your project, but with Cocos2d-x 3.17, the way I described is the new way to create projects. As far as I know, the files in the proj.win32 folder may not work correctly, if that’s what you were using.
Perhaps a more user friendly starting point would be beneficial, along with direct links to getting started in Cocos2d-x, at least for the installation part, because if that proves to be a source of friction, then users may give up and move on before they even give it a chance.
I didn’t realise the previous method of creating projects was still being used, or that it even worked. When I upgraded to 3.17, I couldn’t get it to compile, with similar issues to the OP. That led me to the CMake project creation in a forum post here, and that worked instantly, so I just assumed that was new method we needed to use.
Anyhow, the transition to CMake made managing the different platform builds so much easier, with less platform specific makefiles and such. I wouldn’t want to go back to the previous method.